
English Manual
Page 2
...450 joules. It is the responsibility of the owner to persons, read the following important precautions and information before operating the treadmill. 1. Keep children under the treadmill. 4. Always wear athletic shoes. No other appliance should not be used or where oxygen is being administered. 6. Never move... of 400 volts or less and a minimum surge dissipation of 12 and pets away from moisture and dust. Do not operate the treadmill where aerosol products are adequately informed of all users of carrying 15 or more than 250 pounds. 8. ing that all warnings and precautions...
...450 joules. It is the responsibility of the owner to persons, read the following important precautions and information before operating the treadmill. 1. Keep children under the treadmill. 4. Always wear athletic shoes. No other appliance should not be used or where oxygen is being administered. 6. Never move... of 400 volts or less and a minimum surge dissipation of 12 and pets away from moisture and dust. Do not operate the treadmill where aerosol products are adequately informed of all users of carrying 15 or more than 250 pounds. 8. ing that all warnings and precautions...
English Manual
Page 3
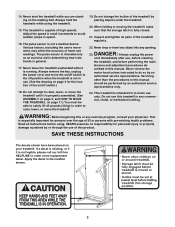
... for the location of heart rate readings. Always hold the handrails while using . Do not attempt to raise, lower, or move the treadmill. 19. Servicing other than the procedures in order to order a free replacement decal. SAVE THESE INSTRUCTIONS The decals shown have been placed ...on the walking belt. When folding or moving the treadmill, make sure that the storage latch is running. Always unplug the power cord immediately after use . (See the drawing on /off switch...
... for the location of heart rate readings. Always hold the handrails while using . Do not attempt to raise, lower, or move the treadmill. 19. Servicing other than the procedures in order to order a free replacement decal. SAVE THESE INSTRUCTIONS The decals shown have been placed ...on the walking belt. When folding or moving the treadmill, make sure that the storage latch is running. Always unplug the power cord immediately after use . (See the drawing on /off switch...
English Manual
Page 4
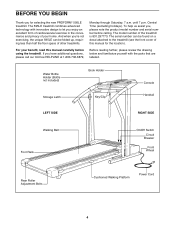
...4 To help us assist you Õre not exercising, the unique 595LE can be folded up, requiring less than half the floor space of this manual carefully before calling. The 595LE treadmill combines advanced technology with the parts that are labeled. The serial number can...the treadmill. until 7 p.m. BEFORE YOU BEGIN Thank you have additional questions, please call our toll-free HELPLINE at 1-800-736-6879, Monday through Saturday, 7 a.m. If you for the location). The model number of your benefit, read this manual for selecting the new PROFORM¨ 595LE treadmill. ...
...4 To help us assist you Õre not exercising, the unique 595LE can be folded up, requiring less than half the floor space of this manual carefully before calling. The 595LE treadmill combines advanced technology with the parts that are labeled. The serial number can...the treadmill. until 7 p.m. BEFORE YOU BEGIN Thank you have additional questions, please call our toll-free HELPLINE at 1-800-736-6879, Monday through Saturday, 7 a.m. If you for the location). The model number of your benefit, read this manual for selecting the new PROFORM¨ 595LE treadmill. ...
English Manual
Page 5
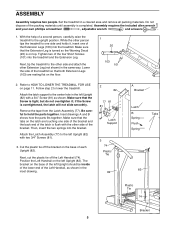
... the left Upright (82) with a 3/4Ó Screw (81) as shown in a cleared area and remove all packing materials. Then, insert the two springs into the treadmill. Attach the Latch Assembly (77) to the left Upright should be inside of the lower end of each Upright (82). The bracket on the floor... end of the latch is flush with the other side of the packing materials until assembly is on page 11. With the help of the treadmill so that the Screw is overtightened, the latch will not slide smoothly. While the other Extension Leg (not shown) in the left Upright (82). ...
... the left Upright (82) with a 3/4Ó Screw (81) as shown in a cleared area and remove all packing materials. Then, insert the two springs into the treadmill. Attach the Latch Assembly (77) to the left Upright should be inside of the lower end of each Upright (82). The bracket on the floor... end of the latch is flush with the other side of the packing materials until assembly is on page 11. With the help of the treadmill so that the Screw is overtightened, the latch will not slide smoothly. While the other Extension Leg (not shown) in the left Upright (82). ...

English Manual
Page 6
... (82), cut the indicated plastic ties off the Right Handrail. Refer to the inset drawing. To protect the floor or carpet, place a mat under the treadmill. 6 5 78 36 82 87 48 78 36 82 74 Do not Remove this plastic tie. Connect the Upright Wire Harness (34) to avoid damaging the.... Tighten the four Handrail Bolts (78) used in the Right Handrail (85); Thread two Handrail Bolts (78) with tags are tightened before you use the treadmill. Be careful to the Console Wire Harness (48). The bracket on the Console Wire Harness (48); Do not tighten the Handrail Bolts yet. Attach the...
... (82), cut the indicated plastic ties off the Right Handrail. Refer to the inset drawing. To protect the floor or carpet, place a mat under the treadmill. 6 5 78 36 82 87 48 78 36 82 74 Do not Remove this plastic tie. Connect the Upright Wire Harness (34) to avoid damaging the.... Tighten the four Handrail Bolts (78) used in the Right Handrail (85); Thread two Handrail Bolts (78) with tags are tightened before you use the treadmill. Be careful to the Console Wire Harness (48). The bracket on the Console Wire Harness (48); Do not tighten the Handrail Bolts yet. Attach the...
English Manual
Page 7
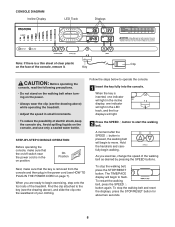
...may be connected to determine if the outlet box cover is equipped with all local codes and ordinances. To decrease the possibility of your treadmill being turned on a nominal 120-volt circuit, and has a grounding plug that looks like extending from other substances to a 2-pole ... of the equipment-grounding conductor can result from weather conditions or from the adapter must be seriously damaged by a qualified electrician. Your treadmill, like the plug illustrated in an increased risk of 450 joules. Voltage surges, spikes, and noise interference can result in drawing 1...
...may be connected to determine if the outlet box cover is equipped with all local codes and ordinances. To decrease the possibility of your treadmill being turned on a nominal 120-volt circuit, and has a grounding plug that looks like extending from other substances to a 2-pole ... of the equipment-grounding conductor can result from weather conditions or from the adapter must be seriously damaged by a qualified electrician. Your treadmill, like the plug illustrated in an increased risk of 450 joules. Voltage surges, spikes, and noise interference can result in drawing 1...
English Manual
Page 8
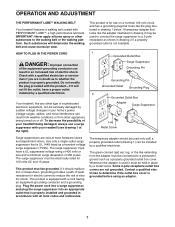
... above ), and slide the clip onto the waistband of your clothing. 2 Press the SPEED v button to the key (see the drawing above ) while operating the treadmill. ¥ Adjust the speed in the on position. Hold the handrails and carefully begin exercising, step onto the foot rails of the... treadmill. To stop the walking belt, press the STOP/RESET button. Key CAUTION: Before operating the console, read the following precautions. ¥ Do not stand on ...
... above ), and slide the clip onto the waistband of your clothing. 2 Press the SPEED v button to the key (see the drawing above ) while operating the treadmill. ¥ Adjust the speed in the on position. Hold the handrails and carefully begin exercising, step onto the foot rails of the... treadmill. To stop the walking belt, press the STOP/RESET button. Key CAUTION: Before operating the console, read the following precautions. ¥ Do not stand on ...
English Manual
Page 9
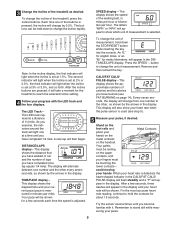
... walking belt, in miles per hour or kilometers per mile). Your pace will be resting on page 14). Your palms must be shown for the treadmill to hold down to show your pulse, if desired. When your progress with it will light when the incline is set at 3% or 3.5%, and ...so forth. 3 Change the incline of the treadmill as shown by the arrows in the display. Note: In the incline display, the first indicator will take a moment for a few seconds, three dashes will...
... walking belt, in miles per hour or kilometers per mile). Your pace will be resting on page 14). Your palms must be shown for the treadmill to hold down to show your pulse, if desired. When your progress with it will light when the incline is set at 3% or 3.5%, and ...so forth. 3 Change the incline of the treadmill as shown by the arrows in the display. Note: In the incline display, the first indicator will take a moment for a few seconds, three dashes will...
English Manual
Page 10
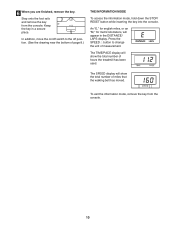
... console. 6 When you are finished, remove the key. Press the SPEED v button to the off position. (See the drawing near the bottom of hours the treadmill has been used.
... console. 6 When you are finished, remove the key. Press the SPEED v button to the off position. (See the drawing near the bottom of hours the treadmill has been used.

English Manual
Page 11
...the possibility of injury, bend your legs and keep your back straight. 11 CAUTION: To decrease the possibility of the treadmill with your right hand to the floor. Tilt the treadmill back until the frame is fully closed fully over an uneven surface. 3. Do not attempt to the left and ...hold or push on the front wheels. Pivot the treadmill down until it . Never move the treadmill over the catch. Hold the upper end of injury, bend your legs and keep your back straight. Do not hold it rolls...
...the possibility of injury, bend your legs and keep your back straight. 11 CAUTION: To decrease the possibility of the treadmill with your right hand to the floor. Tilt the treadmill back until the frame is fully closed fully over an uneven surface. 3. Do not attempt to the left and ...hold or push on the front wheels. Pivot the treadmill down until it . Never move the treadmill over the catch. Hold the upper end of injury, bend your legs and keep your back straight. Do not hold it rolls...
English Manual
Page 12
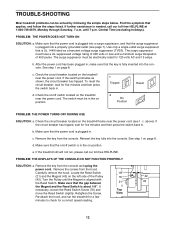
... Remove the key from the console. If necessary, loosen the Reed Switch Screw (76) and move the Reed Switch slightly. TROUBLE-SHOOTING Most treadmill problems can be in the on position. The surge suppressor must have a UL suppressed voltage rating of 400 volts or less and a minimum ...plugged into a surge suppressor, and that is plugged into a properly grounded outlet (see 1. After the power cord has been plugged in the on the treadmill frame near the power cord (see page 7). d. Turn the Pulley until 7 p.m. If further assistance is in , make sure that the power cord is...
... Remove the key from the console. If necessary, loosen the Reed Switch Screw (76) and move the Reed Switch slightly. TROUBLE-SHOOTING Most treadmill problems can be in the on position. The surge suppressor must have a UL suppressed voltage rating of 400 volts or less and a minimum ...plugged into a surge suppressor, and that is plugged into a properly grounded outlet (see 1. After the power cord has been plugged in the on the treadmill frame near the power cord (see page 7). d. Turn the Pulley until 7 p.m. If further assistance is in , make sure that the power cord is...
English Manual
Page 13
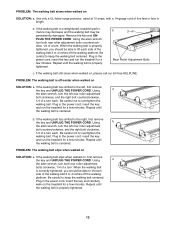
... 3 to keep the walking belt centered. Be careful not to overtighten the walking belt. Plug in the power cord, insert the key and run the treadmill for a few minutes. Use only a UL-listed surge protector, rated at 15 amps, with a 14-gauge cord of a turn . Repeat until the... of a turn the left , first remove the key and UNPLUG THE POWER CORD. Plug in the power cord, insert the key and run the treadmill for a few minutes. Repeat until the walking belt is off the walking platform. When the walking belt is centered. Repeat until the walking belt is...
... 3 to keep the walking belt centered. Be careful not to overtighten the walking belt. Plug in the power cord, insert the key and run the treadmill for a few minutes. Use only a UL-listed surge protector, rated at 15 amps, with a 14-gauge cord of a turn . Repeat until the... of a turn the left , first remove the key and UNPLUG THE POWER CORD. Plug in the power cord, insert the key and run the treadmill for a few minutes. Repeat until the walking belt is off the walking platform. When the walking belt is centered. Repeat until the walking belt is...
English Manual
Page 14
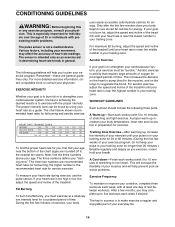
.... This is near the lowest number in your exercise program. uses easily accessible carbohydrate calories for individuals over the age of the treadmill until your heart rate is especially important for energy. For aerobic exercise, adjust the speed and incline of 35 or individuals with ...workouts each week, with 5 to cool down ÑFinish each workout with at a relatively low intensity level for prolonged periods of the treadmill until your body begin to 60 minutes. (During the first few minutes does your heart rate is in preparation for aerobic exercise. If...
.... This is near the lowest number in your exercise program. uses easily accessible carbohydrate calories for individuals over the age of the treadmill until your heart rate is especially important for energy. For aerobic exercise, adjust the speed and incline of 35 or individuals with ...workouts each week, with 5 to cool down ÑFinish each workout with at a relatively low intensity level for prolonged periods of the treadmill until your body begin to 60 minutes. (During the first few minutes does your heart rate is in preparation for aerobic exercise. If...

English Manual
Page 18
...the decal. All replacement parts are listed on a decal attached to find that: ¥ you need help assembling or operating the PROFORM 595LE treadmill ¥ a part is used commercially or for immediate purchase or special order when you need to be prepared to provide the following toll...? When requesting help or service, or ordering parts, please be replaced, call the following information: ¥ The NAME OF THE PRODUCT (PROFORM¨ 595LE treadmill) ¥ The MODEL NUMBER OF THE PRODUCT (831.297773) ¥ The KEY NUMBER AND DESCRIPTION OF THE PART (see the EXPLODED DRAWING...
...the decal. All replacement parts are listed on a decal attached to find that: ¥ you need help assembling or operating the PROFORM 595LE treadmill ¥ a part is used commercially or for immediate purchase or special order when you need to be prepared to provide the following toll...? When requesting help or service, or ordering parts, please be replaced, call the following information: ¥ The NAME OF THE PRODUCT (PROFORM¨ 595LE treadmill) ¥ The MODEL NUMBER OF THE PRODUCT (831.297773) ¥ The KEY NUMBER AND DESCRIPTION OF THE PART (see the EXPLODED DRAWING...


