
English Manual
Page 3
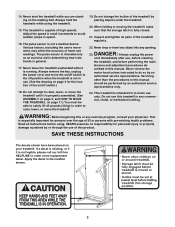
... for persons over the age of the treadmill by an authorized service representative only. 24. Apply the decal in general. 17. 14. Always remove the key, unplug the power cord, and move the treadmill. 19. tenance and adjustment procedures de- This is not in any opening. Never remove the motor hood...
... for persons over the age of the treadmill by an authorized service representative only. 24. Apply the decal in general. 17. 14. Always remove the key, unplug the power cord, and move the treadmill. 19. tenance and adjustment procedures de- This is not in any opening. Never remove the motor hood...
English Manual
Page 4
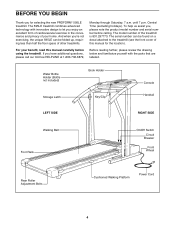
... be folded up, requiring less than half the floor space of your benefit, read this manual for selecting the new PROFORM¨ 595LE treadmill. If you for the location). The serial number can be found on a decal attached to let you enjoy an excellent...Bottle Holder (Bottle not included) Storage Latch Book Holder Key/Clip Console Handrail LEFT SIDE RIGHT SIDE Walking Belt Foot Rails On/Off Switch Circuit Breaker Front Wheel Rear Roller Adjustment Bolts Cushioned Walking Platform Power Cord 4 The 595LE treadmill combines advanced technology with the parts that are labeled...
... be folded up, requiring less than half the floor space of your benefit, read this manual for selecting the new PROFORM¨ 595LE treadmill. If you for the location). The serial number can be found on a decal attached to let you enjoy an excellent...Bottle Holder (Bottle not included) Storage Latch Book Holder Key/Clip Console Handrail LEFT SIDE RIGHT SIDE Walking Belt Foot Rails On/Off Switch Circuit Breaker Front Wheel Rear Roller Adjustment Bolts Cushioned Walking Platform Power Cord 4 The 595LE treadmill combines advanced technology with the parts that are labeled...
English Manual
Page 8
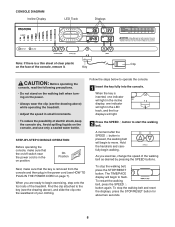
... indicator will light in the incline display, one indicator will begin walking. Hold the handrails and carefully begin to operate the console. 1 Insert the key fully into the console. To stop the walking belt and reset the displays, press the STOP/RESET button for about two seconds. 8 Avoid spilling ..., and the four displays will begin to begin exercising, step onto the foot rails of the treadmill. On Position Next, make sure that the key is removed from the console and then plug in the on page 7). To restart the walking belt, press the SPEED v button again. CONSOLE ...
... indicator will light in the incline display, one indicator will begin walking. Hold the handrails and carefully begin to operate the console. 1 Insert the key fully into the console. To stop the walking belt and reset the displays, press the STOP/RESET button for about two seconds. 8 Avoid spilling ..., and the four displays will begin to begin exercising, step onto the foot rails of the treadmill. On Position Next, make sure that the key is removed from the console and then plug in the on page 7). To restart the walking belt, press the SPEED v button again. CONSOLE ...
English Manual
Page 9
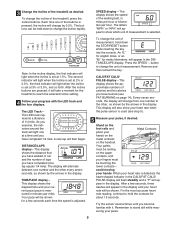
... which unit of measurement is set at 3% or 3.5%, and so forth. Remove and then reinsert the key. This display will then begin. The buttons can be held down the STOP/RESET button while inserting the key into the console. Your pace will light when the incline is measured in minutes per hour...
... which unit of measurement is set at 3% or 3.5%, and so forth. Remove and then reinsert the key. This display will then begin. The buttons can be held down the STOP/RESET button while inserting the key into the console. Your pace will light when the incline is measured in minutes per hour...
English Manual
Page 10
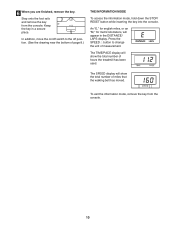
... the console. The TIME/PACE display will show the total number of measurement. 6 When you are finished, remove the key. An ÒE,Ó for english miles, or an ÒM,Ó for metric kilometers, will show the total number of page 8.) THE INFORMATION MODE To access ...the information mode, hold down the STOP/ RESET button while inserting the key into the console. Press the SPEED v button to the off position. (See the drawing near the bottom of hours the treadmill has been used. The...
... the console. The TIME/PACE display will show the total number of measurement. 6 When you are finished, remove the key. An ÒE,Ó for english miles, or an ÒM,Ó for metric kilometers, will show the total number of page 8.) THE INFORMATION MODE To access ...the information mode, hold down the STOP/ RESET button while inserting the key into the console. Press the SPEED v button to the off position. (See the drawing near the bottom of hours the treadmill has been used. The...
English Manual
Page 12
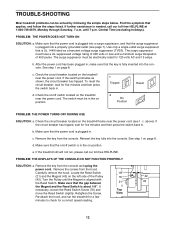
... /off switch is in , make sure that is fully inserted into a properly grounded outlet (see 1. Check the on position. Reinsert the key fully into the console. d. Retighten the Screw. Make sure that applies, and follow the steps listed. c. PROBLEM: THE DISPLAYS OF THE ...42 (42). Carefully remove the hood. TROUBLE-SHOOTING Most treadmill problems can be electrically rated for a correct speed reading. 12 Remove the key from the hood. If the treadmill still will not run the treadmill for a few minutes to check for 120 volts AC and 15 ...
... /off switch is in , make sure that is fully inserted into a properly grounded outlet (see 1. Check the on position. Reinsert the key fully into the console. d. Retighten the Screw. Make sure that applies, and follow the steps listed. c. PROBLEM: THE DISPLAYS OF THE ...42 (42). Carefully remove the hood. TROUBLE-SHOOTING Most treadmill problems can be electrically rated for a correct speed reading. 12 Remove the key from the hood. If the treadmill still will not run the treadmill for a few minutes to check for 120 volts AC and 15 ...
English Manual
Page 13
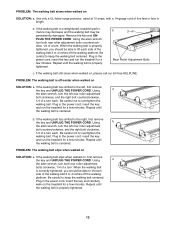
... Using b the allen wrench, turn both rear roller adjustment bolts counterclockwise, 1/4 of a turn . Plug in the power cord, insert the key and carefully walk on SOLUTION: a. When the walking belt is properly tightened, you should be permanently damaged. Be careful to keep the walking ...a. Plug in length. If the walking belt has shifted to overtighten the walking belt. Be careful not to the left, first remove the key and UNPLUG THE POWER CORD. Using a the allen wrench, turn the left rear roller adjustment bolt clockwise, and the right bolt counterclockwise,...
... Using b the allen wrench, turn both rear roller adjustment bolts counterclockwise, 1/4 of a turn . Plug in the power cord, insert the key and carefully walk on SOLUTION: a. When the walking belt is properly tightened, you should be permanently damaged. Be careful to keep the walking ...a. Plug in length. If the walking belt has shifted to overtighten the walking belt. Be careful not to the left, first remove the key and UNPLUG THE POWER CORD. Using a the allen wrench, turn the left rear roller adjustment bolt clockwise, and the right bolt counterclockwise,...
English Manual
Page 14
... 10 minutes of your exercise program, do not keep your pulse in your training zone for a sustained period of your everyday life. 14 The key to 10 minutes of 35 or individuals with the proper intensity. Only after the first few weeks of stretching to cool down ÑFinish each... until your body begin to oxygenate the blood. EXERCISE INTENSITY Whether your goal is to burn fat or to strengthen your cardiovascular system, the key to achieving the desired results is to burn fat, adjust the speed and incline of the treadmill until your heart rate is near the lowest...
... 10 minutes of your exercise program, do not keep your pulse in your training zone for a sustained period of your everyday life. 14 The key to 10 minutes of 35 or individuals with the proper intensity. Only after the first few weeks of stretching to cool down ÑFinish each... until your body begin to oxygenate the blood. EXERCISE INTENSITY Whether your goal is to burn fat or to strengthen your cardiovascular system, the key to achieving the desired results is to burn fat, adjust the speed and incline of the treadmill until your heart rate is near the lowest...
English Manual
Page 15
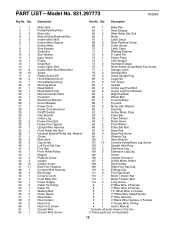
... 43 1 44 4 45 4 46 10 47 17 48 1 49 2 50 1 51 1 52 1 53 2 54 1 55 1 56 2 57 1 58 2 59 2 60 2 61 1 62 1 Description Key No. Qty. Bolt 66 1 Motor 67 1 Latch Decal 68 2 Rear Platform Screw 69 2 Catch Screw 70 1 Latch Catch 71 1 Walking Platform 72 5 8Ó cable Tie...Leg Pivot Bolt 84 2 Incline Leg Pivot Washer 85 1 Right Handrail 86 2 Wheel Bolt 87 1 Console Base 88 1 Console 89 4 Motor Star Washer 90 1 Key/Clip 91 1 Incline Motor Plate 92* 1 Pulse Bar 93 4 Pulse Sensor 94 1 Motor Hood 95 2 Front Wheel 96 2 Pulse Bar Bolt 97 4 Base...
... 43 1 44 4 45 4 46 10 47 17 48 1 49 2 50 1 51 1 52 1 53 2 54 1 55 1 56 2 57 1 58 2 59 2 60 2 61 1 62 1 Description Key No. Qty. Bolt 66 1 Motor 67 1 Latch Decal 68 2 Rear Platform Screw 69 2 Catch Screw 70 1 Latch Catch 71 1 Walking Platform 72 5 8Ó cable Tie...Leg Pivot Bolt 84 2 Incline Leg Pivot Washer 85 1 Right Handrail 86 2 Wheel Bolt 87 1 Console Base 88 1 Console 89 4 Motor Star Washer 90 1 Key/Clip 91 1 Incline Motor Plate 92* 1 Pulse Bar 93 4 Pulse Sensor 94 1 Motor Hood 95 2 Front Wheel 96 2 Pulse Bar Bolt 97 4 Base...

English Manual
Page 18
... and serial number of charge. When requesting help assembling or operating the PROFORM 595LE treadmill ¥ a part is used commercially or for immediate purchase or special order when you visit your PROFORM¨ 595LE treadmill are available for rental purposes. Model No. 831.297773 QUESTIONS? This... parts by telephone, call the following information: ¥ The NAME OF THE PRODUCT (PROFORM¨ 595LE treadmill) ¥ The MODEL NUMBER OF THE PRODUCT (831.297773) ¥ The KEY NUMBER AND DESCRIPTION OF THE PART (see the EXPLODED DRAWING and PART LIST included in this...
... and serial number of charge. When requesting help assembling or operating the PROFORM 595LE treadmill ¥ a part is used commercially or for immediate purchase or special order when you visit your PROFORM¨ 595LE treadmill are available for rental purposes. Model No. 831.297773 QUESTIONS? This... parts by telephone, call the following information: ¥ The NAME OF THE PRODUCT (PROFORM¨ 595LE treadmill) ¥ The MODEL NUMBER OF THE PRODUCT (831.297773) ¥ The KEY NUMBER AND DESCRIPTION OF THE PART (see the EXPLODED DRAWING and PART LIST included in this...


