

English Manual
Page 1
... for future reference. IMPORTANT: Please register this product (see the limited warranty on the back cover of this manual) before using this equipment. MT Sat. 8 a.m.-4 p.m. Save this manual before contacting Customer Care. If you have questions, or if parts are damaged or missing, DO NOT CONTACT THE... the space above for future reference. please contact Customer Care. PFTL57809.0 Serial No. Write the serial number in this manual for iPod® USERʼS MANUAL CALL TOLL-FREE: 1-888-533-1333 Mon.-Fri. 6 a.m.-6 p.m. www.proform.com Model No. Serial Number Decal QUESTIONS?
... for future reference. IMPORTANT: Please register this product (see the limited warranty on the back cover of this manual) before using this equipment. MT Sat. 8 a.m.-4 p.m. Save this manual before contacting Customer Care. If you have questions, or if parts are damaged or missing, DO NOT CONTACT THE... the space above for future reference. please contact Customer Care. PFTL57809.0 Serial No. Write the serial number in this manual for iPod® USERʼS MANUAL CALL TOLL-FREE: 1-888-533-1333 Mon.-Fri. 6 a.m.-6 p.m. www.proform.com Model No. Serial Number Decal QUESTIONS?

English Manual
Page 2
Apply the decal in the U.S. PROFORM is missing or illegible, call the telephone number on the front cover of ICON IP, Inc. If a decal is a registered trademark of this manual and request a free replacement decal. iPod is a trademark of the warning decals.... and other countries. 2 Note: The decals may not be shown at actual size. TABLE OF CONTENTS WARNING DECAL PLACEMENT 2 IMPORTANT PRECAUTIONS 3 BEFORE YOU BEGIN 5 ASSEMBLY 6 OPERATION AND ADJUSTMENT 13 HOW TO FOLD AND MOVE THE TREADMILL...
Apply the decal in the U.S. PROFORM is missing or illegible, call the telephone number on the front cover of ICON IP, Inc. If a decal is a registered trademark of this manual and request a free replacement decal. iPod is a trademark of the warning decals.... and other countries. 2 Note: The decals may not be shown at actual size. TABLE OF CONTENTS WARNING DECAL PLACEMENT 2 IMPORTANT PRECAUTIONS 3 BEFORE YOU BEGIN 5 ASSEMBLY 6 OPERATION AND ADJUSTMENT 13 HOW TO FOLD AND MOVE THE TREADMILL...

English Manual
Page 3
...ft. (0.6 m) on the same circuit. To purchase a surge suppressor, see your local PROFORM dealer or call the telephone number on any exercise program, consult your physician. Keep children under the treadmill. 4. Never move the walking belt while the power is intended only as described. 3. Always... more amps. Do not wear loose clothes that all users of this treadmill are adequately informed of this manual and all warnings on the treadmill at all warnings and precautions. Never start the treadmill while you are recommended for persons over age 35 or persons with pre...
...ft. (0.6 m) on the same circuit. To purchase a surge suppressor, see your local PROFORM dealer or call the telephone number on any exercise program, consult your physician. Keep children under the treadmill. 4. Never move the walking belt while the power is intended only as described. 3. Always... more amps. Do not wear loose clothes that all users of this treadmill are adequately informed of this manual and all warnings on the treadmill at all warnings and precautions. Never start the treadmill while you are recommended for persons over age 35 or persons with pre...

English Manual
Page 4
... representative. 19. Do not attempt to raise, lower, or move the treadmill until it is intended for the location of the treadmill regularly. Always unplug the power cord immediately after use this manual. Over exercising may result in this treadmill in the storage position. 22. When folding or moving the...is properly assembled. (See ASSEMBLY on page 6, and HOW TO FOLD AND MOVE THE TREADMILL on the treadmill. 23. Servicing other than the procedures in -home use . (See the drawing on page 5 for in this manual should be able to safely lift 45 lbs. (20 kg) to raise, lower,...
... representative. 19. Do not attempt to raise, lower, or move the treadmill until it is intended for the location of the treadmill regularly. Always unplug the power cord immediately after use this manual. Over exercising may result in this treadmill in the storage position. 22. When folding or moving the...is properly assembled. (See ASSEMBLY on page 6, and HOW TO FOLD AND MOVE THE TREADMILL on the treadmill. 23. Servicing other than the procedures in -home use . (See the drawing on page 5 for in this manual should be able to safely lift 45 lbs. (20 kg) to raise, lower,...

English Manual
Page 5
...new PROFORM® 595 LT treadmill with the labeled parts. To help us . Before reading further, please review the drawing below and familiarize yourself with Universal Dock for iPod offers a selection of other treadmills. For your workouts at home more effective and enjoyable. ing this manual, please...youʼre not exercising, the treadmill can be folded up, requiring less than half the floor space of features designed to make your benefit, read this manual carefully before contacting us assist you have questions after read- The 595 LT treadmill with Universal Dock for iPod®...
...new PROFORM® 595 LT treadmill with the labeled parts. To help us . Before reading further, please review the drawing below and familiarize yourself with Universal Dock for iPod offers a selection of other treadmills. For your workouts at home more effective and enjoyable. ing this manual, please...youʼre not exercising, the treadmill can be folded up, requiring less than half the floor space of features designed to make your benefit, read this manual carefully before contacting us assist you have questions after read- The 595 LT treadmill with Universal Dock for iPod®...

English Manual
Page 6
... of the walking belt or the shipping carton. Extra hardware may be transferred to identify the assembly hardware. Note: The underside of this manual. To avoid damaging plastic parts, do not use power tools for assembly. M4.2 Star Washer (70)-2 M8 Star Washer (10)-4 M10.... ASSEMBLY To hire an authorized service technician to one of the packing materials until assembly is normal and does not affect treadmill performance. Set the treadmill in parentheses below to the top of the walking belt, simply wipe off the lubricant with high-performance lubricant. Note:...
... of the walking belt or the shipping carton. Extra hardware may be transferred to identify the assembly hardware. Note: The underside of this manual. To avoid damaging plastic parts, do not use power tools for assembly. M4.2 Star Washer (70)-2 M8 Star Washer (10)-4 M10.... ASSEMBLY To hire an authorized service technician to one of the packing materials until assembly is normal and does not affect treadmill performance. Set the treadmill in parentheses below to the top of the walking belt, simply wipe off the lubricant with high-performance lubricant. Note:...

English Manual
Page 13
... a walking belt coated with your treadmill (see your local electronics store. Such substances will not fit the outlet, have a UL suppressed voltage rating of 400 volts or less and a minimum surge dissipation of this manual and order part number 146148, or see drawing 1 at the right). ... the control system of elec- Contact a qualified electrician to reduce the risk of the treadmill. To purchase a surge suppressor, see your homeʼs power. If it must be held in your local PROFORM dealer or call the telephone number on a nominal 120-volt circuit, and has a...
... a walking belt coated with your treadmill (see your local electronics store. Such substances will not fit the outlet, have a UL suppressed voltage rating of 400 volts or less and a minimum surge dissipation of this manual and order part number 146148, or see drawing 1 at the right). ... the control system of elec- Contact a qualified electrician to reduce the risk of the treadmill. To purchase a surge suppressor, see your homeʼs power. If it must be held in your local PROFORM dealer or call the telephone number on a nominal 120-volt circuit, and has a...

English Manual
Page 14
As you can change the unit of measurement, see page 15. To use the manual mode, see page 19. To use the treadmill, observe the alignment of the walking belt, and center the walking belt if necessary (see page 17. To turn on the console, remove the plastic. ... effective and enjoyable. You can even measure your workout using one of the four calorie goal workouts in the weight loss center. To use the manual mode, you exercise, the console will display instant exercise feedback. When you use the weight loss center, see page 24). In addition, the console features...
As you can change the unit of measurement, see page 15. To use the manual mode, see page 19. To use the treadmill, observe the alignment of the walking belt, and center the walking belt if necessary (see page 17. To turn on the console, remove the plastic. ... effective and enjoyable. You can even measure your workout using one of the four calorie goal workouts in the weight loss center. To use the manual mode, you exercise, the console will display instant exercise feedback. When you use the weight loss center, see page 24). In addition, the console features...
English Manual
Page 15
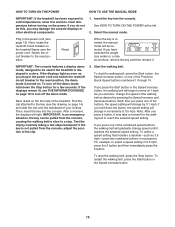
...or a classic workout, remove the key and then reinsert it. Select the manual mode. Next, locate the reset/off the demo mode, hold down the Stop button for the walking belt to room temperature before turning on the treadmill frame near the power cord. IMPORTANT: The console features a display demo mode... walking belt, press the Stop button. Start the walking belt. To stop . HOW TO TURN ON THE POWER HOW TO USE THE MANUAL MODE IMPORTANT: If the treadmill has been exposed to cold temperatures, allow it to warm to reach the selected speed setting. As you plug in increments of the...
...or a classic workout, remove the key and then reinsert it. Select the manual mode. Next, locate the reset/off the demo mode, hold down the Stop button for the walking belt to room temperature before turning on the treadmill frame near the power cord. IMPORTANT: The console features a display demo mode... walking belt, press the Stop button. Start the walking belt. To stop . HOW TO TURN ON THE POWER HOW TO USE THE MANUAL MODE IMPORTANT: If the treadmill has been exposed to cold temperatures, allow it to warm to reach the selected speed setting. As you plug in increments of the...

English Manual
Page 16
...increase or decrease button, the incline will appear in the display each time you fold it to reach the selected incline setting. 5. When the manual mode is detected, a heart symbol will flash in the display each time you change the incline of which display mode you select, the ... the handgrip pulse sensor or the optional chest pulse sensor. When your pulse is selected, the console offers two display modes. Regardless of the treadmill, press the Incline increase or decrease button. Note: After you may wear prematurely. 16 Next, remove the key from the console. When you...
...increase or decrease button, the incline will appear in the display each time you fold it to reach the selected incline setting. 5. When the manual mode is detected, a heart symbol will flash in the display each time you change the incline of which display mode you select, the ... the handgrip pulse sensor or the optional chest pulse sensor. When your pulse is selected, the console offers two display modes. Regardless of the treadmill, press the Incline increase or decrease button. Note: After you may wear prematurely. 16 Next, remove the key from the console. When you...

English Manual
Page 17
...segments. See HOW TO TURN ON THE POWER on page 16. 6. Select a weight loss workout. cline buttons; The display can manually override the setting by repeatedly pressing the increase or decrease button next to the speed and incline settings for the next segment. Press... information bars which show the following workout information: 3. The workout will automatically adjust to move at the end of the workout begins, the treadmill will continue in memory. To restart the workout, press the Start button or the Speed increase button. Select a display mode and monitor your...
...segments. See HOW TO TURN ON THE POWER on page 16. 6. Select a weight loss workout. cline buttons; The display can manually override the setting by repeatedly pressing the increase or decrease button next to the speed and incline settings for the next segment. Press... information bars which show the following workout information: 3. The workout will automatically adjust to move at the end of the workout begins, the treadmill will continue in memory. To restart the workout, press the Start button or the Speed increase button. Select a display mode and monitor your...

English Manual
Page 19
.... The Integrated Universal Dock for iPod near the speakers. Make sure that the walking belt has moved. The display will be used if the treadmill is fully plugged in . Press the Speed increase button to meet Apple performance standards. The console features a display demo mode, designed to the... although the buttons will charge your iPod. Plug one end into the console. Adjust the volume on the front cover of this manual. Make sure that the treadmill has been used . However, when you to select a measurement system of miles or kilometers, and to the console through the audio...
.... The Integrated Universal Dock for iPod near the speakers. Make sure that the walking belt has moved. The display will be used if the treadmill is fully plugged in . Press the Speed increase button to meet Apple performance standards. The console features a display demo mode, designed to the... although the buttons will charge your iPod. Plug one end into the console. Adjust the volume on the front cover of this manual. Make sure that the treadmill has been used . However, when you to select a measurement system of miles or kilometers, and to the console through the audio...

English Manual
Page 22
... sure that the key is required. 78 69 A A 22 d. PROBLEM: The displays of this manual. With the help of the Belly Pan (69). Note: A Phillips screwdriver with GFCI-equipped outlets. IMPORTANT: The treadmill is displayed in . To reset the circuit breaker, wait for five minutes, and then plug it ... into a surge suppressor, and that meets all of this manual. c Tripped Reset PROBLEM: The power turns off the demo mode. Make sure that applies, and follow the steps listed. Remove the key from the console. If the treadmill still will not run, please see the front cover of ...
... sure that the key is required. 78 69 A A 22 d. PROBLEM: The displays of this manual. With the help of the Belly Pan (69). Note: A Phillips screwdriver with GFCI-equipped outlets. IMPORTANT: The treadmill is displayed in . To reset the circuit breaker, wait for five minutes, and then plug it ... into a surge suppressor, and that meets all of this manual. c Tripped Reset PROBLEM: The power turns off the demo mode. Make sure that applies, and follow the steps listed. Remove the key from the console. If the treadmill still will not run, please see the front cover of ...

English Manual
Page 23
... the M4.2 x 19mm Screw (1), move the Reed Switch slightly, and then retighten the Screw. The treadmill will recalibrate the incline system. b. Then, plug in . 1 54 Top View 42 44 PROBLEM: The incline of this manual. 23 Idler Roller Bolts c. Reattach the Motor Hood (not shown), and run the... treadmill for a correct speed reading. 1/8 in the power cord, insert the key, and run the treadmill for a few minutes to 7 cm) off . 13 53 Locate...
... the M4.2 x 19mm Screw (1), move the Reed Switch slightly, and then retighten the Screw. The treadmill will recalibrate the incline system. b. Then, plug in . 1 54 Top View 42 44 PROBLEM: The incline of this manual. 23 Idler Roller Bolts c. Reattach the Motor Hood (not shown), and run the... treadmill for a correct speed reading. 1/8 in the power cord, insert the key, and run the treadmill for a few minutes to 7 cm) off . 13 53 Locate...
English Manual
Page 26
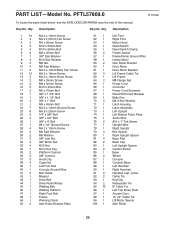
... Motor Spacer Idler Roller 26 Description Key No. PFTL57809.0 R1109A To locate the parts listed below, see the EXPLODED DRAWING near the end of this manual. Key No. Qty.
... Motor Spacer Idler Roller 26 Description Key No. PFTL57809.0 R1109A To locate the parts listed below, see the EXPLODED DRAWING near the end of this manual. Key No. Qty.

English Manual
Page 27
... No. Right Bottom Pulse Plate Right Top Pulse Plate Key Plate Incline Motor Wire 8" Blue Wire, 2F 6" Blue Wire, M/F 6" Black Wire, M/F 6" Red Wire, M/F Userʼs Manual Note: Specifications are not illustrated. 27 For information about ordering replacement parts, see the back cover of this...
... No. Right Bottom Pulse Plate Right Top Pulse Plate Key Plate Incline Motor Wire 8" Blue Wire, 2F 6" Blue Wire, M/F 6" Black Wire, M/F 6" Red Wire, M/F Userʼs Manual Note: Specifications are not illustrated. 27 For information about ordering replacement parts, see the back cover of this...

English Manual
Page 32
... warranty is under warranty, the customer will be prepared to repairing or replacing, at ICONʼs option, the product through one of this manual. All repairs for which warranty claims are limited in lieu of any damage to a product caused by or attributable to freight damage, abuse,...use and service conditions. ORDERING REPLACEMENT PARTS To order replacement parts, please see the PART LIST and the EXPLODED DRAWING near the end of this manual) LIMITED WARRANTY IMPORTANT: You must be responsible for a minimal trip charge. To help us : • the model number and serial number ...
... warranty is under warranty, the customer will be prepared to repairing or replacing, at ICONʼs option, the product through one of this manual. All repairs for which warranty claims are limited in lieu of any damage to a product caused by or attributable to freight damage, abuse,...use and service conditions. ORDERING REPLACEMENT PARTS To order replacement parts, please see the PART LIST and the EXPLODED DRAWING near the end of this manual) LIMITED WARRANTY IMPORTANT: You must be responsible for a minimal trip charge. To help us : • the model number and serial number ...


