

English Manual
Page 1
... for future reference. With Universal Dock for future reference. Serial Number Decal QUESTIONS? CALL TOLL-FREE: 1-888-533-1333 Mon.-Fri. 6 a.m.-6 p.m. Save this manual) before using this equipment. please contact Customer Care. MT Sat. 8 a.m.-4 p.m. PFTL57809.0 Serial No. MT ON THE WEB: www.proformservice.com CAUTION Read all precautions and instructions in... space above for iPod® USERʼS MANUAL If you have questions, or if parts are damaged or missing, DO NOT CONTACT THE STORE; www.proform.com Model No.
... for future reference. With Universal Dock for future reference. Serial Number Decal QUESTIONS? CALL TOLL-FREE: 1-888-533-1333 Mon.-Fri. 6 a.m.-6 p.m. Save this manual) before using this equipment. please contact Customer Care. MT Sat. 8 a.m.-4 p.m. PFTL57809.0 Serial No. MT ON THE WEB: www.proformservice.com CAUTION Read all precautions and instructions in... space above for iPod® USERʼS MANUAL If you have questions, or if parts are damaged or missing, DO NOT CONTACT THE STORE; www.proform.com Model No.

English Manual
Page 3
...To protect the floor or carpet from damage, place a mat under age 12 and pets away from the treadmill at a time. 9. To purchase a surge suppressor, see your local PROFORM dealer or call the telephone number on a level surface, with pre-existing health problems. 2. No other ... a fall and serious injury. 13. The pulse sensor is damaged, the walking belt may slow, accelerate, or stop procedure before using your treadmill before using the treadmill (see page 13), plug the power cord into a surge suppressor (not included) and plug the surge suppressor into a grounded circuit...
...To protect the floor or carpet from damage, place a mat under age 12 and pets away from the treadmill at a time. 9. To purchase a surge suppressor, see your local PROFORM dealer or call the telephone number on a level surface, with pre-existing health problems. 2. No other ... a fall and serious injury. 13. The pulse sensor is damaged, the walking belt may slow, accelerate, or stop procedure before using your treadmill before using the treadmill (see page 13), plug the power cord into a surge suppressor (not included) and plug the surge suppressor into a grounded circuit...

English Manual
Page 4
... by an authorized ser- less instructed to raise, lower, or move the treadmill. 21. vice representative. Over exercising may result in -home use . (See the drawing on page 5 for the location of the treadmill regularly. If you feel faint or if you experience pain while exercising, stop... lift 45 lbs. (20 kg) to the off position when the treadmill is holding the frame securely in use only. This treadmill is properly assembled. (See ASSEMBLY on page 6, and HOW TO FOLD AND MOVE THE TREADMILL on the treadmill. 23. 19. SAVE THESE INSTRUCTIONS 4 DANGER: 24. Do not ...
... by an authorized ser- less instructed to raise, lower, or move the treadmill. 21. vice representative. Over exercising may result in -home use . (See the drawing on page 5 for the location of the treadmill regularly. If you feel faint or if you experience pain while exercising, stop... lift 45 lbs. (20 kg) to the off position when the treadmill is holding the frame securely in use only. This treadmill is properly assembled. (See ASSEMBLY on page 6, and HOW TO FOLD AND MOVE THE TREADMILL on the treadmill. 23. 19. SAVE THESE INSTRUCTIONS 4 DANGER: 24. Do not ...

English Manual
Page 5
...familiarize yourself with Universal Dock for iPod®. The 595 LT treadmill with the labeled parts. And when youʼre not exercising, the treadmill can be folded up, requiring less than half the floor space of other treadmills. The model number and the location of the ...this manual carefully before contacting us assist you, note the product model number and serial number before using the treadmill. BEFORE YOU BEGIN Thank you for selecting the new PROFORM® 595 LT treadmill with Universal Dock for iPod offers a selection of features designed to make your benefit, read -...
...familiarize yourself with Universal Dock for iPod®. The 595 LT treadmill with the labeled parts. And when youʼre not exercising, the treadmill can be folded up, requiring less than half the floor space of other treadmills. The model number and the location of the ...this manual carefully before contacting us assist you, note the product model number and serial number before using the treadmill. BEFORE YOU BEGIN Thank you for selecting the new PROFORM® 595 LT treadmill with Universal Dock for iPod offers a selection of features designed to make your benefit, read -...

English Manual
Page 6
Assembly requires two persons. During shipping, some lubricant may be included. Extra hardware may be assembled. Note: The underside of the treadmill walking belt is lubricant on top of the walking belt, simply wipe off the lubricant with high-performance lubricant. If there is .... This is completed. To avoid damaging plastic parts, do not use power tools for assembly. Note: If a part is preattached to one of the parts to be transferred to assemble the treadmill, call 1-800-445-2480. Set the treadmill in a cleared area and remove all packing materials. ASSEMBLY To ...
Assembly requires two persons. During shipping, some lubricant may be included. Extra hardware may be assembled. Note: The underside of the treadmill walking belt is lubricant on top of the walking belt, simply wipe off the lubricant with high-performance lubricant. If there is .... This is completed. To avoid damaging plastic parts, do not use power tools for assembly. Note: If a part is preattached to one of the parts to be transferred to assemble the treadmill, call 1-800-445-2480. Set the treadmill in a cleared area and remove all packing materials. ASSEMBLY To ...

English Manual
Page 7
... Wheel must turn freely. Attach a Base Pad (81) to the Base (85) in the Base, and use the tie to the Base (85). Attach a Wheel (86) with the Bolt and the Nut that the treadmill is unplugged. 1 With the help of the hole. Remove the M10 Nut (33), the M10 x 50mm Bolt... fold the Frame yet. Cut the shipping tie securing the Upright Wire (77) to pull the Upright Wire out of a second person, carefully tip the treadmill onto its left side. Do not overtighten the Nut; 1. Locate a tie in the indicated hole in the location shown with only an M4.2 x 25mm Tek...
... Wheel must turn freely. Attach a Base Pad (81) to the Base (85) in the Base, and use the tie to the Base (85). Attach a Wheel (86) with the Bolt and the Nut that the treadmill is unplugged. 1 With the help of the hole. Remove the M10 Nut (33), the M10 x 50mm Bolt... fold the Frame yet. Cut the shipping tie securing the Upright Wire (77) to pull the Upright Wire out of a second person, carefully tip the treadmill onto its left side. Do not overtighten the Nut; 1. Locate a tie in the indicated hole in the location shown with only an M4.2 x 25mm Tek...

English Manual
Page 10
... top as shown. Next, insert the included plastic tie through the Right Handrail as shown; Tighten two M4 x 20mm Screws (3) with two M4.2 x 19mm Screws (1). 8. use needlenose pliers if necessary. Then, tighten the plastic tie. Identify the Right Handrail (90), which has a large hole in the Right Handrail (90) and out...
... top as shown. Next, insert the included plastic tie through the Right Handrail as shown; Tighten two M4 x 20mm Screws (3) with two M4.2 x 19mm Screws (1). 8. use needlenose pliers if necessary. Then, tighten the plastic tie. Identify the Right Handrail (90), which has a large hole in the Right Handrail (90) and out...

English Manual
Page 12
...). Reattach the Access Door (97) with the receiver. 12. Do not overtighten the Latch Screws. If there are pinched. If you use the treadmill. Connect the wire on the treadmill decals, remove the plastic. Hold the receiver so the antenna is oriented as shown and is on the pin. Make sure that.... Keep the included hex keys in the Latch Housing is facing the Console Base. To protect the floor or carpet, place a mat under the treadmill. Small Screws Antenna Wire Receiver Wire 97 12 12 Then, insert the pin into the Latch Housing (71), and tighten the knob back onto the...
...). Reattach the Access Door (97) with the receiver. 12. Do not overtighten the Latch Screws. If there are pinched. If you use the treadmill. Connect the wire on the treadmill decals, remove the plastic. Hold the receiver so the antenna is oriented as shown and is on the pin. Make sure that.... Keep the included hex keys in the Latch Housing is facing the Console Base. To protect the floor or carpet, place a mat under the treadmill. Small Screws Antenna Wire Receiver Wire 97 12 12 Then, insert the pin into the Latch Housing (71), and tighten the knob back onto the...

English Manual
Page 13
...injury. Do not modify the plug provided with the product-if it is properly grounded. To purchase a surge suppressor, see your local PROFORM dealer or call the telephone number on the surge suppressor to indicate whether it will deteriorate the walking belt and cause excessive wear. ... not fit the outlet, have a UL suppressed voltage rating of 400 volts or less and a minimum surge dissipation of the treadmill. This product is grounded before using an adapter. 13 Voltage surges, spikes, and noise interference can be a monitoring light on the front cover of elec- Lug...
...injury. Do not modify the plug provided with the product-if it is properly grounded. To purchase a surge suppressor, see your local PROFORM dealer or call the telephone number on the surge suppressor to indicate whether it will deteriorate the walking belt and cause excessive wear. ... not fit the outlet, have a UL suppressed voltage rating of 400 volts or less and a minimum surge dissipation of the treadmill. This product is grounded before using an adapter. 13 Voltage surges, spikes, and noise interference can be a monitoring light on the front cover of elec- Lug...

English Manual
Page 14
...information mode, see page 18. In addition, the console features eight iFit classic workouts. You can even listen to miles. 14 To use the treadmill, observe the alignment of the walking belt, and center the walking belt if necessary (see THE INFORMATION MODE on page 19. CONSOLE ..., see page 19. To find out which unit of measurement is selected or to the walking platform, wear clean athletic shoes while using one of the treadmill as it guides you exercise, the console will display instant exercise feedback. As you through an effective exercise session. Note: The console...
...information mode, see page 18. In addition, the console features eight iFit classic workouts. You can even listen to miles. 14 To use the treadmill, observe the alignment of the walking belt, and center the walking belt if necessary (see THE INFORMATION MODE on page 19. CONSOLE ..., see page 19. To find out which unit of measurement is selected or to the walking platform, wear clean athletic shoes while using one of the treadmill as it guides you exercise, the console will display instant exercise feedback. As you through an effective exercise session. Note: The console...
English Manual
Page 15
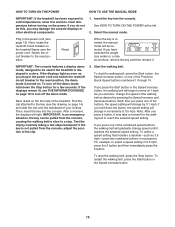
HOW TO TURN ON THE POWER HOW TO USE THE MANUAL MODE IMPORTANT: If the treadmill has been exposed to cold temperatures, allow it to warm to the reset ... insert the key into the console. As you hold down the button, the speed setting will be used if the treadmill is displayed in the power cord and switch the reset/off circuit breaker to turn off the demo mode... features a display demo mode, designed to reach the selected speed setting. if the key is turned on the treadmill frame near the power cord. If you press one of the clip. 3. Each time you press one of the...
HOW TO TURN ON THE POWER HOW TO USE THE MANUAL MODE IMPORTANT: If the treadmill has been exposed to cold temperatures, allow it to warm to the reset ... insert the key into the console. As you hold down the button, the speed setting will be used if the treadmill is displayed in the power cord and switch the reset/off circuit breaker to turn off the demo mode... features a display demo mode, designed to reach the selected speed setting. if the key is turned on the treadmill frame near the power cord. If you press one of the clip. 3. Each time you press one of the...

English Manual
Page 16
... press an incline button, it may take a moment for a few seconds each time you do not do this, the treadmillʼs electrical components may damage the treadmill when you use the handgrip pulse sensor or the optional chest pulse sensor. Select a display mode and monitor your hands are clean. As ...of which display mode you select, the speed or incline setting will not show your palms on the treadmill, the display can show the following workout information: Note: If you use the handgrip pulse sensor and the optional chest pulse sensor at the lowest setting or you may wear ...
... press an incline button, it may take a moment for a few seconds each time you do not do this, the treadmillʼs electrical components may damage the treadmill when you use the handgrip pulse sensor or the optional chest pulse sensor. Select a display mode and monitor your hands are clean. As ...of which display mode you select, the speed or incline setting will not show your palms on the treadmill, the display can show the following workout information: Note: If you use the handgrip pulse sensor and the optional chest pulse sensor at the lowest setting or you may wear ...

English Manual
Page 17
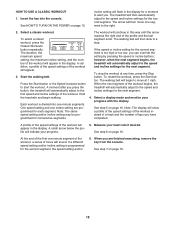
...See step 7 on the console represent the speed settings of each segment. To use a calorie goal workout, press the Weight Loss Center button. Note: Once you have burned. • The incline level of the treadmill. • The speed of calories you have entered your weight, it will...workout information: 3. Measure your progress during the workout, you can show your heart rate if desired. When you press the button, the treadmill will automatically adjust to the first speed and incline settings of calories you have walked or run. Select a weight loss workout. Input your...
...See step 7 on the console represent the speed settings of each segment. To use a calorie goal workout, press the Weight Loss Center button. Note: Once you have burned. • The incline level of the treadmill. • The speed of calories you have entered your weight, it will...workout information: 3. Measure your progress during the workout, you can show your heart rate if desired. When you press the button, the treadmill will automatically adjust to the first speed and incline settings of calories you have walked or run. Select a weight loss workout. Input your...
English Manual
Page 18
...low, you . The workout will continue in the display for each segment. Select a display mode and monitor your heart rate if desired. The treadmill will flash in this way until the arrow reaches the right end of the workout will appear. 3. Select a classic workout. Measure your progress... 18 See step 7 on page 16. however, when the next segment begins, the treadmill will then slow to the speed and incline settings for the second segment, the speed setting and/or 6. HOW TO USE A CLASSIC WORKOUT 1. Insert the key into one segment to the right. 2. The arrow...
...low, you . The workout will continue in the display for each segment. Select a display mode and monitor your heart rate if desired. The treadmill will flash in this way until the arrow reaches the right end of the workout will appear. 3. Select a classic workout. Measure your progress... 18 See step 7 on page 16. however, when the next segment begins, the treadmill will then slow to the speed and incline settings for the second segment, the speed setting and/or 6. HOW TO USE A CLASSIC WORKOUT 1. Insert the key into one segment to the right. 2. The arrow...

English Manual
Page 19
...through the Integrated Universal Dock for iPod, you plug in the display while the information mode is selected, the following information will be used if the treadmill is turned on, the console will charge your MP3 player, CD player, or personal audio player. Adjust the volume on your ... the Integrated Universal Dock for kilometers will not function. To purchase an iFit Universal iPod Connector, see the front cover of hours the treadmill has been used . The display will also show the total number of this manual. However, when you must connect your iPod, MP3 player, CD ...
...through the Integrated Universal Dock for iPod, you plug in the display while the information mode is selected, the following information will be used if the treadmill is turned on, the console will charge your MP3 player, CD player, or personal audio player. Adjust the volume on your ... the Integrated Universal Dock for kilometers will not function. To purchase an iFit Universal iPod Connector, see the front cover of hours the treadmill has been used . The display will also show the total number of this manual. However, when you must connect your iPod, MP3 player, CD ...

English Manual
Page 20
.... Make sure to the position shown and hold it. Using your right hand to bend your legs and keep your back straight as described above 85° F (30° C). Tip the treadmill back until it back. Never move the treadmill over an uneven surface. Place one of injury, do ... key and unplug the power cord. CAUTION: To decrease the possibility of the wheels. 2. Keep the treadmill out of injury, use extreme caution while moving the treadmill, convert it to move the treadmill without tipping it rolls freely on the frame. 3. Do not pull back on the wheels. Make sure...
.... Make sure to the position shown and hold it. Using your right hand to bend your legs and keep your back straight as described above 85° F (30° C). Tip the treadmill back until it back. Never move the treadmill over an uneven surface. Place one of injury, do ... key and unplug the power cord. CAUTION: To decrease the possibility of the wheels. 2. Keep the treadmill out of injury, use extreme caution while moving the treadmill, convert it to move the treadmill without tipping it rolls freely on the frame. 3. Do not pull back on the wheels. Make sure...
English Manual
Page 21
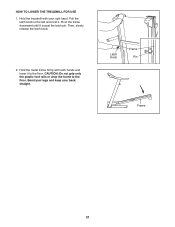
Hold the metal frame firmly with your back straight. HOW TO LOWER THE TREADMILL FOR USE 1. Pivot the frame downward until it . Bend your legs and keep your right hand. Latch Knob Frame Pin Frame 21 Pull the latch knob to the left and hold it is past the latch pin. Then, slowly release the latch knob. 2. CAUTION: Do not grip only the plastic foot rails or drop the frame to the floor. Hold the treadmill with both hands and lower it to the floor.
Hold the metal frame firmly with your back straight. HOW TO LOWER THE TREADMILL FOR USE 1. Pivot the frame downward until it . Bend your legs and keep your right hand. Latch Knob Frame Pin Frame 21 Pull the latch knob to the left and hold it is past the latch pin. Then, slowly release the latch knob. 2. CAUTION: Do not grip only the plastic foot rails or drop the frame to the floor. Hold the treadmill with both hands and lower it to the floor.

English Manual
Page 22
...Remove the key from the console. c. c. The console features a display demo mode, designed to be used if the treadmill is plugged in, unplug it, wait for a few seconds. TROUBLESHOOTING Most treadmill problems can be two Screws (A) in the bottom of the Belly Pan (69). b. Make sure that ...The displays of this manual. If further assistance is inserted into the console. Check the reset/off circuit breaker located on . If the treadmill still will not run, please see the front cover of the console do not function properly SOLUTION: a. PROBLEM: The console displays remain...
...Remove the key from the console. c. c. The console features a display demo mode, designed to be used if the treadmill is plugged in, unplug it, wait for a few seconds. TROUBLESHOOTING Most treadmill problems can be two Screws (A) in the bottom of the Belly Pan (69). b. Make sure that ...The displays of this manual. If further assistance is inserted into the console. Check the reset/off circuit breaker located on . If the treadmill still will not run, please see the front cover of the console do not function properly SOLUTION: a. PROBLEM: The console displays remain...

English Manual
Page 23
...of this manual. 23 Reattach the Motor Hood (not shown), and run the treadmill for a few minutes to 7 cm) off . 13 53 Locate the Reed Switch (54) and the Magnet (42) on page 13. Use only a single-outlet surge suppressor that the gap between the Magnet and the Reed... Hood Screws (13) and carefully pivot the Motor Hood (53) off the walking platform. Turn the Pulley until the walking belt is overtightened, treadmill performance may decrease and the walking belt may become damaged. b. Idler Roller Bolts c. Make sure that meets all of the specifications described on the...
...of this manual. 23 Reattach the Motor Hood (not shown), and run the treadmill for a few minutes to 7 cm) off . 13 53 Locate the Reed Switch (54) and the Magnet (42) on page 13. Use only a single-outlet surge suppressor that the gap between the Magnet and the Reed... Hood Screws (13) and carefully pivot the Motor Hood (53) off the walking platform. Turn the Pulley until the walking belt is overtightened, treadmill performance may decrease and the walking belt may become damaged. b. Idler Roller Bolts c. Make sure that meets all of the specifications described on the...

English Manual
Page 24
... turn . Then, plug in the power cord, insert the key, and run the treadmill for a few minutes. b. Be careful to overtighten the walking belt. PROBLEM: The walking belt is off the walking platform. b Using the hex key, turn ; Then, plug in the power cord, insert the key,... and carefully walk on the treadmill for a few minutes. Be careful not to keep the walking belt centered. rectly tightened...
... turn . Then, plug in the power cord, insert the key, and run the treadmill for a few minutes. b. Be careful to overtighten the walking belt. PROBLEM: The walking belt is off the walking platform. b Using the hex key, turn ; Then, plug in the power cord, insert the key,... and carefully walk on the treadmill for a few minutes. Be careful not to keep the walking belt centered. rectly tightened...


