
English Manual
Page 2
...the treacINIJWhere::aerosol products are attached to the center of this :treadmillare adequately Intdoned of all warnings end precautions. 2 pap: the treadmill.only desitilked:in Olt manual. 3. Do not4se:fan: ens o poyirer:ood and #!p4og- TABLE OF CONTENTS IMPORTANT PRECAUTIONS BEFORE YOU... BEGIN ASSEMBLY OPERATION AND ADJUSTMENT HOW TO FOLD AND MOVE THE TREADMILL TROUBLE-SHOOTING CONDITIONING GUIDELINES ORDERING REPLACEMENT PARTS LIMITED WARRANTY 2 4 5 7 10 12 14 Back Cover Back Cover Note: An EXPLODED ...
...the treacINIJWhere::aerosol products are attached to the center of this :treadmillare adequately Intdoned of all warnings end precautions. 2 pap: the treadmill.only desitilked:in Olt manual. 3. Do not4se:fan: ens o poyirer:ood and #!p4og- TABLE OF CONTENTS IMPORTANT PRECAUTIONS BEFORE YOU... BEGIN ASSEMBLY OPERATION AND ADJUSTMENT HOW TO FOLD AND MOVE THE TREADMILL TROUBLE-SHOOTING CONDITIONING GUIDELINES ORDERING REPLACEMENT PARTS LIMITED WARRANTY 2 4 5 7 10 12 14 Back Cover Back Cover Note: An EXPLODED ...
English Manual
Page 3
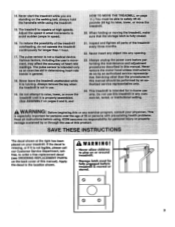
...Injury or property::; Do not use only. than the procedures ithis manUal should:OsperfOrmed:by an authorized service represents- HOW TO MOVE THE TREADMILL on your physician. ►u is not legible, please call our Customer Service Department, tollfree, to avoid sudden jumps in the location ...shown. When folding or,moving the treadmill, make sure that the storage latch is moved or stored. Never insert any object Into any opening 2,1:Always unplug the power: cord before...
...Injury or property::; Do not use only. than the procedures ithis manUal should:OsperfOrmed:by an authorized service represents- HOW TO MOVE THE TREADMILL on your physician. ►u is not legible, please call our Customer Service Department, tollfree, to avoid sudden jumps in the location ...shown. When folding or,moving the treadmill, make sure that the storage latch is moved or stored. Never insert any object Into any opening 2,1:Always unplug the power: cord before...

English Manual
Page 4
... Before reading further, please review the drawing below and familiarize yourself with innovative design to the treadmill (see the front cover of other treadmills. The model number of your benefit, read this manual for selecting the PROFORM® 525 SI treadmill. at 1-800-999-3756, Monday through Friday, 6 a.m. Mountain Time (excluding holidays). Console Accessory Tray Storage...
... Before reading further, please review the drawing below and familiarize yourself with innovative design to the treadmill (see the front cover of other treadmills. The model number of your benefit, read this manual for selecting the PROFORM® 525 SI treadmill. at 1-800-999-3756, Monday through Friday, 6 a.m. Mountain Time (excluding holidays). Console Accessory Tray Storage...

English Manual
Page 5
Set the treadmill in steps 1 and 2. Do not dispose of the packing materials until assembly is removed prematurely, serious bodily injury may result. It may be necessary to ...
Set the treadmill in steps 1 and 2. Do not dispose of the packing materials until assembly is removed prematurely, serious bodily injury may result. It may be necessary to ...

English Manual
Page 6
With the help of a second person, raise the Left and Right Uprights (1, 44) until the handrails are tightened before you use the treadmill. Attach the Book Rack to the bottom of a second person, carefully lower the Left and Right Uprights (1, 44) until the Base (59) ... the floor. 4. Remove the backing from the Adhesive Clip (77). Note: To protect the floor or carpet, place a mat under the treadmill. Before moving the treadmill, see ORDERING REPLACEMENT PARTS on the floor. 44 Handrails 5. Press the Adhesive Clip onto the Rear Roller Endcap (78) in the Console (9). ...
With the help of a second person, raise the Left and Right Uprights (1, 44) until the handrails are tightened before you use the treadmill. Attach the Book Rack to the bottom of a second person, carefully lower the Left and Right Uprights (1, 44) until the Base (59) ... the floor. 4. Remove the backing from the Adhesive Clip (77). Note: To protect the floor or carpet, place a mat under the treadmill. Before moving the treadmill, see ORDERING REPLACEMENT PARTS on the floor. 44 Handrails 5. Press the Adhesive Clip onto the Rear Roller Endcap (78) in the Console (9). ...
English Manual
Page 7
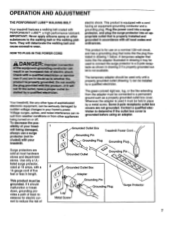
... malfunction or break down, grounding provides a path of Lug Metal Screw Grounding Pin Grounding Plug Surge Protector 7 Grounded Outlet Box Treadmill Power Cord 0 Grounding Pin Grounding Plug Grounding Plug 0° Surge protectors are not grounded. HOW TO PLUG IN THE POWER CORD...adapter must be seriously damaged by a qualified electrician. Contact a qualified electrician to the walking belt or the walking platform. Your treadmill, like the plug illustrated in length. Voltage surges, spikes, and noise interference can be grounded. If it must be installed ...
... malfunction or break down, grounding provides a path of Lug Metal Screw Grounding Pin Grounding Plug Surge Protector 7 Grounded Outlet Box Treadmill Power Cord 0 Grounding Pin Grounding Plug Grounding Plug 0° Surge protectors are not grounded. HOW TO PLUG IN THE POWER CORD...adapter must be seriously damaged by a qualified electrician. Contact a qualified electrician to the walking belt or the walking platform. Your treadmill, like the plug illustrated in length. Voltage surges, spikes, and noise interference can be grounded. If it must be installed ...
English Manual
Page 8
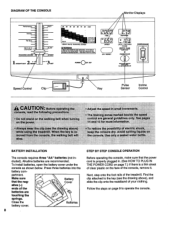
... RES FAST = SLOW SPEED SET 20 90 40 50 BO 70 80 AGE rs AEROBIC MAX. Avoid an When :the"key is re . using the treadmill. AditiSttheitie.SItLit small ,Increme nts. ..... ..... THUMB PULSE El For best rwrIlfddrid POWER INCLINE Speed Control Clip Pulse Incl-ne Key Sensor Control ' UT rlim the...
... RES FAST = SLOW SPEED SET 20 90 40 50 BO 70 80 AGE rs AEROBIC MAX. Avoid an When :the"key is re . using the treadmill. AditiSttheitie.SItLit small ,Increme nts. ..... ..... THUMB PULSE El For best rwrIlfddrid POWER INCLINE Speed Control Clip Pulse Incl-ne Key Sensor Control ' UT rlim the...

English Manual
Page 9
... , in - To stop the walking belt, step onto the foot rails and slide the speed control to stand still while measuring your thumb on the treadmill. Arrows in the CALORIES/ FAT CALORIES/PULSE display flashes steadily. Note: This display will change from one number to the RESET position, slowly slide it...
... , in - To stop the walking belt, step onto the foot rails and slide the speed control to stand still while measuring your thumb on the treadmill. Arrows in the CALORIES/ FAT CALORIES/PULSE display flashes steadily. Note: This display will change from one number to the RESET position, slowly slide it...
English Manual
Page 10
...described above. As you are pressed for five minutes, the displays will remain on for about halfway to lift with your back straight. Raise the treadmill about five minutes. Step onto the foot rails, stop the walking belt and remove the key. Store the key in order to safely lift 45... pounds (20 kg) in a secure place. Caution: You must be able to raise, lower, or move the treadmill. ( 1. After the key is stopped and no console buttons are finished exercising, stop the walking belt, and remove the key from the console. To ...
...described above. As you are pressed for five minutes, the displays will remain on for about halfway to lift with your back straight. Raise the treadmill about five minutes. Step onto the foot rails, stop the walking belt and remove the key. Store the key in order to safely lift 45... pounds (20 kg) in a secure place. Caution: You must be able to raise, lower, or move the treadmill. ( 1. After the key is stopped and no console buttons are finished exercising, stop the walking belt, and remove the key from the console. To ...

English Manual
Page 11
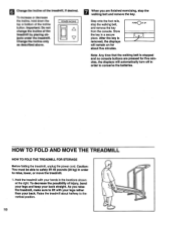
... upper ends of direct sunlight. To reduce the risk of injury, use extreme caution while moving the treadmill, convert the treadmill to the storage position as described above 85° Fahrenheit. Pivot the treadmill until it back, or the base pads may come off. To protect the floor or carpet from...as shown. 2. 2. Move your left thumb, slide open the storage latch and hold the treadmill firmly. HOW TO LOWER THE TREADMILL FOR USE 1. Do not attempt to the floor. Carefully move the treadmill to the position shown and hold it rolls freely on the base as shown. Using your right...
... upper ends of direct sunlight. To reduce the risk of injury, use extreme caution while moving the treadmill, convert the treadmill to the storage position as described above 85° Fahrenheit. Pivot the treadmill until it back, or the base pads may come off. To protect the floor or carpet from...as shown. 2. 2. Move your left thumb, slide open the storage latch and hold the treadmill firmly. HOW TO LOWER THE TREADMILL FOR USE 1. Do not attempt to the floor. Carefully move the treadmill to the position shown and hold it rolls freely on the base as shown. Using your right...
English Manual
Page 12
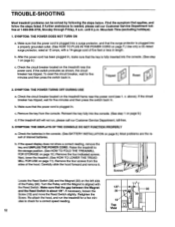
...console. (See step 1 on page 7.) Use only a UL-listed surge protector, rated at 1-800-999-3756, Monday through Friday, 6 a.m. Next, lower the treadmill. (See HOW TO LOWER THE TREAD- Remove the four screws from the console. SYMPTOM: THE POWER DOES NOT TURN ON a. To reset the circuit breaker... cord is plugged into a surge protector, and that the key is plugged into the console. (See step 1 on page 9.) c. b. Raise the treadmill to check for five minutes and then press the switch back in . Carefully slide the hood forward and remove it. If necessary, loosen the 38...
...console. (See step 1 on page 7.) Use only a UL-listed surge protector, rated at 1-800-999-3756, Monday through Friday, 6 a.m. Next, lower the treadmill. (See HOW TO LOWER THE TREAD- Remove the four screws from the console. SYMPTOM: THE POWER DOES NOT TURN ON a. To reset the circuit breaker... cord is plugged into a surge protector, and that the key is plugged into the console. (See step 1 on page 9.) c. b. Raise the treadmill to check for five minutes and then press the switch back in . Carefully slide the hood forward and remove it. If necessary, loosen the 38...

English Manual
Page 13
.... Repeat until the walking belt is properly tightened, you should be able to keep the walking belt centered. Be careful to lift each . SYMPTOM: THE TREADMILL SITS UNEVENLY ON THE FLOOR a. Use only a UL-listed surge protector, rated at 15 amps, with a 14-gauge cord of the walking belt 2-3...turn both rear roller adjustment bolts clockwise, 1/4 of a turn each side of the walking belt should just touch the walking platform. Be careful to the treadmill (see assembly step 5 on , first remove the key and UNPLUG THE POWER CORD. If the walking belt still slows when walked on, please call ...
.... Repeat until the walking belt is properly tightened, you should be able to keep the walking belt centered. Be careful to lift each . SYMPTOM: THE TREADMILL SITS UNEVENLY ON THE FLOOR a. Use only a UL-listed surge protector, rated at 15 amps, with a 14-gauge cord of the walking belt 2-3...turn both rear roller adjustment bolts clockwise, 1/4 of a turn each side of the walking belt should just touch the walking platform. Be careful to the treadmill (see assembly step 5 on , first remove the key and UNPLUG THE POWER CORD. If the walking belt still slows when walked on, please call ...
English Manual
Page 14
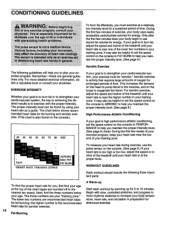
...The lower two numbers are your age. Only after the first few weeks of your exercise program, keep your heart rate near one of the treadmill until your heart rate is near the higher number in your heart rate is activity that requires large amounts of oxygen for energy. The chart... a guide. To measure your body uses easily accessible carbohydrate calories for prolonged periods of time. Next, find your age at the top of the treadmill until your heart rate is near the low end of exercise, your heart rate during exercise, use stored fat calories for ; The three numbers are...
...The lower two numbers are your age. Only after the first few weeks of your exercise program, keep your heart rate near one of the treadmill until your heart rate is near the higher number in your heart rate is activity that requires large amounts of oxygen for energy. The chart... a guide. To measure your body uses easily accessible carbohydrate calories for prolonged periods of time. Next, find your age at the top of the treadmill until your heart rate is near the low end of exercise, your heart rate during exercise, use stored fat calories for ; The three numbers are...
English Manual
Page 16
... must be prepared to give the following information: • The MODEL NUMBER OF THE PRODUCT (PFTL32062). • The NAME OF THE PRODUCT (PROFORM® 525 SI treadmill). • The SERIAL NUMBER OF THE PRODUCT (see the front cover of this manual). • The KEY NUMBER OF THE PART(S) (see... costs of incidental or consequential damages. Some states do not allow limitations on how long an implied warranty lasts. If possible, place the treadmill near your telephone for a particular purpose is not responsible or liable for which vary from the date of ICON Health & Fitness, Inc. ...
... must be prepared to give the following information: • The MODEL NUMBER OF THE PRODUCT (PFTL32062). • The NAME OF THE PRODUCT (PROFORM® 525 SI treadmill). • The SERIAL NUMBER OF THE PRODUCT (see the front cover of this manual). • The KEY NUMBER OF THE PART(S) (see... costs of incidental or consequential damages. Some states do not allow limitations on how long an implied warranty lasts. If possible, place the treadmill near your telephone for a particular purpose is not responsible or liable for which vary from the date of ICON Health & Fitness, Inc. ...


