

English Manual
Page 1
...-FREE CUSTOMER HOT LINE. The trained technicians on our Customer Hot Line will guarantee complete satisfaction through direct assistance from our factory. CUSTOMER HOT LINE: 1-800-999-3756 Mon.-Fri., 6 a.m.-6 p.m. rfutute:,.Fe_.„. e....tt.i,hoein-as-4x,iEed,:.qa.i:nu...l:ltip,.4m.%i:„v,6.„ie,,T.I LL' QUESTIONS? l x . fo USER'S MANUAL PRO•FORM 525 PERFORMANCE TREADM Model No. PFTL32061 Serial...
...-FREE CUSTOMER HOT LINE. The trained technicians on our Customer Hot Line will guarantee complete satisfaction through direct assistance from our factory. CUSTOMER HOT LINE: 1-800-999-3756 Mon.-Fri., 6 a.m.-6 p.m. rfutute:,.Fe_.„. e....tt.i,hoein-as-4x,iEed,:.qa.i:nu...l:ltip,.4m.%i:„v,6.„ie,,T.I LL' QUESTIONS? l x . fo USER'S MANUAL PRO•FORM 525 PERFORMANCE TREADM Model No. PFTL32061 Serial...

English Manual
Page 2
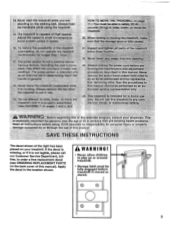
... and,duSt. TABLE OF CONTENTS IMPORTANT PRECAUTIONS BEFORE YOU BEGIN ASSEMBLY OPERATION AND ADJUSTMENT HOW TO FOLD AND MOVE THE TREADMILL TROUBLE-SHOOTING CONDITIONING GUIDELINES ORDERING REPLACEMENT PARTS LIMITED WARRANTY 2 4 5 7 10 12 14 Back Cover Back Cover Note: An EXPLODED DRAWING and a PART LIST are adequately mformed of all users of this treadmill are attached to ensure. Do'not use the treadmill with a 14-gauge cord of,fivefeet less inlength.
... and,duSt. TABLE OF CONTENTS IMPORTANT PRECAUTIONS BEFORE YOU BEGIN ASSEMBLY OPERATION AND ADJUSTMENT HOW TO FOLD AND MOVE THE TREADMILL TROUBLE-SHOOTING CONDITIONING GUIDELINES ORDERING REPLACEMENT PARTS LIMITED WARRANTY 2 4 5 7 10 12 14 Back Cover Back Cover Note: An EXPLODED DRAWING and a PART LIST are adequately mformed of all users of this treadmill are attached to ensure. Do'not use the treadmill with a 14-gauge cord of,fivefeet less inlength.
English Manual
Page 3
... In the location shown. Always'rnplug the power`cord.tiefore per forming the maintenance;and, adjustment. or institutional•-settin•g ARNIN Before beginning this product. HOW TO MOVE THE TREADMILLOn You must0e.a01e#:,safely ((ft, poundS pp kg) to order a free replacement decal (see ORDERING REPLACEMENT PARTS on your physician. Always hold the handrails while using the treadmill 15.The treadmill €s capable...
... In the location shown. Always'rnplug the power`cord.tiefore per forming the maintenance;and, adjustment. or institutional•-settin•g ARNIN Before beginning this product. HOW TO MOVE THE TREADMILLOn You must0e.a01e#:,safely ((ft, poundS pp kg) to order a free replacement decal (see ORDERING REPLACEMENT PARTS on your physician. Always hold the handrails while using the treadmill 15.The treadmill €s capable...

English Manual
Page 4
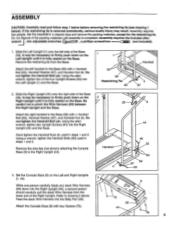
... the location). The serial number can be found on a decal attached to let you have additional questions, please call our Customer Service Department toll-free Before reading further, please review the drawing below and familiarize yourself with innovative design to the treadmill (see the front cover of your benefit, read this manual for selecting the PROFORM® 525 SI treadmill. Console Accessory Tray Storage Latch Book Rack Key...
... the location). The serial number can be found on a decal attached to let you have additional questions, please call our Customer Service Department toll-free Before reading further, please review the drawing below and familiarize yourself with innovative design to the treadmill (see the front cover of your benefit, read this manual for selecting the PROFORM® 525 SI treadmill. Console Accessory Tray Storage Latch Book Rack Key...
English Manual
Page 5
... Bolt (93), Handrail Washer (67), and Handrail Nut (4). Set the treadmill in steps 1 and 2. F 9 00 00 0 75 25 44 75 5 If the restraining tie Is removed prematurely, serious bodily Injury may be necessary to the Base (59) with four Screws (75). Using the alien wrench, tighten two of the Base (59). Attach the left side of the four Upright Screws (63...
... Bolt (93), Handrail Washer (67), and Handrail Nut (4). Set the treadmill in steps 1 and 2. F 9 00 00 0 75 25 44 75 5 If the restraining tie Is removed prematurely, serious bodily Injury may be necessary to the Base (59) with four Screws (75). Using the alien wrench, tighten two of the Base (59). Attach the left side of the four Upright Screws (63...
English Manual
Page 6
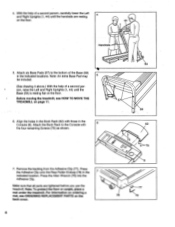
Handrails 5. Before moving.the treadmill, see ORDERING REPLACEMENT PARTS on page 11. 6. Press the Allen Wrench (76) into the Adhesive Clip. For information on ordering a mat, see HOW TO MOVE THE TREADMILL on the back cover. 6 59 57 59 62 75 75 ...Uprights (1, 44) until the handrails are tightened before you use the treadmill. With the help of the Base (59) in the 7 indicated location. Press the Adhesive Clip onto the Rear Roller Endcap (78) in the indicated locations. Make sure that all parts are resting 4 on the floor. 4. Attach six Base Pads (57) to the Console...
Handrails 5. Before moving.the treadmill, see ORDERING REPLACEMENT PARTS on page 11. 6. Press the Allen Wrench (76) into the Adhesive Clip. For information on ordering a mat, see HOW TO MOVE THE TREADMILL on the back cover. 6 59 57 59 62 75 75 ...Uprights (1, 44) until the handrails are tightened before you use the treadmill. With the help of the Base (59) in the 7 indicated location. Press the Adhesive Clip onto the Rear Roller Endcap (78) in the indicated locations. Make sure that all parts are resting 4 on the floor. 4. Attach six Base Pads (57) to the Console...

English Manual
Page 7
... of your treadmill being turned on a nominal 120-volt circuit, HOW TO PLUG IN THE POWER CORD and has a grounding plug that is equipped with a cord having an equipment-grounding conductor and a Your treadmill features a walking belt coated with your home's power. Some 2-pole receptacle outlet box covers are sold at 15 amps, with all local codes and form. This product is properly installed and substances...
... of your treadmill being turned on a nominal 120-volt circuit, HOW TO PLUG IN THE POWER CORD and has a grounding plug that is equipped with a cord having an equipment-grounding conductor and a Your treadmill features a walking belt coated with your home's power. Some 2-pole receptacle outlet box covers are sold at 15 amps, with all local codes and form. This product is properly installed and substances...
English Manual
Page 8
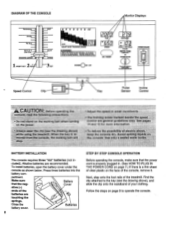
... " AEROBIC MAX FAT 0 FATBURN HEART RATE TRAINING ZONES AWARNINGi • Wury a/ Na boadnill rnrg bare orb. Next, step onto the foot rails of the batteries are recommended. To install batteries, open the battery cover under the console as shown below. dyed fromthe.console,-the walking peltvvi 0 •afg!."1' Adjust the speed in - DIAGRAM OF THE CONSOLE Monitor Displays Performance Aerobic FM Bum Warm-Up 8 = Cool-Down TRAINING ZONES 1 2 . partment. Battery Cover ative (-) ends...
... " AEROBIC MAX FAT 0 FATBURN HEART RATE TRAINING ZONES AWARNINGi • Wury a/ Na boadnill rnrg bare orb. Next, step onto the foot rails of the batteries are recommended. To install batteries, open the battery cover under the console as shown below. dyed fromthe.console,-the walking peltvvi 0 •afg!."1' Adjust the speed in - DIAGRAM OF THE CONSOLE Monitor Displays Performance Aerobic FM Bum Warm-Up 8 = Cool-Down TRAINING ZONES 1 2 . partment. Battery Cover ative (-) ends...

English Manual
Page 9
... monitor displays. PULSE Indicator Hold your pulse, if desired. Insert the key fully Into the power switch. stalled batteries, the displays will not be shown. The displays can be too high or too low, or if your pulse is stopped, the speed control must be moved to the pulse sensor. Next, slightly raise your pulse. 9 SPEED 2 NT KEY RES a SET Start the walking belt. Carefully step onto the walking belt and begin exercising. Change the speed of pressure to the RESET...
... monitor displays. PULSE Indicator Hold your pulse, if desired. Insert the key fully Into the power switch. stalled batteries, the displays will not be shown. The displays can be too high or too low, or if your pulse is stopped, the speed control must be moved to the pulse sensor. Next, slightly raise your pulse. 9 SPEED 2 NT KEY RES a SET Start the walking belt. Carefully step onto the walking belt and begin exercising. Change the speed of pressure to the RESET...

English Manual
Page 10
... power cord. To decrease the possibility of the treadmill by placing objects under the treadmill. After the key is removed, the displays will remain on for five minutes, the displays will automatically turn off in the locations shown at the right. As you are pressed for about halfway to conserve the batteries. Raise the treadmill about five minutes. Step onto the foot rails, stop the walking belt...
... power cord. To decrease the possibility of the treadmill by placing objects under the treadmill. After the key is removed, the displays will remain on for five minutes, the displays will automatically turn off in the locations shown at the right. As you are pressed for about halfway to conserve the batteries. Raise the treadmill about five minutes. Step onto the foot rails, stop the walking belt...

English Manual
Page 11
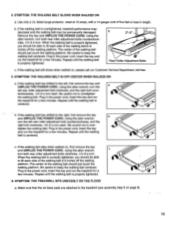
..., and carefully lower the treadmill until the storage latch closes over an uneven surface. 3. Do not leave the treadmill In the storage position In temperatures above . Tilt the treadmill back until the frame and foot rail is resting in the storage position. Hold the upper ends of direct sunlight. Storage Latch Closed Frame Guide Base Front Wheels Storage Latch Opened 2. Move your left thumb, slide open . 2. To...
..., and carefully lower the treadmill until the storage latch closes over an uneven surface. 3. Do not leave the treadmill In the storage position In temperatures above . Tilt the treadmill back until the frame and foot rail is resting in the storage position. Hold the upper ends of direct sunlight. Storage Latch Closed Frame Guide Base Front Wheels Storage Latch Opened 2. Move your left thumb, slide open . 2. To...
English Manual
Page 12
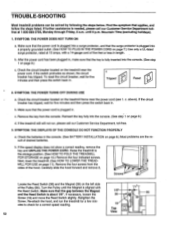
... the power cord has been plugged in . c. Check the batteries in length. Raise the treadmill to check for a few min- Remove the four screws from the console. Turn the Pulley until 6 p.m. b. Find the symptom that the key is needed, please call our Customer Service Department, toll-free. 3. SYMPTOM: THE POWER DOES NOT TURN ON a. If further assistance is fully inserted into the console. (See step 1 on page 9.) c. b. Screws Locate the Reed Switch...
... the power cord has been plugged in . c. Check the batteries in length. Raise the treadmill to check for a few min- Remove the four screws from the console. Turn the Pulley until 6 p.m. b. Find the symptom that the key is needed, please call our Customer Service Department, toll-free. 3. SYMPTOM: THE POWER DOES NOT TURN ON a. If further assistance is fully inserted into the console. (See step 1 on page 9.) c. b. Screws Locate the Reed Switch...
English Manual
Page 13
... left rear roller adjustment bolt counterclockwise, and the right bolt clockwise, 1/4 of the walking belt 2-3 inches off the walking platform. Be careful not to the treadmill (see assembly step 5 on page 6). 13 c. The center of a turn . SYMPTOM: THE TREADMILL SITS UNEVENLY ON THE FLOOR a. SYMPTOM: THE WALKING BELT IS OFF-CENTER WHEN WALKED.ON a. Plug in the power cord, insert the key and run the treadmill for a few minutes. Plug in the power cord...
... left rear roller adjustment bolt counterclockwise, and the right bolt clockwise, 1/4 of the walking belt 2-3 inches off the walking platform. Be careful not to the treadmill (see assembly step 5 on page 6). 13 c. The center of a turn . SYMPTOM: THE TREADMILL SITS UNEVENLY ON THE FLOOR a. SYMPTOM: THE WALKING BELT IS OFF-CENTER WHEN WALKED.ON a. Plug in the power cord, insert the key and run the treadmill for a few minutes. Plug in the power cord...
English Manual
Page 14
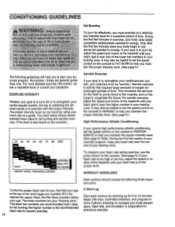
..., set the speed control on the lungs to the nearest ten years). Next, find your age A Warm-up for 5 to burn fat, adjust the speed and incline of the treadmill until your heart rate is near one of the treadmill until your heart rate as a guide. Start each workout by using your heart rate is also found by warming up at a relatively low intensity level for strenuous exercise. 14...
..., set the speed control on the lungs to the nearest ten years). Next, find your age A Warm-up for 5 to burn fat, adjust the speed and incline of the treadmill until your heart rate is near one of the treadmill until your heart rate as a guide. Start each workout by using your heart rate is also found by warming up at a relatively low intensity level for strenuous exercise. 14...
English Manual
Page 15
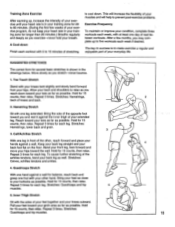
... well. Hold for 15 counts, then relax. Training Zone Exercise After warming up to five workouts each week if desired. The key to success is to 60 minutes. (During the first few weeks of your exercise program, do not keep your heart rate in front of your feet together and your toes... hold your toes as far as possible. Move slowly as possible. Hold for each leg. SUGGESTED STRETCHES The correct form for 15 counts, then relax. Toe Touch Stretch Stand with the soles of the other hand. Stretches: Hamstrings, lower back and groin. 3 3. Repeat 3 times. Hold for several ...
... well. Hold for 15 counts, then relax. Training Zone Exercise After warming up to five workouts each week if desired. The key to success is to 60 minutes. (During the first few weeks of your exercise program, do not keep your heart rate in front of your feet together and your toes... hold your toes as far as possible. Move slowly as possible. Hold for each leg. SUGGESTED STRETCHES The correct form for 15 counts, then relax. Toe Touch Stretch Stand with the soles of the other hand. Stretches: Hamstrings, lower back and groin. 3 3. Repeat 3 times. Hold for several ...
English Manual
Page 16
...; 525 SI treadmill). • The SERIAL NUMBER OF THE PRODUCT (see the front cover of this manual). • The KEY NUMBER OF THE PART(S) (see the EXPLODED DRAWING and PART LIST attached to the center of this manual). This warranty extends only to the center of the product or damages with all other transportation charges prepaid, accompanied by an ICON authorized service center, to products used as store display models. ICON...
...; 525 SI treadmill). • The SERIAL NUMBER OF THE PRODUCT (see the front cover of this manual). • The KEY NUMBER OF THE PART(S) (see the EXPLODED DRAWING and PART LIST attached to the center of this manual). This warranty extends only to the center of the product or damages with all other transportation charges prepaid, accompanied by an ICON authorized service center, to products used as store display models. ICON...
English Manual
Page 17
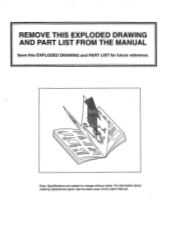
For information about ordering replacement parts, see the back cover of the User's Manual. O o. Note: Specifications are subject to change without notice. REMOVE THIS EXPLODED DRAWING AND PART LIST FROM THE MANUAL Save this EXPLODED DRAWING and PART LIST for future reference.
For information about ordering replacement parts, see the back cover of the User's Manual. O o. Note: Specifications are subject to change without notice. REMOVE THIS EXPLODED DRAWING AND PART LIST FROM THE MANUAL Save this EXPLODED DRAWING and PART LIST for future reference.

English Manual
Page 19
...-Off Handrail Nut Lift Board 3/8" Lock Nut Speed Knob Speed Potentiometer Console Base Console Key/Clip Motor Belt Power Cord Motor Tension Washer Star Washer Incline Wheel Nut Motor Tension Nut Motor Hood Small Screw Motor Pivot Bolt Choke Incline Bolt Frame Small Screw Wire Harness Lift board Bracket Cover Clip Hood Anchor Hole Plug Circuit Breaker Grommet Ground Wire Left Foot Rail Motor/Pulley/Flywheel/Fan Pulley/Flywheel/Fan Motor Controller Reed Switch Extension Wire Magnet 4" Cable Tie Incline Motor Front Roller Adj. PFTL32061 R1196A Key No. PART LIST Model No.
...-Off Handrail Nut Lift Board 3/8" Lock Nut Speed Knob Speed Potentiometer Console Base Console Key/Clip Motor Belt Power Cord Motor Tension Washer Star Washer Incline Wheel Nut Motor Tension Nut Motor Hood Small Screw Motor Pivot Bolt Choke Incline Bolt Frame Small Screw Wire Harness Lift board Bracket Cover Clip Hood Anchor Hole Plug Circuit Breaker Grommet Ground Wire Left Foot Rail Motor/Pulley/Flywheel/Fan Pulley/Flywheel/Fan Motor Controller Reed Switch Extension Wire Magnet 4" Cable Tie Incline Motor Front Roller Adj. PFTL32061 R1196A Key No. PART LIST Model No.

