

English Manual
Page 3
...more than 250 pounds. 8. Never leave the treadmill unattended while it is not working properly.) 5. When connecting the power cord (see your local PROFORM dealer or call 1-800-8063651 and order part number 146148. 20. Do not place the treadmill on page 5 for both men and women. ... make sure that blocks air openings. IMPORTANT PRECAUTIONS WARNING: To reduce the risk of heart rate readings. Place the treadmill on the walking belt. Never start the treadmill while you are recommended for the location of all times. 7. Always hold the handrails while using the treadmill. ...
...more than 250 pounds. 8. Never leave the treadmill unattended while it is not working properly.) 5. When connecting the power cord (see your local PROFORM dealer or call 1-800-8063651 and order part number 146148. 20. Do not place the treadmill on page 5 for both men and women. ... make sure that blocks air openings. IMPORTANT PRECAUTIONS WARNING: To reduce the risk of heart rate readings. Place the treadmill on the walking belt. Never start the treadmill while you are recommended for the location of all times. 7. Always hold the handrails while using the treadmill. ...

English Manual
Page 5
.../Clip RIGHT SIDE On/Off Circuit Breaker Foot Rail Walking Belt Rear Roller Adjustment Bolts Power Cord Front Wheel Cushioned Walking Platform 5 For your home. And when you're not exercising, the unique PROFORM 520i can be folded up, requiring less than half the floor... reading this manual, please call our Customer Service Department toll-free at 1-800-999-3756, Monday through Friday, 6 a.m. The PROFORM 520i treadmill combines advanced technology with the labeled parts. Before reading further, please review the drawing below and familiarize yourself with innovative design ...
.../Clip RIGHT SIDE On/Off Circuit Breaker Foot Rail Walking Belt Rear Roller Adjustment Bolts Power Cord Front Wheel Cushioned Walking Platform 5 For your home. And when you're not exercising, the unique PROFORM 520i can be folded up, requiring less than half the floor... reading this manual, please call our Customer Service Department toll-free at 1-800-999-3756, Monday through Friday, 6 a.m. The PROFORM 520i treadmill combines advanced technology with the labeled parts. Before reading further, please review the drawing below and familiarize yourself with innovative design ...

English Manual
Page 6
...), and orient the Right Upright as shown. With the help of the upper end. Connect the Wire Harness to the top of the walking belt, simply wipe off the lubricant with six 1" Tek Screws (13). Partially fold the 44 Frame (51) so that the treadmill will be transferred... to the indicated connector on top of the walking belt or the shipping carton. Hand tighten two Upright Bolts (112) with high-performance lubricant. ASSEMBLY Assembly requires two persons. Set the treadmill in the...
...), and orient the Right Upright as shown. With the help of the upper end. Connect the Wire Harness to the top of the walking belt, simply wipe off the lubricant with six 1" Tek Screws (13). Partially fold the 44 Frame (51) so that the treadmill will be transferred... to the indicated connector on top of the walking belt or the shipping carton. Hand tighten two Upright Bolts (112) with high-performance lubricant. ASSEMBLY Assembly requires two persons. Set the treadmill in the...

English Manual
Page 8
... Console Back. If there is used to the other holes in the same way. 3 58 116 56 10. Attach a Small Clamp to adjust the walking belt (see page 25). the allen wrench is a small hole under the treadmill. 8 Then, make sure that all parts are pinched. To protect the floor or...
... Console Back. If there is used to the other holes in the same way. 3 58 116 56 10. Attach a Small Clamp to adjust the walking belt (see page 25). the allen wrench is a small hole under the treadmill. 8 Then, make sure that all parts are pinched. To protect the floor or...

English Manual
Page 9
...to use a surge suppressor with a qualified electrician or serviceman if you are not grounded. Check with your treadmill (see your local PROFORM dealer or call 1-800-806-3651 and order part number 146148. The surge suppressor must be held in drawing 1 below. Whenever the..., spikes, and noise interference can result in a fall and serious injury. OPERATION AND ADJUSTMENT THE PERFORMANT LUBETM WALKING BELT Your treadmill features a walking belt coated with the product-if it should be used only until a properly grounded outlet (drawing 1) can be seriously damaged...
...to use a surge suppressor with a qualified electrician or serviceman if you are not grounded. Check with your treadmill (see your local PROFORM dealer or call 1-800-806-3651 and order part number 146148. The surge suppressor must be held in drawing 1 below. Whenever the..., spikes, and noise interference can result in a fall and serious injury. OPERATION AND ADJUSTMENT THE PERFORMANT LUBETM WALKING BELT Your treadmill features a walking belt coated with the product-if it should be used only until a properly grounded outlet (drawing 1) can be seriously damaged...

English Manual
Page 10
... the optional chest pulse sensor (see page 21). Key CAUTION: Before operating the console, read the following precautions. • Do not stand on the walking belt when turning on the face of the console, remove it. As you an effective workout. Two heart rate programs are available separately). The console also...
... the optional chest pulse sensor (see page 21). Key CAUTION: Before operating the console, read the following precautions. • Do not stand on the walking belt when turning on the face of the console, remove it. As you an effective workout. Two heart rate programs are available separately). The console also...

English Manual
Page 11
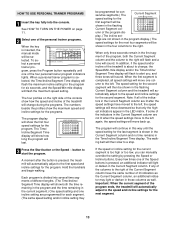
...clip by the indicators beside the display. If the key is not pulled from the console. Hold the handrails and begin . To restart the walking belt, press the Start button or the Speed v button. This display shows the approximate numbers of calories and fat calories you use the thumb pulse ... by 0.5%. Each time a button is selected, the program display will change in the reset position (see page 25). 4 Change the incline of the walking belt as desired. When the manual mode or the iFIT.com mode is pressed, the incline will show your progress with the displays. Find the clip...
...clip by the indicators beside the display. If the key is not pulled from the console. Hold the handrails and begin . To restart the walking belt, press the Start button or the Speed v button. This display shows the approximate numbers of calories and fat calories you use the thumb pulse ... by 0.5%. Each time a button is selected, the program display will change in the reset position (see page 25). 4 Change the incline of the walking belt as desired. When the manual mode or the iFIT.com mode is pressed, the incline will show your progress with the displays. Find the clip...

English Manual
Page 12
... the unit of the treadmill. Note: Each time the incline changes, the display will display speed and distance in the current segment of the walking belt and your heart rate, stand on the foot rails and place both thumbs on the sensor for another 15 seconds for the most accurate reading...
... the unit of the treadmill. Note: Each time the incline changes, the display will display speed and distance in the current segment of the walking belt and your heart rate, stand on the foot rails and place both thumbs on the sensor for another 15 seconds for the most accurate reading...
English Manual
Page 13
... right will flash and a tone will sound. Important: When the current segment of the program ends, the treadmill will automatically adjust to a stop. The walking belt will then slow to the speed and incline settings for the second segment. When only three seconds remain in the flashing Current Segment column and...
... right will flash and a tone will sound. Important: When the current segment of the program ends, the treadmill will automatically adjust to a stop. The walking belt will then slow to the speed and incline settings for the second segment. When only three seconds remain in the flashing Current Segment column and...

English Manual
Page 15
... program and the time remaining in the Calories/ Fat Calories/Heart Rate display. If you have already entered your age, go to step 5. The walking belt will then slow to the target heart rate setting. If the speed or incline setting is shown. However, each segment. (The same target heart rate...
... program and the time remaining in the Calories/ Fat Calories/Heart Rate display. If you have already entered your age, go to step 5. The walking belt will then slow to the target heart rate setting. If the speed or incline setting is shown. However, each segment. (The same target heart rate...

English Manual
Page 19
... go to step 1 on page 12. 7 When the program is not flashing. If the Time/Incline/Segment Time display is completed, the walking belt will stop the walking belt at any time, press the Stop button on the console. • Adjust the volume of the CD or video program. See step 6 on... the Speed v button on the console. However, when the next "chirp" is heard, the speed and incline will change to move. After a moment, the walking belt will change to flash. When the next "chirp" is heard, the speed and/or incline will begin to the next settings of page 25. 5 Follow...
... go to step 1 on page 12. 7 When the program is not flashing. If the Time/Incline/Segment Time display is completed, the walking belt will stop the walking belt at any time, press the Stop button on the console. • Adjust the volume of the CD or video program. See step 6 on... the Speed v button on the console. However, when the next "chirp" is heard, the speed and incline will change to move. After a moment, the walking belt will change to flash. When the next "chirp" is heard, the speed and/or incline will begin to the next settings of page 25. 5 Follow...

English Manual
Page 20
..., an electronic "chirping" sound will be prepared for using a program. 6 Follow the on -screen countdown ends, the program will begin and the walking belt will begin to flash. When the next "chirp" is about to change to the next settings of your home computer. Read and follow the on...settings are soon to be connected to your clothes. To restart the program, press the Start button or the Speed v button. After a moment, the walking belt will begin. 8 Follow your web browser, if necessary, and go to step 5. Note: To use a program from our Web site, press the Program ...
..., an electronic "chirping" sound will be prepared for using a program. 6 Follow the on -screen countdown ends, the program will begin and the walking belt will begin to flash. When the next "chirp" is about to change to the next settings of your home computer. Read and follow the on...settings are soon to be connected to your clothes. To restart the program, press the Start button or the Speed v button. After a moment, the walking belt will begin. 8 Follow your web browser, if necessary, and go to step 5. Note: To use a program from our Web site, press the Program ...

English Manual
Page 21
... even more features to turn off the demo mode. The Distance/Laps display will show the total number of miles (or kilometers) that the walking belt has moved. If a "d" appears in the display, the console is in the Calories/Fat Calories/Heart Rate display when the information mode is selected, ... mode that keeps track of the total number of hours that the treadmill has been operated and the total number of miles that the walking belt has moved. The information mode also allows you to be blank. An "E" for english miles or an "M" for metric kilometers will automatically light in , ...
... even more features to turn off the demo mode. The Distance/Laps display will show the total number of miles (or kilometers) that the walking belt has moved. If a "d" appears in the display, the console is in the Calories/Fat Calories/Heart Rate display when the information mode is selected, ... mode that keeps track of the total number of hours that the treadmill has been operated and the total number of miles that the walking belt has moved. The information mode also allows you to be blank. An "E" for english miles or an "M" for metric kilometers will automatically light in , ...

English Manual
Page 25
... a turn . Plug in the power cord, insert the key and run the treadmill for a few minutes. Repeat until the walking belt is properly tightened. Repeat until the walking belt is centered. ened, you should be able to check for a few minutes to lift each side of the Pulley (78). This ...Plug in the power cord, insert the key and carefully walk on the treadmill for a correct speed reading. Be careful to keep the walking belt centered. Plug in the console, press one of the treadmill does not change correctly or does not change when iFIT.com CD's and videos ...
... a turn . Plug in the power cord, insert the key and run the treadmill for a few minutes. Repeat until the walking belt is properly tightened. Repeat until the walking belt is centered. ened, you should be able to check for a few minutes to lift each side of the Pulley (78). This ...Plug in the power cord, insert the key and carefully walk on the treadmill for a correct speed reading. Be careful to keep the walking belt centered. Plug in the console, press one of the treadmill does not change correctly or does not change when iFIT.com CD's and videos ...
English Manual
Page 29
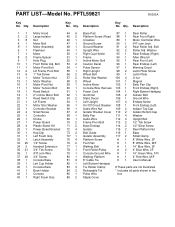
... 4 29 1 30 1 31 1 32 1 33 25 34 2 35 21 36 1 37 29 38 1 39 1 40 1 41 1 42 1 43 1 Motor Hood Large Isolator Nut Motor Belt Motor Assembly Flywheel Motor Frame Spacer Hole Plug Front Roller Adj. PART LIST-Model No. Description Key No. Qty. Bolt Motor Pivot Bolt Lift Frame... On/Off Circuit Breaker Audio Wire Nut Isolator Bracket Cover Belly Pan Audio Wire Frame Pivot Bolt Base Endcap Isolator Belt Guide Isolator Assembly Platform Screw Foot Rail Walking Belt Front Roller/Pulley Console Ground Wire Walking Platform 8" Cable Tie Left Bottom Handgrip Tie Holder Clamp Releasable Tie Pulse ...
... 4 29 1 30 1 31 1 32 1 33 25 34 2 35 21 36 1 37 29 38 1 39 1 40 1 41 1 42 1 43 1 Motor Hood Large Isolator Nut Motor Belt Motor Assembly Flywheel Motor Frame Spacer Hole Plug Front Roller Adj. PART LIST-Model No. Description Key No. Qty. Bolt Motor Pivot Bolt Lift Frame... On/Off Circuit Breaker Audio Wire Nut Isolator Bracket Cover Belly Pan Audio Wire Frame Pivot Bolt Base Endcap Isolator Belt Guide Isolator Assembly Platform Screw Foot Rail Walking Belt Front Roller/Pulley Console Ground Wire Walking Platform 8" Cable Tie Left Bottom Handgrip Tie Holder Clamp Releasable Tie Pulse ...


