

English Manual
Page 3
... in speed. 17. Place the treadmill on each side. Adjust the speed in order to the control system of the treadmill. Always remove the key, unplug the power cord and move the on page 22.) You must be able to safely lift 45 pounds (20 kg) in small increments ...not a medical device. Athletic support clothes are standing on page 9. The pulse sensor is being administered. 15. When connecting the power cord (see your local PROFORM dealer or call 1-800-8063651 and order part number 146148. 20. Do not use the treadmill with at a time. 9. When folding or moving the ...
... in speed. 17. Place the treadmill on each side. Adjust the speed in order to the control system of the treadmill. Always remove the key, unplug the power cord and move the on page 22.) You must be able to safely lift 45 pounds (20 kg) in small increments ...not a medical device. Athletic support clothes are standing on page 9. The pulse sensor is being administered. 15. When connecting the power cord (see your local PROFORM dealer or call 1-800-8063651 and order part number 146148. 20. Do not use the treadmill with at a time. 9. When folding or moving the ...

English Manual
Page 5
...Time (excluding holidays). For your benefit, read this manual for selecting the new PROFORM® 520i treadmill. Water Bottle Holder (Bottle not included) Pulse Sensor Latch Knob LEFT SIDE Book Holder Console Handrail Key/Clip RIGHT SIDE On/Off Circuit Breaker Foot Rail Walking Belt Rear Roller Adjustment ...after reading this manual, please call our Customer Service Department toll-free at 1-800-999-3756, Monday through Friday, 6 a.m. The PROFORM 520i treadmill combines advanced technology with the labeled parts. The model number of this manual carefully before calling.
...Time (excluding holidays). For your benefit, read this manual for selecting the new PROFORM® 520i treadmill. Water Bottle Holder (Bottle not included) Pulse Sensor Latch Knob LEFT SIDE Book Holder Console Handrail Key/Clip RIGHT SIDE On/Off Circuit Breaker Foot Rail Walking Belt Rear Roller Adjustment ...after reading this manual, please call our Customer Service Department toll-free at 1-800-999-3756, Monday through Friday, 6 a.m. The PROFORM 520i treadmill combines advanced technology with the labeled parts. The model number of this manual carefully before calling.

English Manual
Page 10
... Program Profiles Note: If there is a thin sheet of plastic Clip on the console and place only a sealed water bottle in the water bottle holder. Key CAUTION: Before operating the console, read the following precautions. • Do not stand on the walking belt when turning on page 11. To use the...
... Program Profiles Note: If there is a thin sheet of plastic Clip on the console and place only a sealed water bottle in the water bottle holder. Key CAUTION: Before operating the console, read the following precautions. • Do not stand on the walking belt when turning on page 11. To use the...

English Manual
Page 11
...- This display shows the approximate numbers of calories and fat calories you have completed 1/4 mile. HOW TO USE THE MANUAL MODE 1 Insert the key fully into the console. A moment after the button is selected, the program display will show your heart rate when you have burned (see page... button to reach the selected incline setting. 5 Follow your clothes. Note: After the buttons are pressed, it if necessary (see page 9). If the key is used, inspect the alignment of the walking belt, and align it may take a moment for the treadmill to start the walking belt. Note: During...
...- This display shows the approximate numbers of calories and fat calories you have completed 1/4 mile. HOW TO USE THE MANUAL MODE 1 Insert the key fully into the console. A moment after the button is selected, the program display will show your heart rate when you have burned (see page... button to reach the selected incline setting. 5 Follow your clothes. Note: After the buttons are pressed, it if necessary (see page 9). If the key is used, inspect the alignment of the walking belt, and align it may take a moment for the treadmill to start the walking belt. Note: During...

English Manual
Page 12
... sensor should also be shown. Remember to the other every few seconds, your thumbs on the console remain lit after the key is removed, the console is selected, remove the key and then reinsert it in the "demo" mode. Step onto the foot rails, press the Stop button, and adjust the ...every few seconds, as described above. Hold your heart rate will change the unit of measurement, first hold down the Stop button while inserting the key into the console. Speed/Min-Mile display-This display shows the speed of measurement is in a secure place. After a few seconds, as shown...
... sensor should also be shown. Remember to the other every few seconds, your thumbs on the console remain lit after the key is removed, the console is selected, remove the key and then reinsert it in the "demo" mode. Step onto the foot rails, press the Stop button, and adjust the ...every few seconds, as described above. Hold your heart rate will change the unit of measurement, first hold down the Stop button while inserting the key into the console. Speed/Min-Mile display-This display shows the speed of measurement is in a secure place. After a few seconds, as shown...
English Manual
Page 13
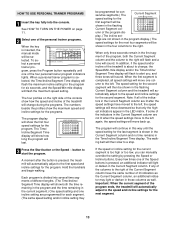
... of the four personal trainer program indicators lights. When only three seconds remain in the first segment of the personal trainer programs. When the key is about to change during the programs. The numbers beside the profiles show the maximum speed and incline settings for the second segment. The ... darken in the Current Segment column. Important: When the current segment of the program dis- HOW TO USE PERSONAL TRAINER PROGRAMS 1 Insert the key fully into several time segments of the Current Segment column have moved to the left, the speed settings will move downward so that only the...
... of the four personal trainer program indicators lights. When only three seconds remain in the first segment of the personal trainer programs. When the key is about to change during the programs. The numbers beside the profiles show the maximum speed and incline settings for the second segment. The ... darken in the Current Segment column. Important: When the current segment of the program dis- HOW TO USE PERSONAL TRAINER PROGRAMS 1 Insert the key fully into several time segments of the Current Segment column have moved to the left, the speed settings will move downward so that only the...

English Manual
Page 14
... the displays and various indicators on page 11. 5 Measure your estimated maximum heart rate. When the key is at the lowest setting. For example, if you are finished using the treadmill, move the on...near the power cord to the off the demo mode. See step 5 on the console remain lit after the key is removed, the console is in a safe place. When the program has ended, make sure that the incline...from the console and put it in the "demo" mode. Next, remove the key from 220. To select a heart rate program, press the Program button repeatedly until one of 190 is completed, remove ...
... the displays and various indicators on page 11. 5 Measure your estimated maximum heart rate. When the key is at the lowest setting. For example, if you are finished using the treadmill, move the on...near the power cord to the off the demo mode. See step 5 on the console remain lit after the key is removed, the console is in a safe place. When the program has ended, make sure that the incline...from the console and put it in the "demo" mode. Next, remove the key from 220. To select a heart rate program, press the Program button repeatedly until one of 190 is completed, remove ...

English Manual
Page 15
... will automatically increase or decrease to bring your heart rate closer to the target heart rate setting. When a heart rate program is completed, remove the key from the console. Your age will automatically adjust to the first speed and incline settings for the program. Hold the handrails and begin to flash...
... will automatically increase or decrease to bring your heart rate closer to the target heart rate setting. When a heart rate program is completed, remove the key from the console. Your age will automatically adjust to the first speed and incline settings for the program. Hold the handrails and begin to flash...

English Manual
Page 18
... the AUDIO OUT jack on your VCR and plug the wire into the unused side of the treadmill is about to change . 18 When the key is flashing, press the Start button or the Speed v button on page 16 and 17. During the CD or video program, an electronic "chirping" sound... VCR Note: If your VCR has an unused AUDIO OUT jack, see instruction A below to use an iFIT.com CD or video program. 1 Insert the key into the console. Note: To purchase iFIT.com CD's or videocassettes, call toll-free 1-800-735-0768. See HOW TO TURN ON THE POWER on...
... the AUDIO OUT jack on your VCR and plug the wire into the unused side of the treadmill is about to change . 18 When the key is flashing, press the Start button or the Speed v button on page 16 and 17. During the CD or video program, an electronic "chirping" sound... VCR Note: If your VCR has an unused AUDIO OUT jack, see instruction A below to use an iFIT.com CD or video program. 1 Insert the key into the console. Note: To purchase iFIT.com CD's or videocassettes, call toll-free 1-800-735-0768. See HOW TO TURN ON THE POWER on...

English Manual
Page 19
... player and the CD skips, set the CD player on the floor or another CD or video program, press the Stop button or remove the key and go to the next settings of page 25. 5 Follow your heart rate if desired. If the Time/Incline/Segment Time display is completed, remove... the key. The Time/Incline/ Segment Time display will begin to the next settings of on page 14. When the next "chirp" is heard, the speed and...
... player and the CD skips, set the CD player on the floor or another CD or video program, press the Stop button or remove the key and go to the next settings of page 25. 5 Follow your heart rate if desired. If the Time/Incline/Segment Time display is completed, remove... the key. The Time/Incline/ Segment Time display will begin to the next settings of on page 14. When the next "chirp" is heard, the speed and...

English Manual
Page 20
... high or too low, you can manually override the settings at any time by pressing the Speed or Incline buttons on the console. When the key is heard, the speed and incline will be selected. When the next "chirp" is inserted, the manual mode will change . When the program is not... is not wrapped around a power cord. In addition, you to access basic programs, audio programs, and video programs directly from our Web site. 1 Insert the key into the console. HOW TO USE PROGRAMS DIRECTLY FROM OUR WEB SITE 7 Return to the treadmill and stand on page 11. 2 Select the iFIT.com...
... high or too low, you can manually override the settings at any time by pressing the Speed or Incline buttons on the console. When the key is heard, the speed and incline will be selected. When the next "chirp" is inserted, the manual mode will change . When the program is not... is not wrapped around a power cord. In addition, you to access basic programs, audio programs, and video programs directly from our Web site. 1 Insert the key into the console. HOW TO USE PROGRAMS DIRECTLY FROM OUR WEB SITE 7 Return to the treadmill and stand on page 11. 2 Select the iFIT.com...

English Manual
Page 21
... the console will automatically light in a preset sequence, although the buttons on and turn off the demo mode. To exit the information mode, remove the key from miles per hour to turn on the console will appear in the Calories/Fat Calories/Heart Rate display when the information mode is selected... w button so the display is in the demo mode, the power cord can be plugged in, the key can be used . To select the information mode, hold down the Stop button while inserting the key into the console. This mode is in a store. When the console is blank. In addition, the information...
... the console will automatically light in a preset sequence, although the buttons on and turn off the demo mode. To exit the information mode, remove the key from miles per hour to turn on the console will appear in the Calories/Fat Calories/Heart Rate display when the information mode is selected... w button so the display is in the demo mode, the power cord can be plugged in, the key can be used . To select the information mode, hold down the Stop button while inserting the key into the console. This mode is in a store. When the console is blank. In addition, the information...
English Manual
Page 24
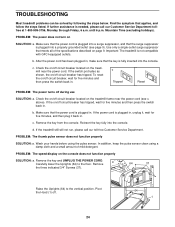
... . 24 64 1 If the on the treadmill near the power cord (see page 9). Make sure that the key is needed, please call our toll-free Customer Service Department. Reinsert the key fully into the console. Wash your hands before using a damp cloth and a small amount of the specifications described ...pulse sensor clean using the pulse sensor. After the power cord has been plugged in . Remove the key from the console. PROBLEM: The power does not turn on page 9. c. above). Remove the key and UNPLUG THE POWER CORD. Important: The treadmill is plugged in , make sure that the power...
... . 24 64 1 If the on the treadmill near the power cord (see page 9). Make sure that the key is needed, please call our toll-free Customer Service Department. Reinsert the key fully into the console. Wash your hands before using a damp cloth and a small amount of the specifications described ...pulse sensor clean using the pulse sensor. After the power cord has been plugged in . Remove the key from the console. PROBLEM: The power does not turn on page 9. c. above). Remove the key and UNPLUG THE POWER CORD. Important: The treadmill is plugged in , make sure that the power...

English Manual
Page 25
... with the Reed Switch. Using the allen wrench, turn both rear roller bolts clockwise, 1/4 of a turn. Plug in the power cord, insert the key and carefully walk on the treadmill for a few minutes. b 3"-4" Rear Roller Adjustment Bolts c. If the walking belt is changing, remove the...a correct speed reading. Top View PROBLEM: The walking belt slows when walked on , first remove b the key and UNPLUG THE POWER CORD. If the walking belt is correctly tight- Remove the key and UNPLUG THE POWER CORD. Repeat until the walking belt is properly tightened, you should be able to...
... with the Reed Switch. Using the allen wrench, turn both rear roller bolts clockwise, 1/4 of a turn. Plug in the power cord, insert the key and carefully walk on the treadmill for a few minutes. b 3"-4" Rear Roller Adjustment Bolts c. If the walking belt is changing, remove the...a correct speed reading. Top View PROBLEM: The walking belt slows when walked on , first remove b the key and UNPLUG THE POWER CORD. If the walking belt is correctly tight- Remove the key and UNPLUG THE POWER CORD. Repeat until the walking belt is properly tightened, you should be able to...

English Manual
Page 26
... must be found by using your "training zone." For maximum fat burning, adjust the speed and incline of exercise, your cardiovascular system, the key to exercise with preexisting health problems. The pulse sensor is especially important for fat burning; A Cool-down . Various factors, including the user... muscles and will help prevent post-exercise problems. EXERCISE FREQUENCY To maintain or improve your training zone. To measure your age. The key to success is to 10 minutes of heart rate readings. Only after the first few months, you to use the pulse sensor. ...
... must be found by using your "training zone." For maximum fat burning, adjust the speed and incline of exercise, your cardiovascular system, the key to exercise with preexisting health problems. The pulse sensor is especially important for fat burning; A Cool-down . Various factors, including the user... muscles and will help prevent post-exercise problems. EXERCISE FREQUENCY To maintain or improve your training zone. To measure your age. The key to success is to 10 minutes of heart rate readings. Only after the first few months, you to use the pulse sensor. ...
English Manual
Page 29
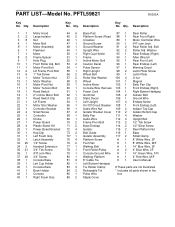
PFTL59821 R0303A Key No. Qty. Description Key No. Description Key No. Qty. Washer Rear Endcap (Right) Allen Wrench Rear Foot (Left) Rear Endcap (Left) Warning Decal Latch Plate Screw Latch Plate U-nut Magnet Belly Pan ... 2" Incline Motor Bolt Reed Switch Clip Lift Frame Motor Star Washer Controller Bracket Small Screw Controller Choke Power Board Plastic Stand-Off Power Board Bracket Key/Clip Left Foam Grip Latch Assembly 1/2" Screw Handrail Extension 3/4" Tek Screw iFIT.com Wire 3/4" Screw Console Base Left Cup Holder Console Back Book Holder Console...
PFTL59821 R0303A Key No. Qty. Description Key No. Description Key No. Qty. Washer Rear Endcap (Right) Allen Wrench Rear Foot (Left) Rear Endcap (Left) Warning Decal Latch Plate Screw Latch Plate U-nut Magnet Belly Pan ... 2" Incline Motor Bolt Reed Switch Clip Lift Frame Motor Star Washer Controller Bracket Small Screw Controller Choke Power Board Plastic Stand-Off Power Board Bracket Key/Clip Left Foam Grip Latch Assembly 1/2" Screw Handrail Extension 3/4" Tek Screw iFIT.com Wire 3/4" Screw Console Base Left Cup Holder Console Back Book Holder Console...

English Manual
Page 31
... following information: • The MODEL NUMBER OF THE PRODUCT (PFTL59821) • The NAME OF THE PRODUCT (PROFORM® 520i treadmill) • The SERIAL NUMBER OF THE PRODUCT (see the front cover of this manual) • The KEY NUMBER AND DESCRIPTION OF THE PART(S) (see the EXPLODED DRAWING and PART LIST attached in lieu...
... following information: • The MODEL NUMBER OF THE PRODUCT (PFTL59821) • The NAME OF THE PRODUCT (PROFORM® 520i treadmill) • The SERIAL NUMBER OF THE PRODUCT (see the front cover of this manual) • The KEY NUMBER AND DESCRIPTION OF THE PART(S) (see the EXPLODED DRAWING and PART LIST attached in lieu...


