

Uk Manual
Page 2
PROFORM is missing or illegible, call the telephone number on the front cover of ICON IP, Inc. 2 Note: The decals may not be shown at actual ... PLACEMENT 2 IMPORTANT PRECAUTIONS 3 BEFORE YOU BEGIN 5 ASSEMBLY 6 HOW TO USE THE CHEST PULSE SENSOR 12 OPERATION AND ADJUSTMENT 13 HOW TO FOLD AND MOVE THE TREADMILL 21 TROUBLESHOOTING 22 EXERCISE GUIDELINES 25 PART LIST 26 EXPLODED DRAWING 28 ORDERING REPLACEMENT PARTS Back Cover RECYCLING INFORMATION Back Cover WARNING DECAL PLACEMENT The...
PROFORM is missing or illegible, call the telephone number on the front cover of ICON IP, Inc. 2 Note: The decals may not be shown at actual ... PLACEMENT 2 IMPORTANT PRECAUTIONS 3 BEFORE YOU BEGIN 5 ASSEMBLY 6 HOW TO USE THE CHEST PULSE SENSOR 12 OPERATION AND ADJUSTMENT 13 HOW TO FOLD AND MOVE THE TREADMILL 21 TROUBLESHOOTING 22 EXERCISE GUIDELINES 25 PART LIST 26 EXPLODED DRAWING 28 ORDERING REPLACEMENT PARTS Back Cover RECYCLING INFORMATION Back Cover WARNING DECAL PLACEMENT The...

Uk Manual
Page 3
... and dust. Never allow more than 1.5 m. 13. The pulse sensor is turned off circuit breaker to avoid sudden jumps in the treadmill. Never start the treadmill while you are recommended for personal injury or property damage sustained by persons weighing 286 lbs. (130 kg) or less. Do not ...see HOW TO TURN ON THE POWER on the walking belt. cuit. structions in a garage or covered patio, or near water. 6. Use the treadmill only as an exercise aid in determining heart rate trends in - IMPORTANT PRECAUTIONS WARNING: To reduce the risk of the circuit breaker.) 3 ICON assumes ...
... and dust. Never allow more than 1.5 m. 13. The pulse sensor is turned off circuit breaker to avoid sudden jumps in the treadmill. Never start the treadmill while you are recommended for personal injury or property damage sustained by persons weighing 286 lbs. (130 kg) or less. Do not ...see HOW TO TURN ON THE POWER on the walking belt. cuit. structions in a garage or covered patio, or near water. 6. Use the treadmill only as an exercise aid in determining heart rate trends in - IMPORTANT PRECAUTIONS WARNING: To reduce the risk of the circuit breaker.) 3 ICON assumes ...

Uk Manual
Page 4
... able to safely lift 45 lbs. (20 kg) to raise, lower, or move the treadmill until it is properly assembled. (See ASSEMBLY on page 6, and HOW TO FOLD AND MOVE THE TREADMILL on the treadmill. 23. Do not attempt to do so by an authorized service representative only. 25. When... folding or moving the treadmill, make sure that the frame is intended for in this treadmill in the storage position. 22. vice representative. SAVE THESE INSTRUCTIONS 4 Never remove the motor hood un- Do not use ...
... able to safely lift 45 lbs. (20 kg) to raise, lower, or move the treadmill until it is properly assembled. (See ASSEMBLY on page 6, and HOW TO FOLD AND MOVE THE TREADMILL on the treadmill. 23. Do not attempt to do so by an authorized service representative only. 25. When... folding or moving the treadmill, make sure that the frame is intended for in this treadmill in the storage position. 22. vice representative. SAVE THESE INSTRUCTIONS 4 Never remove the motor hood un- Do not use ...
Uk Manual
Page 5
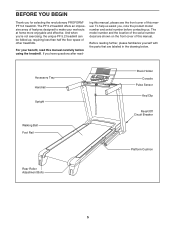
... YOU BEGIN Thank you 're not exercising, the unique PF 5.2 treadmill can be folded up, requiring less than half the floor space of other treadmills. And when you for selecting the revolutionary PROFORM® PF 5.2 treadmill. If you , note the product model number and serial number before... using the treadmill. Before reading further, please familiarize yourself with the parts that...
... YOU BEGIN Thank you 're not exercising, the unique PF 5.2 treadmill can be folded up, requiring less than half the floor space of other treadmills. And when you for selecting the revolutionary PROFORM® PF 5.2 treadmill. If you , note the product model number and serial number before... using the treadmill. Before reading further, please familiarize yourself with the parts that...

Uk Manual
Page 6
... lubricant with high-performance lubricant. Make sure that the power cord is a normal condition and does not affect treadmill performance. Assembly requires the included hex keys and your own Phillips screwdriver , adjustable wrench , and scissors .... in a cleared area and remove all packing materials. The Nuts and Bolts will be assembled. Set the treadmill in parentheses below to one of the treadmill walking belt is lubricant on the other side of the treadmill. Bolt Spacer (80)-4 Base Pad Spacer (13)-2 3/8" Star Washer (9)-11 3/8" Nut (8)-3 1" Screw (2)-4 3/8" x 2 ...
... lubricant with high-performance lubricant. Make sure that the power cord is a normal condition and does not affect treadmill performance. Assembly requires the included hex keys and your own Phillips screwdriver , adjustable wrench , and scissors .... in a cleared area and remove all packing materials. The Nuts and Bolts will be assembled. Set the treadmill in parentheses below to one of the treadmill walking belt is lubricant on the other side of the treadmill. Bolt Spacer (80)-4 Base Pad Spacer (13)-2 3/8" Star Washer (9)-11 3/8" Nut (8)-3 1" Screw (2)-4 3/8" x 2 ...

Uk Manual
Page 7
... Frame (56) so that you removed in the Base, and use the tie to pull the Upright Wire out of a second person, carefully tip 2 the treadmill onto its left side. Cut the tie securing the Upright Wire (38) to the Base (83) in the Right Upright (78) securely around the end... (81) with stickers. Do not overtighten the Nut; 2. Tie the wire tie in the location shown with the 3/8" Jamnut (34) 3 and the 3/8" x 2" Bolt (4) that the treadmill is routed completely through the Right Upright Spacer as shown.
... Frame (56) so that you removed in the Base, and use the tie to pull the Upright Wire out of a second person, carefully tip 2 the treadmill onto its left side. Cut the tie securing the Upright Wire (38) to the Base (83) in the Right Upright (78) securely around the end... (81) with stickers. Do not overtighten the Nut; 2. Tie the wire tie in the location shown with the 3/8" Jamnut (34) 3 and the 3/8" x 2" Bolt (4) that the treadmill is routed completely through the Right Upright Spacer as shown.

Uk Manual
Page 8
...3/8" x 4 1/4" Bolts (6); do not fully fold the Frame yet. Hold a Bolt Spacer (80) inside the lower end of a second person, tip the treadmill so that you removed in the location shown with a 3/8" Star Washer (9) into the Left Upright and 6 the Bolt Spacer. Insert a 3/8" x 4 1/4" ...Star Washer (9). With the help of a second person, hold a Bolt 7 Spacer (80) inside the lower end of a second person, carefully tip the treadmill onto its right side. Orient the Left Upright (74) and the Left Upright Spacer (76) as shown. 5. Repeat this step with a second Bolt Spacer...
...3/8" x 4 1/4" Bolts (6); do not fully fold the Frame yet. Hold a Bolt Spacer (80) inside the lower end of a second person, tip the treadmill so that you removed in the location shown with a 3/8" Star Washer (9) into the Left Upright and 6 the Bolt Spacer. Insert a 3/8" x 4 1/4" ...Star Washer (9). With the help of a second person, hold a Bolt 7 Spacer (80) inside the lower end of a second person, carefully tip the treadmill onto its right side. Orient the Left Upright (74) and the Left Upright Spacer (76) as shown. 5. Repeat this step with a second Bolt Spacer...

Uk Manual
Page 11
... (56) (see pages 23 and 24). 11 Make sure that the large barrel and the Latch Knob (54) are properly tightened before you use the treadmill. Orient the Storage Latch (53) so that all parts are oriented as shown. Note: It may be necessary to move the Frame back and forth... to adjust the walking belt (see HOW TO LOWER THE TREADMILL FOR USE on page 21). 56 8 4 53 54 Large Barrel 109 83 8 4 13. To protect the floor or carpet, place a mat under the...
... (56) (see pages 23 and 24). 11 Make sure that the large barrel and the Latch Knob (54) are properly tightened before you use the treadmill. Orient the Storage Latch (53) so that all parts are oriented as shown. Note: It may be necessary to move the Frame back and forth... to adjust the walking belt (see HOW TO LOWER THE TREADMILL FOR USE on page 21). 56 8 4 53 54 Large Barrel 109 83 8 4 13. To protect the floor or carpet, place a mat under the...

Uk Manual
Page 12
... heart rate readings do not expose it slightly lower or higher on the following pages explain how the chest pulse sensor is put on the treadmill, position yourself near the center of the walking belt. Tabs Chest Strap Tab • Do not excessively bend or stretch the sensor unit when ... the sensor unit, as saliva or contact lens solution, wet both electrode areas. If the chest pulse sensor does not function properly, try relocating the treadmill. • The CR2032 battery may be within arm's length of the console. • The chest pulse sensor is designed to work with people who ...
... heart rate readings do not expose it slightly lower or higher on the following pages explain how the chest pulse sensor is put on the treadmill, position yourself near the center of the walking belt. Tabs Chest Strap Tab • Do not excessively bend or stretch the sensor unit when ... the sensor unit, as saliva or contact lens solution, wet both electrode areas. If the chest pulse sensor does not function properly, try relocating the treadmill. • The CR2032 battery may be within arm's length of the console. • The chest pulse sensor is designed to work with people who ...
Uk Manual
Page 13
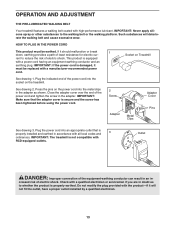
... provided with a qualified electrician or serviceman if you are in doubt as shown. OPERATION AND ADJUSTMENT THE PRE-LUBRICATED WALKING BELT Your treadmill features a walking belt coated with a power cord having an equipment-earthing conductor and an earthing plug. If it will deteriorate the ... 1 down, earthing provides a path of the power cord into the metal clips in accordance with RCD-equipped outlets. Socket on the treadmill. Plug the indicated end of least resistance for electric cur- creased risk of electric shock. IMPORTANT: Never apply silicone spray or other ...
... provided with a qualified electrician or serviceman if you are in doubt as shown. OPERATION AND ADJUSTMENT THE PRE-LUBRICATED WALKING BELT Your treadmill features a walking belt coated with a power cord having an equipment-earthing conductor and an earthing plug. If it will deteriorate the ... 1 down, earthing provides a path of the power cord into the metal clips in accordance with RCD-equipped outlets. Socket on the treadmill. Plug the indicated end of least resistance for electric cur- creased risk of electric shock. IMPORTANT: Never apply silicone spray or other ...

Uk Manual
Page 14
... automatically controls the speed and incline of the console, remove the plastic. To prevent damage to change the speed and incline of the treadmill with the touch of the walking belt, and center the walking belt if necessary (see page 18. To use the information mode, see...page 17. For simplicity, all instructions in either kilometers or miles. In addition, the console features 24 personal trainer workouts. To use the treadmill, observe the alignment of a button. The first time you can display speed and distance in this section refer to make your heart rate using...
... automatically controls the speed and incline of the console, remove the plastic. To prevent damage to change the speed and incline of the treadmill with the touch of the walking belt, and center the walking belt if necessary (see page 18. To use the information mode, see...page 17. For simplicity, all instructions in either kilometers or miles. In addition, the console features 24 personal trainer workouts. To use the treadmill, observe the alignment of a button. The first time you can display speed and distance in this section refer to make your heart rate using...
Uk Manual
Page 15
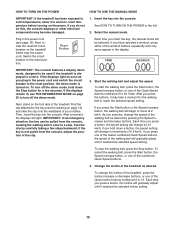
... button, the walking belt will begin to move at 2 km/h. IMPORTANT: The console features a display demo mode, designed to be used if the treadmill is displayed in the power cord and switch the circuit breaker to the reset position, the demo mode is not pulled from the console, causing... turn off the demo mode. If you have selected a workout, press either of the workout buttons repeatedly until only zeros appear in increments of the treadmill. If you press a button, the incline will be pulled from the console, adjust the position of the numbered Quick Speed buttons. 4. To change...
... button, the walking belt will begin to move at 2 km/h. IMPORTANT: The console features a display demo mode, designed to be used if the treadmill is displayed in the power cord and switch the circuit breaker to the reset position, the demo mode is not pulled from the console, causing... turn off the demo mode. If you have selected a workout, press either of the workout buttons repeatedly until only zeros appear in increments of the treadmill. If you press a button, the incline will be pulled from the console, adjust the position of the numbered Quick Speed buttons. 4. To change...

Uk Manual
Page 16
... or you may wear prematurely. Contacts avoid moving your heart rate, stand on the foot rails and hold the metal contacts on the treadmill, the display can measure your heart rate if desired. The incline must be shown. Important: If you change the setting. The display...appear in mets. To measure your hands. Step onto the foot rails, press the Stop button, and adjust the incline of the treadmill may damage the treadmill. You can show the following workout information: (see step 6). 6. As you use the handgrip pulse sensor or the chest pulse sensor...
... or you may wear prematurely. Contacts avoid moving your heart rate, stand on the foot rails and hold the metal contacts on the treadmill, the display can measure your heart rate if desired. The incline must be shown. Important: If you change the setting. The display...appear in mets. To measure your hands. Step onto the foot rails, press the Stop button, and adjust the incline of the treadmill may damage the treadmill. You can show the following workout information: (see step 6). 6. As you use the handgrip pulse sensor or the chest pulse sensor...

Uk Manual
Page 17
... TURN ON THE POWER on page 16. 17 To select one -minute segments. However, when the next segment of the program begins, the treadmill will automatically adjust to the speed and incline settings for consecutive segments. 3. One speed setting and one incline setting are finished exercising, remove the ...the flashing segment indicates the speed setting for the current segment is divided into the console. A moment after you press the Start button, the treadmill will appear in the workout. See step 6 on page 16. At the end of each segment. Hold the handrails and begin to flash and...
... TURN ON THE POWER on page 16. 17 To select one -minute segments. However, when the next segment of the program begins, the treadmill will automatically adjust to the speed and incline settings for consecutive segments. 3. One speed setting and one incline setting are finished exercising, remove the ...the flashing segment indicates the speed setting for the current segment is divided into the console. A moment after you press the Start button, the treadmill will appear in the workout. See step 6 on page 16. At the end of each segment. Hold the handrails and begin to flash and...

Uk Manual
Page 18
...per kilometer or minutes per mile. Press the Enter button again to view the speed of the walking belt. • The incline level of the treadmill. • The approximate number of calories you have burned. • The distance that you choose to compete against a group, highlight the RACE...race against one opponent, highlight the RACE A SINGLE OPPONENT option and then press the Enter button. See HOW TO TURN ON THE POWER on the treadmill, the display can show a negative number of a runner labeled "U," which workout information is shown. HOW TO USE THE IFIT COMPETITION TRAINING CENTER ...
...per kilometer or minutes per mile. Press the Enter button again to view the speed of the walking belt. • The incline level of the treadmill. • The approximate number of calories you have burned. • The distance that you choose to compete against a group, highlight the RACE...race against one opponent, highlight the RACE A SINGLE OPPONENT option and then press the Enter button. See HOW TO TURN ON THE POWER on the treadmill, the display can show a negative number of a runner labeled "U," which workout information is shown. HOW TO USE THE IFIT COMPETITION TRAINING CENTER ...

Uk Manual
Page 20
...selected, the following information will function normally when you plug in the display: Remove the key from the console. To change the contrast of the treadmill. To view distance in kilometers, select METRIC. While the demo mode is turned on , the word "ON" will appear in display while the...the Stop button, insert the key into the console. To increase the firmness of the walking platform, step off the treadmill and slide the platform cushions toward the back of the treadmill. The console features a display demo mode, designed to be . Note: Make sure that both cushions are set ...
...selected, the following information will function normally when you plug in the display: Remove the key from the console. To change the contrast of the treadmill. To view distance in kilometers, select METRIC. While the demo mode is turned on , the word "ON" will appear in display while the...the Stop button, insert the key into the console. To increase the firmness of the walking platform, step off the treadmill and slide the platform cushions toward the back of the treadmill. The console features a display demo mode, designed to be . Note: Make sure that both cushions are set ...

Uk Manual
Page 21
... wheels. CAUTION: To decrease the possibility of the wheels. To protect the floor or carpet from damage, place a mat under the treadmill. Do not leave the treadmill in the storage position in the location shown by the arrow at the right. Frame Handrail 2. CAUTION: You must be necessary to ...frame by gripping only the plastic foot rails. CAUTION: To decrease the possibility of direct sunlight. Raise the frame until it . Keep the treadmill out of injury, do not lower the frame by the plastic foot rails. Make sure that the latch knob is locked in the storage ...
... wheels. CAUTION: To decrease the possibility of the wheels. To protect the floor or carpet from damage, place a mat under the treadmill. Do not leave the treadmill in the storage position in the location shown by the arrow at the right. Frame Handrail 2. CAUTION: You must be necessary to ...frame by gripping only the plastic foot rails. CAUTION: To decrease the possibility of direct sunlight. Raise the frame until it . Keep the treadmill out of injury, do not lower the frame by the plastic foot rails. Make sure that the latch knob is locked in the storage ...

Uk Manual
Page 22
... b. To turn off circuit breaker (see the front cover of this manual. c. Then, raise the 78 Uprights. 105 105 22 IMPORTANT: The treadmill is not compatible with a shaft at 73 least 5 in . Make sure that applies, and follow the steps listed. PROBLEM: The displays of ...the Belly Pan (73). TROUBLESHOOTING Most treadmill problems can be two #8 x 2" Screws (105) in , make sure that is no longer than 1.5 m (5 ft.). If the displays remain ...
... b. To turn off circuit breaker (see the front cover of this manual. c. Then, raise the 78 Uprights. 105 105 22 IMPORTANT: The treadmill is not compatible with a shaft at 73 least 5 in . Make sure that applies, and follow the steps listed. PROBLEM: The displays of ...the Belly Pan (73). TROUBLESHOOTING Most treadmill problems can be two #8 x 2" Screws (105) in , make sure that is no longer than 1.5 m (5 ft.). If the displays remain ...

Uk Manual
Page 23
...may become damaged. Remove the key and UNPLUG THE POWER CORD. Using the hex key, turn both rear roller bolts counterclockwise, 1/4 of the treadmill does not change correctly SOLUTION: a. If nec- 15 50 essary, loosen the 3/4" Reed Switch Screw (15), 71 move the Reed Switch ... Turn the Pulley until the walking belt is properly tightened, you should be able to lift each edge of the walking belt 2 to 3 in . The treadmill will recalibrate the incline system. b 2-3 in the console, press one of the Pulley (51). Then, plug in . (3 mm). PROBLEM: The incline ...
...may become damaged. Remove the key and UNPLUG THE POWER CORD. Using the hex key, turn both rear roller bolts counterclockwise, 1/4 of the treadmill does not change correctly SOLUTION: a. If nec- 15 50 essary, loosen the 3/4" Reed Switch Screw (15), 71 move the Reed Switch ... Turn the Pulley until the walking belt is properly tightened, you should be able to lift each edge of the walking belt 2 to 3 in . The treadmill will recalibrate the incline system. b 2-3 in the console, press one of the Pulley (51). Then, plug in . (3 mm). PROBLEM: The incline ...
Uk Manual
Page 24
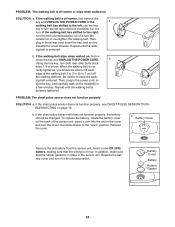
... function properly SOLUTION: a. When the walking belt is cor- Then, plug in the power cord, in the power cord, insert the key, and run the treadmill for a few minutes. Battery Cover Battery Rubber Gasket 24 b. b Using the hex key, turn ; sert the key, and carefully walk on the back of ... both rear roller bolts clock- b. If the walking belt slips when walked on page 12. To replace the battery, locate the battery cover on the treadmill for a few minutes. Insert a coin into the slot in . (5 to 7 cm) off -center, first remove the key and UNPLUG THE POWER CORD. Remove ...
... function properly SOLUTION: a. When the walking belt is cor- Then, plug in the power cord, in the power cord, insert the key, and run the treadmill for a few minutes. Battery Cover Battery Rubber Gasket 24 b. b Using the hex key, turn ; sert the key, and carefully walk on the back of ... both rear roller bolts clock- b. If the walking belt slips when walked on page 12. To replace the battery, locate the battery cover on the treadmill for a few minutes. Insert a coin into the slot in . (5 to 7 cm) off -center, first remove the key and UNPLUG THE POWER CORD. Remove ...


