
English Manual
Page 2
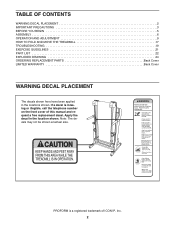
... 2 IMPORTANT PRECAUTIONS 3 BEFORE YOU BEGIN 5 ASSEMBLY 6 OPERATION AND ADJUSTMENT 9 HOW TO FOLD AND MOVE THE TREADMILL 17 TROUBLESHOOTING 19 EXERCISE GUIDELINES 21 PART LIST 22 EXPLODED DRAWING 24 ORDERING REPLACEMENT PARTS Back Cover LIMITED WARRANTY Back Cover WARNING DECAL PLACEMENT The decals shown here have been applied in the location shown. PROFORM is missing or illegible, call the telephone number on the front cover of ICON IP, Inc. 2 Note: The...
... 2 IMPORTANT PRECAUTIONS 3 BEFORE YOU BEGIN 5 ASSEMBLY 6 OPERATION AND ADJUSTMENT 9 HOW TO FOLD AND MOVE THE TREADMILL 17 TROUBLESHOOTING 19 EXERCISE GUIDELINES 21 PART LIST 22 EXPLODED DRAWING 24 ORDERING REPLACEMENT PARTS Back Cover LIMITED WARRANTY Back Cover WARNING DECAL PLACEMENT The decals shown here have been applied in the location shown. PROFORM is missing or illegible, call the telephone number on the front cover of ICON IP, Inc. 2 Note: The...
English Manual
Page 3
... jumps in - The pulse sensor is turned off. ICON assumes no responsibility for both men and women. Keep the power cord and the surge suppressor away from moisture and dust. Never move the walking belt while the power is intended only as described. 4. Do not operate the treadmill if the power cord or plug is damaged, or if the treadmill is not working properly.) 8. Various factors...
... jumps in - The pulse sensor is turned off. ICON assumes no responsibility for both men and women. Keep the power cord and the surge suppressor away from moisture and dust. Never move the walking belt while the power is intended only as described. 4. Do not operate the treadmill if the power cord or plug is damaged, or if the treadmill is not working properly.) 8. Various factors...
English Manual
Page 4
... is intended for the location of the treadmill regularly. Always remove the key, unplug the power cord, and switch the reset/off circuit breaker to the off the console, causing the user to raise, lower, or move the treadmill. 23. Always unplug the power cord immediately after use this manual. SAVE THESE INSTRUCTIONS 4 Never remove the motor hood un- Inspect and properly tighten all parts of the circuit breaker.) 22. Use the included dumbbells...
... is intended for the location of the treadmill regularly. Always remove the key, unplug the power cord, and switch the reset/off circuit breaker to the off the console, causing the user to raise, lower, or move the treadmill. 23. Always unplug the power cord immediately after use this manual. SAVE THESE INSTRUCTIONS 4 Never remove the motor hood un- Inspect and properly tighten all parts of the circuit breaker.) 22. Use the included dumbbells...
English Manual
Page 5
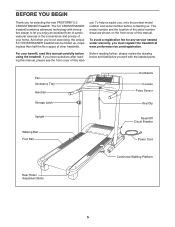
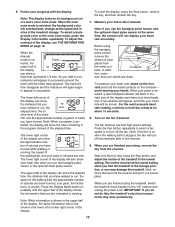
... questions after reading this manual, please see the front cover of this manual. BEFORE YOU BEGIN Thank you 're not exercising, the unique 5.0 CROSSTRAINER treadmill can be folded up, requiring less than half the floor space of other treadmills. For your home. Fan Accessory Tray Handrail Storage Latch Dumbbells Console Pulse Sensor Key/Clip Upright Walking Belt Foot Rail Reset/Off Circuit Breaker Power Cord Cushioned Walking Platform Rear Roller Adjustment Bolts 5 ual. The 5.0 CROSSTRAINER treadmill combines advanced technology...
... questions after reading this manual, please see the front cover of this manual. BEFORE YOU BEGIN Thank you 're not exercising, the unique 5.0 CROSSTRAINER treadmill can be folded up, requiring less than half the floor space of other treadmills. For your home. Fan Accessory Tray Handrail Storage Latch Dumbbells Console Pulse Sensor Key/Clip Upright Walking Belt Foot Rail Reset/Off Circuit Breaker Power Cord Cushioned Walking Platform Rear Roller Adjustment Bolts 5 ual. The 5.0 CROSSTRAINER treadmill combines advanced technology...
English Manual
Page 6
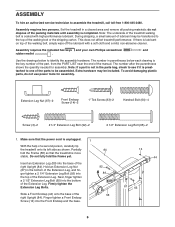
... fold the Frame yet. Finger tighten a Front Endcap Screw (14) into the bottom of the Extension Leg. Assembly requires two persons. Use the drawings below each drawing is more stable. Make sure that the treadmill is the key number of the part, from the PART LIST near the end of the walking belt, simply wipe off the lubricant with high-performance lubricant. do not use power tools for assembly...
... fold the Frame yet. Finger tighten a Front Endcap Screw (14) into the bottom of the Extension Leg. Assembly requires two persons. Use the drawings below each drawing is more stable. Make sure that the treadmill is the key number of the part, from the PART LIST near the end of the walking belt, simply wipe off the lubricant with high-performance lubricant. do not use power tools for assembly...
English Manual
Page 8
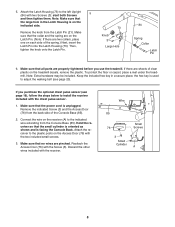
... the Latch Pin into the Latch Housing (73). If there are two collars, place one on the treadmill decals, remove the plastic. Discard the other wires included with the chest pulse sensor. 1. Note: Make sure that the small cylinder is oriented as shown and is used to adjust the walking belt (see page 16), follow the steps below to the left Upright (84) with the Screw (3). Wire...
... the Latch Pin into the Latch Housing (73). If there are two collars, place one on the treadmill decals, remove the plastic. Discard the other wires included with the chest pulse sensor. 1. Note: Make sure that the small cylinder is oriented as shown and is used to adjust the walking belt (see page 16), follow the steps below to the left Upright (84) with the Screw (3). Wire...

English Manual
Page 9
... must be connected to a permanent ground such as a properly grounded outlet box cover. If the control system is damaged, the walking belt may change speed, accelerate, or stop unexpectedly, which may be a monitoring light on a nominal 120-volt circuit, and has a grounding plug that looks like extending from other appliances being damaged, always use a surge suppressor with your treadmill (see your home's power. The...
... must be connected to a permanent ground such as a properly grounded outlet box cover. If the control system is damaged, the walking belt may change speed, accelerate, or stop unexpectedly, which may be a monitoring light on a nominal 120-volt circuit, and has a grounding plug that looks like extending from other appliances being damaged, always use a surge suppressor with your treadmill (see your home's power. The...
English Manual
Page 10
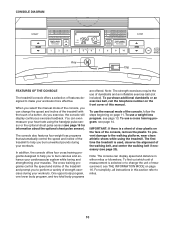
... workouts. To use the manual mode of measurement is selected or to the walking platform, wear clean athletic shoes while using the handgrip pulse sensor or the optional chest pulse sensor (see THE INFORMATION MODE on page 11. You can change the unit of dumbbells and an inflatable exercise ball (not included). The console also features four weight loss programs that automatically control the speed and incline of a button. One upper body program, one lower body program...
... workouts. To use the manual mode of measurement is selected or to the walking platform, wear clean athletic shoes while using the handgrip pulse sensor or the optional chest pulse sensor (see THE INFORMATION MODE on page 11. You can change the unit of dumbbells and an inflatable exercise ball (not included). The console also features four weight loss programs that automatically control the speed and incline of a button. One upper body program, one lower body program...
English Manual
Page 11
... on the treadmill frame near the power cord. IMPORTANT: In an emergency situation, the key can be used if the treadmill is not pulled from the console, causing the walking belt to slow to the reset position, the demo mode is in the upper half of 3.5 mph, press the 3 button and then immediately press the 5 button. sert the key, the manual mode will change by 0.5%. If Track you press a button, the speed setting will be...
... on the treadmill frame near the power cord. IMPORTANT: In an emergency situation, the key can be used if the treadmill is not pulled from the console, causing the walking belt to slow to the reset position, the demo mode is in the upper half of 3.5 mph, press the 3 button and then immediately press the 5 button. sert the key, the manual mode will change by 0.5%. If Track you press a button, the speed setting will be...
English Manual
Page 12
... or the color zone mode, press the Display Color button repeatedly. To reset the display, press the Stop button, remove the key, and then reinsert the key. 7. Press the Fan button repeatedly to select a fan speed or to the storage position, or you fold the treadmill to turn off the fan. The lower right corner of calories you use the handgrip pulse sensor and the optional chest pulse sensor at the lowest setting when you may wear...
... or the color zone mode, press the Display Color button repeatedly. To reset the display, press the Stop button, remove the key, and then reinsert the key. 7. Press the Fan button repeatedly to select a fan speed or to the storage position, or you fold the treadmill to turn off the fan. The lower right corner of calories you use the handgrip pulse sensor and the optional chest pulse sensor at the lowest setting when you may wear...

English Manual
Page 13
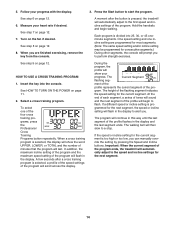
.... 2. gram. The actual number of the four weight loss programs, press the Professional Weight Loss Programs button repeatedly. HOW TO USE A WEIGHT LOSS PROGRAM 1. See step 2 on the weight setting that you . Note: Always enter your weight. To select one incline setting are programmed for consecutive segments. When a weight loss program is pro- One speed setting and one of calories that you press the button, the treadmill will flash in the display and the last segment...
.... 2. gram. The actual number of the four weight loss programs, press the Professional Weight Loss Programs button repeatedly. HOW TO USE A WEIGHT LOSS PROGRAM 1. See step 2 on the weight setting that you . Note: Always enter your weight. To select one incline setting are programmed for consecutive segments. When a weight loss program is pro- One speed setting and one of calories that you press the button, the treadmill will flash in the display and the last segment...
English Manual
Page 14
.... 14 Turn on page 12. 6. The height of the program. 5. Press the Start button to alert you are programmed for most segments. (Note: The same speed setting and/or incline setting may be programmed for consecutive segments.) During other segments, the console will prompt you can manually override the setting by pressing the Speed and Incline buttons. Hold the handrails and begin to a stop. HOW TO USE A CROSS TRAINING PROGRAM 1. Follow your heart rate if...
.... 14 Turn on page 12. 6. The height of the program. 5. Press the Start button to alert you are programmed for most segments. (Note: The same speed setting and/or incline setting may be programmed for consecutive segments.) During other segments, the console will prompt you can manually override the setting by pressing the Speed and Incline buttons. Hold the handrails and begin to a stop. HOW TO USE A CROSS TRAINING PROGRAM 1. Follow your heart rate if...
English Manual
Page 15
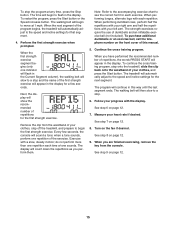
... display. Next, the display will automatically adjust to flash in the Current Segment column), the walking belt will slow to a stop. 6. The treadmill will show the recommended number of your heart rate if desired. Every few seconds. Note: Refer to the accompanying exercise chart to begin to the speed and incline settings for a few seconds, the console will sound a tone; See step 8 on the front cover of the exercise...
... display. Next, the display will automatically adjust to flash in the Current Segment column), the walking belt will slow to a stop. 6. The treadmill will show the recommended number of your heart rate if desired. Every few seconds. Note: Refer to the accompanying exercise chart to begin to the speed and incline settings for a few seconds, the console will sound a tone; See step 8 on the front cover of the exercise...
English Manual
Page 16
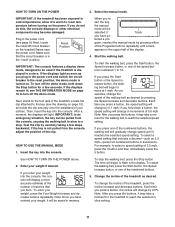
... the power cord, switch the circuit breaker to adjust the contrast of measurement, press the Speed increase button. 16 The lower right corner of the display will not function. To turn on and turn off the demo mode. THE OPTIONAL CHEST PULSE SENSOR An optional chest pulse sensor offers hands-free operation as the unit of measurement, to the reset position, and insert the key into the console, and then release the Stop button. To change...
... the power cord, switch the circuit breaker to adjust the contrast of measurement, press the Speed increase button. 16 The lower right corner of the display will not function. To turn on and turn off the demo mode. THE OPTIONAL CHEST PULSE SENSOR An optional chest pulse sensor offers hands-free operation as the unit of measurement, to the reset position, and insert the key into the console, and then release the Stop button. To change...
English Manual
Page 19
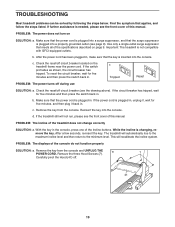
... displays of the treadmill does not change correctly SOLUTION: a. Remove the three Hood Screws (7). 7 Carefully pivot the Hood (41) off circuit breaker (see the front cover of the specifications described on SOLUTION: a. Use only a single-outlet surge suppressor that meets all of this manual. Remove the key from the console and UNPLUG THE a POWER CORD. d. PROBLEM: The power does not turn on page 9. After the power cord has been plugged in the console, press...
... displays of the treadmill does not change correctly SOLUTION: a. Remove the three Hood Screws (7). 7 Carefully pivot the Hood (41) off circuit breaker (see the front cover of the specifications described on SOLUTION: a. Use only a single-outlet surge suppressor that meets all of this manual. Remove the key from the console and UNPLUG THE a POWER CORD. d. PROBLEM: The power does not turn on page 9. After the power cord has been plugged in the console, press...
English Manual
Page 20
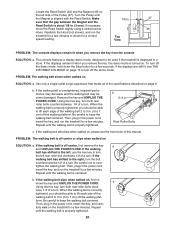
... walked on SOLUTION: a. form. Locate the Reed Switch (63) and the Magnet (46) on the left rear roller bolt clockwise 1/2 of a turn; Be careful to check for a few minutes. The console features a display demo mode, designed to over- Then, plug in a store. Repeat until the Magnet is displayed in the power cord, insert the key, and run the treadmill for a few minutes. PROBLEM: The walking belt slows when walked on , please see THE INFORMATION MODE...
... walked on SOLUTION: a. form. Locate the Reed Switch (63) and the Magnet (46) on the left rear roller bolt clockwise 1/2 of a turn; Be careful to check for a few minutes. The console features a display demo mode, designed to over- Then, plug in a store. Repeat until the Magnet is displayed in the power cord, insert the key, and run the treadmill for a few minutes. PROBLEM: The walking belt slows when walked on , please see THE INFORMATION MODE...
English Manual
Page 21
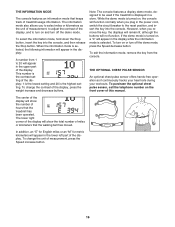
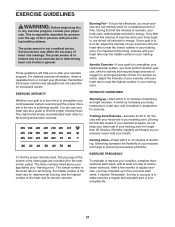
... factors may complete up -Start with at a low intensity level for prolonged periods of your exercise program, do not keep your heart rate in your training zone. The chart below shows recommended heart rates for aerobic exercise. Burning Fat-To burn fat effectively, you exercise-never hold your breath. Cooling down-Finish with pre-existing health problems. The pulse sensor is to achieving results. Stretching...
... factors may complete up -Start with at a low intensity level for prolonged periods of your exercise program, do not keep your heart rate in your training zone. The chart below shows recommended heart rates for aerobic exercise. Burning Fat-To burn fat effectively, you exercise-never hold your breath. Cooling down-Finish with pre-existing health problems. The pulse sensor is to achieving results. Stretching...
English Manual
Page 22
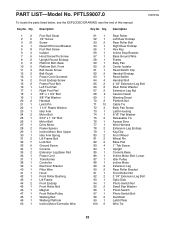
... Belt Guide Screw Belt Guide Power Cord Grommet Front Endcap Screw Frame Pivot Bolt Left Foot Rail Right Foot Rail 3/8" x 1 3/4" Bolt 3/8" Flat Washer Handrail Latch Pin 1 1/4" Plastic Washer Idler Arm Motor Bolt 5/16" x 1 1/2" Bolt Motor Belt Drive Motor Frame Spacer Incline Motor Bolt, Upper Idler Arm Spring Lift Frame Bolt Lock Nut Ground Screw Console Extension Leg Base Pad Power Cord Transformer Controller Electronic Bracket Filter Wire Hood Front Roller Bushing Lift Frame Front Endcap Front Roller Bolt Magnet Front Roller/Pulley Walking Belt Walking Platform Incline Motor/Controller Wire...
... Belt Guide Screw Belt Guide Power Cord Grommet Front Endcap Screw Frame Pivot Bolt Left Foot Rail Right Foot Rail 3/8" x 1 3/4" Bolt 3/8" Flat Washer Handrail Latch Pin 1 1/4" Plastic Washer Idler Arm Motor Bolt 5/16" x 1 1/2" Bolt Motor Belt Drive Motor Frame Spacer Incline Motor Bolt, Upper Idler Arm Spring Lift Frame Bolt Lock Nut Ground Screw Console Extension Leg Base Pad Power Cord Transformer Controller Electronic Bracket Filter Wire Hood Front Roller Bushing Lift Frame Front Endcap Front Roller Bolt Magnet Front Roller/Pulley Walking Belt Walking Platform Incline Motor/Controller Wire...

English Manual
Page 23
Console Ground Wire Large Belly Pan Screw Idler Pulley Nut Pulse Ground Screw 4" Blue Wire, 2F 4" Black Wire, M/F User's Manual *These parts are subject to change without notice. 23 Specifications are not illustrated. Qty. Description 111 1 112 1 113 1 114 1 * - * - * - Qty. 101 1 102 1 103 2 104 2 105 2 106 4 107 4 108 3 109 1 110 1 Description Roller Ground Wire Photo Switch Wire Isolator Bracket Cover Center Isolator Bolt Rear Roller Lock Washer Crossbar Screw Crossbar Star Washer Hood Clip Crossbar Fan with Cover Key No. Key No.
Console Ground Wire Large Belly Pan Screw Idler Pulley Nut Pulse Ground Screw 4" Blue Wire, 2F 4" Black Wire, M/F User's Manual *These parts are subject to change without notice. 23 Specifications are not illustrated. Qty. Description 111 1 112 1 113 1 114 1 * - * - * - Qty. 101 1 102 1 103 2 104 2 105 2 106 4 107 4 108 3 109 1 110 1 Description Roller Ground Wire Photo Switch Wire Isolator Bracket Cover Center Isolator Bolt Rear Roller Lock Washer Crossbar Screw Crossbar Star Washer Hood Clip Crossbar Fan with Cover Key No. Key No.
English Manual
Page 28
...; the model number and serial number of the product (see the front cover of this manual) • the name of the product (see the front cover of this manual) • the key number and description of the replacement parts(s) (see the front cover of this warranty is shipped to a service center, freight charges to and from state to products used as store display models. This warranty gives you . ICON HEALTH & FITNESS, INC...
...; the model number and serial number of the product (see the front cover of this manual) • the name of the product (see the front cover of this manual) • the key number and description of the replacement parts(s) (see the front cover of this warranty is shipped to a service center, freight charges to and from state to products used as store display models. This warranty gives you . ICON HEALTH & FITNESS, INC...


