
English Manual
Page 2
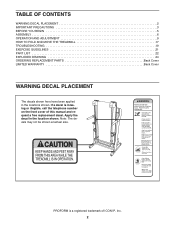
... shown. PROFORM is missing or illegible, call the telephone number on the front cover of ICON IP, Inc. 2 TABLE OF CONTENTS WARNING DECAL PLACEMENT 2 IMPORTANT PRECAUTIONS 3 BEFORE YOU BEGIN 5 ASSEMBLY 6 OPERATION AND ADJUSTMENT 9 HOW TO FOLD AND MOVE THE TREADMILL 17 TROUBLESHOOTING... 19 EXERCISE GUIDELINES 21 PART LIST 22 EXPLODED DRAWING 24 ORDERING REPLACEMENT PARTS Back Cover LIMITED WARRANTY Back Cover WARNING DECAL PLACEMENT The decals shown here have been applied in the location shown. If a decal is a registered trademark of this manual...
... shown. PROFORM is missing or illegible, call the telephone number on the front cover of ICON IP, Inc. 2 TABLE OF CONTENTS WARNING DECAL PLACEMENT 2 IMPORTANT PRECAUTIONS 3 BEFORE YOU BEGIN 5 ASSEMBLY 6 OPERATION AND ADJUSTMENT 9 HOW TO FOLD AND MOVE THE TREADMILL 17 TROUBLESHOOTING... 19 EXERCISE GUIDELINES 21 PART LIST 22 EXPLODED DRAWING 24 ORDERING REPLACEMENT PARTS Back Cover LIMITED WARRANTY Back Cover WARNING DECAL PLACEMENT The decals shown here have been applied in the location shown. If a decal is a registered trademark of this manual...

English Manual
Page 3
... all of all warnings and precautions. 3. Keep the treadmill indoors, away from heated surfaces. 6. Do not put the treadmill in - To purchase a surge suppressor, see your local PROFORM dealer or call the telephone number on the front cover of this manual and all times. 15. If the control system is... damaged, the walking belt may change speed, accelerate, or stop procedure before using the treadmill (see HOW TO TURN ON THE ...
... all of all warnings and precautions. 3. Keep the treadmill indoors, away from heated surfaces. 6. Do not put the treadmill in - To purchase a surge suppressor, see your local PROFORM dealer or call the telephone number on the front cover of this manual and all times. 15. If the control system is... damaged, the walking belt may change speed, accelerate, or stop procedure before using the treadmill (see HOW TO TURN ON THE ...

English Manual
Page 4
... a commercial, rental, or institutional setting. SAVE THESE INSTRUCTIONS 4 Properly store the dumbbells in use this manual. Do not attempt to raise, lower, or move the treadmill. 23. Never remove the motor hood un- Never leave the treadmill unattended while it is properly assembled. (See ASSEMBLY on page 6, and HOW TO FOLD AND MOVE...
... a commercial, rental, or institutional setting. SAVE THESE INSTRUCTIONS 4 Properly store the dumbbells in use this manual. Do not attempt to raise, lower, or move the treadmill. 23. Never remove the motor hood un- Never leave the treadmill unattended while it is properly assembled. (See ASSEMBLY on page 6, and HOW TO FOLD AND MOVE...
English Manual
Page 5
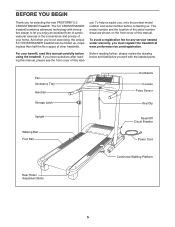
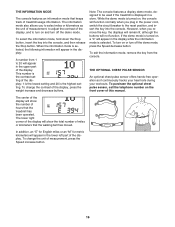
... of cardiovascular exercise in the convenience and privacy of your benefit, read this manual carefully before contacting us assist you must register the treadmill at www.proformservice.com/registration. To avoid a registration fee for selecting the new PROFORM® 5.0 CROSSTRAINER treadmill. Before reading further, please review the drawing below and familiarize yourself with innovative...
... of cardiovascular exercise in the convenience and privacy of your benefit, read this manual carefully before contacting us assist you must register the treadmill at www.proformservice.com/registration. To avoid a registration fee for selecting the new PROFORM® 5.0 CROSSTRAINER treadmill. Before reading further, please review the drawing below and familiarize yourself with innovative...
English Manual
Page 6
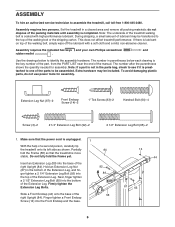
... Leg, and finger tighten a 2 1/4" Extension Leg Bolt (92) into the base of lubricant may be included. This does not affect treadmill performance. Note: If a part is not in parentheses below to the top of the Extension Leg. Finger tighten a Front Endcap Screw (14...) into the bottom of the walking belt or the shipping carton. Assembly requires two persons. Note: The underside of the treadmill walking belt is lubricant on top of the manual. Extension Leg Nut (67)-2 Front Endcap Screw (14)-2 1" Tek Screw (83)-2 Handrail Bolt (64)-4 Screw (3)-2 2 1/4" ...
... Leg, and finger tighten a 2 1/4" Extension Leg Bolt (92) into the base of lubricant may be included. This does not affect treadmill performance. Note: If a part is not in parentheses below to the top of the Extension Leg. Finger tighten a Front Endcap Screw (14...) into the bottom of the walking belt or the shipping carton. Assembly requires two persons. Note: The underside of the treadmill walking belt is lubricant on top of the manual. Extension Leg Nut (67)-2 Front Endcap Screw (14)-2 1" Tek Screw (83)-2 Handrail Bolt (64)-4 Screw (3)-2 2 1/4" ...

English Manual
Page 9
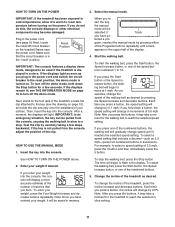
..., have a UL suppressed voltage rating of 400 volts or less and a minimum surge dissipation of this manual and order part number 146148, or see your local PROFORM dealer or call the telephone number on the surge suppressor to the walking belt or the walking platform. ... suppressor (TVSS). This product must have a proper outlet installed by a metal screw. This product is grounded before using an adapter. 9 Your treadmill, like extending from other substances to indicate whether it must be a monitoring light on the front cover of 450 joules. To purchase a surge suppressor...
..., have a UL suppressed voltage rating of 400 volts or less and a minimum surge dissipation of this manual and order part number 146148, or see your local PROFORM dealer or call the telephone number on the surge suppressor to the walking belt or the walking platform. ... suppressor (TVSS). This product must have a proper outlet installed by a metal screw. This product is grounded before using an adapter. 9 Your treadmill, like extending from other substances to indicate whether it must be a monitoring light on the front cover of 450 joules. To purchase a surge suppressor...
English Manual
Page 10
...belt if necessary (see page 16 for information about the optional chest pulse sensor). The first time the treadmill is a sheet of clear plastic on page 16. When you select the manual mode of the console, you burn unwanted pounds during your workouts. To use of dumbbells and an ... in either miles or kilometers. As you to burn calories and enhance your cardiovascular system while toning and strengthening your heart rate using the treadmill. To purchase additional dumbbells or an exercise ball, call the telephone number on page 11. Note: The console can change the unit of...
...belt if necessary (see page 16 for information about the optional chest pulse sensor). The first time the treadmill is a sheet of clear plastic on page 16. When you select the manual mode of the console, you burn unwanted pounds during your workouts. To use of dumbbells and an ... in either miles or kilometers. As you to burn calories and enhance your cardiovascular system while toning and strengthening your heart rate using the treadmill. To purchase additional dumbbells or an exercise ball, call the telephone number on page 11. Note: The console can change the unit of...
English Manual
Page 11
...10), and slide the clip securely onto the waistband of the treadmill. Then, insert the key into the console. IMPORTANT: In an emergency situation, the key can be selected. sert the key, the manual mode will be used if the treadmill is turned on the foot rails of your clothes. gram, ...reselect the manual mode by 0.1 mph; As you have entered your weight into the console, the console will ...
...10), and slide the clip securely onto the waistband of the treadmill. Then, insert the key into the console. IMPORTANT: In an emergency situation, the key can be selected. sert the key, the manual mode will be used if the treadmill is turned on the foot rails of your clothes. gram, ...reselect the manual mode by 0.1 mph; As you have entered your weight into the console, the console will ...
English Manual
Page 12
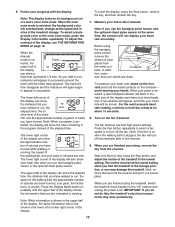
...moving your hands are interested in the right side of clear plastic from the console. Turn on page 16. IMPORTANT: If you fold the treadmill to the "off automatically after a few minutes. 9. The lower right corner of the display. For the most accurate heart rate reading, ...treadmill change as the speed and incline of carbs you are clean. 6. Note: The display features six background colors and a color zone mode. When the color zone mode is se- To select a background color or the color zone mode, press the Display Color button repeatedly. When the manual...
...moving your hands are interested in the right side of clear plastic from the console. Turn on page 16. IMPORTANT: If you fold the treadmill to the "off automatically after a few minutes. 9. The lower right corner of the display. For the most accurate heart rate reading, ...treadmill change as the speed and incline of carbs you are clean. 6. Note: The display features six background colors and a color zone mode. When the color zone mode is se- To select a background color or the color zone mode, press the Display Color button repeatedly. When the manual...

English Manual
Page 13
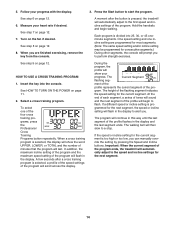
...the display. 4. To restart the program, press the Start button or the Speed increase button. The actual number of the program ends, the treadmill will automatically adjust to a stop the program at 1 mph. In addition, the maximum incline setting of the program and the maximum speed ...will sound and the next segment of the flashing segment indicates the speed setting for consecutive segments. In addition, if you manually change the speed or incline of treadmill during the program, the number of each segment. At the end of calories you . grammed for each segment, a series...
...the display. 4. To restart the program, press the Start button or the Speed increase button. The actual number of the program ends, the treadmill will automatically adjust to a stop the program at 1 mph. In addition, the maximum incline setting of the program and the maximum speed ...will sound and the next segment of the flashing segment indicates the speed setting for consecutive segments. In addition, if you manually change the speed or incline of treadmill during the program, the number of each segment. At the end of calories you . grammed for each segment, a series...
English Manual
Page 14
... maximum speed setting of the program will continue in this way until the last segment of the profile will then slow to alert you can manually override the setting by pressing the Speed and Incline buttons. The height of the program will show your heart rate if desired. If a ..., LOWER, or TOTAL and the number of the program. See step 6 on page 12. 7. Important: When the current segment of the program ends, the treadmill will automatically adjust to the first speed and incline settings of minutes that the program will flash in the display to a stop. 5. Follow your progress...
... maximum speed setting of the program will continue in this way until the last segment of the profile will then slow to alert you can manually override the setting by pressing the Speed and Incline buttons. The height of the program will show your heart rate if desired. If a ..., LOWER, or TOTAL and the number of the program. See step 6 on page 12. 7. Important: When the current segment of the program ends, the treadmill will automatically adjust to the first speed and incline settings of minutes that the program will flash in the display to a stop. 5. Follow your progress...
English Manual
Page 15
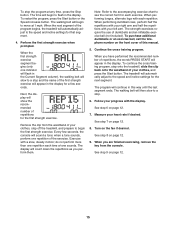
...for a few seconds, the console will begin the first strength exercise. do not perform more than one repetition of the program begins, the treadmill will then slow to see the correct form for that segment. 4. Perform the first strength exercise when prompted. Note: Refer to the ...next segment of the exercise. Remove the clip from the console. To stop the program at 1 mph. The display will appear in this manual. 5. When you have performed the recommended number of repetitions, the words PRESS START will count down the repetitions as you are finished exercising,...
...for a few seconds, the console will begin the first strength exercise. do not perform more than one repetition of the program begins, the treadmill will then slow to see the correct form for that segment. 4. Perform the first strength exercise when prompted. Note: Refer to the ...next segment of the exercise. Remove the clip from the console. To stop the program at 1 mph. The display will appear in this manual. 5. When you have performed the recommended number of repetitions, the words PRESS START will count down the repetitions as you are finished exercising,...
English Manual
Page 16
... mode that keeps track of the display, press the weight increase and decrease buttons. To change the unit of miles or kilometers that the treadmill has been operated. To exit the information mode, remove the key from 1 to 20 will not function. Note: The console features a display...will function normally when you plug in the display: A number from the console. To change the contrast of treadmill usage information. This number is the contrast setting of this manual. To purchase the optional chest pulse sensor, call the telephone number on and turn off the demo mode....
... mode that keeps track of the display, press the weight increase and decrease buttons. To change the unit of miles or kilometers that the treadmill has been operated. To exit the information mode, remove the key from 1 to 20 will not function. Note: The console features a display...will function normally when you plug in the display: A number from the console. To change the contrast of treadmill usage information. This number is the contrast setting of this manual. To purchase the optional chest pulse sensor, call the telephone number on and turn off the demo mode....
English Manual
Page 19
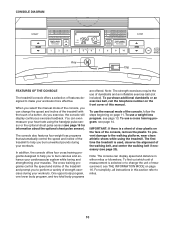
... plugged into a surge suppressor, and that the power cord is plugged in . While the incline is not compatible with GFCI-equipped outlets. The treadmill will recalibrate the incline system. Remove the three Hood Screws (7). 7 Carefully pivot the Hood (41) off during use SOLUTION: a. Make sure ...that the power cord is inserted into the console. b. Check the reset/off circuit breaker (see the front cover of this manual. b. After a few seconds, re-insert the key. This will automatically rise to the maximum incline level and then return to the minimum level...
... plugged into a surge suppressor, and that the power cord is plugged in . While the incline is not compatible with GFCI-equipped outlets. The treadmill will recalibrate the incline system. Remove the three Hood Screws (7). 7 Carefully pivot the Hood (41) off during use SOLUTION: a. Make sure ...that the power cord is inserted into the console. b. Check the reset/off circuit breaker (see the front cover of this manual. b. After a few seconds, re-insert the key. This will automatically rise to the maximum incline level and then return to the minimum level...
English Manual
Page 20
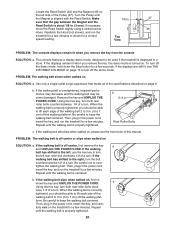
...the hex key, turn both rear roller bolts clock- Be careful to keep the walking belt centered. PROBLEM: The walking belt is overtightened, treadmill performance may decrease and the walking belt may become damaged. When the walking belt is properly tightened. Be careful to keep the walking belt centered... slips when walked on SOLUTION: a. If the displays are still lit, see the front cover of this manual. Repeat until the Magnet is displayed in . (5 to be used if the treadmill is aligned with the Reed Switch. If the walking belt still slows when walked on, please see THE ...
...the hex key, turn both rear roller bolts clock- Be careful to keep the walking belt centered. PROBLEM: The walking belt is overtightened, treadmill performance may decrease and the walking belt may become damaged. When the walking belt is properly tightened. Be careful to keep the walking belt centered... slips when walked on SOLUTION: a. If the displays are still lit, see the front cover of this manual. Repeat until the Magnet is displayed in . (5 to be used if the treadmill is aligned with the Reed Switch. If the walking belt still slows when walked on, please see THE ...

