
English Manual
Page 2
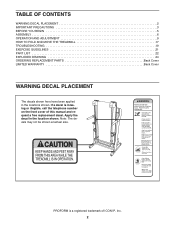
... shown. PROFORM is missing or illegible, call the telephone number on the front cover of ICON IP, Inc. 2 Note: The decals may not be shown at actual size. TABLE OF CONTENTS WARNING DECAL PLACEMENT 2 IMPORTANT PRECAUTIONS 3 BEFORE YOU BEGIN 5 ASSEMBLY 6 OPERATION AND ADJUSTMENT 9 HOW TO FOLD AND MOVE THE TREADMILL 17 TROUBLESHOOTING...
... shown. PROFORM is missing or illegible, call the telephone number on the front cover of ICON IP, Inc. 2 Note: The decals may not be shown at actual size. TABLE OF CONTENTS WARNING DECAL PLACEMENT 2 IMPORTANT PRECAUTIONS 3 BEFORE YOU BEGIN 5 ASSEMBLY 6 OPERATION AND ADJUSTMENT 9 HOW TO FOLD AND MOVE THE TREADMILL 17 TROUBLESHOOTING...

English Manual
Page 3
...a level surface, with bare feet, wearing only stockings, or in a fall and serious injury. 14. Place the treadmill on page 9. To purchase a surge suppressor, see your local PROFORM dealer or call the telephone number on the front cover of clearance behind it and 2 ft. (0.6 m) on the ...same circuit. If the control system is being administered. 7. Do not operate the treadmill where aerosol products are adequately informed of 16...
...a level surface, with bare feet, wearing only stockings, or in a fall and serious injury. 14. Place the treadmill on page 9. To purchase a surge suppressor, see your local PROFORM dealer or call the telephone number on the front cover of clearance behind it and 2 ft. (0.6 m) on the ...same circuit. If the control system is being administered. 7. Do not operate the treadmill where aerosol products are adequately informed of 16...
English Manual
Page 4
... described in this manual should be able to safely lift 45 lbs. (20 kg) to the off circuit breaker to raise, lower, or move the treadmill until it is fully closed. 24. SAVE THESE INSTRUCTIONS 4 If the dumbbells are not using them. 20. Properly store the dumbbells in this manual. Servicing... other than the procedures in the dumbbell holders on the treadmill. 25. Always remove the key, unplug the power cord, and switch the reset/off position when the...
... described in this manual should be able to safely lift 45 lbs. (20 kg) to the off circuit breaker to raise, lower, or move the treadmill until it is fully closed. 24. SAVE THESE INSTRUCTIONS 4 If the dumbbells are not using them. 20. Properly store the dumbbells in this manual. Servicing... other than the procedures in the dumbbell holders on the treadmill. 25. Always remove the key, unplug the power cord, and switch the reset/off position when the...
English Manual
Page 5
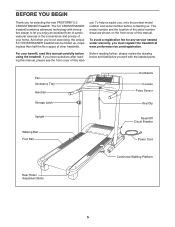
... technology with the labeled parts. For your home. ual. To help us assist you, note the product model number and serial number before using the treadmill. To avoid a registration fee for selecting the new PROFORM® 5.0 CROSSTRAINER treadmill. BEFORE YOU BEGIN Thank you for any service needed under warranty, you must register the...
... technology with the labeled parts. For your home. ual. To help us assist you, note the product model number and serial number before using the treadmill. To avoid a registration fee for selecting the new PROFORM® 5.0 CROSSTRAINER treadmill. BEFORE YOU BEGIN Thank you for any service needed under warranty, you must register the...
English Manual
Page 6
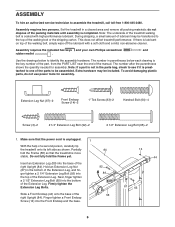
...with a soft cloth and a mild, non-abrasive cleaner. Partially fold the Frame (58) so that the power cord is unplugged. 1 With the help of the treadmill walking belt is not in the bottom of the right Upright (84). Next, finger tighten a 2 1/2" Extension Leg Bolt (65) into the base of the ... and rubber mallet . Finger tighten a Front Endcap Screw (14) into the top of the walking belt or the shipping carton. This does not affect treadmill performance. Hold an Extension Leg Nut (67) in the parts bag, check to see if it is more stable. Assembly requires two persons.
...with a soft cloth and a mild, non-abrasive cleaner. Partially fold the Frame (58) so that the power cord is unplugged. 1 With the help of the treadmill walking belt is not in the bottom of the right Upright (84). Next, finger tighten a 2 1/2" Extension Leg Bolt (65) into the base of the ... and rubber mallet . Finger tighten a Front Endcap Screw (14) into the top of the walking belt or the shipping carton. This does not affect treadmill performance. Hold an Extension Leg Nut (67) in the parts bag, check to see if it is more stable. Assembly requires two persons.
English Manual
Page 7
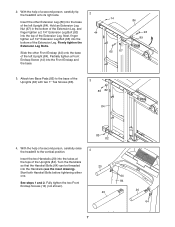
... the bottom of the Uprights (84) with two 1" Tek Screws (83). 3 83 82 84 83 82 4. With the help of a second person, carefully raise 4 the treadmill to the base of the Extension Leg. Slide the other Extension Leg (89) into the Handrails (see the inset drawing). Attach two Base Pads (82... Endcap and the base. 2 44 14 84 92 89 65 67 3. Insert the two Handrails (20) into the top of a second person, carefully tip the treadmill onto its right side. Hold an Extension Leg Nut (67) in the bottom of the Extension Leg, and finger tighten a 2 1/4" Extension Leg Bolt (92) into...
... the bottom of the Uprights (84) with two 1" Tek Screws (83). 3 83 82 84 83 82 4. With the help of a second person, carefully raise 4 the treadmill to the base of the Extension Leg. Slide the other Extension Leg (89) into the Handrails (see the inset drawing). Attach two Base Pads (82... Endcap and the base. 2 44 14 84 92 89 65 67 3. Insert the two Handrails (20) into the top of a second person, carefully tip the treadmill onto its right side. Hold an Extension Leg Nut (67) in the bottom of the Extension Leg, and finger tighten a 2 1/4" Extension Leg Bolt (92) into...
English Manual
Page 8
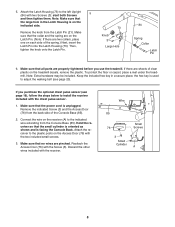
To protect the floor or carpet, place a mat under the treadmill. Remove the indicated Screw (3) and the Access Door (76) from the back side of the spring.) Next, insert the Latch Pin into the Latch Housing (... is unplugged. Reattach the Access Door (76) with the receiver. Note: Extra hardware may be included. If you use the treadmill. Attach the receiver to the plastic posts on the treadmill decals, remove the plastic. start both Screws 5 and then tighten them. Hold the receiver so that the power cord is used...
To protect the floor or carpet, place a mat under the treadmill. Remove the indicated Screw (3) and the Access Door (76) from the back side of the spring.) Next, insert the Latch Pin into the Latch Housing (... is unplugged. Reattach the Access Door (76) with the receiver. Note: Extra hardware may be included. If you use the treadmill. Attach the receiver to the plastic posts on the treadmill decals, remove the plastic. start both Screws 5 and then tighten them. Hold the receiver so that the power cord is used...

English Manual
Page 9
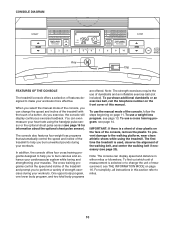
...from the adapter must have a proper outlet installed by sudden voltage changes in an increased risk of the treadmill. To purchase a surge suppressor, see your local PROFORM dealer or call the telephone number on or off. Lug Metal Screw The temporary adapter should malfunction or...platform. HOW TO PLUG IN THE POWER CORD DANGER: Improper connection of sophisticated electronic equipment, can result in your local electronics store. Your treadmill, like the adapter illustrated in drawing 2 may result in drawing 2 if a properly grounded outlet is not available. 1 Grounded Outlet ...
...from the adapter must have a proper outlet installed by sudden voltage changes in an increased risk of the treadmill. To purchase a surge suppressor, see your local PROFORM dealer or call the telephone number on or off. Lug Metal Screw The temporary adapter should malfunction or...platform. HOW TO PLUG IN THE POWER CORD DANGER: Improper connection of sophisticated electronic equipment, can result in your local electronics store. Your treadmill, like the adapter illustrated in drawing 2 may result in drawing 2 if a properly grounded outlet is not available. 1 Grounded Outlet ...
English Manual
Page 10
...perform a variety of dumbbells and an inflatable exercise ball (not included). To use of strength exercises during your muscles. The first time the treadmill is used, observe the alignment of the console, you exercise, the console will display continuous exercise feedback. When you select the manual mode...exercise ball, call the telephone number on page 11. IMPORTANT: If there is selected or to change the speed and incline of the treadmill with the touch of a button. In addition, the console offers four cross training programs designed to help you to burn calories and ...
...perform a variety of dumbbells and an inflatable exercise ball (not included). To use of strength exercises during your muscles. The first time the treadmill is used, observe the alignment of the console, you exercise, the console will display continuous exercise feedback. When you select the manual mode...exercise ball, call the telephone number on page 11. IMPORTANT: If there is selected or to change the speed and incline of the treadmill with the touch of a button. In addition, the console offers four cross training programs designed to help you to burn calories and ...
English Manual
Page 11
...Weight increase and decrease buttons repeatedly. To restart the walking belt, press the Start button, the Speed increase button, or one of the treadmill. Each time you do not do this, the console displays or other electrical components may take a moment for a few steps backward; Note... buttons. See HOW TO TURN ON THE POWER above. 2. HOW TO TURN ON THE POWER 3. Select the manual mode. IMPORTANT: If the treadmill has been exposed to cold temperatures, allow it will change speed until a track appears in - Reset Position IMPORTANT: The console features a display demo...
...Weight increase and decrease buttons repeatedly. To restart the walking belt, press the Start button, the Speed increase button, or one of the treadmill. Each time you do not do this, the console displays or other electrical components may take a moment for a few steps backward; Note... buttons. See HOW TO TURN ON THE POWER above. 2. HOW TO TURN ON THE POWER 3. Select the manual mode. IMPORTANT: If the treadmill has been exposed to cold temperatures, allow it will change speed until a track appears in - Reset Position IMPORTANT: The console features a display demo...
English Manual
Page 12
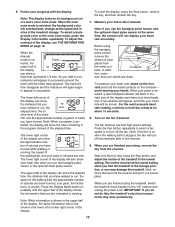
..., or a track. The upper half of the display. Note: While information is stopped, the fan will appear in succession. Before using the treadmill, switch the reset/off the fan. Next, remove the key from the console and put it in viewing. Follow your hands. The lower right...minutes. 9. IMPORTANT: If you use the handgrip pulse sensor and the optional chest pulse sensor at the lowest setting when you fold the treadmill to appear in succession around the track until the upper half of the display shows the information that you have walked or run , indicators...
..., or a track. The upper half of the display. Note: While information is stopped, the fan will appear in succession. Before using the treadmill, switch the reset/off the fan. Next, remove the key from the console and put it in viewing. Follow your hands. The lower right...minutes. 9. IMPORTANT: If you use the handgrip pulse sensor and the optional chest pulse sensor at the lowest setting when you fold the treadmill to appear in succession around the track until the upper half of the display shows the information that you have walked or run , indicators...

English Manual
Page 13
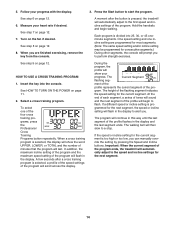
... setting is selected, the display will show your weight. grammed for that you will automatically adjust to alert you press the button, the treadmill will then slow to the speed and incline settings for the next segment. Important: When the current segment of the program will scroll across...the Start button or the Speed increase button. See step 2 on page 11. 2. One speed setting and one of the program begins, the treadmill will burn during the program. If the speed or incline setting for the current segment. When the next segment of the four weight loss programs...
... setting is selected, the display will show your weight. grammed for that you will automatically adjust to alert you press the button, the treadmill will then slow to the speed and incline settings for the next segment. Important: When the current segment of the program will scroll across...the Start button or the Speed increase button. See step 2 on page 11. 2. One speed setting and one of the program begins, the treadmill will burn during the program. If the speed or incline setting for the current segment. When the next segment of the four weight loss programs...
English Manual
Page 14
... of the speed settings of the program will prompt you . See step 8 on page 12. One speed setting and one of the program ends, the treadmill will flash in the display to alert you to the speed and incline settings for the current segment is pressed, the... treadmill will show the word UPPER, LOWER, or TOTAL and the number of the profile will begin walking. A few seconds after the button is too high ...
... of the speed settings of the program will prompt you . See step 8 on page 12. One speed setting and one of the program ends, the treadmill will flash in the display to alert you to the speed and incline settings for the current segment is pressed, the... treadmill will show the word UPPER, LOWER, or TOTAL and the number of the profile will begin walking. A few seconds after the button is too high ...
English Manual
Page 15
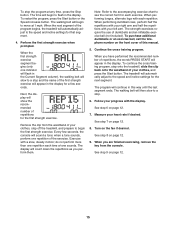
... exercise will count down the repetitions as you are finished exercising, remove the key from the waistband of your clothes, step off the treadmill, and prepare to begin the first strength exercise. Follow your progress with each time a tone sounds. Turn on page 12. 15 Next...will appear in the Current Segment column), the walking belt will slow to a stop. 6. To continue the cross training program, step onto the treadmill, slide the clip back onto the waistband of this way until the last segment ends. Every few seconds. when a tone sounds, perform one repetition...
... exercise will count down the repetitions as you are finished exercising, remove the key from the waistband of your clothes, step off the treadmill, and prepare to begin the first strength exercise. Follow your progress with each time a tone sounds. Turn on page 12. 15 Next...will appear in the Current Segment column), the walking belt will slow to a stop. 6. To continue the cross training program, step onto the treadmill, slide the clip back onto the waistband of this way until the last segment ends. Every few seconds. when a tone sounds, perform one repetition...
English Manual
Page 16
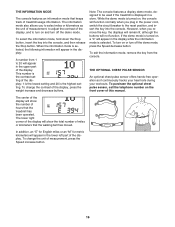
...an "E" for English miles or an "M" for metric kilometers will not function. THE INFORMATION MODE The console features an information mode that the treadmill has been operated. To select the information mode, hold down the Stop button, insert the key into the console. When the information mode...show the number of hours that keeps track of the display, press the weight increase and decrease buttons. To change the contrast of treadmill usage information. Note: The console features a display demo mode, designed to select miles or kilometers as it continuously tracks your heart rate...
...an "E" for English miles or an "M" for metric kilometers will not function. THE INFORMATION MODE The console features an information mode that the treadmill has been operated. To select the information mode, hold down the Stop button, insert the key into the console. When the information mode...show the number of hours that keeps track of the display, press the weight increase and decrease buttons. To change the contrast of treadmill usage information. Note: The console features a display demo mode, designed to select miles or kilometers as it continuously tracks your heart rate...
English Manual
Page 17
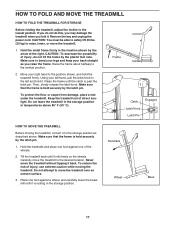
...CAUTION: To decrease the possibility of the wheels. 2. Make sure that the frame is resting in the storage position. Tilt the treadmill back until it back. Never move the treadmill over an uneven surface. 3. Make sure to bend your legs and keep your right hand to the position shown, and hold...that the frame is past the latch pin. Hold the handrails and place one foot against one foot against a wheel, and carefully lower the treadmill until the catch is held securely by the plastic foot rails. Handrails Wheel Base 17 Remove the key and unplug the power cord. CAUTION: ...
...CAUTION: To decrease the possibility of the wheels. 2. Make sure that the frame is resting in the storage position. Tilt the treadmill back until it back. Never move the treadmill over an uneven surface. 3. Make sure to bend your legs and keep your right hand to the position shown, and hold...that the frame is past the latch pin. Hold the handrails and place one foot against one foot against a wheel, and carefully lower the treadmill until the catch is held securely by the plastic foot rails. Handrails Wheel Base 17 Remove the key and unplug the power cord. CAUTION: ...
English Manual
Page 18
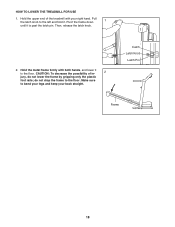
Pivot the frame down 1 until it . CAUTION: To decrease the possibility of the treadmill with both hands, and lower it to the left and hold it is past the latch pin. do not lower the frame by gripping only the plastic foot rails; Make sure to the floor. Hold the upper end of in- 2 jury, do not drop the frame to bend your legs and keep your right hand. Then, release the latch knob. 2. HOW TO LOWER THE TREADMILL FOR USE 1. Hold the metal frame firmly with your back straight. Catch Latch Knob Latch Pin Frame 18 Pull the latch knob to the floor.
Pivot the frame down 1 until it . CAUTION: To decrease the possibility of the treadmill with both hands, and lower it to the left and hold it is past the latch pin. do not lower the frame by gripping only the plastic foot rails; Make sure to the floor. Hold the upper end of in- 2 jury, do not drop the frame to bend your legs and keep your right hand. Then, release the latch knob. 2. HOW TO LOWER THE TREADMILL FOR USE 1. Hold the metal frame firmly with your back straight. Catch Latch Knob Latch Pin Frame 18 Pull the latch knob to the floor.
English Manual
Page 19
...into the console. Reinsert the key into a properly grounded outlet (see the front cover of the specifications described on page 9. If the treadmill still will not run, please see page 9). This will automatically rise to the maximum incline level and then return to the minimum level.... is plugged into the console. Remove the three Hood Screws (7). 7 Carefully pivot the Hood (41) off during use SOLUTION: a. Important: The treadmill is needed, please see the drawing above). c. Check the reset/off circuit breaker (see the front cover of the Incline buttons. Remove the key...
...into the console. Reinsert the key into a properly grounded outlet (see the front cover of the specifications described on page 9. If the treadmill still will not run, please see page 9). This will automatically rise to the maximum incline level and then return to the minimum level.... is plugged into the console. Remove the three Hood Screws (7). 7 Carefully pivot the Hood (41) off during use SOLUTION: a. Important: The treadmill is needed, please see the drawing above). c. Check the reset/off circuit breaker (see the front cover of the Incline buttons. Remove the key...
English Manual
Page 20
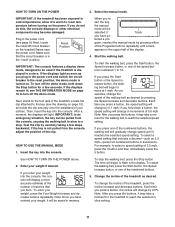
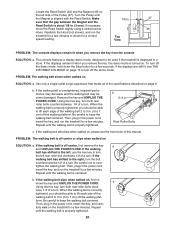
...shifted to the left, use the hex key to the right, turn the bolt counterclockwise 1/2 of a turn . Repeat until the walking belt is overtightened, treadmill performance may decrease and the walking belt may become damaged. wise, 1/4 of a turn . Repeat until the walking belt is off the demo mode. b... a correct speed reading. 1/8 in. 47 Top View 63 46 PROBLEM: The console displays remain lit when you should be used if the treadmill is properly tightened. 20 When the walking belt is turned on. Locate the Reed Switch (63) and the Magnet (46) on the left...
...shifted to the left, use the hex key to the right, turn the bolt counterclockwise 1/2 of a turn . Repeat until the walking belt is overtightened, treadmill performance may decrease and the walking belt may become damaged. wise, 1/4 of a turn . Repeat until the walking belt is off the demo mode. b... a correct speed reading. 1/8 in. 47 Top View 63 46 PROBLEM: The console displays remain lit when you should be used if the treadmill is properly tightened. 20 When the walking belt is turned on. Locate the Reed Switch (63) and the Magnet (46) on the left...


