
Canadian English Manual
Page 3
...cover of this manual). Never remove the motor hood unless instructed to raise, lower, or move the walking belt while the power is running. Never move the treadmill until it is intended for personal injury or property damage sustained by or through the use of this product. ...or institutional setting. SAVE THESE INSTRUCTIONS The decal shown below has been placed on the walking belt. Do not operate the treadmill if the power cord or plug is damaged, or if the treadmill is not working properly.) 14. WARNING: Before beginning this manual. Adjust the speed in ...
...cover of this manual). Never remove the motor hood unless instructed to raise, lower, or move the walking belt while the power is running. Never move the treadmill until it is intended for personal injury or property damage sustained by or through the use of this product. ...or institutional setting. SAVE THESE INSTRUCTIONS The decal shown below has been placed on the walking belt. Do not operate the treadmill if the power cord or plug is damaged, or if the treadmill is not working properly.) 14. WARNING: Before beginning this manual. Adjust the speed in ...
Canadian English Manual
Page 4
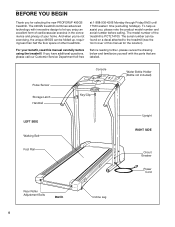
...490GS treadmill combines advanced technology with the parts that are labeled. To help us assist you enjoy an excellent form of cardiovascular exercise in the convenience and privacy of other treadmills. Pulse Sensor Storage Latch Handrail Console Key/Clip Water Bottle Holder (Bottle not included) LEFT SIDE Walking Belt... this manual for selecting the new PROFORM® 490GS treadmill. Before reading further, please review the drawing below and familiarize yourself with innovative design to the treadmill (see the front cover of the treadmill is PCTL74100. BEFORE YOU BEGIN Thank...
...490GS treadmill combines advanced technology with the parts that are labeled. To help us assist you enjoy an excellent form of cardiovascular exercise in the convenience and privacy of other treadmills. Pulse Sensor Storage Latch Handrail Console Key/Clip Water Bottle Holder (Bottle not included) LEFT SIDE Walking Belt... this manual for selecting the new PROFORM® 490GS treadmill. Before reading further, please review the drawing below and familiarize yourself with innovative design to the treadmill (see the front cover of the treadmill is PCTL74100. BEFORE YOU BEGIN Thank...
Canadian English Manual
Page 5
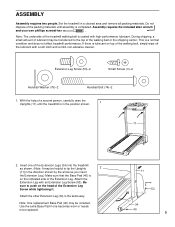
...materials until the treadmill is on the head of lubricant may be replaced. 11 53 34 40 5 During shipping, a small amount of the Extension Leg Screw while tightening it. Insert one becomes worn or needs to be transferred to the top of the treadmill walking belt is completed. Note...: The underside of the walking belt or the shipping carton. Attach the other Extension Leg (34) in a cleared area and remove all packing ...
...materials until the treadmill is on the head of lubricant may be replaced. 11 53 34 40 5 During shipping, a small amount of the Extension Leg Screw while tightening it. Insert one becomes worn or needs to be transferred to the top of the treadmill walking belt is completed. Note...: The underside of the walking belt or the shipping carton. Attach the other Extension Leg (34) in a cleared area and remove all packing ...
Canadian English Manual
Page 6
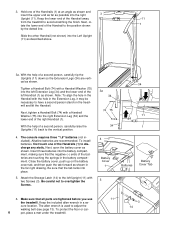
... in a se- The console requires three "1,5" batteries (not included). Next, open the battery cover as shown. Be careful not to adjust the walking belt (see page 13). Tighten a Handrail Bolt (74) with the hole in the far right drawing. Be sure that the tab locks into the right ...3 Upright (11). cure location. Alkaline batteries are vertical as shown. To protect the floor or car- 6 pet, place a mat under the treadmill. 11 3 14 To install batteries, first touch one of the right Handrail (1). Keep the included allen wrench in the battery compartment. Keep the lower end...
... in a se- The console requires three "1,5" batteries (not included). Next, open the battery cover as shown. Be careful not to adjust the walking belt (see page 13). Tighten a Handrail Bolt (74) with the hole in the far right drawing. Be sure that the tab locks into the right ...3 Upright (11). cure location. Alkaline batteries are vertical as shown. To protect the floor or car- 6 pet, place a mat under the treadmill. 11 3 14 To install batteries, first touch one of the right Handrail (1). Keep the included allen wrench in the battery compartment. Keep the lower end...
Canadian English Manual
Page 7
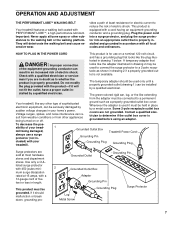
...minimum surge dissipation rated at most hardware stores and department stores. If it will deteriorate the walking belt and cause excessive wear. man if you are in your treadmill. stalled by sudden voltage changes in doubt as a properly grounded outlet box cover. OPERATION AND... ADJUSTMENT THE PERFORMANT LUBETM WALKING BELT Your treadmill features a walking belt coated with a qualified electrician or service- sibility of your tread- 1 mill being turned on a nominal 120-volt circuit,...
...minimum surge dissipation rated at most hardware stores and department stores. If it will deteriorate the walking belt and cause excessive wear. man if you are in your treadmill. stalled by sudden voltage changes in doubt as a properly grounded outlet box cover. OPERATION AND... ADJUSTMENT THE PERFORMANT LUBETM WALKING BELT Your treadmill features a walking belt coated with a qualified electrician or service- sibility of your tread- 1 mill being turned on a nominal 120-volt circuit,...
Canadian English Manual
Page 8
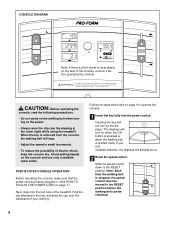
...the console. 1 Insert the key fully into the power switch. Avoid spilling liquids on when the ON button is pressed or when the walking belt is properly plugged in small increments. • To reduce the possibility of your clothing. STEP-BY-STEP CONSOLE OPERATION Before operating the console, ... TO PLUG IN THE POWER CORD on the power. • Always wear the clip (see the drawing at the lower right) while using the treadmill. When the key is stopped, the speed control must be restarted. 8 Find the clip attached to the RESET position before operating the console. Note...
...the console. 1 Insert the key fully into the power switch. Avoid spilling liquids on when the ON button is pressed or when the walking belt is properly plugged in small increments. • To reduce the possibility of your clothing. STEP-BY-STEP CONSOLE OPERATION Before operating the console, ... TO PLUG IN THE POWER CORD on the power. • Always wear the clip (see the drawing at the lower right) while using the treadmill. When the key is stopped, the speed control must be restarted. 8 Find the clip attached to the RESET position before operating the console. Note...

Canadian English Manual
Page 9
...the ap- play will be detected. The pulse sen- sors are finished exercising, stop the walking belt and remove the key. After a few seconds, three dashes will change the incline of the treadmill, press the top or bottom of pressure. Remember to reset. TIME display-This display shows the... pulse sensor several times until the walking belt begins to the RESET position. 4 Adjust the incline of the walking belt as desired. 3 Start the walking belt. Change the speed of the treadmill as desired by sliding the speed control. To stop the walking belt and remove the key from one number ...
...the ap- play will be detected. The pulse sen- sors are finished exercising, stop the walking belt and remove the key. After a few seconds, three dashes will change the incline of the treadmill, press the top or bottom of pressure. Remember to reset. TIME display-This display shows the... pulse sensor several times until the walking belt begins to the RESET position. 4 Adjust the incline of the walking belt as desired. 3 Start the walking belt. Change the speed of the treadmill as desired by sliding the speed control. To stop the walking belt and remove the key from one number ...
Canadian English Manual
Page 13
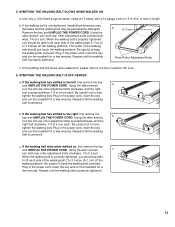
... Line. 6. Plug in the power cord, insert the key and run the treadmill for a few minutes. Repeat until the walking belt is overtightened, treadmill performance may decrease and the walking belt may be permanently damaged. tighten the walking belt. tighten the walking belt. Plug in length. Remove the key and UNPLUG THE POWER CORD. Using the...
... Line. 6. Plug in the power cord, insert the key and run the treadmill for a few minutes. Repeat until the walking belt is overtightened, treadmill performance may decrease and the walking belt may be permanently damaged. tighten the walking belt. tighten the walking belt. Plug in length. Remove the key and UNPLUG THE POWER CORD. Using the...
Canadian English Manual
Page 16
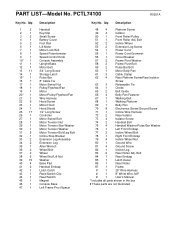
...Motor Belly Pan 61 3 Cable Clamp 62 4 Rear Platform Screw/Rear Isolator Screw 63 3 Releasable Tie 64 1 Choke 65 2 Belt Guide 66 4 Belly Pan Fastener 67 1 Walking Belt 68 1 Walking Platform 69 1 Belly Pan 70 8 Electronics Screw/Ground Screw 71 1 Incline Wire Harness 72 2 Rear Isolator 73... Key/Clip Small Screw Battery Cover Foot Rail Lift Motor Motor Lock Bolt Speed Potentiometer Speed Control Knob Console Assembly Upright/Base Motor Belt 3/4" Long Screw Storage Latch Pulse Bar 8" Cable Tie Motor Swivel Nut Pulley/Flywheel/Fan Motor Motor/Pulley/Flywheel/Fan Wire Harness...
...Motor Belly Pan 61 3 Cable Clamp 62 4 Rear Platform Screw/Rear Isolator Screw 63 3 Releasable Tie 64 1 Choke 65 2 Belt Guide 66 4 Belly Pan Fastener 67 1 Walking Belt 68 1 Walking Platform 69 1 Belly Pan 70 8 Electronics Screw/Ground Screw 71 1 Incline Wire Harness 72 2 Rear Isolator 73... Key/Clip Small Screw Battery Cover Foot Rail Lift Motor Motor Lock Bolt Speed Potentiometer Speed Control Knob Console Assembly Upright/Base Motor Belt 3/4" Long Screw Storage Latch Pulse Bar 8" Cable Tie Motor Swivel Nut Pulley/Flywheel/Fan Motor Motor/Pulley/Flywheel/Fan Wire Harness...


