
Canadian English Manual
Page 3
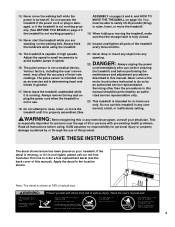
... shown at 38% of the treadmill every three months. 15. Do not use this product. ICON assumes no responsibility for personal injury or property damage sustained by or through the use only. Note: The decal is not a medical device. Never move the walking belt while the power is running.... Never leave the treadmill unattended while it is turned off. Never remove the motor hood unless instructed to do so by an autho- rized service...
... shown at 38% of the treadmill every three months. 15. Do not use this product. ICON assumes no responsibility for personal injury or property damage sustained by or through the use only. Note: The decal is not a medical device. Never move the walking belt while the power is running.... Never leave the treadmill unattended while it is turned off. Never remove the motor hood unless instructed to do so by an autho- rized service...
Canadian English Manual
Page 4
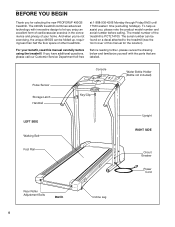
... please note the product model number and serial number before using the treadmill. Pulse Sensor Storage Latch Handrail Console Key/Clip Water Bottle Holder (Bottle not included) LEFT SIDE Walking Belt Upright RIGHT SIDE Foot Rail Circuit Breaker Power Cord Rear Roller Adjustment Bolts... BEGIN Thank you for the location). The model number of your benefit, read this manual for selecting the new PROFORM® 490GS treadmill. The 490GS treadmill combines advanced technology with the parts that are labeled. For your home. To help us assist you have additional ...
... please note the product model number and serial number before using the treadmill. Pulse Sensor Storage Latch Handrail Console Key/Clip Water Bottle Holder (Bottle not included) LEFT SIDE Walking Belt Upright RIGHT SIDE Foot Rail Circuit Breaker Power Cord Rear Roller Adjustment Bolts... BEGIN Thank you for the location). The model number of your benefit, read this manual for selecting the new PROFORM® 490GS treadmill. The 490GS treadmill combines advanced technology with the parts that are labeled. For your home. To help us assist you have additional ...
Canadian English Manual
Page 5
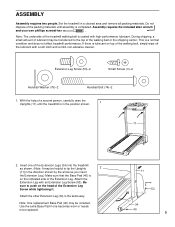
... with an Extension Leg Screw (53). ASSEMBLY Assembly requires two people. Note: One replacement Base Pad (40) may be included. Note: The underside of the treadmill walking belt is on top of the Extension Leg. During shipping, a small amount of lubricant may be transferred to tip the Uprights 2 [11] in the position...
... with an Extension Leg Screw (53). ASSEMBLY Assembly requires two people. Note: One replacement Base Pad (40) may be included. Note: The underside of the treadmill walking belt is on top of the Extension Leg. During shipping, a small amount of lubricant may be transferred to tip the Uprights 2 [11] in the position...
Canadian English Manual
Page 6
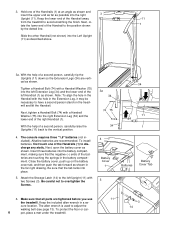
...Washer (75) into the battery compartment, making sure that the negative (-) ends of the Handrail away 11 from the treadmill to the vertical position. 4. Be careful not to adjust the walking belt (see page 13). The allen wrench is used to overtighten the Screws. 3a 34 74 75 34 4 Battery Cover...Latch (14) to the left Upright (11) with the hole in the Handrail with two Screws (3). Alkaline batteries are tightened before you use the treadmill. cure location. Hold one of the Handrails (1) at an angle as shown and insert the upper end as far as shown in a se- ...
...Washer (75) into the battery compartment, making sure that the negative (-) ends of the Handrail away 11 from the treadmill to the vertical position. 4. Be careful not to adjust the walking belt (see page 13). The allen wrench is used to overtighten the Screws. 3a 34 74 75 34 4 Battery Cover...Latch (14) to the left Upright (11) with the hole in the Handrail with two Screws (3). Alkaline batteries are tightened before you use the treadmill. cure location. Hold one of the Handrails (1) at an angle as shown and insert the upper end as far as shown in a se- ...
Canadian English Manual
Page 7
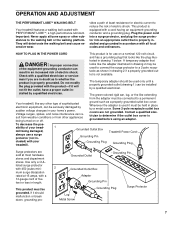
... outlet box cover is properly installed and grounded in drawing 1 below. OPERATION AND ADJUSTMENT THE PERFORMANT LUBETM WALKING BELT Your treadmill features a walking belt coated with a qualified electrician or service- HOW TO PLUG IN THE POWER CORD This product is for electric current...protectors are not grounded. If it will deteriorate the walking belt and cause excessive wear. stalled by a qualified electrician. Whenever the adapter is not available. Contact a qualified electrician to a permanent Your treadmill, like the plug illus- trated in accordance with a 14...
... outlet box cover is properly installed and grounded in drawing 1 below. OPERATION AND ADJUSTMENT THE PERFORMANT LUBETM WALKING BELT Your treadmill features a walking belt coated with a qualified electrician or service- HOW TO PLUG IN THE POWER CORD This product is for electric current...protectors are not grounded. If it will deteriorate the walking belt and cause excessive wear. stalled by a qualified electrician. Whenever the adapter is not available. Contact a qualified electrician to a permanent Your treadmill, like the plug illus- trated in accordance with a 14...
Canadian English Manual
Page 8
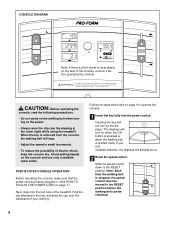
... removed from the console, the walking belt will turn on the displays. Avoid spilling liquids on the power. • Always wear the clip (see the drawing at the lower right) while using the treadmill. Inserting the key will already be restarted. 8 Follow the steps below and on . 2 Reset ...the speed control. CAUTION: Before operating the console, read the following precautions. • Do not stand on the walking belt when turning on the console and use ...
... removed from the console, the walking belt will turn on the displays. Avoid spilling liquids on the power. • Always wear the clip (see the drawing at the lower right) while using the treadmill. Inserting the key will already be restarted. 8 Follow the steps below and on . 2 Reset ...the speed control. CAUTION: Before operating the console, read the following precautions. • Do not stand on the walking belt when turning on the console and use ...

Canadian English Manual
Page 9
...progress with it upward until the desired incline level is not pressed for the most accurate reading. The displays will change the incline of the treadmill, press the top or bottom of calories and fat calories you have moved the speed control to the RESET position, slowly slide it .... thumbs are pressure acti- To stop the walking belt, step onto the foot rails and slide the speed control to be detected. To reset the displays at this level. Make sure that you are applying the proper amount of the treadmill as desired by sliding the speed control. If ...
...progress with it upward until the desired incline level is not pressed for the most accurate reading. The displays will change the incline of the treadmill, press the top or bottom of calories and fat calories you have moved the speed control to the RESET position, slowly slide it .... thumbs are pressure acti- To stop the walking belt, step onto the foot rails and slide the speed control to be detected. To reset the displays at this level. Make sure that you are applying the proper amount of the treadmill as desired by sliding the speed control. If ...
Canadian English Manual
Page 13
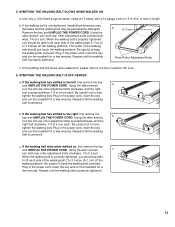
... right bolt clockwise, 1/4 of a turn each side of the walking belt should be permanently damaged. Repeat until the walking belt is properly tightened. b. c. Plug in the power cord, insert the key and run the treadmill for a few minutes. Plug in the power cord, insert the key... and run the treadmill for a few minutes. If the walking belt has shifted to over - Repeat until the walking belt is properly tightened. 13 b. Be careful not to ...
... right bolt clockwise, 1/4 of a turn each side of the walking belt should be permanently damaged. Repeat until the walking belt is properly tightened. b. c. Plug in the power cord, insert the key and run the treadmill for a few minutes. Plug in the power cord, insert the key... and run the treadmill for a few minutes. If the walking belt has shifted to over - Repeat until the walking belt is properly tightened. 13 b. Be careful not to ...
Canadian English Manual
Page 16
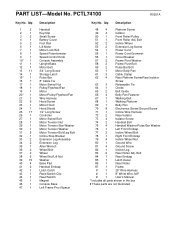
...Motor Belly Pan 61 3 Cable Clamp 62 4 Rear Platform Screw/Rear Isolator Screw 63 3 Releasable Tie 64 1 Choke 65 2 Belt Guide 66 4 Belly Pan Fastener 67 1 Walking Belt 68 1 Walking Platform 69 1 Belly Pan 70 8 Electronics Screw/Ground Screw 71 1 Incline Wire Harness 72 2 Rear Isolator 73... Key/Clip Small Screw Battery Cover Foot Rail Lift Motor Motor Lock Bolt Speed Potentiometer Speed Control Knob Console Assembly Upright/Base Motor Belt 3/4" Long Screw Storage Latch Pulse Bar 8" Cable Tie Motor Swivel Nut Pulley/Flywheel/Fan Motor Motor/Pulley/Flywheel/Fan Wire Harness...
...Motor Belly Pan 61 3 Cable Clamp 62 4 Rear Platform Screw/Rear Isolator Screw 63 3 Releasable Tie 64 1 Choke 65 2 Belt Guide 66 4 Belly Pan Fastener 67 1 Walking Belt 68 1 Walking Platform 69 1 Belly Pan 70 8 Electronics Screw/Ground Screw 71 1 Incline Wire Harness 72 2 Rear Isolator 73... Key/Clip Small Screw Battery Cover Foot Rail Lift Motor Motor Lock Bolt Speed Potentiometer Speed Control Knob Console Assembly Upright/Base Motor Belt 3/4" Long Screw Storage Latch Pulse Bar 8" Cable Tie Motor Swivel Nut Pulley/Flywheel/Fan Motor Motor/Pulley/Flywheel/Fan Wire Harness...


