
Uk Manual
Page 1
... are missing or damaged parts, we are committed to providing complete customer satisfaction. Keep this equipment. Please CALL: 0345-089009 Or WRITE: ICON Fitness Lifestyle Ltd. Serial Number Decal The serial number is found in the space above. As a manufacturer, we will guarantee complete satisfaction through our Customer Service Department. Write the serial number in the location shown below. USER'S MANUAL Patent Pending Visit...
... are missing or damaged parts, we are committed to providing complete customer satisfaction. Keep this equipment. Please CALL: 0345-089009 Or WRITE: ICON Fitness Lifestyle Ltd. Serial Number Decal The serial number is found in the space above. As a manufacturer, we will guarantee complete satisfaction through our Customer Service Department. Write the serial number in the location shown below. USER'S MANUAL Patent Pending Visit...
Uk Manual
Page 2
® TABLE OF CONTENTS IMPORTANT PRECAUTIONS 3 BEFORE YOU BEGIN 4 PART IDENTIFICATION CHART 5 ASSEMBLY 6 HOW TO USE THE ELLIPTICAL EXERCISER 9 MAINTENANCE 11 CONDITIONING GUIDELINES 12 PART LIST 14 EXPLODED DRAWING 15 HOW TO ORDER REPLACEMENT PARTS Back Cover 2
® TABLE OF CONTENTS IMPORTANT PRECAUTIONS 3 BEFORE YOU BEGIN 4 PART IDENTIFICATION CHART 5 ASSEMBLY 6 HOW TO USE THE ELLIPTICAL EXERCISER 9 MAINTENANCE 11 CONDITIONING GUIDELINES 12 PART LIST 14 EXPLODED DRAWING 15 HOW TO ORDER REPLACEMENT PARTS Back Cover 2
Uk Manual
Page 3
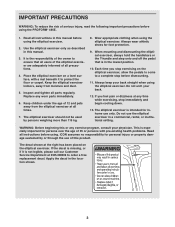
... of the owner to order a free replacement decal. When mounting and dismounting the elliptical exerciser, always hold the handlebars or the T-handle and step onto and off the pedal that all users of the elliptical exerciser are adequately informed of all instructions in the lowest position. 10. Always keep your back straight when using the elliptical exerciser. If you stop exercising on the elliptical exerciser, allow the pedals to come...
... of the owner to order a free replacement decal. When mounting and dismounting the elliptical exerciser, always hold the handlebars or the T-handle and step onto and off the pedal that all users of the elliptical exerciser are adequately informed of all instructions in the lowest position. 10. Always keep your back straight when using the elliptical exerciser. If you stop exercising on the elliptical exerciser, allow the pedals to come...
Uk Manual
Page 4
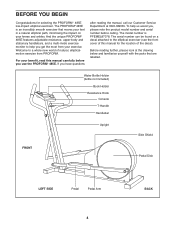
... model number and serial number before you get the most from PROFORM. Welcome to the elliptical exerciser (see the front cover of this manual carefully before calling. Water Bottle Holder (bottle not included) Book Holder Resistance Knob Console T-Handle Handlebar Upright Side Shield FRONT Pedal Disk LEFT SIDE Pedal Pedal Arm 4 BACK Before reading further, please look at 0345-089009. And the unique PROFORM® 485E features adjustable resistance, upper-body...
... model number and serial number before you get the most from PROFORM. Welcome to the elliptical exerciser (see the front cover of this manual carefully before calling. Water Bottle Holder (bottle not included) Book Holder Resistance Knob Console T-Handle Handlebar Upright Side Shield FRONT Pedal Disk LEFT SIDE Pedal Pedal Arm 4 BACK Before reading further, please look at 0345-089009. And the unique PROFORM® 485E features adjustable resistance, upper-body...
Uk Manual
Page 5
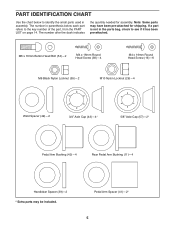
... have been pre-attached for assembly. PART IDENTIFICATION CHART Use the chart below each part refers to see if it has been pre-attached. The number after the dash indicates the quantity needed for shipping. Note: Some parts may be included. The number in parenthesis below to identify the small parts used in the parts bag, check to the key number of the part, from the PART LIST on page...
... have been pre-attached for assembly. PART IDENTIFICATION CHART Use the chart below each part refers to see if it has been pre-attached. The number after the dash indicates the quantity needed for shipping. Note: Some parts may be included. The number in parenthesis below to identify the small parts used in the parts bag, check to the key number of the part, from the PART LIST on page...
Uk Manual
Page 6
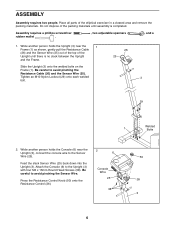
.... Press the Resistance Control Knob (50) onto the Resistance Control (26). 2 6 Console Wire 25 38 50 26 3 6 Attach the Console (6) to avoid pinching the Sensor Wire. Be careful to the Sensor Wire (25). While another person holds the Console (6) near the 1 Frame (1) as shown, gently pull the Resistance Cable (26) and the Sensor Wire (25) out of the top of the elliptical exerciser in a cleared area and remove the packing materials. Assembly requires...
.... Press the Resistance Control Knob (50) onto the Resistance Control (26). 2 6 Console Wire 25 38 50 26 3 6 Attach the Console (6) to avoid pinching the Sensor Wire. Be careful to the Sensor Wire (25). While another person holds the Console (6) near the 1 Frame (1) as shown, gently pull the Resistance Cable (26) and the Sensor Wire (25) out of the top of the elliptical exerciser in a cleared area and remove the packing materials. Assembly requires...
Uk Manual
Page 7
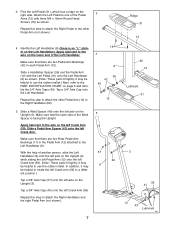
...Upright (3). Repeat this step to the PART IDENTIFICATION CHART on the Upright (3) while sliding the left Pedal Arm (12) onto the left axle on the Left Handlebar). Apply lubricant to the Left Handlebar (8). Slide a Weld Spacer (49) onto the left Crank Arm (59). (Note: These parts fit tightly; Make sure that the open...Slide a Handlebar Spacer (39) and the Pedal Arm (12) with three M4 x 19mm Round Head Screws (16) as shown. (Note: These parts fit tightly; Make sure that there are two Rear Pedal Arm Bushings (11) in each Pedal Arm (12). In addition, it may be ...
...Upright (3). Repeat this step to the PART IDENTIFICATION CHART on the Upright (3) while sliding the left Pedal Arm (12) onto the left axle on the Left Handlebar). Apply lubricant to the Left Handlebar (8). Slide a Weld Spacer (49) onto the left Crank Arm (59). (Note: These parts fit tightly; Make sure that the open...Slide a Handlebar Spacer (39) and the Pedal Arm (12) with three M4 x 19mm Round Head Screws (16) as shown. (Note: These parts fit tightly; Make sure that there are two Rear Pedal Arm Bushings (11) in each Pedal Arm (12). In addition, it may be ...
Uk Manual
Page 8
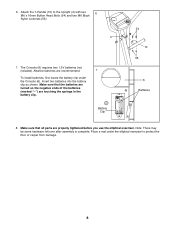
... properly tightened before you use the elliptical exerciser. Note: There may be some hardware left over after assembly is complete. Place a mat under the Console (6). Make sure that all parts are touching the springs in the battery clip. Battery Clip 54 10 55 6 Batteries 8. Alkaline batteries are recommended. 7 To install batteries, first locate the battery clip under the elliptical exerciser to the Upright (3) with two 6 M6 x 16mm Button Head Bolts...
... properly tightened before you use the elliptical exerciser. Note: There may be some hardware left over after assembly is complete. Place a mat under the Console (6). Make sure that all parts are touching the springs in the battery clip. Battery Clip 54 10 55 6 Batteries 8. Alkaline batteries are recommended. 7 To install batteries, first locate the battery clip under the elliptical exerciser to the Upright (3) with two 6 M6 x 16mm Button Head Bolts...
Uk Manual
Page 9
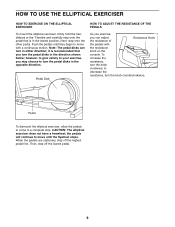
... the resistance, turn the knob counterclockwise. to decrease the resistance, turn the knob clockwise; CAUTION: The elliptical exerciser does not have a freewheel; Pedal Disk HOW TO ADJUST THE RESISTANCE OF THE PEDALS As you exercise, you can turn in either direction; the pedals will continue to move until they begin to move with the resistance knob on the console. Then, step off the highest pedal first. HOW TO USE THE ELLIPTICAL EXERCISER HOW TO EXERCISE ON THE ELLIPTICAL EXERCISER...
... the resistance, turn the knob counterclockwise. to decrease the resistance, turn the knob clockwise; CAUTION: The elliptical exerciser does not have a freewheel; Pedal Disk HOW TO ADJUST THE RESISTANCE OF THE PEDALS As you exercise, you can turn in either direction; the pedals will continue to move until they begin to move with the resistance knob on the console. Then, step off the highest pedal first. HOW TO USE THE ELLIPTICAL EXERCISER HOW TO EXERCISE ON THE ELLIPTICAL EXERCISER...

Uk Manual
Page 10
... you exercise, the indicators around the track will pause until you have not installed batteries, see assembly step 7 on /reset" button or simply begin . 4. If you have completed 1/4 mile. When the power is turned on /reset" button. 5. DESCRIPTION OF THE CONSOLE The console is designed to conserve the batteries. 10 tor will show which mode is currently displayed. If the pedals are not moved and the console buttons are described below. Speed, Time, Distance...
... you exercise, the indicators around the track will pause until you have not installed batteries, see assembly step 7 on /reset" button or simply begin . 4. If you have completed 1/4 mile. When the power is turned on /reset" button. 5. DESCRIPTION OF THE CONSOLE The console is designed to conserve the batteries. 10 tor will show which mode is currently displayed. If the pedals are not moved and the console buttons are described below. Speed, Time, Distance...

Uk Manual
Page 11
To prevent damage to assembly step 7 on page 8. CONSOLE TROUBLE-SHOOTING If the console does not function properly, the batteries should be wiped clean with a soft cloth and mild detergent. Keep the elliptical exerciser in the console. STORAGE When storing the elliptical exerciser, remove the batteries from the console. Replace any worn parts immediately. The elliptical exerciser can be replaced. Use only a sealable water bottle in a clean, dry location, away from moisture and...
To prevent damage to assembly step 7 on page 8. CONSOLE TROUBLE-SHOOTING If the console does not function properly, the batteries should be wiped clean with a soft cloth and mild detergent. Keep the elliptical exerciser in the console. STORAGE When storing the elliptical exerciser, remove the batteries from the console. Replace any worn parts immediately. The elliptical exerciser can be replaced. Use only a sealable water bottle in a clean, dry location, away from moisture and...
Uk Manual
Page 12
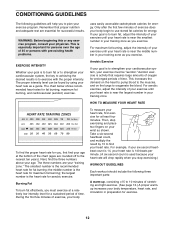
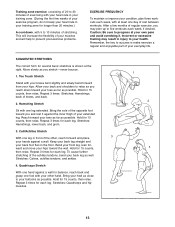
... is to burn fat or to strengthen your cardiovascular system, the key to achieving the desired results is near the largest number in your physician. Then, stop exercising.) WORKOUT GUIDELINES Each workout should include the following three important parts: A warm-up, consisting of 5 to exercise with pre-existing health problems. uses easily accessible carbohydrate calories for fat burning, maximum fat burning...
... is to burn fat or to strengthen your cardiovascular system, the key to achieving the desired results is near the largest number in your physician. Then, stop exercising.) WORKOUT GUIDELINES Each workout should include the following three important parts: A warm-up, consisting of 5 to exercise with pre-existing health problems. uses easily accessible carbohydrate calories for fat burning, maximum fat burning...
Uk Manual
Page 13
... minutes of exercising with your heart rate in your training zone. (During the first few months of regular exercise, you may result in injury to progress at least one leg in your training zone for longer than 20 minutes.) A cool-down toward your own pace and avoid overdoing it against the inner thigh of rest between workouts. Move slowly...
... minutes of exercising with your heart rate in your training zone. (During the first few months of regular exercise, you may result in injury to progress at least one leg in your training zone for longer than 20 minutes.) A cool-down toward your own pace and avoid overdoing it against the inner thigh of rest between workouts. Move slowly...
Uk Manual
Page 14
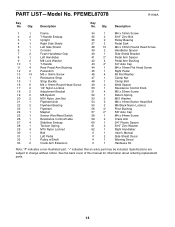
... Screw 14 1 Resistance Strap 15 1 Strap Buckle 16 6 M4 x 19mm Round Head Screw 17 2 1/4" Nylon Locknut 18 2 Adjustment Bracket 19 2 M6 Eyebolt 20 2 M10 Nylon Jam Nut 21 1 Flywheel Axle 22 2 Flywheel Bearing 23 1 Flywheel 24 1 Magnet 25 1 Sensor Wire/Reed Switch 26 1 Resistance Control/Cable 27 4 Stabiliser Endcap 28 1 Tension Spring 29 4 M10 Nylon Locknut 30 1 Belt 31 1 Left Pedal 32 1 Pulley w/Shaft 33 2 Crank Arm Extension...
... Screw 14 1 Resistance Strap 15 1 Strap Buckle 16 6 M4 x 19mm Round Head Screw 17 2 1/4" Nylon Locknut 18 2 Adjustment Bracket 19 2 M6 Eyebolt 20 2 M10 Nylon Jam Nut 21 1 Flywheel Axle 22 2 Flywheel Bearing 23 1 Flywheel 24 1 Magnet 25 1 Sensor Wire/Reed Switch 26 1 Resistance Control/Cable 27 4 Stabiliser Endcap 28 1 Tension Spring 29 4 M10 Nylon Locknut 30 1 Belt 31 1 Left Pedal 32 1 Pulley w/Shaft 33 2 Crank Arm Extension...

Uk Manual
Page 15
PFEMEL87078 4 58 50 R1199A 13 13 76 51 51 26 62 57 38 13 38 56 57 42 39 43 12 14 56 49 56 56 5 8 2 16 13 49 38 30 43 45 42 3 38 38 54 29 42 16 2 39 17 12 43 10 55 31 1 18 20 41 27 22 11 19 17 18 22 53 53 19 28 21 25 52 20 48 23 24 47 46 13 9 35 59 61 34 27 11 41 25 11 43 33 32 13 59 9 61 35 60 36 33 36 40 13 44 15 37 27 27 37 15 EXPLODED DRAWING-Model No.
PFEMEL87078 4 58 50 R1199A 13 13 76 51 51 26 62 57 38 13 38 56 57 42 39 43 12 14 56 49 56 56 5 8 2 16 13 49 38 30 43 45 42 3 38 38 54 29 42 16 2 39 17 12 43 10 55 31 1 18 20 41 27 22 11 19 17 18 22 53 53 19 28 21 25 52 20 48 23 24 47 46 13 9 35 59 61 34 27 11 41 25 11 43 33 32 13 59 9 61 35 60 36 33 36 40 13 44 15 37 27 27 37 15 EXPLODED DRAWING-Model No.
Uk Manual
Page 16
...; The MODEL NUMBER of the product (PFEMEL87078) • The NAME of the product (PROFORM® 485E) • The SERIAL NUMBER of the product (see the front cover of this product, or if you encounter any difficulties with this manual) • The KEY NUMBER and DESCRIPTION of the part(s) (see the PART LIST AND EXPLODED DRAWING on pages 14 and 15 of ICON Health & Fitness, Inc...
...; The MODEL NUMBER of the product (PFEMEL87078) • The NAME of the product (PROFORM® 485E) • The SERIAL NUMBER of the product (see the front cover of this product, or if you encounter any difficulties with this manual) • The KEY NUMBER and DESCRIPTION of the part(s) (see the PART LIST AND EXPLODED DRAWING on pages 14 and 15 of ICON Health & Fitness, Inc...


