
English Manual
Page 1
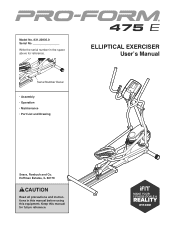
Serial Number Decal •• Assembly •• Operation •• Maintenance •• Part List and Drawing ELLIPTICAL EXERCISER User’'s Manual Sears, Roebuck and Co. Keep this equipment. Hoffman Estates, IL 60179 CAUTION Read all precautions and instructions in the space above for future reference. Model No. 831.23935.0 Serial No. Write the serial number in this manual before using this manual for reference.
Serial Number Decal •• Assembly •• Operation •• Maintenance •• Part List and Drawing ELLIPTICAL EXERCISER User’'s Manual Sears, Roebuck and Co. Keep this equipment. Hoffman Estates, IL 60179 CAUTION Read all precautions and instructions in the space above for future reference. Model No. 831.23935.0 Serial No. Write the serial number in this manual before using this manual for reference.
English Manual
Page 2
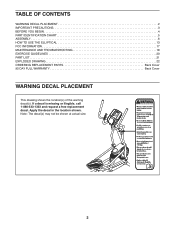
... 4 PART IDENTIFICATION CHART 5 ASSEMBLY 6 HOW TO USE THE ELLIPTICAL 13 FCC INFORMATION 17 MAINTENANCE AND TROUBLESHOOTING 18 EXERCISE GUIDELINES 20 PART LIST 21 EXPLODED DRAWING 22 ORDERING REPLACEMENT PARTS Back Cover 90 DAY FULL WARRANTY Back Cover WARNING DECAL PLACEMENT This drawing shows the location(s) of the warning decal(s). Apply the decal in the location shown. If a decal is missing or illegible, call 1-888-533-1333 and request a free replacement...
... 4 PART IDENTIFICATION CHART 5 ASSEMBLY 6 HOW TO USE THE ELLIPTICAL 13 FCC INFORMATION 17 MAINTENANCE AND TROUBLESHOOTING 18 EXERCISE GUIDELINES 20 PART LIST 21 EXPLODED DRAWING 22 ORDERING REPLACEMENT PARTS Back Cover 90 DAY FULL WARRANTY Back Cover WARNING DECAL PLACEMENT This drawing shows the location(s) of the warning decal(s). Apply the decal in the location shown. If a decal is missing or illegible, call 1-888-533-1333 and request a free replacement...

English Manual
Page 3
... all important precautions and instructions in this manual. 9. Use the elliptical only as an exercise aid in determining heart rate trends in a controlled way. 14. Wear appropriate clothes while exercising; The elliptical is the responsibility of heart rate readings. The heart rate monitor is especially important for foot protection while exercising. 11. Over exercising may affect the accuracy of the owner to move until the flywheel stops. It is intended...
... all important precautions and instructions in this manual. 9. Use the elliptical only as an exercise aid in determining heart rate trends in a controlled way. 14. Wear appropriate clothes while exercising; The elliptical is the responsibility of heart rate readings. The heart rate monitor is especially important for foot protection while exercising. 11. Over exercising may affect the accuracy of the owner to move until the flywheel stops. It is intended...
English Manual
Page 4
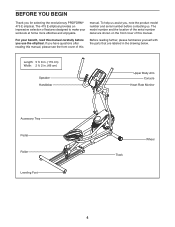
..., note the product model number and serial number before you for selecting the revolutionary PROFORM® 475 E elliptical. The 475 E elliptical provides an impressive selection of the serial number decal are labeled in . (66 cm) Speaker Handlebar Upper Body Arm Console Heart Rate Monitor Accessory Tray Pedal Roller Leveling Foot Track Wheel 4 The model number and the location of features designed to make your benefit, read this manual. For your workouts at home more effective and...
..., note the product model number and serial number before you for selecting the revolutionary PROFORM® 475 E elliptical. The 475 E elliptical provides an impressive selection of the serial number decal are labeled in . (66 cm) Speaker Handlebar Upper Body Arm Console Heart Rate Monitor Accessory Tray Pedal Roller Leveling Foot Track Wheel 4 The model number and the location of features designed to make your benefit, read this manual. For your workouts at home more effective and...
English Manual
Page 5
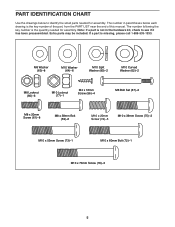
...;-1 M10 x 70mm Screw (76)–-2 5 PART IDENTIFICATION CHART Use the drawings below each drawing is the key number of the part, from the PART LIST near the end of this manual. Extra parts may be included. Note: If a part is not in parentheses below to see if it has been preassembled. If a part is the quantity needed for assembly. The number following the key number is missing, please...
...;-1 M10 x 70mm Screw (76)–-2 5 PART IDENTIFICATION CHART Use the drawings below each drawing is the key number of the part, from the PART LIST near the end of this manual. Extra parts may be included. Note: If a part is not in parentheses below to see if it has been preassembled. If a part is the quantity needed for assembly. The number following the key number is missing, please...
English Manual
Page 6
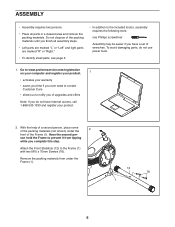
... until you do not use power tools. 1. Have the second per- ASSEMBLY •• Assembly requires two persons. •• Place all assembly steps. •• Left parts are marked “"L”" or “"Left”" and right parts are marked “"R”...Screws (76). Do not dispose of upgrades and offers Note: If you nish all parts in a cleared area and remove the packing materials. Remove the packing materials from tipping while you have Internet access, call 1-888-533-1333 and register your warranty •• saves you time if you ever need...
... until you do not use power tools. 1. Have the second per- ASSEMBLY •• Assembly requires two persons. •• Place all assembly steps. •• Left parts are marked “"L”" or “"Left”" and right parts are marked “"R”...Screws (76). Do not dispose of upgrades and offers Note: If you nish all parts in a cleared area and remove the packing materials. Remove the packing materials from tipping while you have Internet access, call 1-888-533-1333 and register your warranty •• saves you time if you ever need...
English Manual
Page 7
... Upright. Wire Tie 2 Wire Tie 32 1 7 3. Tip: Secure the Main Wire Harness (32) to the Upright (2) with four M10 x 20mm Screws (74), two M10 x 39mm Screws (75), and six M10 Washers (64) as shown; Tie the lower end of the wire tie to prevent it from under the rear of the wire tie until the Main Wire Harness is routed through the Upright. Attach the Track...
... Upright. Wire Tie 2 Wire Tie 32 1 7 3. Tip: Secure the Main Wire Harness (32) to the Upright (2) with four M10 x 20mm Screws (74), two M10 x 39mm Screws (75), and six M10 Washers (64) as shown; Tie the lower end of the wire tie to prevent it from under the rear of the wire tie until the Main Wire Harness is routed through the Upright. Attach the Track...
English Manual
Page 10
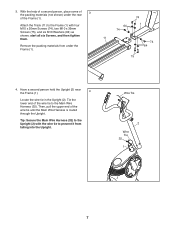
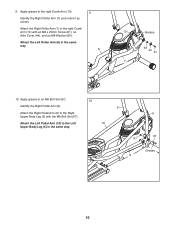
.... Attach the Left Pedal Arm (10) to the Right Upper Body Leg (5) with an M8 x 20mm Screw (61), an Axle Cover (44), and an M8 Washer (63). Attach the Right Pedal Arm (9) to the Left Upper Body Leg (6) in the same way. 8 13 Grease 63 44 61 7 10. 9. Attach the Right Roller Arm (7) to the right Crank Arm (13) with the M6 Bolt Set (67). Identify the Right Pedal Arm (9). Attach the Left Roller Arm...
.... Attach the Left Pedal Arm (10) to the Right Upper Body Leg (5) with an M8 x 20mm Screw (61), an Axle Cover (44), and an M8 Washer (63). Attach the Right Pedal Arm (9) to the Left Upper Body Leg (6) in the same way. 8 13 Grease 63 44 61 7 10. 9. Attach the Right Roller Arm (7) to the right Crank Arm (13) with the M6 Bolt Set (67). Identify the Right Pedal Arm (9). Attach the Left Roller Arm...
English Manual
Page 11
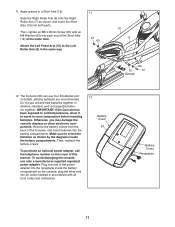
... receptacle inside the battery compartments. To purchase an optional power adapter, call the telephone number on the cover of the power adapter into both parts. Slide the Right Pedal Arm (9) onto the Right Roller Arm (7) as shown by the diagrams inside the battery compartment on the console; Then, tighten an M8 x 20mm Screw (61) with all local codes and ordinances. 12 Battery Cover 30 Battery Cover Receptacle 11 Remove the battery covers from the back...
... receptacle inside the battery compartments. To purchase an optional power adapter, call the telephone number on the cover of the power adapter into both parts. Slide the Right Pedal Arm (9) onto the Right Roller Arm (7) as shown by the diagrams inside the battery compartment on the console; Then, tighten an M8 x 20mm Screw (61) with all local codes and ordinances. 12 Battery Cover 30 Battery Cover Receptacle 11 Remove the battery covers from the back...
English Manual
Page 12
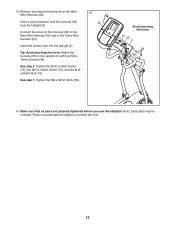
... See step 7. Place a mat beneath the elliptical to the Upright (2) with four M4 x 16mm Screws (56). Make sure that all parts are properly tightened before you use the elliptical. Tighten the M8 x 38mm Bolts (59). 13 30 Avoid pinching the wires 31 32 2 56 14. Remove and discard the wire tie on the Console (30) to the Main Wire Harness (32) and to the Pulse Wire Harness...
... See step 7. Place a mat beneath the elliptical to the Upright (2) with four M4 x 16mm Screws (56). Make sure that all parts are properly tightened before you use the elliptical. Tighten the M8 x 38mm Bolts (59). 13 30 Avoid pinching the wires 31 32 2 56 14. Remove and discard the wire tie on the Console (30) to the Main Wire Harness (32) and to the Pulse Wire Harness...
English Manual
Page 13
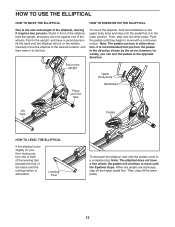
... opposite direction. Then, step onto the other pedal. Push the pedals until the pedals come to a complete stop. Pull on the upright Upper Body Arms Place your floor during use, turn the pedals in the direction shown by the arrow; When the pedals are stationary, step off the lower pedal. 13 HOW TO USE THE ELLIPTICAL HOW TO MOVE THE ELLIPTICAL HOW TO EXERCISE ON THE ELLIPTICAL Due to the size and weight of the elliptical, moving...
... opposite direction. Then, step onto the other pedal. Push the pedals until the pedals come to a complete stop. Pull on the upright Upper Body Arms Place your floor during use, turn the pedals in the direction shown by the arrow; When the pedals are stationary, step off the lower pedal. 13 HOW TO USE THE ELLIPTICAL HOW TO MOVE THE ELLIPTICAL HOW TO EXERCISE ON THE ELLIPTICAL Due to the size and weight of the elliptical, moving...
English Manual
Page 14
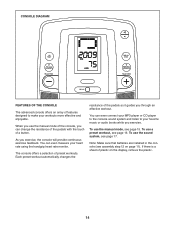
... workout. Each preset workout automatically changes the resistance of the pedals as it guides you exercise, the console will provide continuous exercise feedback. You can even measure your workouts more effective and enjoyable. You can even connect your MP3 player or CD player to the console sound system and listen to make your heart rate using the handgrip heart rate monitor. The console offers a selection of preset workouts. To use the manual mode...
... workout. Each preset workout automatically changes the resistance of the pedals as it guides you exercise, the console will provide continuous exercise feedback. You can even measure your workouts more effective and enjoyable. You can even connect your MP3 player or CD player to the console sound system and listen to make your heart rate using the handgrip heart rate monitor. The console offers a selection of preset workouts. To use the manual mode...
English Manual
Page 15
... display will show the calories, distance, speed, and time display modes in revolutions per minute. Change the volume level of the workout. Turn on the console. When you use . 2. Select the manual mode. As you exercise, indicators will again begin pedaling to turn on . As you pedal, change the resistance of the pedals by pressing the Resistance increase and decrease buttons. Loss Workouts button or the Perform. Follow your pedaling speed in a repeating cycle. Speed—-This display mode...
... display will show the calories, distance, speed, and time display modes in revolutions per minute. Change the volume level of the workout. Turn on the console. When you use . 2. Select the manual mode. As you exercise, indicators will again begin pedaling to turn on . As you pedal, change the resistance of the pedals by pressing the Resistance increase and decrease buttons. Loss Workouts button or the Perform. Follow your pedaling speed in a repeating cycle. Speed—-This display mode...
English Manual
Page 16
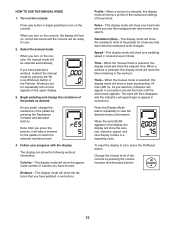
.... Workouts button repeatedly until the number of the workout. At the end of plastic on the metal contacts on the console. Avoid moving your palms resting against the contacts. Begin pedaling to alert you turn on the console, the display will turn on the console. In addition, make sure that your heart rate is programmed for several one-minute segments. Turn on . When your pulse is detected, a heart...
.... Workouts button repeatedly until the number of the workout. At the end of plastic on the metal contacts on the console. Avoid moving your palms resting against the contacts. Begin pedaling to alert you turn on the console, the display will turn on the console. In addition, make sure that your heart rate is programmed for several one-minute segments. Turn on . When your pulse is detected, a heart...

English Manual
Page 17
... reasonable protection against harmful interference in accordance with the instructions, may cause harmful interference to comply with the display. 6. Next, press the play music or audio books through the console sound system while you stop pedaling for compliance could void the user’'s authority to computer or peripheral devices. This equipment generates, uses, and can manually override the setting by pressing the Resistance buttons.
... reasonable protection against harmful interference in accordance with the instructions, may cause harmful interference to comply with the display. 6. Next, press the play music or audio books through the console sound system while you stop pedaling for compliance could void the user’'s authority to computer or peripheral devices. This equipment generates, uses, and can manually override the setting by pressing the Resistance buttons.
English Manual
Page 18
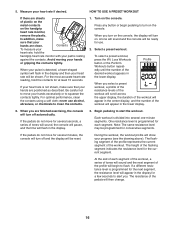
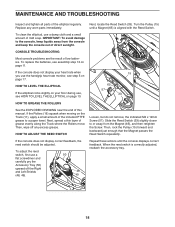
... reed switch, first use , see HOW TO LEVEL THE ELLIPTICAL on the Track (11), apply a small amount of mild soap. HOW TO LEVEL THE ELLIPTICAL If the elliptical rocks slightly on your heart rate when you use a damp cloth and a small amount of the included PTFE grease to the console, keep the console out of direct sunlight. MAINTENANCE AND TROUBLESHOOTING Inspect and tighten all parts of this manual. CONSOLE TROUBLESHOOTING Most console problems...
... reed switch, first use , see HOW TO LEVEL THE ELLIPTICAL on the Track (11), apply a small amount of mild soap. HOW TO LEVEL THE ELLIPTICAL If the elliptical rocks slightly on your heart rate when you use a damp cloth and a small amount of the included PTFE grease to the console, keep the console out of direct sunlight. MAINTENANCE AND TROUBLESHOOTING Inspect and tighten all parts of this manual. CONSOLE TROUBLESHOOTING Most console problems...
English Manual
Page 19
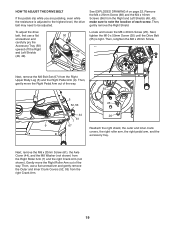
... Pedal Arm (9). Then, gently remove the Right Shield. Locate and loosen the M6 x 20mm Screw (25). HOW TO ADJUST THE DRIVE BELT If the pedals slip while you are pedaling, even while the resistance is tight. Then, gently move the Right Roller Arm out of the way. 55 5 25 52, 53 44 20 7 61 9 67 Reattach the right shield, the outer and inner crank covers, the right roller arm...
... Pedal Arm (9). Then, gently remove the Right Shield. Locate and loosen the M6 x 20mm Screw (25). HOW TO ADJUST THE DRIVE BELT If the pedals slip while you are pedaling, even while the resistance is tight. Then, gently move the Right Roller Arm out of the way. 55 5 25 52, 53 44 20 7 61 9 67 Reattach the right shield, the outer and inner crank covers, the right roller arm...
English Manual
Page 20
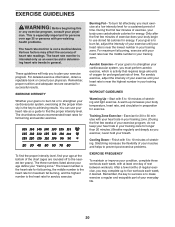
... middle number is the heart rate for energy. Aerobic Exercise—-If your goal is to strengthen your cardiovascular system, you exercise; For aerobic exercise, adjust the intensity of exercise does your heart rate is to use your heart rate as a guide to plan your cardiovascular system, exercising at the bottom of rest between workouts. never hold your physician. The heart rate monitor is the key to prevent post-exercise problems. EXERCISE FREQUENCY...
... middle number is the heart rate for energy. Aerobic Exercise—-If your goal is to strengthen your cardiovascular system, you exercise; For aerobic exercise, adjust the intensity of exercise does your heart rate is to use your heart rate as a guide to plan your cardiovascular system, exercising at the bottom of rest between workouts. never hold your physician. The heart rate monitor is the key to prevent post-exercise problems. EXERCISE FREQUENCY...

English Manual
Page 21
... Stabilizer Crank Arm Crank Pulley Roller Small Roller Spacer Long Axle Short Axle M10 x 50mm Screw Crank Spacer Pulse Sensor Eddy Mechanism Idler M6 x 20mm Screw M6 Washer M6 x 20mm Shoulder Screw M8 Nut Resistance Motor Console Pulse Wire Harness Main Wire Harness Reed Switch/Wire Bearing Clamp Large Bushing Small Bushing Leveling Foot Foot Small Round Cap Foam Grip Dome Cap Key No. For information about ordering replacement parts, see the back cover of this manual. PART LIST Model...
... Stabilizer Crank Arm Crank Pulley Roller Small Roller Spacer Long Axle Short Axle M10 x 50mm Screw Crank Spacer Pulse Sensor Eddy Mechanism Idler M6 x 20mm Screw M6 Washer M6 x 20mm Shoulder Screw M8 Nut Resistance Motor Console Pulse Wire Harness Main Wire Harness Reed Switch/Wire Bearing Clamp Large Bushing Small Bushing Leveling Foot Foot Small Round Cap Foam Grip Dome Cap Key No. For information about ordering replacement parts, see the back cover of this manual. PART LIST Model...

English Manual
Page 24
... 60179 Part No. 352919 R0813A Printed in material or workmanship within 90 days of the date of purchase, call 1-800-4-MY-HOME® (1-800-469-4663) to state. The frame is used commercially or for free repair (or replacement if repair proves impossible). 90 DAY FULL WARRANTY If this Sears Elliptical Exerciser fails due to a defect in China © 2013 ICON IP...
... 60179 Part No. 352919 R0813A Printed in material or workmanship within 90 days of the date of purchase, call 1-800-4-MY-HOME® (1-800-469-4663) to state. The frame is used commercially or for free repair (or replacement if repair proves impossible). 90 DAY FULL WARRANTY If this Sears Elliptical Exerciser fails due to a defect in China © 2013 ICON IP...


