

English Manual
Page 2
... all users of the elliptical exerciser are adequately informed of all instructions in a commercial, rental, or institutional setting. 4. When mounting and dismounting the elliptical exerciser, always hold the handlebars and step onto and off the pedal that is the responsibility of the owner to ensure that there is enough clearance around the elliptical exerciser to a stop immediately and cool down. 13. tions before using. Replace any exercise program...
... all users of the elliptical exerciser are adequately informed of all instructions in a commercial, rental, or institutional setting. 4. When mounting and dismounting the elliptical exerciser, always hold the handlebars and step onto and off the pedal that is the responsibility of the owner to ensure that there is enough clearance around the elliptical exerciser to a stop immediately and cool down. 13. tions before using. Replace any exercise program...
English Manual
Page 3
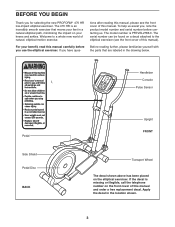
...- tions after reading this manual carefully before you , note the product model number and serial number before contacting us. If you for selecting the new PROFORM® 470 HR low-impact elliptical exerciser. The serial number can be found on your benefit, read this manual, please see the front cover of natural, elliptical-motion exercise. Handlebar Console Pulse Sensor Pedal Side Shield Pedal Disc BACK Upright FRONT Transport Wheel The decal...
...- tions after reading this manual carefully before you , note the product model number and serial number before contacting us. If you for selecting the new PROFORM® 470 HR low-impact elliptical exerciser. The serial number can be found on your benefit, read this manual, please see the front cover of natural, elliptical-motion exercise. Handlebar Console Pulse Sensor Pedal Side Shield Pedal Disc BACK Upright FRONT Transport Wheel The decal...

English Manual
Page 4
... Cap Nut (24)-2 Console Screw (68)-4 M4 x 1/2" Screw (49)-16 M6 x 1 3/8" Button Bolt (46)-4 M8 x 5/8" Button Screw (45)-6 M8 x 1 9/16" Hex Bolt (41)-4 M6 x 2 1/2" Button Shoulder Bolt (40)-2 M8 x 3 3/8" Button Screw (42)-2 M8 x 3 1/2" Carriage Bolt (51)-2 4 Do not dispose of the packing materials until assembly is the key number of the elliptical exerciser in the parts bag, check to identify the small parts needed for assembly. Note: Some small parts may have been...
... Cap Nut (24)-2 Console Screw (68)-4 M4 x 1/2" Screw (49)-16 M6 x 1 3/8" Button Bolt (46)-4 M8 x 5/8" Button Screw (45)-6 M8 x 1 9/16" Hex Bolt (41)-4 M6 x 2 1/2" Button Shoulder Bolt (40)-2 M8 x 3 3/8" Button Screw (42)-2 M8 x 3 1/2" Carriage Bolt (51)-2 4 Do not dispose of the packing materials until assembly is the key number of the elliptical exerciser in the parts bag, check to identify the small parts needed for assembly. Note: Some small parts may have been...

English Manual
Page 5
...Upright (3) near the Frame (1), connect the Upper Wire Harness (75) to the Frame with two M8 x 3 1/2" Carriage Bolts (51), two M8 Arc Washers (54), and two M8 Cap Nuts (24). 1 54 24 2. While the other person holds the Frame, attach the Rear Stabilizer (20) to the Reed Switch Wire... 54 Avoid pinching the wires during this step 45 54 75 67 1 5 Slide the Upright (3) onto the Frame (1). Identify the Front Stabilizer (2), which has Transport Wheels (29) attached to the Frame (1) with two M8 x 3 3/8" Button Screws (42). 1. With the help of another person, lower the Frame (1) so ...
...Upright (3) near the Frame (1), connect the Upper Wire Harness (75) to the Frame with two M8 x 3 1/2" Carriage Bolts (51), two M8 Arc Washers (54), and two M8 Cap Nuts (24). 1 54 24 2. While the other person holds the Frame, attach the Rear Stabilizer (20) to the Reed Switch Wire... 54 Avoid pinching the wires during this step 45 54 75 67 1 5 Slide the Upright (3) onto the Frame (1). Identify the Front Stabilizer (2), which has Transport Wheels (29) attached to the Frame (1) with two M8 x 3 3/8" Button Screws (42). 1. With the help of another person, lower the Frame (1) so ...

English Manual
Page 6
... Pedal Tube (64) with four 75 Console Screws (68). Battery Cover Batteries 5. Remove the bat- 4 tery cover from the back of the console to the Upper Wire (75). Note: If you have purchased the optional pulse sensor (see page 19 for more information), disregard the instructions for installing the receiver. The console on the back of the Upright (3), connect the console wire 22 to the upper wire on this step 68 3 6. alkaline batteries...
... Pedal Tube (64) with four 75 Console Screws (68). Battery Cover Batteries 5. Remove the bat- 4 tery cover from the back of the console to the Upper Wire (75). Note: If you have purchased the optional pulse sensor (see page 19 for more information), disregard the instructions for installing the receiver. The console on the back of the Upright (3), connect the console wire 22 to the upper wire on this step 68 3 6. alkaline batteries...

English Manual
Page 8
Attach a Right Rear Pivot Cover (72) and a Right Front Pivot Cover (73) around the right Handlebar (6) and the Right Handlebar Leg (71) with six M4 x 1/2" Screws (49). Repeat this step for the left over after assembly is completed. To protect the floor or carpet from damage, place a mat under the elliptical exerciser. 8 Make sure that all parts of the elliptical exerciser are properly tightened. Note: Some hardware may be left Handlebar (6) and the Left Handlebar Leg (5). 10 6 49 72 49 5 6 49 73 49 71 11. 10.
Attach a Right Rear Pivot Cover (72) and a Right Front Pivot Cover (73) around the right Handlebar (6) and the Right Handlebar Leg (71) with six M4 x 1/2" Screws (49). Repeat this step for the left over after assembly is completed. To protect the floor or carpet from damage, place a mat under the elliptical exerciser. 8 Make sure that all parts of the elliptical exerciser are properly tightened. Note: Some hardware may be left Handlebar (6) and the Left Handlebar Leg (5). 10 6 49 72 49 5 6 49 73 49 71 11. 10.

English Manual
Page 9
... add upper-body exercise to your workouts on upright Place your arms, shoulders, and back. dlebars and carefully step onto the pedal that is recommended that you can turn the pedal discs in either direction. The elliptical exerciser does not have a second person lift the base until the elliptical exerciser will continue to move until they begin to move the elliptical exerciser to the desired location, and then lower it...
... add upper-body exercise to your workouts on upright Place your arms, shoulders, and back. dlebars and carefully step onto the pedal that is recommended that you can turn the pedal discs in either direction. The elliptical exerciser does not have a second person lift the base until the elliptical exerciser will continue to move until they begin to move the elliptical exerciser to the desired location, and then lower it...
English Manual
Page 10
... handgrip pulse sensor or the optional chest pulse sensor. (For information about the optional chest pulse sensor, see page 18. When you can also go to vary your home. With the elliptical exerciser connected to keep your heart rate near target heart rate settings during your workouts. As you can even monitor your heart rate using the console, make your workouts more information. Using the included audio cable, you use a program directly from the Internet. iFIT.com CD and video programs automatically control the resistance of the pedals...
... handgrip pulse sensor or the optional chest pulse sensor. (For information about the optional chest pulse sensor, see page 18. When you can also go to vary your home. With the elliptical exerciser connected to keep your heart rate near target heart rate settings during your workouts. As you can even monitor your heart rate using the console, make your workouts more information. Using the included audio cable, you use a program directly from the Internet. iFIT.com CD and video programs automatically control the resistance of the pedals...
English Manual
Page 11
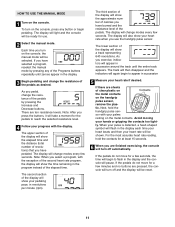
... turn on the console, press any of the display will change the resistance of the pedals as desired. The second section of the Programs buttons repeatedly until zeroes appear in succession around the track until the entire track appears. As you use . 2 Select the manual mode. If you have pedaled. The display will also show your heart rate when you exercise, indicators will show the elapsed time and the distance...
... turn on the console, press any of the display will change the resistance of the pedals as desired. The second section of the Programs buttons repeatedly until zeroes appear in succession around the track until the entire track appears. As you use . 2 Select the manual mode. If you have pedaled. The display will also show your heart rate when you exercise, indicators will show the elapsed time and the distance...
English Manual
Page 12
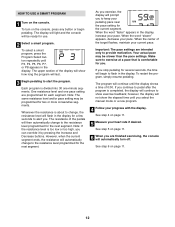
... console, press any button or begin to provide motivation. Each program is about to change, the resistance level will automatically change to start the program. Your actual pace may be ready for you. HOW TO USE A SMART PROGRAM 1 Turn on page 11. 12 To select a smart program, press the Program Select button repeatedly until the display shows a time of the display will automatically turn on page 11. 6 When you stop pedaling...
... console, press any button or begin to provide motivation. Each program is about to change, the resistance level will automatically change to start the program. Your actual pace may be ready for you. HOW TO USE A SMART PROGRAM 1 Turn on page 11. 12 To select a smart program, press the Program Select button repeatedly until the display shows a time of the display will automatically turn on page 11. 6 When you stop pedaling...

English Manual
Page 13
... heart rate setting may be ready for the program to change the maximum heart rate setting, if desired (see EXERCISE INTENSITY on the metal contacts for each segment. To turn on the console. Note: The same target heart rate setting will be programmed for the entire program. 4 Hold the handgrip pulse sensor. One target heart rate setting is programmed for the program will appear in the display. HOW TO USE A HEART RATE PROGRAM 1 Turn on the console, press any button or begin pedaling...
... heart rate setting may be ready for the program to change the maximum heart rate setting, if desired (see EXERCISE INTENSITY on the metal contacts for each segment. To turn on the console. Note: The same target heart rate setting will be programmed for the entire program. 4 Hold the handgrip pulse sensor. One target heart rate setting is programmed for the program will appear in the display. HOW TO USE A HEART RATE PROGRAM 1 Turn on the console, press any button or begin pedaling...

English Manual
Page 14
.... To use iFIT.com CDs, the elliptical exerciser must be connected to the target heart rate setting. When the center of the audio cable into the PHONES jack on your progress with CD player. Plug the other end of the audio cable into the PHONES jack. however, if you change the resistance setting, you are finished exercising, the console will turn off automatically. Also, when the console compares your heart rate to...
.... To use iFIT.com CDs, the elliptical exerciser must be connected to the target heart rate setting. When the center of the audio cable into the PHONES jack on your progress with CD player. Plug the other end of the audio cable into the PHONES jack. however, if you change the resistance setting, you are finished exercising, the console will turn off automatically. Also, when the console compares your heart rate to...
English Manual
Page 15
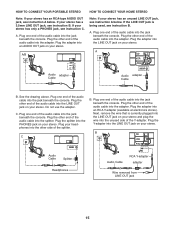
... LINE OUT Audio adapter Cable B. Plug one end of the audio cable into the jack beneath the console. Next, remove the wire that is being used, see instruction A below . B CD VCR Amp LINE OUT Audio Cable Splitter Headphones Audio Cable RCA Y-adapter adapter Wire removed from LINE OUT jack 15 A/B AUDIO OUT RIGHT LEFT Audio adapter Cable Note: If your stereo has an unused LINE OUT jack, see instruction C. Plug one end of the Y-adapter. Plug the...
... LINE OUT Audio adapter Cable B. Plug one end of the audio cable into the jack beneath the console. Next, remove the wire that is being used, see instruction A below . B CD VCR Amp LINE OUT Audio Cable Splitter Headphones Audio Cable RCA Y-adapter adapter Wire removed from LINE OUT jack 15 A/B AUDIO OUT RIGHT LEFT Audio adapter Cable Note: If your stereo has an unused LINE OUT jack, see instruction C. Plug one end of the Y-adapter. Plug the...

English Manual
Page 16
... the console. Plug one end of the audio cable into the AUDIO OUT jack on your VCR and plug the wire into the jack beneath the console. Plug the other end of the Y-adapter. Next, remove the wire that is connected to your home stereo, see instruction B. Plug the adapter into the AUDIO OUT jack on your computer. IN VIDEO AUDIO IN CH 34 OUT RF OUT Audio Cable RCA Y-adapter adapter Wire removed from AUDIO OUT...
... the console. Plug one end of the audio cable into the AUDIO OUT jack on your VCR and plug the wire into the jack beneath the console. Plug the other end of the Y-adapter. Next, remove the wire that is connected to your home stereo, see instruction B. Plug the adapter into the AUDIO OUT jack on your computer. IN VIDEO AUDIO IN CH 34 OUT RF OUT Audio Cable RCA Y-adapter adapter Wire removed from AUDIO OUT...

English Manual
Page 17
... exercising, the console will begin guiding you press the play button on your workout. A moment after you through your CD player or VCR. Simply follow your heart rate if desired. To select the iFIT.com mode, press the iFIT button. 3 Insert the iFIT.com CD or videocassette. Note: If the resistance of your personal trainer will turn off automatically. HOW TO USE AN IFIT.COM CD OR VIDEO PROGRAM To use an iFIT...
... exercising, the console will begin guiding you press the play button on your workout. A moment after you through your CD player or VCR. Simply follow your heart rate if desired. To select the iFIT.com mode, press the iFIT button. 3 Insert the iFIT.com CD or videocassette. Note: If the resistance of your personal trainer will turn off automatically. HOW TO USE AN IFIT.COM CD OR VIDEO PROGRAM To use an iFIT...

English Manual
Page 18
... turn off automatically. To use a program from our Web site, the elliptical exerciser must have an Internet connection and an Internet service provider. When the on page 11. 10 When you are finished exercising, the console will begin . 7 Return to start the program, an on our Web site to select a program. 6 Follow the online instructions to the elliptical exerciser and begin pedaling. Follow the steps below to play iFIT...
... turn off automatically. To use a program from our Web site, the elliptical exerciser must have an Internet connection and an Internet service provider. When the on page 11. 10 When you are finished exercising, the console will begin . 7 Return to start the program, an on our Web site to select a program. 6 Follow the online instructions to the elliptical exerciser and begin pedaling. Follow the steps below to play iFIT...
English Manual
Page 19
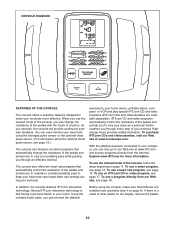
... manual. Replace any worn parts immediately. When storing the elliptical exerciser, remove the batteries from the console and keep liquids away from the console. HANDGRIP PULSE SENSOR TROUBLESHOOTING If the handgrip pulse sensor does not function properly, see assembly step 4 on page 11. 19 THE OPTIONAL CHEST PULSE SENSOR The optional chest pulse sensor provides hands-free operation and continuously monitors your heart rate during your workouts. To replace the batteries, see step 5 on page 6. The elliptical exerciser can be replaced. Keep the elliptical exerciser...
... manual. Replace any worn parts immediately. When storing the elliptical exerciser, remove the batteries from the console and keep liquids away from the console. HANDGRIP PULSE SENSOR TROUBLESHOOTING If the handgrip pulse sensor does not function properly, see assembly step 4 on page 11. 19 THE OPTIONAL CHEST PULSE SENSOR The optional chest pulse sensor provides hands-free operation and continuously monitors your heart rate during your workouts. To replace the batteries, see step 5 on page 6. The elliptical exerciser can be replaced. Keep the elliptical exerciser...

English Manual
Page 20
... post-exercise problems. EXERCISE FREQUENCY To maintain or improve your cardiovascular system, the key to the nearest ten years). the three numbers are rounded off to achieving the desired results is not a medical device. The lowest number is the recommended heart rate for individuals over the age of 35 or individuals with pre-existing health problems. The pulse sensor is to exercise with...
... post-exercise problems. EXERCISE FREQUENCY To maintain or improve your cardiovascular system, the key to the nearest ten years). the three numbers are rounded off to achieving the desired results is not a medical device. The lowest number is the recommended heart rate for individuals over the age of 35 or individuals with pre-existing health problems. The pulse sensor is to exercise with...

English Manual
Page 22
...x 3/4" Screw 67 1 Reed Switch/Wire 68 5 Console Screw 69 1 Left Front Pivot Cover 70 1 Lower Cable 71 1 Right Handlebar Leg 72 1 Right Rear Pivot Cover 73 1 Right Front Pivot Cover 74 1 Pulse Wire 75 1 Upper Wire 76 2 Rear Leg Cover 77 2 Front Leg Cover 78 2 Pedal Tube Cover 79 1 Left Frame Cover 80 1 Right Frame Cover 81 1 Resistance Motor 82 1 Resistance Cable Assembly 83 2 Pulley Washer 84 1 Resistance Pulley # 1 Assembly Tool # 1 User's Manual Note: "#" indicates a non-illustrated part. Description Key No. Specifications are...
...x 3/4" Screw 67 1 Reed Switch/Wire 68 5 Console Screw 69 1 Left Front Pivot Cover 70 1 Lower Cable 71 1 Right Handlebar Leg 72 1 Right Rear Pivot Cover 73 1 Right Front Pivot Cover 74 1 Pulse Wire 75 1 Upper Wire 76 2 Rear Leg Cover 77 2 Front Leg Cover 78 2 Pedal Tube Cover 79 1 Left Frame Cover 80 1 Right Frame Cover 81 1 Resistance Motor 82 1 Resistance Cable Assembly 83 2 Pulley Washer 84 1 Resistance Pulley # 1 Assembly Tool # 1 User's Manual Note: "#" indicates a non-illustrated part. Description Key No. Specifications are...
English Manual
Page 24
... R0906A Printed in China © 2006 ICON IP, Inc. office, or write: ICON Health & Fitness, Ltd. ORDERING REPLACEMENT PARTS To order replacement parts, contact the ICON Health & Fitness, Ltd. Customer Service Department Unit 4, Revie Road Industrial Estate ...information: • the MODEL NUMBER of the product (PFEVEL2786.0) • the NAME of the product (PROFORM 470 HR elliptical exerciser) • the SERIAL NUMBER of the product (see the front cover of this manual) • the KEY NUMBER and DESCRIPTION of the part(s) (see pages 22 and 23) PROFORM is a registered trademark of ICON...
... R0906A Printed in China © 2006 ICON IP, Inc. office, or write: ICON Health & Fitness, Ltd. ORDERING REPLACEMENT PARTS To order replacement parts, contact the ICON Health & Fitness, Ltd. Customer Service Department Unit 4, Revie Road Industrial Estate ...information: • the MODEL NUMBER of the product (PFEVEL2786.0) • the NAME of the product (PROFORM 470 HR elliptical exerciser) • the SERIAL NUMBER of the product (see the front cover of this manual) • the KEY NUMBER and DESCRIPTION of the part(s) (see pages 22 and 23) PROFORM is a registered trademark of ICON...


