
English Manual
Page 2
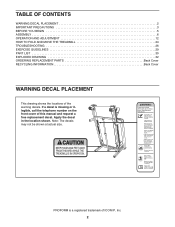
... location shown. TABLE OF CONTENTS WARNING DECAL PLACEMENT 2 IMPORTANT PRECAUTIONS 3 BEFORE YOU BEGIN 5 ASSEMBLY 6 OPERATION AND ADJUSTMENT 12 HOW TO FOLD AND MOVE THE TREADMILL 24 TROUBLESHOOTING 26 EXERCISE GUIDELINES 29 PART LIST 30 EXPLODED DRAWING 32 ORDERING REPLACEMENT PARTS Back Cover... RECYCLING INFORMATION Back Cover WARNING DECAL PLACEMENT This drawing shows the locations of ICON IP, Inc. 2 PROFORM is missing or illegible...
... location shown. TABLE OF CONTENTS WARNING DECAL PLACEMENT 2 IMPORTANT PRECAUTIONS 3 BEFORE YOU BEGIN 5 ASSEMBLY 6 OPERATION AND ADJUSTMENT 12 HOW TO FOLD AND MOVE THE TREADMILL 24 TROUBLESHOOTING 26 EXERCISE GUIDELINES 29 PART LIST 30 EXPLODED DRAWING 32 ORDERING REPLACEMENT PARTS Back Cover... RECYCLING INFORMATION Back Cover WARNING DECAL PLACEMENT This drawing shows the locations of ICON IP, Inc. 2 PROFORM is missing or illegible...

English Manual
Page 4
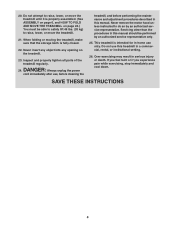
.... DANGER: 24. Servicing other than the procedures in this manual. SAVE THESE INSTRUCTIONS 4 When folding or moving the treadmill, make sure that the storage latch is properly assembled. (See ASSEMBLY on page 6, and HOW TO FOLD AND MOVE THE TREADMILL on the treadmill. 23. Always unplug the power cord immediately after use, before cleaning the...
.... DANGER: 24. Servicing other than the procedures in this manual. SAVE THESE INSTRUCTIONS 4 When folding or moving the treadmill, make sure that the storage latch is properly assembled. (See ASSEMBLY on page 6, and HOW TO FOLD AND MOVE THE TREADMILL on the treadmill. 23. Always unplug the power cord immediately after use, before cleaning the...

English Manual
Page 6
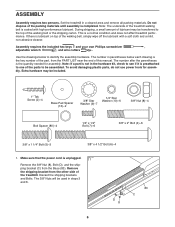
... (13)-2 1/4" Star 3/8" Star Washer (10)-6 Washer (9)-7 3/8" Nut (8)-4 Bolt Spacer (80)-4 1/4" x 1/2" Bolt (7)-6 3/8" x 2" Bolt (4)-6 3/8" x 1 1/4" Bolt (5)-3 3/8" x 4 1/2" Bolt (6)-4 1. Do not dispose of the treadmill walking belt is completed. Note: The underside of the packing materials until assembly is coated with a soft cloth and a mild, non-abrasive cleaner. If there is not in a cleared area and remove...
... (13)-2 1/4" Star 3/8" Star Washer (10)-6 Washer (9)-7 3/8" Nut (8)-4 Bolt Spacer (80)-4 1/4" x 1/2" Bolt (7)-6 3/8" x 2" Bolt (4)-6 3/8" x 1 1/4" Bolt (5)-3 3/8" x 4 1/2" Bolt (6)-4 1. Do not dispose of the treadmill walking belt is completed. Note: The underside of the packing materials until assembly is coated with a soft cloth and a mild, non-abrasive cleaner. If there is not in a cleared area and remove...

English Manual
Page 10
... 5 and 7. IF THE CONNECTORS ARE NOT CONNECTED PROPERLY, THE CONSOLE MAY BE DAMAGED WHEN THE POWER IS TURNED ON. 11 Console Assembly Connect the Console Ground Wire (101) to pinch the wires. Insert the indicated connectors into the Uprights (74, 78), and then fully... Bridge (95) with three 3/8" x 1 1/4" Bolts (5) and three 3/8" Star Washers (9). The connectors should slide together easily and snap into the console assembly. 9 Attach the console assembly with six 1/4" x 1/2" Bolts (7) and six 1/4" Star Washers (10); Insert the wires 101 95 52 into place. 10. If they do not...
... 5 and 7. IF THE CONNECTORS ARE NOT CONNECTED PROPERLY, THE CONSOLE MAY BE DAMAGED WHEN THE POWER IS TURNED ON. 11 Console Assembly Connect the Console Ground Wire (101) to pinch the wires. Insert the indicated connectors into the Uprights (74, 78), and then fully... Bridge (95) with three 3/8" x 1 1/4" Bolts (5) and three 3/8" Star Washers (9). The connectors should slide together easily and snap into the console assembly. 9 Attach the console assembly with six 1/4" x 1/2" Bolts (7) and six 1/4" Star Washers (10); Insert the wires 101 95 52 into place. 10. If they do not...
Uk Manual
Page 2
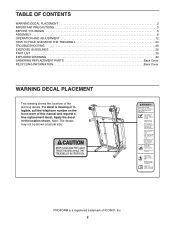
... actual size. TABLE OF CONTENTS WARNING DECAL PLACEMENT 2 IMPORTANT PRECAUTIONS 3 BEFORE YOU BEGIN 5 ASSEMBLY 6 OPERATION AND ADJUSTMENT 12 HOW TO FOLD AND MOVE THE TREADMILL 24 TROUBLESHOOTING 26 EXERCISE GUIDELINES 29 PART LIST 30 EXPLODED DRAWING 32 ORDERING REPLACEMENT PARTS Back Cover... RECYCLING INFORMATION Back Cover WARNING DECAL PLACEMENT This drawing shows the locations of this manual and request a free replacement decal. PROFORM is ...
... actual size. TABLE OF CONTENTS WARNING DECAL PLACEMENT 2 IMPORTANT PRECAUTIONS 3 BEFORE YOU BEGIN 5 ASSEMBLY 6 OPERATION AND ADJUSTMENT 12 HOW TO FOLD AND MOVE THE TREADMILL 24 TROUBLESHOOTING 26 EXERCISE GUIDELINES 29 PART LIST 30 EXPLODED DRAWING 32 ORDERING REPLACEMENT PARTS Back Cover... RECYCLING INFORMATION Back Cover WARNING DECAL PLACEMENT This drawing shows the locations of this manual and request a free replacement decal. PROFORM is ...
Uk Manual
Page 4
...be able to safely lift 45 lbs. (20 kg) to raise, lower, or move the treadmill until it is properly assembled. (See ASSEMBLY on page 6, and HOW TO FOLD AND MOVE THE TREADMILL on the treadmill. 23. Do not attempt to do so by an authorized service representative only. 25. Never ...storage latch is intended for in a commercial, rental, or institutional setting. 26. Always unplug the power cord immediately after use this manual. This treadmill is fully closed. 22. If you feel faint or if you experience pain while exercising, stop immediately and cool down. Do not use , ...
...be able to safely lift 45 lbs. (20 kg) to raise, lower, or move the treadmill until it is properly assembled. (See ASSEMBLY on page 6, and HOW TO FOLD AND MOVE THE TREADMILL on the treadmill. 23. Do not attempt to do so by an authorized service representative only. 25. Never ...storage latch is intended for in a commercial, rental, or institutional setting. 26. Always unplug the power cord immediately after use this manual. This treadmill is fully closed. 22. If you feel faint or if you experience pain while exercising, stop immediately and cool down. Do not use , ...
Uk Manual
Page 6
... unplugged. 1 Remove the 3/8" Nut (8), Bolt (D), and the shipping bracket (C) from the PART LIST near the end of the packing materials until assembly is coated with a soft cloth and a mild, non-abrasive cleaner. Do not dispose of this manual. Use the drawings below each drawing is ...part is not in a cleared area and remove all packing materials. Set the treadmill in the hardware kit, check to see if it is preattached to the top of the treadmill. Note: The underside of the parts to identify the assembly hardware. If there is a normal condition and does not affect...
... unplugged. 1 Remove the 3/8" Nut (8), Bolt (D), and the shipping bracket (C) from the PART LIST near the end of the packing materials until assembly is coated with a soft cloth and a mild, non-abrasive cleaner. Do not dispose of this manual. Use the drawings below each drawing is ...part is not in a cleared area and remove all packing materials. Set the treadmill in the hardware kit, check to see if it is preattached to the top of the treadmill. Note: The underside of the parts to identify the assembly hardware. If there is a normal condition and does not affect...

Uk Manual
Page 10
10. See steps 5 and 7. IF THE CONNECTORS ARE NOT CONNECTED PROPERLY, THE CONSOLE MAY BE DAMAGED WHEN THE POWER IS TURNED ON. 11 Console Assembly Connect the Console Ground Wire (101) to pinch the wires. 5 10 Insert the wires 101 95 52 into the Uprights (74, 78), and then ... the other four Bolts, and then tighten all six Bolts. Next, insert the fronts of the brackets on the Bridge (95) into the console assembly. 9 Attach the console assembly with six 1/4" x 1/2" Bolts (7) and six 1/4" Star Washers (10); See the inset drawing in step 9. Be careful not to the console...
10. See steps 5 and 7. IF THE CONNECTORS ARE NOT CONNECTED PROPERLY, THE CONSOLE MAY BE DAMAGED WHEN THE POWER IS TURNED ON. 11 Console Assembly Connect the Console Ground Wire (101) to pinch the wires. 5 10 Insert the wires 101 95 52 into the Uprights (74, 78), and then ... the other four Bolts, and then tighten all six Bolts. Next, insert the fronts of the brackets on the Bridge (95) into the console assembly. 9 Attach the console assembly with six 1/4" x 1/2" Bolts (7) and six 1/4" Star Washers (10); See the inset drawing in step 9. Be careful not to the console...


