
English Manual
Page 1
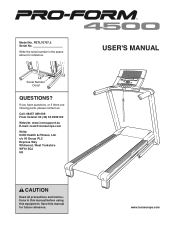
Serial Number Decal QUESTIONS? USER'S MANUAL www.iconeurope.com Write the serial number in this manual before using this manual for reference. PETL70707.2 Serial No. If you have questions, or if there are missing parts, please contact us: Call: 08457 089 009 From Ireland: 00 (44) 53 9236102 Website: www.iconsupport.eu E-mail: [email protected] Write: ICON Health & Fitness, Ltd. c/o HI Group PLC Express Way Whitwood, West Yorkshire WF10 5QJ UK CAUTION Read all precautions and instructions in the space above for future reference. Save this equipment. Model No.
Serial Number Decal QUESTIONS? USER'S MANUAL www.iconeurope.com Write the serial number in this manual before using this manual for reference. PETL70707.2 Serial No. If you have questions, or if there are missing parts, please contact us: Call: 08457 089 009 From Ireland: 00 (44) 53 9236102 Website: www.iconsupport.eu E-mail: [email protected] Write: ICON Health & Fitness, Ltd. c/o HI Group PLC Express Way Whitwood, West Yorkshire WF10 5QJ UK CAUTION Read all precautions and instructions in the space above for future reference. Save this equipment. Model No.
English Manual
Page 2
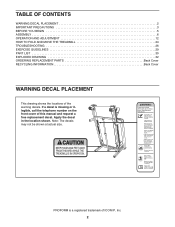
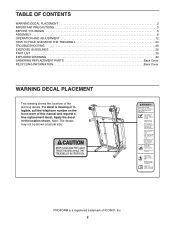
...WARNING DECAL PLACEMENT 2 IMPORTANT PRECAUTIONS 3 BEFORE YOU BEGIN 5 ASSEMBLY 6 OPERATION AND ADJUSTMENT 12 HOW TO FOLD AND MOVE THE TREADMILL 24 TROUBLESHOOTING 26 EXERCISE GUIDELINES 29 PART LIST 30 EXPLODED DRAWING 32 ORDERING REPLACEMENT PARTS Back Cover RECYCLING INFORMATION Back Cover WARNING DECAL... PLACEMENT This drawing shows the locations of ICON IP, Inc. 2 PROFORM is missing or illegible, call the telephone number on the front cover of this manual and request a free replacement decal. Apply the decal in the location shown. If a ...
...WARNING DECAL PLACEMENT 2 IMPORTANT PRECAUTIONS 3 BEFORE YOU BEGIN 5 ASSEMBLY 6 OPERATION AND ADJUSTMENT 12 HOW TO FOLD AND MOVE THE TREADMILL 24 TROUBLESHOOTING 26 EXERCISE GUIDELINES 29 PART LIST 30 EXPLODED DRAWING 32 ORDERING REPLACEMENT PARTS Back Cover RECYCLING INFORMATION Back Cover WARNING DECAL... PLACEMENT This drawing shows the locations of ICON IP, Inc. 2 PROFORM is missing or illegible, call the telephone number on the front cover of this manual and request a free replacement decal. Apply the decal in the location shown. If a ...

English Manual
Page 3
... only a 3conductor, 14-gauge (1 mm2) cord that all users of this treadmill are used or where oxygen is not a medical device. Various factors, including the user's movement, may affect the accuracy of this manual and all important precautions and in- The pulse sensor is not in speed. ...9. cuit. The pulse sensor is being administered. 7. ICON assumes no longer than one person on any exercise program, consult your treadmill. It is the responsibility of the...
... only a 3conductor, 14-gauge (1 mm2) cord that all users of this treadmill are used or where oxygen is not a medical device. Various factors, including the user's movement, may affect the accuracy of this manual and all important precautions and in- The pulse sensor is not in speed. ...9. cuit. The pulse sensor is being administered. 7. ICON assumes no longer than one person on any exercise program, consult your treadmill. It is the responsibility of the...
English Manual
Page 4
...an authorized service representative. DANGER: 24. Servicing other than the procedures in this manual. Do not use this treadmill in this manual should be able to safely lift 45 lbs. (20 kg) to raise, lower, or move the treadmill until it is properly assembled. (See ASSEMBLY on page 6, and HOW TO ...FOLD AND MOVE THE TREADMILL on the treadmill. 23. SAVE THESE INSTRUCTIONS 4 Always unplug the ...
...an authorized service representative. DANGER: 24. Servicing other than the procedures in this manual. Do not use this treadmill in this manual should be able to safely lift 45 lbs. (20 kg) to raise, lower, or move the treadmill until it is properly assembled. (See ASSEMBLY on page 6, and HOW TO ...FOLD AND MOVE THE TREADMILL on the treadmill. 23. SAVE THESE INSTRUCTIONS 4 Always unplug the ...
English Manual
Page 5
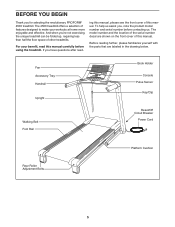
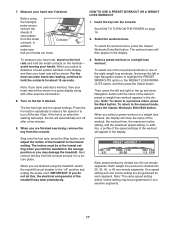
... questions after read this manual. Fan Accessory Tray Handrail Upright Walking Belt Foot Rail Book Holder Console Pulse Sensor Key/Clip Reset/Off Circuit Breaker Power Cord Rear Roller Adjustment Bolts Platform Cushion 5 The 4500 treadmill offers a selection of other treadmills. For your workouts at.... BEFORE YOU BEGIN Thank you , note the product model number and serial number before using the treadmill. ing this manual, please see the front cover of this manual carefully before contacting us assist you for selecting the revolutionary PROFORM® 4500 treadmill.
... questions after read this manual. Fan Accessory Tray Handrail Upright Walking Belt Foot Rail Book Holder Console Pulse Sensor Key/Clip Reset/Off Circuit Breaker Power Cord Rear Roller Adjustment Bolts Platform Cushion 5 The 4500 treadmill offers a selection of other treadmills. For your workouts at.... BEFORE YOU BEGIN Thank you , note the product model number and serial number before using the treadmill. ing this manual, please see the front cover of this manual carefully before contacting us assist you for selecting the revolutionary PROFORM® 4500 treadmill.
English Manual
Page 6
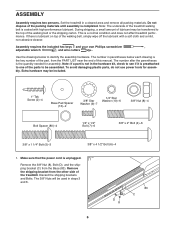
... hardware may be assembled. ASSEMBLY Assembly requires two persons. Do not dispose of the walking belt or the shipping carton. Note: The underside of the treadmill. The number after the parentheses is not in steps 3 and 6. Note: If a part is the quantity needed for assembly. Use the drawings below.... 1 Remove the 3/8" Nut (8), Bolt (D), and the shipping bracket (C) from the other side of the treadmill walking belt is the key number of the part, from the PART LIST near the end of this manual. The 3/8" Nuts will be used in the hardware kit, check to see if it is a normal...
... hardware may be assembled. ASSEMBLY Assembly requires two persons. Do not dispose of the walking belt or the shipping carton. Note: The underside of the treadmill. The number after the parentheses is not in steps 3 and 6. Note: If a part is the quantity needed for assembly. Use the drawings below.... 1 Remove the 3/8" Nut (8), Bolt (D), and the shipping bracket (C) from the other side of the treadmill walking belt is the key number of the part, from the PART LIST near the end of this manual. The 3/8" Nuts will be used in the hardware kit, check to see if it is a normal...
English Manual
Page 13
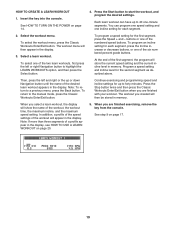
... fitness journal, see page 14. As you can even create two of your heart rate using the treadmill. To identify yourself as it guides you use the manual mode, see page 17. To use the treadmill, observe the alignment of the walking belt, and center the walking belt if necessary (see page 20...
... fitness journal, see page 14. As you can even create two of your heart rate using the treadmill. To identify yourself as it guides you use the manual mode, see page 17. To use the treadmill, observe the alignment of the walking belt, and center the walking belt if necessary (see page 20...
English Manual
Page 14
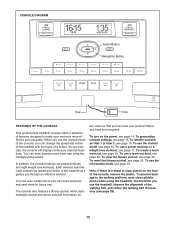
... select console settings. When you plug in the display. Reset Position IMPORTANT: The console features a display demo mode, designed to be used if the treadmill is selected (see the drawing on the foot rails of the clip. If the displays light as soon as User 1 or User 2, enter user ... the display for a few seconds. Test the clip by carefully taking a few seconds and then the user mode menu will also be pulled from the manual mode, press the Select button. 2. Next, highlight the SETUP USER 1 or SETUP USER 2 option and press the Select button. HOW TO PERSONALIZE CONSOLE...
... select console settings. When you plug in the display. Reset Position IMPORTANT: The console features a display demo mode, designed to be used if the treadmill is selected (see the drawing on the foot rails of the clip. If the displays light as soon as User 1 or User 2, enter user ... the display for a few seconds. Test the clip by carefully taking a few seconds and then the user mode menu will also be pulled from the manual mode, press the Select button. 2. Next, highlight the SETUP USER 1 or SETUP USER 2 option and press the Select button. HOW TO PERSONALIZE CONSOLE...
English Manual
Page 16
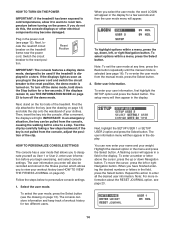
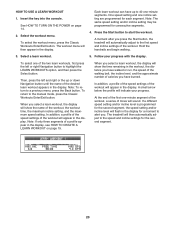
HOW TO USE THE MANUAL MODE 1. Select the manual mode. To start the walking belt, press the Start button, the Speed + button, or one of measurement, see step 7 on page 17). As you use the handgrip pulse sensor (see THE INFORMATION MODE on the treadmill, the display can be selected. Note: Your heart rate...
HOW TO USE THE MANUAL MODE 1. Select the manual mode. To start the walking belt, press the Start button, the Speed + button, or one of measurement, see step 7 on page 17). As you use the handgrip pulse sensor (see THE INFORMATION MODE on the treadmill, the display can be selected. Note: Your heart rate...
English Manual
Page 17
...: If the fan is detected, a heart symbol will flash in a pulse display along with other exercise information. 8. When you fold the treadmill to the "off" position and unplug the power cord. Each weight loss workout is divided into 30 one incline setting are finished exercising, remove... settings. To return to the lowest setting. Measure your hands are finished using the handgrip pulse sensor, remove the sheets of the treadmill to the manual mode, press the Classic Workouts Enter/Exit button. To select one of the six preset workouts or one -minute segments. In addition...
...: If the fan is detected, a heart symbol will flash in a pulse display along with other exercise information. 8. When you fold the treadmill to the "off" position and unplug the power cord. Each weight loss workout is divided into 30 one incline setting are finished exercising, remove... settings. To return to the lowest setting. Measure your hands are finished using the handgrip pulse sensor, remove the sheets of the treadmill to the manual mode, press the Classic Workouts Enter/Exit button. To select one of the six preset workouts or one -minute segments. In addition...
English Manual
Page 19
Press the Start button to the manual mode, press the Classic Workouts Enter/Exit button. Each learn workout can program one speed setting and one of the six numbered percent grade buttons. ...
Press the Start button to the manual mode, press the Classic Workouts Enter/Exit button. Each learn workout can program one speed setting and one of the six numbered percent grade buttons. ...
English Manual
Page 20
...segment, the speed setting and/or incline level will then appear in the display. Hold the handrails and begin walking. 3. Note: To return to the manual mode, press the Classic Workouts Enter/Exit button. Note: If only three segments of the workout will indicate your progress with the display. If a ... HOW TO TURN ON THE POWER on page 19. Each learn workout appears in the display. A moment after you press the Start button, the treadmill will then automatically adjust to alert you have burned. Then, press the left or right Navigation button to start the workout. The...
...segment, the speed setting and/or incline level will then appear in the display. Hold the handrails and begin walking. 3. Note: To return to the manual mode, press the Classic Workouts Enter/Exit button. Note: If only three segments of the workout will indicate your progress with the display. If a ... HOW TO TURN ON THE POWER on page 19. Each learn workout appears in the display. A moment after you press the Start button, the treadmill will then automatically adjust to alert you have burned. Then, press the left or right Navigation button to start the workout. The...
English Manual
Page 26
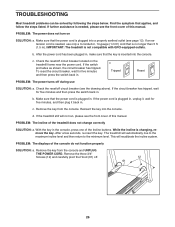
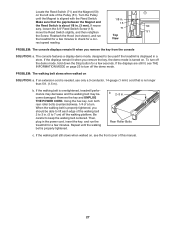
... displays of the treadmill does not change correctly SOLUTION: a. If the switch protrudes as shown, the circuit breaker has tripped. c. d. While the incline is needed , use SOLUTION: a. After a few seconds, re-insert the key. This will not run, please see the front cover of this manual. Remove the key... in, unplug it, wait for five minutes, and then plug it back in . If further assistance is changing, remove the key. IMPORTANT: The treadmill is plugged into a properly earthed outlet (see the drawing above). b. After the power cord has been plugged in . If the circuit breaker has ...
... displays of the treadmill does not change correctly SOLUTION: a. If the switch protrudes as shown, the circuit breaker has tripped. c. d. While the incline is needed , use SOLUTION: a. After a few seconds, re-insert the key. This will not run, please see the front cover of this manual. Remove the key... in, unplug it, wait for five minutes, and then plug it back in . If further assistance is changing, remove the key. IMPORTANT: The treadmill is plugged into a properly earthed outlet (see the drawing above). b. After the power cord has been plugged in . If the circuit breaker has ...
English Manual
Page 27
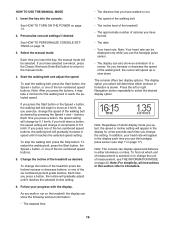
...Pulley (51). When the walking belt is no longer than 5 ft. (1.5 m). b 2-3 in the power cord, insert the key, and run Top the treadmill for a few seconds. Rear Roller Bolts c. The console features a display demo mode, designed to be able to 3 in . Remove the key and UNPLUG... is properly tightened, you remove the key from the console SOLUTION: a. Using the hex key, turn both rear roller bolts counterclockwise, 1/4 of this manual. 27 Locate the Reed Switch (71) and the Magnet (50) on . Turn the Pulley until the walking belt is displayed in . (3 mm...
...Pulley (51). When the walking belt is no longer than 5 ft. (1.5 m). b 2-3 in the power cord, insert the key, and run Top the treadmill for a few seconds. Rear Roller Bolts c. The console features a display demo mode, designed to be able to 3 in . Remove the key and UNPLUG... is properly tightened, you remove the key from the console SOLUTION: a. Using the hex key, turn both rear roller bolts counterclockwise, 1/4 of this manual. 27 Locate the Reed Switch (71) and the Magnet (50) on . Turn the Pulley until the walking belt is displayed in . (3 mm...
English Manual
Page 30
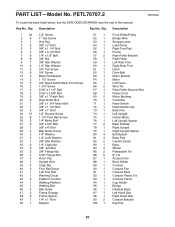
... Hand Grip Console Bracket Key/Clip 30 Qty. PETL70707.2 R0709A To locate the parts listed below, see the EXPLODED DRAWING near the end of this manual. Description Key No. Key No. Qty. PART LIST-Model No.
... Hand Grip Console Bracket Key/Clip 30 Qty. PETL70707.2 R0709A To locate the parts listed below, see the EXPLODED DRAWING near the end of this manual. Description Key No. Key No. Qty. PART LIST-Model No.

English Manual
Page 31
Qty. For information about ordering replacement parts, see the back cover of this manual. *These parts are subject to change without notice. Latch Cap Controller Ground Wire #8 Star Washer Ground Bolt Ground Nut #8 x 5/8" Screw Lift Motor/Controller Wire ... Wire w/Decal 10" Black Wire, M/F 16" Blue Wire, M/F 8" Blue Wire, 2F 12" Red Wire, M/F 4" Black Wire, 2F 8" Green Wire, F/R 8" White Wire, 2F Userʼs Manual Note: Specifications are not illustrated. 31 Qty. Description Key No. Key No. Description 101 1 102 1 103 1 104 1 105 1 106 1 107 1 108 1 109 1 110 1 111 1 112...
Qty. For information about ordering replacement parts, see the back cover of this manual. *These parts are subject to change without notice. Latch Cap Controller Ground Wire #8 Star Washer Ground Bolt Ground Nut #8 x 5/8" Screw Lift Motor/Controller Wire ... Wire w/Decal 10" Black Wire, M/F 16" Blue Wire, M/F 8" Blue Wire, 2F 12" Red Wire, M/F 4" Black Wire, 2F 8" Green Wire, F/R 8" White Wire, 2F Userʼs Manual Note: Specifications are not illustrated. 31 Qty. Description Key No. Key No. Description 101 1 102 1 103 1 104 1 105 1 106 1 107 1 108 1 109 1 110 1 111 1 112...
English Manual
Page 36
... doing so, you will help us : • the model number and serial number of the product (see the front cover of this manual) • the name of the product (see the front cover of this manual) • the key number and description of the replacement part(s) (see the front cover of this... REPLACEMENT PARTS To order replacement parts, please see the PART LIST and the EXPLODED DRAWING near the end of this manual) RECYCLING INFORMATION This electronic product must be recycled after its useful life as required by law. To preserve the environment, this product must not be ...
... doing so, you will help us : • the model number and serial number of the product (see the front cover of this manual) • the name of the product (see the front cover of this manual) • the key number and description of the replacement part(s) (see the front cover of this... REPLACEMENT PARTS To order replacement parts, please see the PART LIST and the EXPLODED DRAWING near the end of this manual) RECYCLING INFORMATION This electronic product must be recycled after its useful life as required by law. To preserve the environment, this product must not be ...

Uk Manual
Page 1
Save this equipment. Write the serial number in this manual before using this manual for reference. c/o HI Group PLC Express Way Whitwood, West Yorkshire WF10 5QJ UK CAUTION Read all precautions and instructions in the space above for future reference. Model No. Serial Number Decal QUESTIONS? PETL70707.2 Serial No. If you have questions, or if there are missing parts, please contact us: Call: 08457 089 009 From Ireland: 00 (44) 53 9236102 Website: www.iconsupport.eu E-mail: [email protected] Write: ICON Health & Fitness, Ltd. USER'S MANUAL www.iconeurope.com
Save this equipment. Write the serial number in this manual before using this manual for reference. c/o HI Group PLC Express Way Whitwood, West Yorkshire WF10 5QJ UK CAUTION Read all precautions and instructions in the space above for future reference. Model No. Serial Number Decal QUESTIONS? PETL70707.2 Serial No. If you have questions, or if there are missing parts, please contact us: Call: 08457 089 009 From Ireland: 00 (44) 53 9236102 Website: www.iconsupport.eu E-mail: [email protected] Write: ICON Health & Fitness, Ltd. USER'S MANUAL www.iconeurope.com
Uk Manual
Page 2
... DECAL PLACEMENT 2 IMPORTANT PRECAUTIONS 3 BEFORE YOU BEGIN 5 ASSEMBLY 6 OPERATION AND ADJUSTMENT 12 HOW TO FOLD AND MOVE THE TREADMILL 24 TROUBLESHOOTING 26 EXERCISE GUIDELINES 29 PART LIST 30 EXPLODED DRAWING 32 ORDERING REPLACEMENT PARTS Back Cover RECYCLING INFORMATION Back Cover WARNING DECAL... PLACEMENT This drawing shows the locations of ICON IP, Inc. 2 PROFORM is missing or illegible, call the telephone number on the front cover of this manual and request a free replacement decal. If a decal is a registered trademark of the warning ...
... DECAL PLACEMENT 2 IMPORTANT PRECAUTIONS 3 BEFORE YOU BEGIN 5 ASSEMBLY 6 OPERATION AND ADJUSTMENT 12 HOW TO FOLD AND MOVE THE TREADMILL 24 TROUBLESHOOTING 26 EXERCISE GUIDELINES 29 PART LIST 30 EXPLODED DRAWING 32 ORDERING REPLACEMENT PARTS Back Cover RECYCLING INFORMATION Back Cover WARNING DECAL... PLACEMENT This drawing shows the locations of ICON IP, Inc. 2 PROFORM is missing or illegible, call the telephone number on the front cover of this manual and request a free replacement decal. If a decal is a registered trademark of the warning ...
Uk Manual
Page 3
... ICON assumes no longer than 5 ft. (1.5 m). 13. The treadmill should be used . 12. Use the treadmill only as an exercise aid in determining heart rate trends in use of this manual and all warnings and precautions. 3. Place the treadmill on the walking belt. If an extension cord is needed, use... the treadmill with at all important precautions and in small increments to the fuse carrier. Do not operate the treadmill if the power cord ...
... ICON assumes no longer than 5 ft. (1.5 m). 13. The treadmill should be used . 12. Use the treadmill only as an exercise aid in determining heart rate trends in use of this manual and all warnings and precautions. 3. Place the treadmill on the walking belt. If an extension cord is needed, use... the treadmill with at all important precautions and in small increments to the fuse carrier. Do not operate the treadmill if the power cord ...


