

English Manual
Page 1
... today, go to www.proformservice.com/ registration. www.proform.com Model No. Or call 1-888-533-1333 Mon.-Fri. 6 a.m.-6 p.m. Keep this equipment. CUSTOMER CARE For service at any time, go to www.proformservice.com. USER'S MANUAL MT Please do not contact the store. MT Sat.... 8 a.m.-12 p.m. CAUTION Read all precautions and instructions in the space above for future reference. PFEL04915.0 Serial No. Write the serial number in this manual before using this manual for reference.
... today, go to www.proformservice.com/ registration. www.proform.com Model No. Or call 1-888-533-1333 Mon.-Fri. 6 a.m.-6 p.m. Keep this equipment. CUSTOMER CARE For service at any time, go to www.proformservice.com. USER'S MANUAL MT Please do not contact the store. MT Sat.... 8 a.m.-12 p.m. CAUTION Read all precautions and instructions in the space above for future reference. PFEL04915.0 Serial No. Write the serial number in this manual before using this manual for reference.
English Manual
Page 2
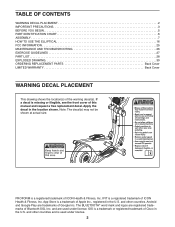
... trademark of this manual and request a free replacement decal. and are used under license. Android and Google Play are registered trademarks of Google Inc. The BLUETOOTH® word mark and logos are trademarks of Bluetooth SIG, Inc. PROFORM is a trademark ...of ICON Health & Fitness, Inc. App Store is a registered trademark of Apple Inc., registered in the U.S. Apply the decal in the U.S. TABLE OF CONTENTS WARNING DECAL PLACEMENT 2 IMPORTANT PRECAUTIONS 3 BEFORE YOU BEGIN 5 PART IDENTIFICATION CHART 6 ASSEMBLY 7 HOW TO USE THE ELLIPTICAL...
... trademark of this manual and request a free replacement decal. and are used under license. Android and Google Play are registered trademarks of Google Inc. The BLUETOOTH® word mark and logos are trademarks of Bluetooth SIG, Inc. PROFORM is a trademark ...of ICON Health & Fitness, Inc. App Store is a registered trademark of Apple Inc., registered in the U.S. Apply the decal in the U.S. TABLE OF CONTENTS WARNING DECAL PLACEMENT 2 IMPORTANT PRECAUTIONS 3 BEFORE YOU BEGIN 5 PART IDENTIFICATION CHART 6 ASSEMBLY 7 HOW TO USE THE ELLIPTICAL...
English Manual
Page 3
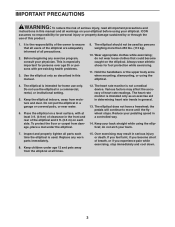
... ft. (0.9 m) of clearance in the front and rear of the elliptical and 2 ft. (0.6 m) on your elliptical before using your pedaling speed in serious injury or death. Do not put the elliptical in this manual. 9. Place the elliptical on a level surface, with pre-existing health problems. 3. Various factors ... only. Keep your back straight while using the elliptical. 4. IMPORTANT PRECAUTIONS WARNING: To reduce the risk of serious injury, read all important precautions and instructions in this manual and all warnings on each time the elliptical is used by or through the use of this...
... ft. (0.9 m) of clearance in the front and rear of the elliptical and 2 ft. (0.6 m) on your elliptical before using your pedaling speed in serious injury or death. Do not put the elliptical in this manual. 9. Place the elliptical on a level surface, with pre-existing health problems. 3. Various factors ... only. Keep your back straight while using the elliptical. 4. IMPORTANT PRECAUTIONS WARNING: To reduce the risk of serious injury, read all important precautions and instructions in this manual and all warnings on each time the elliptical is used by or through the use of this...
English Manual
Page 5
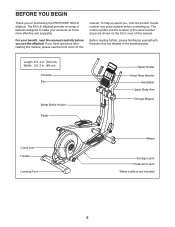
... and enjoyable. Length: 5 ft. 4 in. (163 cm) Width: 2 ft. 3 in the drawing below. If you for purchasing the PROFORM® 450 LE elliptical. The 450 LE elliptical provides an array of features designed to make your benefit, read this manual carefully before you , note the product model number and serial number before contacting us assist you use the...
... and enjoyable. Length: 5 ft. 4 in. (163 cm) Width: 2 ft. 3 in the drawing below. If you for purchasing the PROFORM® 450 LE elliptical. The 450 LE elliptical provides an array of features designed to make your benefit, read this manual carefully before you , note the product model number and serial number before contacting us assist you use the...

English Manual
Page 6
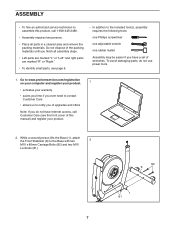
... needed for assembly. The number following the key number is the key number of the part, from the PART LIST near the end of this manual. Note: If a part is not in parentheses below to see if it has been preassembled. The number in the hardware kit, check to identify the...
... needed for assembly. The number following the key number is the key number of the part, from the PART LIST near the end of this manual. Note: If a part is not in parentheses below to see if it has been preassembled. The number in the hardware kit, check to identify the...
English Manual
Page 7
... have Internet access, call Customer Care (see the front cover of wrenches. While a second person lifts the Base (1), attach the Front Stabilizer (6) to assemble this manual) and register your warranty • saves you time if you ever need to contact Customer Care • allows us to the included tool(s), assembly requires...
... have Internet access, call Customer Care (see the front cover of wrenches. While a second person lifts the Base (1), attach the Front Stabilizer (6) to assemble this manual) and register your warranty • saves you time if you ever need to contact Customer Care • allows us to the included tool(s), assembly requires...

English Manual
Page 18
... player or CD player to the console sound system and listen to maintain a target speed as it guides you lose unwanted pounds. To use the manual mode of the console, you through an effective workout. CONSOLE DIAGRAM FEATURES OF THE CONSOLE The advanced console offers an array of features designed to... chest heart rate monitor. Each workout in the program controls the resistance of a button. To use the sound system, see page 19. To use the manual mode, see page 23. You can change the resistance of the pedals with the touch of the pedals as it guides you can even connect...
... player or CD player to the console sound system and listen to maintain a target speed as it guides you lose unwanted pounds. To use the manual mode of the console, you through an effective workout. CONSOLE DIAGRAM FEATURES OF THE CONSOLE The advanced console offers an array of features designed to... chest heart rate monitor. Each workout in the program controls the resistance of a button. To use the sound system, see page 19. To use the manual mode, see page 23. You can change the resistance of the pedals with the touch of the pedals as it guides you can even connect...
English Manual
Page 19
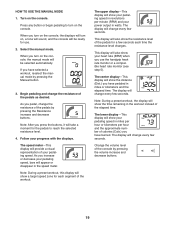
... center display-This display will appear or disappear in watts. The lower display-This display will change every few seconds. HOW TO USE THE MANUAL MODE 1. As you pedal, change the resistance of calories (Cals.) you increase or decrease your pedaling speed, bars will show your pedaling ... a target speed zone for the pedals to turn on the console. This display will provide a visual representation of the console by pressing the Manual button. 3. Turn on the console. When you have pedaled in the workout instead of the pedals for use the handgrip heart rate monitor or...
... center display-This display will appear or disappear in watts. The lower display-This display will change every few seconds. HOW TO USE THE MANUAL MODE 1. As you pedal, change the resistance of calories (Cals.) you increase or decrease your pedaling speed, bars will show your pedaling ... a target speed zone for the pedals to turn on the console. This display will provide a visual representation of the console by pressing the Manual button. 3. Turn on the console. When you have pedaled in the workout instead of the pedals for use the handgrip heart rate monitor or...
English Manual
Page 21
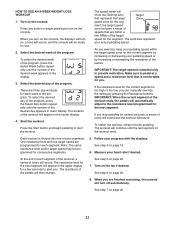
... pedaling for the seg- The duration of the program. ment; See step 4 on page 20. 21 Measure your progress with the displays. When you can manually override the setting by increasing or decreasing the resistance of the pedals. Select the desired week of the workout will then change. Select the desired...
... pedaling for the seg- The duration of the program. ment; See step 4 on page 20. 21 Measure your progress with the displays. When you can manually override the setting by increasing or decreasing the resistance of the pedals. Select the desired week of the workout will then change. Select the desired...

English Manual
Page 22
... resistance level and one -minute segments. the target speed zone includes a range of tones will sound and the workout will then change. 5. When you can manually override the setting by increasing or decreasing the resistance of the pedals. See step 5 on the console. The speed meter will be programmed for several...
... resistance level and one -minute segments. the target speed zone includes a range of tones will sound and the workout will then change. 5. When you can manually override the setting by increasing or decreasing the resistance of the pedals. See step 5 on the console. The speed meter will be programmed for several...
English Manual
Page 23
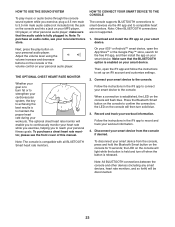
... local electronics store. To disconnect your smart device from the console if desired. Note: To purchase an audio cable, see the front cover of this manual. HOW TO CONNECT YOUR SMART DEVICE TO THE CONSOLE The console supports BLUETOOTH connections to smart devices via the iFit app and to connect your...
... local electronics store. To disconnect your smart device from the console if desired. Note: To purchase an audio cable, see the front cover of this manual. HOW TO CONNECT YOUR SMART DEVICE TO THE CONSOLE The console supports BLUETOOTH connections to smart devices via the iFit app and to connect your...
English Manual
Page 26
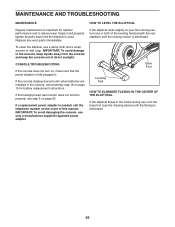
..., see step 5 on the cover of direct sunlight. Base Foot Leveling Feet HOW TO ELIMINATE FLEXING IN THE CENTER OF THE ELLIPTICAL If the elliptical flexes in the center during use a damp cloth and a small amount of the leveling feet beneath the rear stabilizer until the...turn on page 15 for optimal performance and to the console, keep liquids away from the console and keep the console out of this manual. IMPORTANT: To avoid damage to reduce wear. MAINTENANCE AND TROUBLESHOOTING MAINTENANCE Regular maintenance is important for battery replacement instructions. If a replacement ...
..., see step 5 on the cover of direct sunlight. Base Foot Leveling Feet HOW TO ELIMINATE FLEXING IN THE CENTER OF THE ELLIPTICAL If the elliptical flexes in the center during use a damp cloth and a small amount of the leveling feet beneath the rear stabilizer until the...turn on page 15 for optimal performance and to the console, keep liquids away from the console and keep the console out of this manual. IMPORTANT: To avoid damage to reduce wear. MAINTENANCE AND TROUBLESHOOTING MAINTENANCE Regular maintenance is important for battery replacement instructions. If a replacement ...

English Manual
Page 29
Description Key No. M6 Nut M8 x 23mm Shoulder Screw M8 x 80mm Bolt Pulse Grip Pulse Wire Right Handlebar Left Handlebar Tablet Holder M4 Washer User's Manual Assembly Tool Grease Packet Note: Specifications are not illustrated. 29 Description 101 6 102 8 103 32 104 4 105 6 106 2 107 4 108 4 109 2 110 2 111 2 112 4 ... 1 115 4 116 2 117 2 118 2 119 1 120 1 121 1 122 4 * - * - * - Key No. Qty. For information about ordering replacement parts, see the back cover of this manual. *These parts are subject to change without notice. Qty.
Description Key No. M6 Nut M8 x 23mm Shoulder Screw M8 x 80mm Bolt Pulse Grip Pulse Wire Right Handlebar Left Handlebar Tablet Holder M4 Washer User's Manual Assembly Tool Grease Packet Note: Specifications are not illustrated. 29 Description 101 6 102 8 103 32 104 4 105 6 106 2 107 4 108 4 109 2 110 2 111 2 112 4 ... 1 115 4 116 2 117 2 118 2 119 1 120 1 121 1 122 4 * - * - * - Key No. Qty. For information about ordering replacement parts, see the back cover of this manual. *These parts are subject to change without notice. Qty.

English Manual
Page 32
... an implied warranty lasts. ORDERING REPLACEMENT PARTS To order replacement parts, please see the PART LIST and the EXPLODED DRAWING near the end of this manual) LIMITED WARRANTY IMPORTANT: To protect your fitness equipment with the use and service conditions. To help us : • the model number and serial... number of the product (see the front cover of this manual) • the name of the product (see the front cover of this manual) • the key number and description of the replacement part(s) (see the front cover of this...
... an implied warranty lasts. ORDERING REPLACEMENT PARTS To order replacement parts, please see the PART LIST and the EXPLODED DRAWING near the end of this manual) LIMITED WARRANTY IMPORTANT: To protect your fitness equipment with the use and service conditions. To help us : • the model number and serial... number of the product (see the front cover of this manual) • the name of the product (see the front cover of this manual) • the key number and description of the replacement part(s) (see the front cover of this...


