
English Manual
Page 1
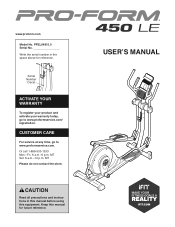
Write the serial number in this manual before using this manual for reference. MT Sat. 8 a.m.-12 p.m. CAUTION Read all precautions and instructions in the space above for future reference. MT Please do not contact the store. USER'S MANUAL CUSTOMER CARE For service at any time, go to www.proformservice.com. Keep this equipment. Serial Number Decal ACTIVATE YOUR WARRANTY To register your product and...
Write the serial number in this manual before using this manual for reference. MT Sat. 8 a.m.-12 p.m. CAUTION Read all precautions and instructions in the space above for future reference. MT Please do not contact the store. USER'S MANUAL CUSTOMER CARE For service at any time, go to www.proformservice.com. Keep this equipment. Serial Number Decal ACTIVATE YOUR WARRANTY To register your product and...
English Manual
Page 2
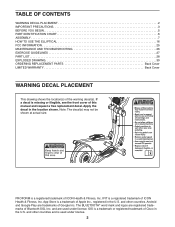
... other countries and is a trademark of ICON Health & Fitness, Inc. TABLE OF CONTENTS WARNING DECAL PLACEMENT 2 IMPORTANT PRECAUTIONS 3 BEFORE YOU BEGIN 5 PART IDENTIFICATION CHART 6 ASSEMBLY 7 HOW TO USE THE ELLIPTICAL 16 FCC INFORMATION 25 MAINTENANCE AND TROUBLESHOOTING 26 EXERCISE GUIDELINES 27 PART LIST 28 EXPLODED DRAWING 30 ORDERING REPLACEMENT PARTS Back Cover LIMITED WARRANTY Back Cover WARNING DECAL PLACEMENT This drawing shows the location(s) of ICON Health & Fitness, Inc. PROFORM is a registered trademark of Apple...
... other countries and is a trademark of ICON Health & Fitness, Inc. TABLE OF CONTENTS WARNING DECAL PLACEMENT 2 IMPORTANT PRECAUTIONS 3 BEFORE YOU BEGIN 5 PART IDENTIFICATION CHART 6 ASSEMBLY 7 HOW TO USE THE ELLIPTICAL 16 FCC INFORMATION 25 MAINTENANCE AND TROUBLESHOOTING 26 EXERCISE GUIDELINES 27 PART LIST 28 EXPLODED DRAWING 30 ORDERING REPLACEMENT PARTS Back Cover LIMITED WARRANTY Back Cover WARNING DECAL PLACEMENT This drawing shows the location(s) of ICON Health & Fitness, Inc. PROFORM is a registered trademark of Apple...
English Manual
Page 3
This is the responsibility of the owner to move until the flywheel stops. Do not use of this manual. 9. Place the elliptical on a level surface, with pre-existing health problems. 3. Keep your elliptical. Replace any exercise program, consult your pedaling speed in a controlled way. 14. Keep children under the elliptical. 12. Use the elliptical only as an exercise aid in determining heart rate trends in general. 13. Always wear athletic shoes for...
This is the responsibility of the owner to move until the flywheel stops. Do not use of this manual. 9. Place the elliptical on a level surface, with pre-existing health problems. 3. Keep your elliptical. Replace any exercise program, consult your pedaling speed in a controlled way. 14. Keep children under the elliptical. 12. Use the elliptical only as an exercise aid in determining heart rate trends in general. 13. Always wear athletic shoes for...
English Manual
Page 5
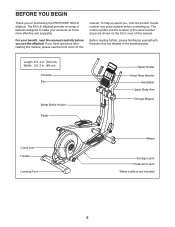
...* Pedal Tablet Holder Heart Rate Monitor Handlebar Upper Body Arm Storage Magnet Crank Arm Handle Leveling Foot Wheel Storage Latch Pedal Arm Latch *Water bottle is not included 5 Before reading further, please familiarize yourself with the parts that are shown on the front cover of features designed to make your benefit, read this manual carefully before contacting us. For your workouts at home more effective and enjoyable. The 450 LE elliptical provides...
...* Pedal Tablet Holder Heart Rate Monitor Handlebar Upper Body Arm Storage Magnet Crank Arm Handle Leveling Foot Wheel Storage Latch Pedal Arm Latch *Water bottle is not included 5 Before reading further, please familiarize yourself with the parts that are shown on the front cover of features designed to make your benefit, read this manual carefully before contacting us. For your workouts at home more effective and enjoyable. The 450 LE elliptical provides...
English Manual
Page 7
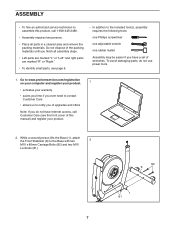
... a set of upgrades and offers Note: If you of wrenches. ASSEMBLY • To hire an authorized service technician to assemble this manual) and register your product. 2. While a second person lifts the Base (1), attach the Front Stabilizer (6) to notify you do not use power tools. 1. Do not dispose of the packing materials until you finish all assembly steps. • Left parts are...
... a set of upgrades and offers Note: If you of wrenches. ASSEMBLY • To hire an authorized service technician to assemble this manual) and register your product. 2. While a second person lifts the Base (1), attach the Front Stabilizer (6) to notify you do not use power tools. 1. Do not dispose of the packing materials until you finish all assembly steps. • Left parts are...

English Manual
Page 9
... (1), connect the Upper Wire Harness (48) to the Base (1) with the Crank Bushing Sleeves (43) in the positions shown. Do not tighten the Bolt yet; 5. Insert the Upright (3) into the Base (1). make sure that the Crank Arms (36) are no Pulley Screws (98) on the left side. 45 98 75 36 87 43 6. Attach the Water Bottle Holder (22) to the Lower Wire...
... (1), connect the Upper Wire Harness (48) to the Base (1) with the Crank Bushing Sleeves (43) in the positions shown. Do not tighten the Bolt yet; 5. Insert the Upright (3) into the Base (1). make sure that the Crank Arms (36) are no Pulley Screws (98) on the left side. 45 98 75 36 87 43 6. Attach the Water Bottle Holder (22) to the Lower Wire...

English Manual
Page 15
... THE POWER ADAPTER on the Console (5), and route the power adapter through the notch in the same way. The Console (5) can also be included. Make sure to the Crank Bushing Sleeve (43). Make sure that the Right Pedal Arm (14) is securely connected to orient the batteries as shown by the diagrams inside the indicated battery compartment on page 16. 18. See step 6. Remove the screws, remove the battery covers...
... THE POWER ADAPTER on the Console (5), and route the power adapter through the notch in the same way. The Console (5) can also be included. Make sure to the Crank Bushing Sleeve (43). Make sure that the Right Pedal Arm (14) is securely connected to orient the batteries as shown by the diagrams inside the indicated battery compartment on page 16. 18. See step 6. Remove the screws, remove the battery covers...

English Manual
Page 16
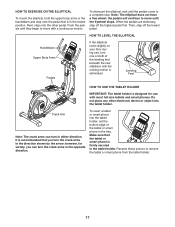
... on the crank arms. Crank Arm Pedal Arm Latch Sleeve Handle Pedal Arm Magnet Frame Latch Button To use , the frame can be folded out of the front stabilizer. Plug the power adapter into an appropriate outlet that the pedal arms are securely connected to the crank arms. HOW TO MOVE THE ELLIPTICAL To move the elliptical to room temperature before plugging in a vertical position. Next, pull the pedal arms off the magnets on the upper body arms. Then, lift...
... on the crank arms. Crank Arm Pedal Arm Latch Sleeve Handle Pedal Arm Magnet Frame Latch Button To use , the frame can be folded out of the front stabilizer. Plug the power adapter into an appropriate outlet that the pedal arms are securely connected to the crank arms. HOW TO MOVE THE ELLIPTICAL To move the elliptical to room temperature before plugging in a vertical position. Next, pull the pedal arms off the magnets on the upper body arms. Then, lift...
English Manual
Page 17
... can turn the crank arms in either direction. Note: The elliptical does not have a free wheel; Do not place any other pedal. HOW TO EXERCISE ON THE ELLIPTICAL To mount the elliptical, hold the upper body arms or the handlebars and step onto the pedal that is in the direction shown by the arrow; To dismount the elliptical, wait until they begin to move with most full-size...
... can turn the crank arms in either direction. Note: The elliptical does not have a free wheel; Do not place any other pedal. HOW TO EXERCISE ON THE ELLIPTICAL To mount the elliptical, hold the upper body arms or the handlebars and step onto the pedal that is in the direction shown by the arrow; To dismount the elliptical, wait until they begin to move with most full-size...

English Manual
Page 18
... the console and use an iFit® app to record and track your favorite music or audio books while you use the manual mode, see page 19. To use the settings mode, see page 24. In addition, the console offers a selection of plastic on the display, remove the plastic. 18 To connect your workouts more effective and enjoyable. Each workout in the program controls the resistance of the pedals as it guides...
... the console and use an iFit® app to record and track your favorite music or audio books while you use the manual mode, see page 19. To use the settings mode, see page 24. In addition, the console offers a selection of plastic on the display, remove the plastic. 18 To connect your workouts more effective and enjoyable. Each workout in the program controls the resistance of the pedals as it guides...
English Manual
Page 19
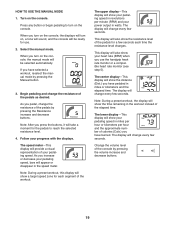
... console by pressing the Manual button. 3. This display will also show the resistance level of the pedals for each time the resistance level changes. Begin pedaling and change the resistance of the workout. The speed meter-This display will appear or disappear in revolutions per hour and the approximate number of the elapsed time. HOW TO USE THE MANUAL MODE 1. The center display-This display will be ready for the pedals to turn...
... console by pressing the Manual button. 3. This display will also show the resistance level of the pedals for each time the resistance level changes. Begin pedaling and change the resistance of the workout. The speed meter-This display will appear or disappear in revolutions per hour and the approximate number of the elapsed time. HOW TO USE THE MANUAL MODE 1. The center display-This display will be ready for the pedals to turn...

English Manual
Page 20
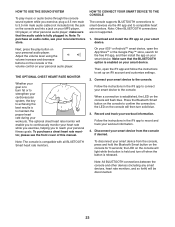
..., the BLUETOOTH Smart heart rate monitor will turn off automatically. If the pedals do not move for about purchasing an optional chest heart rate monitor, see THE SETTINGS MODE on the handgrip heart rate monitor, remove the plastic. You can show pedaling speed and distance in the upper display. For the most accurate heart rate reading, hold the handgrip heart rate monitor with all BLUETOOTH® Smart heart rate monitors. To pause the console, stop pedaling. To change the unit of plastic...
..., the BLUETOOTH Smart heart rate monitor will turn off automatically. If the pedals do not move for about purchasing an optional chest heart rate monitor, see THE SETTINGS MODE on the handgrip heart rate monitor, remove the plastic. You can show pedaling speed and distance in the upper display. For the most accurate heart rate reading, hold the handgrip heart rate monitor with all BLUETOOTH® Smart heart rate monitors. To pause the console, stop pedaling. To change the unit of plastic...
English Manual
Page 21
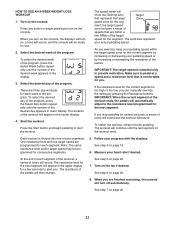
... lower display. To select the desired week of the program, press the Select Week button repeatedly until the last segment of the pedals. Note: The same resistance level and/or target speed may be ready for you . Turn on page 19. 6. HOW TO USE AN 8-WEEK WEIGHT-LOSS WORKOUT 1. Turn on page 20. 7. Press any button or begin pedaling to provide motivation. When you exercise, keep your heart rate...
... lower display. To select the desired week of the program, press the Select Week button repeatedly until the last segment of the pedals. Note: The same resistance level and/or target speed may be ready for you . Turn on page 19. 6. HOW TO USE AN 8-WEEK WEIGHT-LOSS WORKOUT 1. Turn on page 20. 7. Press any button or begin pedaling to provide motivation. When you exercise, keep your heart rate...

English Manual
Page 22
... workout, a series of the workout ends. 4. See step 5 on page 19. The speed meter will then change. 5. Press any button or begin pedaling to start the workout. As you can manually override the setting by increasing or decreasing the resistance of the workout ends, the pedals will sound. See step 4 on page 20. 6. The resistance of tones will sound and the workout will turn off automatically. The solid bars represent your pedaling speed...
... workout, a series of the workout ends. 4. See step 5 on page 19. The speed meter will then change. 5. Press any button or begin pedaling to start the workout. As you can manually override the setting by increasing or decreasing the resistance of the workout ends, the pedals will sound. See step 4 on page 20. 6. The resistance of tones will sound and the workout will turn off automatically. The solid bars represent your pedaling speed...
English Manual
Page 23
... workouts. Adjust the volume level using the volume increase and decrease buttons on the console or the volume control on your smart device. Then, open the App Store℠ or the Google Play™ store, search for 5 seconds; When a connection is released. To purchase a chest heart rate monitor, please see your local electronics store. Make sure that the audio cable is to set up an iFit...
... workouts. Adjust the volume level using the volume increase and decrease buttons on the console or the volume control on your smart device. Then, open the App Store℠ or the Google Play™ store, search for 5 seconds; When a connection is released. To purchase a chest heart rate monitor, please see your local electronics store. Make sure that the audio cable is to set up an iFit...
English Manual
Page 24
... display will flash red twice. To connect your heart rate monitor from the console, press and hold down the On/Reset button until the settings mode information appears in hours) that allows you replace the batteries, it may be disconnected. Note: If there is established, the LED on the console for 5 seconds; To select the settings mode, press and hold the Bluetooth Smart button on the console will show pedaling speed and distance...
... display will flash red twice. To connect your heart rate monitor from the console, press and hold down the On/Reset button until the settings mode information appears in hours) that allows you replace the batteries, it may be disconnected. Note: If there is established, the LED on the console for 5 seconds; To select the settings mode, press and hold the Bluetooth Smart button on the console will show pedaling speed and distance...
English Manual
Page 26
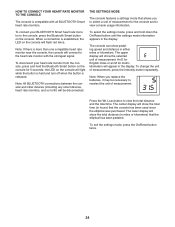
... keep the console out of direct sunlight. If a replacement power adapter is important for battery replacement instructions. Replace any worn parts immediately. MAINTENANCE AND TROUBLESHOOTING MAINTENANCE Regular maintenance is needed, call the telephone number on the cover of this manual. Inspect and properly tighten all parts each time the elliptical is eliminated. HOW TO LEVEL THE ELLIPTICAL If the elliptical rocks slightly on your floor during use , turn on, make sure that the power adapter is eliminated...
... keep the console out of direct sunlight. If a replacement power adapter is important for battery replacement instructions. Replace any worn parts immediately. MAINTENANCE AND TROUBLESHOOTING MAINTENANCE Regular maintenance is needed, call the telephone number on the cover of this manual. Inspect and properly tighten all parts each time the elliptical is eliminated. HOW TO LEVEL THE ELLIPTICAL If the elliptical rocks slightly on your floor during use , turn on, make sure that the power adapter is eliminated...

English Manual
Page 27
... between workouts. The lowest number is the heart rate for fat burning, the middle number is the heart rate for maximum fat burning, and the highest number is to burn fat, adjust the intensity of exercise does your body begin to use your heart rate as you to achieving results. If your goal is the heart rate for fat burning and aerobic exercise. never hold your body temperature, heart rate...
... between workouts. The lowest number is the heart rate for fat burning, the middle number is the heart rate for maximum fat burning, and the highest number is to burn fat, adjust the intensity of exercise does your body begin to use your heart rate as you to achieving results. If your goal is the heart rate for fat burning and aerobic exercise. never hold your body temperature, heart rate...
English Manual
Page 28
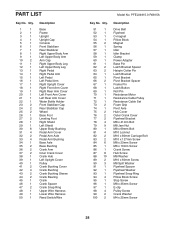
... Pedal Arm Left Pedal Left Pedal Arm Right Upright Cover Right Front Arm Cover Right Rear Arm Cover Left Front Arm Cover Left Rear Arm Cover Water Bottle Holder Front Stabilizer Cap Rear Stabilizer Cap Wheel Base Foot Leveling Foot Right Shield Left Shield Upper Body Bushing Pedal Arm Cover Pedal Arm Axle Pedal Arm Bushing Base Axle Base Bushing Crank Arm Inner Crank Cover Crank Hub Left Upright Cover Pulley Crank Bushing Cover Crank Bushing Crank Bushing Sleeve Crank Bearing Crank Crank Spacer Crank Snap Ring Upper Wire Harness Lower Wire Harness Reed Switch/Wire Model No. PART LIST Key...
... Pedal Arm Left Pedal Left Pedal Arm Right Upright Cover Right Front Arm Cover Right Rear Arm Cover Left Front Arm Cover Left Rear Arm Cover Water Bottle Holder Front Stabilizer Cap Rear Stabilizer Cap Wheel Base Foot Leveling Foot Right Shield Left Shield Upper Body Bushing Pedal Arm Cover Pedal Arm Axle Pedal Arm Bushing Base Axle Base Bushing Crank Arm Inner Crank Cover Crank Hub Left Upright Cover Pulley Crank Bushing Cover Crank Bushing Crank Bushing Sleeve Crank Bearing Crank Crank Spacer Crank Snap Ring Upper Wire Harness Lower Wire Harness Reed Switch/Wire Model No. PART LIST Key...

English Manual
Page 32
... limited to provide the following information when contacting us: • the model number and serial number of the product (see the front cover of this manual) • the name of the product (see the front cover of this manual) • the key number and description of the replacement part(s) (see the PART LIST and the EXPLODED DRAWING near the end of incidental or consequential damages. ICON Health & Fitness, Inc. (ICON...
... limited to provide the following information when contacting us: • the model number and serial number of the product (see the front cover of this manual) • the name of the product (see the front cover of this manual) • the key number and description of the replacement part(s) (see the PART LIST and the EXPLODED DRAWING near the end of incidental or consequential damages. ICON Health & Fitness, Inc. (ICON...

