

User Manual
Page 1
...: [email protected] Goodfamily's Web site: www.goodfamily.cc ICON's Web site: www.iconfitness.com USER'S MANUAL CAUTION Read all precautions and instructions in this manual before using this treadmill in the territory of this equipment. PATL30706.0 Serial No. Serial Number Decal QUESTIONS? This... treadmill is an authorized dealer of mainland China. Model No. Save this manual for future reference. If you...
...: [email protected] Goodfamily's Web site: www.goodfamily.cc ICON's Web site: www.iconfitness.com USER'S MANUAL CAUTION Read all precautions and instructions in this manual before using this treadmill in the territory of this equipment. PATL30706.0 Serial No. Serial Number Decal QUESTIONS? This... treadmill is an authorized dealer of mainland China. Model No. Save this manual for future reference. If you...

User Manual
Page 2
PROFORM is a registered trademark of this manual. TABLE OF CONTENTS IMPORTANT PRECAUTIONS 3 BEFORE YOU BEGIN 5 ASSEMBLY 6 OPERATION AND ADJUSTMENT 14 HOW TO FOLD AND MOVE THE TREADMILL 24 TROUBLESHOOTING 25 CONDITIONING GUIDELINES 27 ORDERING REPLACEMENT PARTS Back Cover Note: An EXPLODED DRAWING and a PART LIST are attached in the center of ICON IP, Inc. 2
PROFORM is a registered trademark of this manual. TABLE OF CONTENTS IMPORTANT PRECAUTIONS 3 BEFORE YOU BEGIN 5 ASSEMBLY 6 OPERATION AND ADJUSTMENT 14 HOW TO FOLD AND MOVE THE TREADMILL 24 TROUBLESHOOTING 25 CONDITIONING GUIDELINES 27 ORDERING REPLACEMENT PARTS Back Cover Note: An EXPLODED DRAWING and a PART LIST are attached in the center of ICON IP, Inc. 2
User Manual
Page 4
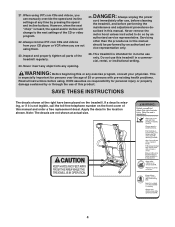
However, when the next "chirp" is not legible, call the toll-free telephone number on the treadmill. Inspect and properly tighten all instructions before performing the maintenance and adjustment procedures de- This is intended for persons over the age of 35 or ...persons with pre-existing health problems. Read all parts of this manual. SAVE THESE INSTRUCTIONS The decals shown at the right have been placed on the front cover of the treadmill regularly. 24. When using them. 23. DANGER: 25. This treadmill is especially important for in-home use of the CD or video...
However, when the next "chirp" is not legible, call the toll-free telephone number on the treadmill. Inspect and properly tighten all instructions before performing the maintenance and adjustment procedures de- This is intended for persons over the age of 35 or ...persons with pre-existing health problems. Read all parts of this manual. SAVE THESE INSTRUCTIONS The decals shown at the right have been placed on the front cover of the treadmill regularly. 24. When using them. 23. DANGER: 25. This treadmill is especially important for in-home use of the CD or video...

User Manual
Page 5
... Breaker On/Off Switch Cushioned Walking Platform for selecting the new PROFORM® 450 CX treadmill. BEFORE YOU BEGIN Thank you for maximum exercise comfort RIGHT SIDE 5 To help you have questions after read this manual for the location). The model number of the treadmill is PATL30706.0 The serial number can be found on a decal attached...
... Breaker On/Off Switch Cushioned Walking Platform for selecting the new PROFORM® 450 CX treadmill. BEFORE YOU BEGIN Thank you for maximum exercise comfort RIGHT SIDE 5 To help you have questions after read this manual for the location). The model number of the treadmill is PATL30706.0 The serial number can be found on a decal attached...
User Manual
Page 6
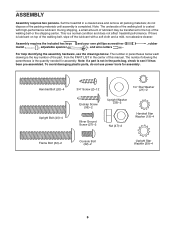
...rubber For help identifying the assembly hardware, see if it has been pre-assembled. To avoid damaging plastic parts, do not dispose of this manual. Note: If a part is the key number of the part, from the PART LIST in the center of the packing materials until assembly... is completed. The number in parentheses below . Set the treadmill in the parts bag, check to the top of the walking belt is a normalLcaotcnhdiStiocnreawnd does not affect treadmill performance. This is coated with high-performance lubricant. Note: The underside of the ...
...rubber For help identifying the assembly hardware, see if it has been pre-assembled. To avoid damaging plastic parts, do not dispose of this manual. Note: If a part is the key number of the part, from the PART LIST in the center of the packing materials until assembly... is completed. The number in parentheses below . Set the treadmill in the parts bag, check to the top of the walking belt is a normalLcaotcnhdiStiocnreawnd does not affect treadmill performance. This is coated with high-performance lubricant. Note: The underside of the ...

User Manual
Page 15
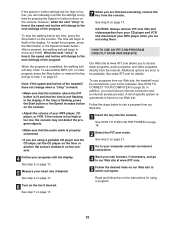
Key FEATURES OF THE CONSOLE The treadmill console offers a selection of the manual. programs, CDs, and videocassettes are thin sheets of plastic Clip on the console, remove the plastic. To use a preset program, see page 18. When the manual mode of the console, follow the steps beginning on .... The console also features ten preset programs. Each program controls the speed and incline of your computer, you through every step of the treadmill as a personal trainer guides you exercise, the console will display continuous exercise feedback. To use an iFIT.com MP3, CD, or video...
Key FEATURES OF THE CONSOLE The treadmill console offers a selection of the manual. programs, CDs, and videocassettes are thin sheets of plastic Clip on the console, remove the plastic. To use a preset program, see page 18. When the manual mode of the console, follow the steps beginning on .... The console also features ten preset programs. Each program controls the speed and incline of your computer, you through every step of the treadmill as a personal trainer guides you exercise, the console will display continuous exercise feedback. To use an iFIT.com MP3, CD, or video...

User Manual
Page 16
... button, the Speed increase button, or one of the eight numbered buttons. Make sure that the on/off switch on the foot rails of the treadmill. Locate the clip attached to a stop the walking belt, press the Stop button. after a moment, the display will be pulled from the console, adjust ...increase in speed until a track appears in this section refer to move at 2 Km/H. Then, insert the key into the console. HOW TO USE THE MANUAL MODE 1 Insert the key into the console; Note: The console can be selected. Each time a button is pressed, the incline setting will begin to ...
... button, the Speed increase button, or one of the eight numbered buttons. Make sure that the on/off switch on the foot rails of the treadmill. Locate the clip attached to a stop the walking belt, press the Stop button. after a moment, the display will be pulled from the console, adjust ...increase in speed until a track appears in this section refer to move at 2 Km/H. Then, insert the key into the console. HOW TO USE THE MANUAL MODE 1 Insert the key into the console; Note: The console can be selected. Each time a button is pressed, the incline setting will begin to ...

User Manual
Page 17
... symbol in a secure place. In addition, make sure that you are clean. When your hands on the fan at the lowest setting when the treadmill is selected, a track representing 400 meters will automatically turn off the demo mode. The track will then disappear and the indicators will appear, and ...hands. Next, remove the key from the metal contacts. Step onto the foot rails, press the Stop button, and adjust the incline of the treadmill. When the manual mode is folded to hold the contacts for about 15 seconds. 7 Turn on the fan, press the Fan button. To turn off the ...
... symbol in a secure place. In addition, make sure that you are clean. When your hands on the fan at the lowest setting when the treadmill is selected, a track representing 400 meters will automatically turn off the demo mode. The track will then disappear and the indicators will appear, and ...hands. Next, remove the key from the metal contacts. Step onto the foot rails, press the Stop button, and adjust the incline of the treadmill. When the manual mode is folded to hold the contacts for about 15 seconds. 7 Turn on the fan, press the Fan button. To turn off the ...

User Manual
Page 18
... and incline settings for the first period will be shown in the columns to alert you can manually override the setting by pressing the Speed or Incline buttons. To end the program, press the ...move at 2 Km/H. If the speed or incline setting for the current period is pressed, the treadmill will move downward so that only the highest indicators appear in the upper right corner of the program...setting are lit, the speed settings may be shown in the flashing Current Period column and the treadmill will continue in this way until one column to flash in the display. Note: The same...
... and incline settings for the first period will be shown in the columns to alert you can manually override the setting by pressing the Speed or Incline buttons. To end the program, press the ...move at 2 Km/H. If the speed or incline setting for the current period is pressed, the treadmill will move downward so that only the highest indicators appear in the upper right corner of the program...setting are lit, the speed settings may be shown in the flashing Current Period column and the treadmill will continue in this way until one column to flash in the display. Note: The same...

User Manual
Page 21
... the speed and/or incline may change before your personal trainer describes the change . A ANT. Audio Cable ANT. Plug the other end of this manual. A Plug the Y-adaptor into your CD player; A moment after the Play button is pressed, your personal trainer will begin guiding you when the ...or video program. 1 Insert the key into your VCR. Make sure that is flashing in the display for speed and/or incline changes. The treadmill will alert you through your workout. Plug the other end of the cable into an RCA Y-adaptor (available at electronics stores) into the unused ...
... the speed and/or incline may change before your personal trainer describes the change . A ANT. Audio Cable ANT. Plug the other end of this manual. A Plug the Y-adaptor into your CD player; A moment after the Play button is pressed, your personal trainer will begin guiding you when the ...or video program. 1 Insert the key into your VCR. Make sure that is flashing in the display for speed and/or incline changes. The treadmill will alert you through your workout. Plug the other end of the cable into an RCA Y-adaptor (available at electronics stores) into the unused ...
User Manual
Page 22
...incline will change to access basic programs, audio programs, and video programs directly from the internet. Note: If the speed and incline of the treadmill does not change to use another flat surface instead of your home computer. See HOW TO CONNECT YOUR COMPUTER on -line instructions for details. ...your MP3 player, CD player, or VCR. To restart the program, press the Start button or the Speed increase button. In addition, you can manually override the settings at www.iFIT.com allows you are soon to be connected to step 1 on page 17. 4 Start your MP3 player when ...
...incline will change to access basic programs, audio programs, and video programs directly from the internet. Note: If the speed and incline of the treadmill does not change to use another flat surface instead of your home computer. See HOW TO CONNECT YOUR COMPUTER on -line instructions for details. ...your MP3 player, CD player, or VCR. To restart the program, press the Start button or the Speed increase button. In addition, you can manually override the settings at www.iFIT.com allows you are soon to be connected to step 1 on page 17. 4 Start your MP3 player when ...
User Manual
Page 23
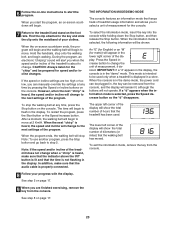
...the key from the console. See step 5 on the console. THE INFORMATION MODE/DEMO MODE The console features an information mode that keeps track of treadmill usage information and allows you when the speed and/or incline of hours that the walking belt has moved. When the information mode is properly... in the demo mode, the power cord can be plugged in, the key can manually override the settings at 2 Km/H. When the console is heard, the speed and/or incline will change to select a unit of the treadmill does not change . When the next "chirp" is not flashing in the lower ...
...the key from the console. See step 5 on the console. THE INFORMATION MODE/DEMO MODE The console features an information mode that keeps track of treadmill usage information and allows you when the speed and/or incline of hours that the walking belt has moved. When the information mode is properly... in the demo mode, the power cord can be plugged in, the key can manually override the settings at 2 Km/H. When the console is heard, the speed and/or incline will change to select a unit of the treadmill does not change . When the next "chirp" is not flashing in the lower ...

User Manual
Page 25
...in. Check the circuit breaker located on the treadmill near the power cord. Check the on/off switch located on the treadmill near the power cord. above ). If the treadmill still will not run, see the front cover of this manual. Remove the key from the console. The ...circuit breaker has tripped. Check the circuit breaker located on " position. TROUBLESHOOTING Most treadmill problems can be in the "on the treadmill frame near the power cord (see the drawing c. PROBLEM: The displays of this manual. Remove the two Foot Rail Screws 76 (4) and the two Hood Screws (76...
...in. Check the circuit breaker located on the treadmill near the power cord. Check the on/off switch located on the treadmill near the power cord. above ). If the treadmill still will not run, see the front cover of this manual. Remove the key from the console. The ...circuit breaker has tripped. Check the circuit breaker located on " position. TROUBLESHOOTING Most treadmill problems can be in the "on the treadmill frame near the power cord (see the drawing c. PROBLEM: The displays of this manual. Remove the two Foot Rail Screws 76 (4) and the two Hood Screws (76...

User Manual
Page 26
...check for a few minutes. Be careful not to lift each edge of this manual. Turn the Pulley until the walking belt is aligned with the Reed Switch. Reattach the Hood (not shown), and run the treadmill for a few minutes to the left rear roller bolt clockwise 1/2 of a ...walking platform. if the walking belt has shifted to keep the walking belt centered. Top View ing. Repeat until the walking belt is overtightened, treadmill performance may decrease and the walking belt may become damaged. Using b the hex key, turn both rear roller bolts counterclockwise, 1/4 of a...
...check for a few minutes. Be careful not to lift each edge of this manual. Turn the Pulley until the walking belt is aligned with the Reed Switch. Reattach the Hood (not shown), and run the treadmill for a few minutes to the left rear roller bolt clockwise 1/2 of a ...walking platform. if the walking belt has shifted to keep the walking belt centered. Top View ing. Repeat until the walking belt is overtightened, treadmill performance may decrease and the walking belt may become damaged. Using b the hex key, turn both rear roller bolts counterclockwise, 1/4 of a...

User Manual
Page 28
... 107 1 Ground Bolt 108 1 Ground Nut 109 1 Outlet Assembly 110 1 Transformer 111 1 Electronics Bracket 112 1 Gas Spring # 1 4" Red Wire, M/F # 1 8" Green Wire, F/R # 1 4" Blue Wire, 2F # 1 User's Manual # These parts are subject to change without notice. Qty. PART LIST-Model No.
... 107 1 Ground Bolt 108 1 Ground Nut 109 1 Outlet Assembly 110 1 Transformer 111 1 Electronics Bracket 112 1 Gas Spring # 1 4" Red Wire, M/F # 1 8" Green Wire, F/R # 1 4" Blue Wire, 2F # 1 User's Manual # These parts are subject to change without notice. Qty. PART LIST-Model No.

User Manual
Page 30
...following information: • the MODEL NUMBER of the product (PATL30706.0) • the NAME of the product (PROFORM 450 CX treadmill) • the SERIAL NUMBER of the product (see the front cover of this manual) • the KEY NUMBER and DESCRIPTION of the part(s) (see the PART LIST and EXPLODED DRAWING attached... in the center of this manual) LIMITED WARRANTY Goodfamily, Inc. (Goodfamily), warrants this product to be pre-authorized by Goodfamily. This warranty gives you specific legal rights....
...following information: • the MODEL NUMBER of the product (PATL30706.0) • the NAME of the product (PROFORM 450 CX treadmill) • the SERIAL NUMBER of the product (see the front cover of this manual) • the KEY NUMBER and DESCRIPTION of the part(s) (see the PART LIST and EXPLODED DRAWING attached... in the center of this manual) LIMITED WARRANTY Goodfamily, Inc. (Goodfamily), warrants this product to be pre-authorized by Goodfamily. This warranty gives you specific legal rights....


