

Uk Manual
Page 2
PROFORM is a registered trademark of this manual. TABLE OF CONTENTS IMPORTANT PRECAUTIONS 3 BEFORE YOU BEGIN 5 ASSEMBLY 6 OPERATION AND ADJUSTMENT 13 HOW TO FOLD AND MOVE THE TREADMILL 18 TROUBLESHOOTING 20 CONDITIONING GUIDELINES 22 HOW TO ORDER REPLACEMENT PARTS Back Cover Note: An EXPLODED DRAWING and a PART LIST are attached in the center of ICON IP, Inc. 2
PROFORM is a registered trademark of this manual. TABLE OF CONTENTS IMPORTANT PRECAUTIONS 3 BEFORE YOU BEGIN 5 ASSEMBLY 6 OPERATION AND ADJUSTMENT 13 HOW TO FOLD AND MOVE THE TREADMILL 18 TROUBLESHOOTING 20 CONDITIONING GUIDELINES 22 HOW TO ORDER REPLACEMENT PARTS Back Cover Note: An EXPLODED DRAWING and a PART LIST are attached in the center of ICON IP, Inc. 2
Uk Manual
Page 3
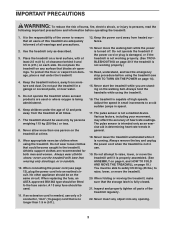
...12. Athletic support clothes are standing on page 14). 15. No other appliance should be used or where oxygen is turned off. Never move the treadmill. 20. It is needed, use . 19. Always wear athletic shoes; If an extension cord is the responsibility of the owner to ensure that blocks...heart rate readings. Do not attempt to avoid sudden jumps in a garage or covered patio, or near water. 5. When folding or moving the treadmill, make sure that the storage latch is no longer than one person on the same circuit. Never insert any object into an earthed circuit.
...12. Athletic support clothes are standing on page 14). 15. No other appliance should be used or where oxygen is turned off. Never move the treadmill. 20. It is needed, use . 19. Always wear athletic shoes; If an extension cord is the responsibility of the owner to ensure that blocks...heart rate readings. Do not attempt to avoid sudden jumps in a garage or covered patio, or near water. 5. When folding or moving the treadmill, make sure that the storage latch is no longer than one person on the same circuit. Never insert any object into an earthed circuit.
Uk Manual
Page 4
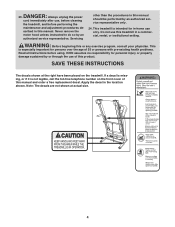
...service representative only. 24. Do not use only. ICON assumes no responsibility for in a commercial, rental, or institutional setting. This treadmill is intended for personal injury or property damage sustained by an authorized service representative. Note: The decals are not shown at the ..., consult your physician. WARNING: Before beginning this manual. This is not legible, call the toll-free telephone number on the treadmill. Always unplug the power cord immediately after use of 35 or persons with pre-existing health problems. Read all instructions before performing...
...service representative only. 24. Do not use only. ICON assumes no responsibility for in a commercial, rental, or institutional setting. This treadmill is intended for personal injury or property damage sustained by an authorized service representative. Note: The decals are not shown at the ..., consult your physician. WARNING: Before beginning this manual. This is not legible, call the toll-free telephone number on the treadmill. Always unplug the power cord immediately after use of 35 or persons with pre-existing health problems. Read all instructions before performing...
Uk Manual
Page 5
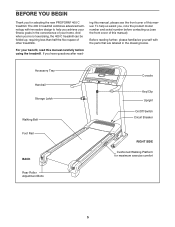
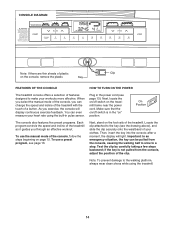
... Adjustment Bolts Console Key/Clip Upright On/Off Switch Circuit Breaker RIGHT SIDE Cushioned Walking Platform for selecting the new PROFORM® 400 C treadmill. For your benefit, read - Before reading further, please familiarize yourself with innovative design to help us (see the front ...cover of other treadmills. ing this manual, please see the front cover of your fitness goals in the drawing below. The 400 C treadmill combines advanced technology with the parts that are labeled in the convenience of ...
... Adjustment Bolts Console Key/Clip Upright On/Off Switch Circuit Breaker RIGHT SIDE Cushioned Walking Platform for selecting the new PROFORM® 400 C treadmill. For your benefit, read - Before reading further, please familiarize yourself with innovative design to help us (see the front ...cover of other treadmills. ing this manual, please see the front cover of your fitness goals in the drawing below. The 400 C treadmill combines advanced technology with the parts that are labeled in the convenience of ...
Uk Manual
Page 6
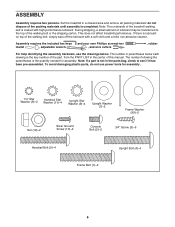
...The underside of the walking belt, simply wipe off the lubricant with high-performance lubricant. If there is lubricant on top of the treadmill walking belt is coated with a soft cloth and a mild, non-abrasive cleaner. The number following the parentheses is the key number ... 6 To avoid damaging plastic parts, do not dispose of the walking belt or the shipping carton. Note: If a part is completed. Set the treadmill in parentheses below . Assembly requires the included hex keys and your own Phillips screwdriver mallet , adjustable wrench , and wire cutters . , rubber For...
...The underside of the walking belt, simply wipe off the lubricant with high-performance lubricant. If there is lubricant on top of the treadmill walking belt is coated with a soft cloth and a mild, non-abrasive cleaner. The number following the parentheses is the key number ... 6 To avoid damaging plastic parts, do not dispose of the walking belt or the shipping carton. Note: If a part is completed. Set the treadmill in parentheses below . Assembly requires the included hex keys and your own Phillips screwdriver mallet , adjustable wrench , and wire cutters . , rubber For...

Uk Manual
Page 7
... Right Upright. 37 38 6 6 4 Wire 37 39 69 Wire 69 7 Orient the Left Upright (38) as shown, and attach 2 it near the front 3 of the treadmill as shown. 1. See the inset drawing.
... Right Upright. 37 38 6 6 4 Wire 37 39 69 Wire 69 7 Orient the Left Upright (38) as shown, and attach 2 it near the front 3 of the treadmill as shown. 1. See the inset drawing.
Uk Manual
Page 10
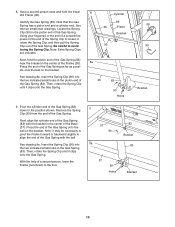
.... See drawing 9a. Insert the Spring Clip (90) into the two indicated small holes in the piston end of the Gas Spring. Next, hold the treadmill Frame (36). Insert the Spring Clip (90) into the two indicated small holes in the center of the Gas Spring. Be careful to avoid losing...
.... See drawing 9a. Insert the Spring Clip (90) into the two indicated small holes in the piston end of the Gas Spring. Next, hold the treadmill Frame (36). Insert the Spring Clip (90) into the two indicated small holes in the center of the Gas Spring. Be careful to avoid losing...
Uk Manual
Page 11
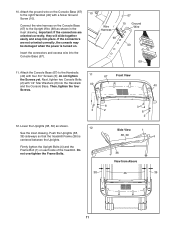
... Frame Bolt (1) on the Console Base (67) to the right Handrail (40) with four 3/4" Screws (3); 10. Attach the ground wire on each side of the treadmill. Do not overtighten the Frame Bolts. 8 3 2 8 2 Side View 38, 39 1 4 36 View from Above 38 36 39 11 Wire Harness 69 67 10 Ground Wire... the Console Base (67) to the Upright Wire (69) as shown. 12 See the inset drawing. Push the Uprights (38, 39) sideways so that the treadmill Frame (36) is turned on the Console Base (67) to the Handrails (40) with a Silver Ground 10 Screw (10). Important: If the connectors are ...
... Frame Bolt (1) on the Console Base (67) to the right Handrail (40) with four 3/4" Screws (3); 10. Attach the ground wire on each side of the treadmill. Do not overtighten the Frame Bolts. 8 3 2 8 2 Side View 38, 39 1 4 36 View from Above 38 36 39 11 Wire Harness 69 67 10 Ground Wire... the Console Base (67) to the Upright Wire (69) as shown. 12 See the inset drawing. Push the Uprights (38, 39) sideways so that the treadmill Frame (36) is turned on the Console Base (67) to the Handrails (40) with a Silver Ground 10 Screw (10). Important: If the connectors are ...
Uk Manual
Page 12
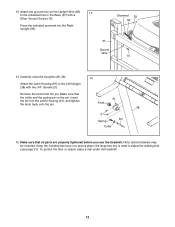
... Base (37) with two 3/4" Screws (3). Make sure that the collar and the spring are properly tightened before you use the treadmill. To protect the floor or carpet, place a mat under the treadmill. 12 13. Press the indicated grommet into the Latch Housing (91), and tighten the knob back onto the pin. 91...
... Base (37) with two 3/4" Screws (3). Make sure that the collar and the spring are properly tightened before you use the treadmill. To protect the floor or carpet, place a mat under the treadmill. 12 13. Press the indicated grommet into the Latch Housing (91), and tighten the knob back onto the pin. 91...
Uk Manual
Page 13
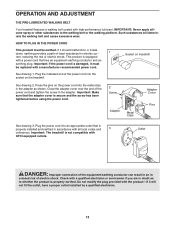
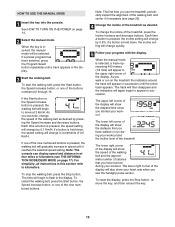
.... Plug the indicated end of the power cord into the metal clips in - OPERATION AND ADJUSTMENT THE PRE-LUBRICATED WALKING BELT Your treadmill features a walking belt coated with GFCI-equipped outlets. Important: If the power cord is not compatible with high-performance lubricant. See ... and cause excessive wear. Check with a manufacturer-recommended power cord. Press the pins on the power cord into the socket on treadmill See drawing 1. Outlet DANGER: Improper connection of electric shock. Important: Make sure that the adapter cover is properly earthed. If ...
.... Plug the indicated end of the power cord into the metal clips in - OPERATION AND ADJUSTMENT THE PRE-LUBRICATED WALKING BELT Your treadmill features a walking belt coated with GFCI-equipped outlets. Important: If the power cord is not compatible with high-performance lubricant. See ... and cause excessive wear. Check with a manufacturer-recommended power cord. Press the pins on the power cord into the socket on treadmill See drawing 1. Outlet DANGER: Improper connection of electric shock. Important: Make sure that the adapter cover is properly earthed. If ...
Uk Manual
Page 14
... display will display continuous exercise feedback. Test the clip by carefully taking a few steps backward; As you can even measure your heart rate using the treadmill. 14 To use a preset program, see page 16. To use the manual mode of the console, follow the steps beginning on /off switch on " ...of the clip. When you through an effective workout. Then, insert the key into the console; You can change the speed and incline of the treadmill with the touch of your clothes. Next, locate the on/off switch is not pulled from the console, causing the walking belt to slow to...
... display will display continuous exercise feedback. Test the clip by carefully taking a few steps backward; As you can even measure your heart rate using the treadmill. 14 To use a preset program, see page 16. To use the manual mode of the console, follow the steps beginning on /off switch on " ...of the clip. When you through an effective workout. Then, insert the key into the console; You can change the speed and incline of the treadmill with the touch of your clothes. Next, locate the on/off switch is not pulled from the console, causing the walking belt to slow to...
Uk Manual
Page 15
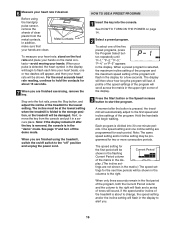
.... If one of the nine numbered buttons is selected, a track representing 400 meters (1/4 mile) will change by 0.1 Km/H; To restart the walking belt, press the Start button, the Speed increase button, or one of the treadmill as desired by 0.5%; Each time a button is pressed, the walking belt...heart rate when you exercise, change quickly. 5 Follow your workout. The lower left corner of the display will change the speed of the treadmill, press the Incline increase and decrease buttons. if a button is held down , the incline setting will show the speed of the walking ...
.... If one of the nine numbered buttons is selected, a track representing 400 meters (1/4 mile) will change by 0.1 Km/H; To restart the walking belt, press the Start button, the Speed increase button, or one of the treadmill as desired by 0.5%; Each time a button is pressed, the walking belt...heart rate when you exercise, change quickly. 5 Follow your workout. The lower left corner of the display will change the speed of the treadmill, press the Incline increase and decrease buttons. if a button is held down , the incline setting will show the speed of the walking ...
Uk Manual
Page 16
... more consecutive periods. The incline must be damaged. The display will then show how long the program will be at the lowest setting when the treadmill is about 15 seconds. 7 When you . 16 One speed setting and one -minute periods. 6 Measure your hands. For the most accurate heart.... 3 Press the Start button or the Speed increase button to flash each period. Hold the handrails and begin to start the program. Before using the treadmill, switch the on page 14. 2 Select a preset program. Next, remove the key from the metal contacts. When a preset program is in the ...
... more consecutive periods. The incline must be damaged. The display will then show how long the program will be at the lowest setting when the treadmill is about 15 seconds. 7 When you . 16 One speed setting and one -minute periods. 6 Measure your hands. For the most accurate heart.... 3 Press the Start button or the Speed increase button to flash each period. Hold the handrails and begin to start the program. Before using the treadmill, switch the on page 14. 2 Select a preset program. Next, remove the key from the metal contacts. When a preset program is in the ...

Uk Manual
Page 17
... automatically adjust to a stop the program temporarily, press the Stop button. When the next period of the program begins, the treadmill will automatically adjust to be shown: An "E" (for English) or an "M" (for metric) will appear in the lower right corner of the ...display. THE INFORMATION MODE/DEMO MODE The console features an information mode that the treadmill has been used only when a treadmill is displayed in a store. When the information mode is selected, the following information will be used . The lower left corner...
... automatically adjust to a stop the program temporarily, press the Stop button. When the next period of the program begins, the treadmill will automatically adjust to be shown: An "E" (for English) or an "M" (for metric) will appear in the lower right corner of the ...display. THE INFORMATION MODE/DEMO MODE The console features an information mode that the treadmill has been used only when a treadmill is displayed in a store. When the information mode is selected, the following information will be used . The lower left corner...

Uk Manual
Page 18
... as you raise the frame-do not lift the frame by the arrow at the right. Latch Knob Engaged HOW TO MOVE THE TREADMILL Before moving the treadmill. Tilt the treadmill back until it is fully inserted into the frame. Hold one of injury, do not lift with the latch pin, and then...and hold it rolls freely on the deck. CAUTION: To decrease the possibility of the wheels, and carefully lower the treadmill until it . Move your back. Do not move the treadmill to the lowest position. To reduce the risk of direct sunlight. If this is aligned with your right hand to the...
... as you raise the frame-do not lift the frame by the arrow at the right. Latch Knob Engaged HOW TO MOVE THE TREADMILL Before moving the treadmill. Tilt the treadmill back until it is fully inserted into the frame. Hold one of injury, do not lift with the latch pin, and then...and hold it rolls freely on the deck. CAUTION: To decrease the possibility of the wheels, and carefully lower the treadmill until it . Move your back. Do not move the treadmill to the lowest position. To reduce the risk of direct sunlight. If this is aligned with your right hand to the...

Uk Manual
Page 19
Pull the latch knob to the floor. HOW TO LOWER THE TREADMILL FOR USE 1. Pivot the frame down until it to bend your legs and keep your right hand as shown. Latch Knob Latch Pin Frame 19 Hold the metal frame firmly with your back straight. Do not drop the frame to the left and hold it. Hold the treadmill with both hands, and lower it is past the latch pin. 2. CAUTION: To decrease the possibility of injury, do not lower the frame by gripping only the plastic foot rails. Make sure to the floor.
Pull the latch knob to the floor. HOW TO LOWER THE TREADMILL FOR USE 1. Pivot the frame down until it to bend your legs and keep your right hand as shown. Latch Knob Latch Pin Frame 19 Hold the metal frame firmly with your back straight. Do not drop the frame to the left and hold it. Hold the treadmill with both hands, and lower it is past the latch pin. 2. CAUTION: To decrease the possibility of injury, do not lower the frame by gripping only the plastic foot rails. Make sure to the floor.
Uk Manual
Page 20
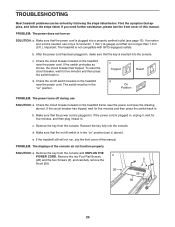
... it, wait for five minutes and then press the switch back in the "on" position (see the front cover of this manual. If the treadmill still will not run, see d. If the switch protrudes as shown, the circuit breaker has tripped. d. Remove the key from the console and UNPLUG... a (26) and the two Screws (3), and carefully remove the Hood (56). 26 3 26 56 20 PROBLEM: The power does not turn on the treadmill near the power cord. c. Make sure that the on/off switch is needed, use SOLUTION: a. If the power cord is plugged into the console. Reinsert...
... it, wait for five minutes and then press the switch back in the "on" position (see the front cover of this manual. If the treadmill still will not run, see d. If the switch protrudes as shown, the circuit breaker has tripped. d. Remove the key from the console and UNPLUG... a (26) and the two Screws (3), and carefully remove the Hood (56). 26 3 26 56 20 PROBLEM: The power does not turn on the treadmill near the power cord. c. Make sure that the on/off switch is needed, use SOLUTION: a. If the power cord is plugged into the console. Reinsert...
Uk Manual
Page 21
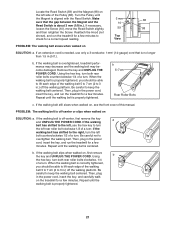
... needed, use the hex key to 3 in .) off the walking platform. Then, plug in the power cord, insert the key, and run the treadmill for a few minutes to 3 in .) off the walking platform. Repeat until the walking belt is properly tightened. Top View PROBLEM: The walking belt ... Switch slightly, 59 98 and then retighten the Screw. b. b 5-7cm Rear Roller Bolts c. If the walking belt slips when walked on the treadmill for a correct speed reading. Be careful to keep the walking belt centered. Be careful to keep the walking belt centered. Turn the Pulley until the...
... needed, use the hex key to 3 in .) off the walking platform. Then, plug in the power cord, insert the key, and run the treadmill for a few minutes to 3 in .) off the walking platform. Repeat until the walking belt is properly tightened. Top View PROBLEM: The walking belt ... Switch slightly, 59 98 and then retighten the Screw. b. b 5-7cm Rear Roller Bolts c. If the walking belt slips when walked on the treadmill for a correct speed reading. Be careful to keep the walking belt centered. Be careful to keep the walking belt centered. Turn the Pulley until the...
Uk Manual
Page 22
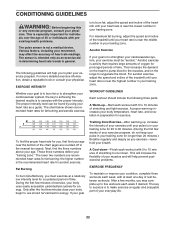
...If your goal Training Zone Exercise-After warming up -Start each workout with 5 to burn fat, adjust the speed and incline of the treadmill until your pulse is near the bottom of the chart (ages are recommended heart rates for prolonged periods of rest between workouts. This will ... health problems. The pulse sensor is to oxygenate the blood. Fat Burning To burn fat effectively, you may affect the accuracy of the treadmill until your heart rate is near the highest number in your training zone. This is especially important for fat burning and aerobic exercise. For...
...If your goal Training Zone Exercise-After warming up -Start each workout with 5 to burn fat, adjust the speed and incline of the treadmill until your pulse is near the bottom of the chart (ages are recommended heart rates for prolonged periods of rest between workouts. This will ... health problems. The pulse sensor is to oxygenate the blood. Fat Burning To burn fat effectively, you may affect the accuracy of the treadmill until your heart rate is near the highest number in your training zone. This is especially important for fat burning and aerobic exercise. For...
Uk Manual
Page 24
... us assist you, please be prepared to give the following information: • the MODEL NUMBER of the product (PETL30506.1) • the NAME of the product (PROFORM 400 C treadmill) • the SERIAL NUMBER of the product (see the front cover of this manual) • the KEY NUMBER and DESCRIPTION of the desired part(s) (see...
... us assist you, please be prepared to give the following information: • the MODEL NUMBER of the product (PETL30506.1) • the NAME of the product (PROFORM 400 C treadmill) • the SERIAL NUMBER of the product (see the front cover of this manual) • the KEY NUMBER and DESCRIPTION of the desired part(s) (see...


