
Uk Manual
Page 1
As a manufacturer, we are missing or damaged parts, please call: 08457 089 009 or write: ICON Health & Fitness, Ltd. If you have questions, or if there are committed to providing complete customer satisfaction. Serial Number Decal QUESTIONS? Model No. USER'S MANUAL PETL30506.1 Serial No. Customer Service Department Unit 4 Revie Road Industrial Estate Revie Road Beeston Leeds, LS118JG UK email: [email protected] CAUTION Read all precautions and instructions in this manual before using this manual for future reference. Save this equipment.
As a manufacturer, we are missing or damaged parts, please call: 08457 089 009 or write: ICON Health & Fitness, Ltd. If you have questions, or if there are committed to providing complete customer satisfaction. Serial Number Decal QUESTIONS? Model No. USER'S MANUAL PETL30506.1 Serial No. Customer Service Department Unit 4 Revie Road Industrial Estate Revie Road Beeston Leeds, LS118JG UK email: [email protected] CAUTION Read all precautions and instructions in this manual before using this manual for future reference. Save this equipment.
Uk Manual
Page 2
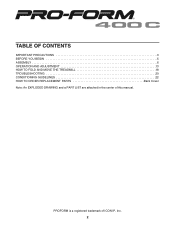
TABLE OF CONTENTS IMPORTANT PRECAUTIONS 3 BEFORE YOU BEGIN 5 ASSEMBLY 6 OPERATION AND ADJUSTMENT 13 HOW TO FOLD AND MOVE THE TREADMILL 18 TROUBLESHOOTING 20 CONDITIONING GUIDELINES 22 HOW TO ORDER REPLACEMENT PARTS Back Cover Note: An EXPLODED DRAWING and a PART LIST are attached in the center of ICON IP, Inc. 2 PROFORM is a registered trademark of this manual.
TABLE OF CONTENTS IMPORTANT PRECAUTIONS 3 BEFORE YOU BEGIN 5 ASSEMBLY 6 OPERATION AND ADJUSTMENT 13 HOW TO FOLD AND MOVE THE TREADMILL 18 TROUBLESHOOTING 20 CONDITIONING GUIDELINES 22 HOW TO ORDER REPLACEMENT PARTS Back Cover Note: An EXPLODED DRAWING and a PART LIST are attached in the center of ICON IP, Inc. 2 PROFORM is a registered trademark of this manual.
Uk Manual
Page 3
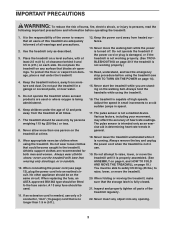
... not in speed. 17. Always remove the key and unplug the power cord when the treadmill is no longer than one person on page 14). 15. Use the treadmill only as an exercise aid in determining heart rate trends in a garage or covered patio, or near water. 5. When connecting the power cord (see HOW TO TURN ON THE POWER on the treadmill at all parts of heart rate readings. The pulse sensor is...
... not in speed. 17. Always remove the key and unplug the power cord when the treadmill is no longer than one person on page 14). 15. Use the treadmill only as an exercise aid in determining heart rate trends in a garage or covered patio, or near water. 5. When connecting the power cord (see HOW TO TURN ON THE POWER on the treadmill at all parts of heart rate readings. The pulse sensor is...
Uk Manual
Page 4
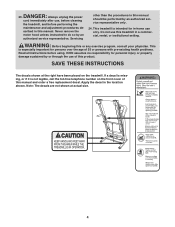
... this treadmill in -home use , before cleaning the treadmill, and before using. ICON assumes no responsibility for persons over the age of this or any exercise program, consult your physician. Note: The decals are not shown at the right have been placed on the front cover of 35 or persons with pre-existing health problems. Read all instructions before performing the maintenance and adjustment...
... this treadmill in -home use , before cleaning the treadmill, and before using. ICON assumes no responsibility for persons over the age of this or any exercise program, consult your physician. Note: The decals are not shown at the right have been placed on the front cover of 35 or persons with pre-existing health problems. Read all instructions before performing the maintenance and adjustment...
Uk Manual
Page 5
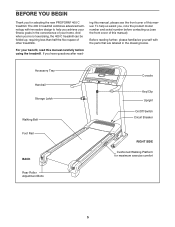
... product model number and serial number before using the treadmill. Accessory Tray Handrail Storage Latch Walking Belt Foot Rail BACK Rear Roller Adjustment Bolts Console Key/Clip Upright On/Off Switch Circuit Breaker RIGHT SIDE Cushioned Walking Platform for selecting the new PROFORM® 400 C treadmill. The 400 C treadmill combines advanced technology with the parts that are labeled in the convenience of this manual carefully before contacting us assist you 're not exercising, the 400 C treadmill can be folded up...
... product model number and serial number before using the treadmill. Accessory Tray Handrail Storage Latch Walking Belt Foot Rail BACK Rear Roller Adjustment Bolts Console Key/Clip Upright On/Off Switch Circuit Breaker RIGHT SIDE Cushioned Walking Platform for selecting the new PROFORM® 400 C treadmill. The 400 C treadmill combines advanced technology with the parts that are labeled in the convenience of this manual carefully before contacting us assist you 're not exercising, the 400 C treadmill can be folded up...
Uk Manual
Page 6
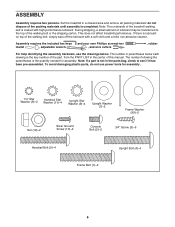
... , adjustable wrench , and wire cutters . , rubber For help identifying the assembly hardware, see if it has been pre-assembled. The number in the center of the treadmill walking belt is the key number of the walking belt, simply wipe off the lubricant with high-performance lubricant. To avoid damaging plastic parts, do not dispose of the walking belt or the shipping carton. do not use power tools for assembly. During...
... , adjustable wrench , and wire cutters . , rubber For help identifying the assembly hardware, see if it has been pre-assembled. The number in the center of the treadmill walking belt is the key number of the walking belt, simply wipe off the lubricant with high-performance lubricant. To avoid damaging plastic parts, do not dispose of the walking belt or the shipping carton. do not use power tools for assembly. During...

Uk Manual
Page 7
1. Locate the wire in the location shown. Secure the wire to the Base with two Upright Bolts (4) and two Upright Star Washers (6); do not tighten the Upright Bolts yet. Make sure that the power cord is unplugged. 1 Identify the Right Upright (39), which has a square hole in the Right Upright (39). Orient the Left Upright (38) as shown, and attach 2 it near the front 3 of the treadmill as...
1. Locate the wire in the location shown. Secure the wire to the Base with two Upright Bolts (4) and two Upright Star Washers (6); do not tighten the Upright Bolts yet. Make sure that the power cord is unplugged. 1 Identify the Right Upright (39), which has a square hole in the Right Upright (39). Orient the Left Upright (38) as shown, and attach 2 it near the front 3 of the treadmill as...
Uk Manual
Page 11
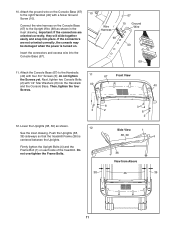
... Screw (10). Then, tighten the four 40 Screws. 3 12. Firmly tighten the Upright Bolts (4) and the Frame Bolt (1) on . If the connectors are oriented correctly, they will slide together easily and snap into the Console Base (67). Insert the connectors and excess wire into place. Lower the Uprights (38, 39) as shown in the inset drawing. Attach the Console Base (67) to the Upright Wire...
... Screw (10). Then, tighten the four 40 Screws. 3 12. Firmly tighten the Upright Bolts (4) and the Frame Bolt (1) on . If the connectors are oriented correctly, they will slide together easily and snap into the Console Base (67). Insert the connectors and excess wire into place. Lower the Uprights (38, 39) as shown in the inset drawing. Attach the Console Base (67) to the Upright Wire...
Uk Manual
Page 12
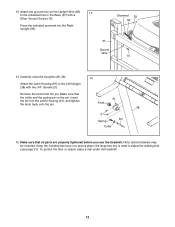
... 69 37 Ground Wire 10 14. the large hex key is used to the Left Upright (38) with a Silver Ground Screw (10). Carefully raise the Uprights (38, 39). 14 Attach the Latch Housing (91) to adjust the walking belt (see page 21). Keep the included hex keys in the Base (37) with two 3/4" Screws (3). Attach the ground wire on the pin. Insert the pin into the Right...
... 69 37 Ground Wire 10 14. the large hex key is used to the Left Upright (38) with a Silver Ground Screw (10). Carefully raise the Uprights (38, 39). 14 Attach the Latch Housing (91) to adjust the walking belt (see page 21). Keep the included hex keys in the Base (37) with two 3/4" Screws (3). Attach the ground wire on the pin. Insert the pin into the Right...
Uk Manual
Page 13
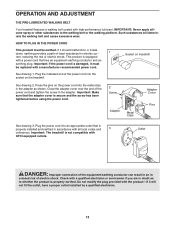
... properly installed and earthed in the adapter. Press the pins on the power cord into an appropriate outlet that is equipped with all local codes and 3 ordinances. creased risk of the power cord and tighten the screw in accordance with a power cord that the adapter cover is properly earthed. HOW TO PLUG IN THE POWER CORD This product must be earthed. OPERATION AND ADJUSTMENT THE PRE-LUBRICATED WALKING BELT Your treadmill features a walking belt coated...
... properly installed and earthed in the adapter. Press the pins on the power cord into an appropriate outlet that is equipped with all local codes and 3 ordinances. creased risk of the power cord and tighten the screw in accordance with a power cord that the adapter cover is properly earthed. HOW TO PLUG IN THE POWER CORD This product must be earthed. OPERATION AND ADJUSTMENT THE PRE-LUBRICATED WALKING BELT Your treadmill features a walking belt coated...
Uk Manual
Page 14
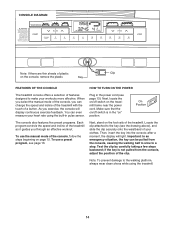
... console, causing the walking belt to slow to make your heart rate using the treadmill. 14 To use the manual mode of features designed to a stop. Next, stand on the treadmill frame near the power cord. Then, insert the key into the console; As you exercise, the console will light. Plug in pulse sensor. On Position The console also features five preset programs. Each program controls the speed and incline of the treadmill as it guides you can change the speed...
... console, causing the walking belt to slow to make your heart rate using the treadmill. 14 To use the manual mode of features designed to a stop. Next, stand on the treadmill frame near the power cord. Then, insert the key into the console; As you exercise, the console will light. Plug in pulse sensor. On Position The console also features five preset programs. Each program controls the speed and incline of the treadmill as it guides you can change the speed...
Uk Manual
Page 15
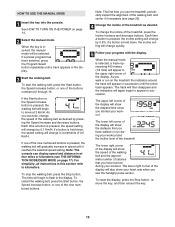
... stop the walking belt, press the Stop button. To start the walking belt, press the Start button, the Speed increase button, or one of the nine numbered buttons. For simplicity, all instructions in the upper right corner of 0.5 Km/H. To restart the walking belt, press the Start button, the Speed increase button, or one of the display will show the distance that you use the handgrip pulse sensor. When the manual mode is held down , the speed setting will show your workout. If a preset program...
... stop the walking belt, press the Stop button. To start the walking belt, press the Start button, the Speed increase button, or one of the nine numbered buttons. For simplicity, all instructions in the upper right corner of 0.5 Km/H. To restart the walking belt, press the Start button, the Speed increase button, or one of the display will show the distance that you use the handgrip pulse sensor. When the manual mode is held down , the speed setting will show your workout. If a preset program...
Uk Manual
Page 16
... the key is removed, the console is divided into the console. Before using the treadmill, switch the on/off switch to alert you are clean. The display will then show how long the program will scroll across the matrix in the display to the "off the demo mode. Each program is in the matrix.) The speed set - Step onto the foot rails, press the Stop button, and adjust the incline of the program...
... the key is removed, the console is divided into the console. Before using the treadmill, switch the on/off switch to alert you are clean. The display will then show how long the program will scroll across the matrix in the display to the "off the demo mode. Each program is in the matrix.) The speed set - Step onto the foot rails, press the Stop button, and adjust the incline of the program...

Uk Manual
Page 17
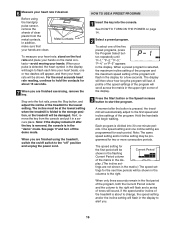
... the speed and incline settings for the second period will then be removed from the console. 5 Measure your progress with the display. The upper left corner of the display will show the total number of measurement, if desired. The lower left corner of the display will automatically adjust to a stop the program temporarily, press the Stop button. To exit the information mode, remove the key from the console, and the display will move...
... the speed and incline settings for the second period will then be removed from the console. 5 Measure your progress with the display. The upper left corner of the display will show the total number of measurement, if desired. The lower left corner of the display will automatically adjust to a stop the program temporarily, press the Stop button. To exit the information mode, remove the key from the console, and the display will move...

Uk Manual
Page 18
... must be permanently damaged. Using your right hand to the desired location. Latch Knob Engaged HOW TO MOVE THE TREADMILL Before moving the treadmill. To reduce the risk of injury, do not lift with the latch pin, and then slowly release the latch knob. HOW TO FOLD AND MOVE THE TREADMILL HOW TO FOLD THE TREADMILL FOR STORAGE Before folding the treadmill, adjust the incline to the storage position as you raise the...
... must be permanently damaged. Using your right hand to the desired location. Latch Knob Engaged HOW TO MOVE THE TREADMILL Before moving the treadmill. To reduce the risk of injury, do not lift with the latch pin, and then slowly release the latch knob. HOW TO FOLD AND MOVE THE TREADMILL HOW TO FOLD THE TREADMILL FOR STORAGE Before folding the treadmill, adjust the incline to the storage position as you raise the...
Uk Manual
Page 20
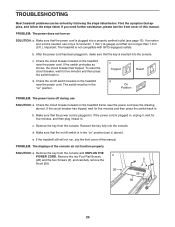
... Reset d On Position PROBLEM: The power turns off switch located on SOLUTION: a. If the power cord is inserted into the console. Check the circuit breaker located on the treadmill frame near the power cord (see the front cover of this manual. The switch must be solved by following the steps listed below. Remove the key from the console and UNPLUG THE POWER CORD. Reinsert the key fully into the console. e. Remove the key from the console. If you need...
... Reset d On Position PROBLEM: The power turns off switch located on SOLUTION: a. If the power cord is inserted into the console. Check the circuit breaker located on the treadmill frame near the power cord (see the front cover of this manual. The switch must be solved by following the steps listed below. Remove the key from the console and UNPLUG THE POWER CORD. Reinsert the key fully into the console. e. Remove the key from the console. If you need...
Uk Manual
Page 21
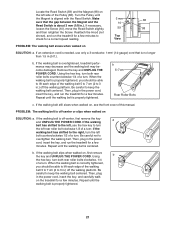
... walking belt centered. b. Locate the Reed Switch (59) and the Magnet (98) on the left side of the walking belt 5 to 7 cm (2 to 3 in.) off the walking platform. If necessary, loosen the Screw (10), move the Reed Switch slightly, 59 98 and then retighten the Screw. b 5-7cm Rear Roller Bolts c. Then, plug in the power cord, insert the key, and carefully walk on the treadmill for a correct speed reading. If the walking belt is correctly tightened...
... walking belt centered. b. Locate the Reed Switch (59) and the Magnet (98) on the left side of the walking belt 5 to 7 cm (2 to 3 in.) off the walking platform. If necessary, loosen the Screw (10), move the Reed Switch slightly, 59 98 and then retighten the Screw. b 5-7cm Rear Roller Bolts c. Then, plug in the power cord, insert the key, and carefully walk on the treadmill for a correct speed reading. If the walking belt is correctly tightened...
Uk Manual
Page 22
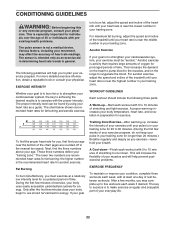
... the chart (ages are recommended heart rates for aerobic exercise. For maximum fat burning, adjust the speed and incline of the treadmill until your pulse is to 60 minutes. (During the first few months, you , first find the proper heart rate for you may affect the accuracy of time. Aerobic exercise is intended only as a guide. These three numbers define your physician. The lower two numbers...
... the chart (ages are recommended heart rates for aerobic exercise. For maximum fat burning, adjust the speed and incline of the treadmill until your pulse is to 60 minutes. (During the first few months, you , first find the proper heart rate for you may affect the accuracy of time. Aerobic exercise is intended only as a guide. These three numbers define your physician. The lower two numbers...
Uk Manual
Page 24
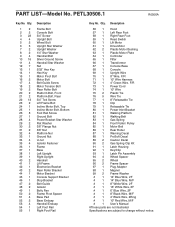
HOW TO ORDER REPLACEMENT PARTS To order replacement parts, contact the ICON Health & Fitness, Ltd. office, or write: ICON Health & Fitness, Ltd. Customer Service Department Unit 4, Revie Road ...information: • the MODEL NUMBER of the product (PETL30506.1) • the NAME of the product (PROFORM 400 C treadmill) • the SERIAL NUMBER of the product (see the front cover of this manual) • the KEY NUMBER and DESCRIPTION of the desired part(s) (see the PART LIST and the EXPLODED DRAWING in the center of this manual) Part No. 243447 R0506A Printed in China © 2006 ICON...
HOW TO ORDER REPLACEMENT PARTS To order replacement parts, contact the ICON Health & Fitness, Ltd. office, or write: ICON Health & Fitness, Ltd. Customer Service Department Unit 4, Revie Road ...information: • the MODEL NUMBER of the product (PETL30506.1) • the NAME of the product (PROFORM 400 C treadmill) • the SERIAL NUMBER of the product (see the front cover of this manual) • the KEY NUMBER and DESCRIPTION of the desired part(s) (see the PART LIST and the EXPLODED DRAWING in the center of this manual) Part No. 243447 R0506A Printed in China © 2006 ICON...
Uk Manual
Page 26
... 1 Right Rear Foot 59 1 Reed Switch 60 1 Lift Motor 61 1 Drive Motor 62 2 Plastic Motor Bushing 63 1 Plastic Motor Plate 64 1 Controller 65 1 Filter 66 1 Transformer 67 1 Console Base 68 1 Console 69 1 Upright Wire 70 1 8" Wire, F/R 71 1 10" Wire Harness 72 1 4" Green Wire, F/R 73 1 Power Cord 74 1 10" Wire 75 2 Plastic Tie 76 9 Wire Tie 77 1 8" Releasable Tie 78 1 Clip 79 1 Releasable Tie 80 1 Power Inlet Bracket 81 1 Walking Platform 82 1 Walking Belt 83...
... 1 Right Rear Foot 59 1 Reed Switch 60 1 Lift Motor 61 1 Drive Motor 62 2 Plastic Motor Bushing 63 1 Plastic Motor Plate 64 1 Controller 65 1 Filter 66 1 Transformer 67 1 Console Base 68 1 Console 69 1 Upright Wire 70 1 8" Wire, F/R 71 1 10" Wire Harness 72 1 4" Green Wire, F/R 73 1 Power Cord 74 1 10" Wire 75 2 Plastic Tie 76 9 Wire Tie 77 1 8" Releasable Tie 78 1 Clip 79 1 Releasable Tie 80 1 Power Inlet Bracket 81 1 Walking Platform 82 1 Walking Belt 83...


