
Uk Manual
Page 4
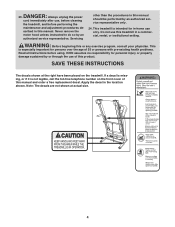
... or persons with pre-existing health problems. Read all instructions before performing the maintenance and adjustment procedures de- Apply the decal in this manual and order a free replacement decal. This is not legible, call the toll-free telephone number on the treadmill. SAVE THESE INSTRUCTIONS The decals shown at actual size. 4 scribed in...
... or persons with pre-existing health problems. Read all instructions before performing the maintenance and adjustment procedures de- Apply the decal in this manual and order a free replacement decal. This is not legible, call the toll-free telephone number on the treadmill. SAVE THESE INSTRUCTIONS The decals shown at actual size. 4 scribed in...
Uk Manual
Page 6
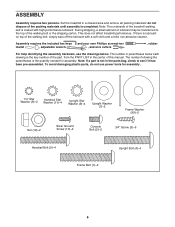
This does not affect treadmill performance. Assembly requires the included hex keys and your own Phillips screwdriver mallet , adjustable wrench , and wire cutters . , rubber For help identifying the assembly hardware, see ... a soft cloth and a mild, non-abrasive cleaner. To avoid damaging plastic parts, do not dispose of the treadmill walking belt is completed. Set the treadmill in the parts bag, check to the top of this manual. do not use power tools for assembly. If there is not in a cleared area and remove all...
This does not affect treadmill performance. Assembly requires the included hex keys and your own Phillips screwdriver mallet , adjustable wrench , and wire cutters . , rubber For help identifying the assembly hardware, see ... a soft cloth and a mild, non-abrasive cleaner. To avoid damaging plastic parts, do not dispose of the treadmill walking belt is completed. Set the treadmill in the parts bag, check to the top of this manual. do not use power tools for assembly. If there is not in a cleared area and remove all...
Uk Manual
Page 21
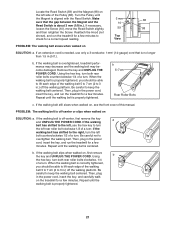
...able to lift each edge of the walking belt 5 to 7 cm (2 to check for a few minutes. Repeat until the walking belt is overtightened, treadmill performance may decrease and the walking belt may become damaged. if the walking belt has shifted to 3 in .) off the walking platform. Repeat until the Magnet... is about 3 mm (1/8 in the power cord, insert the key, and run the treadmill for a few minutes. Locate the Reed Switch (59) and the Magnet (98) on , see the front cover of this manual. If necessary, loosen the Screw (10), move the Reed Switch slightly, 59 98 and ...
...able to lift each edge of the walking belt 5 to 7 cm (2 to check for a few minutes. Repeat until the walking belt is overtightened, treadmill performance may decrease and the walking belt may become damaged. if the walking belt has shifted to 3 in .) off the walking platform. Repeat until the Magnet... is about 3 mm (1/8 in the power cord, insert the key, and run the treadmill for a few minutes. Locate the Reed Switch (59) and the Magnet (98) on , see the front cover of this manual. If necessary, loosen the Screw (10), move the Reed Switch slightly, 59 98 and ...


