

User Manual
Page 3
...Adjust the speed in any commercial, rental, or institutional setting. Do not attempt to raise, lower, or move the treadmill until it is shown at 38% of the treadmill every three months. 20. Inspect and tighten all instructions before performing the maintenance and adjustment procedures de- Do not use...pounds (20 kg) to order a free replacement decal (see the back cover of this manual). Always remove the key and unplug the power cord when the treadmill is especially important for persons over the age of high speeds. Never drop or insert any object into any exercise program...
...Adjust the speed in any commercial, rental, or institutional setting. Do not attempt to raise, lower, or move the treadmill until it is shown at 38% of the treadmill every three months. 20. Inspect and tighten all instructions before performing the maintenance and adjustment procedures de- Do not use...pounds (20 kg) to order a free replacement decal (see the back cover of this manual). Always remove the key and unplug the power cord when the treadmill is especially important for persons over the age of high speeds. Never drop or insert any object into any exercise program...
User Manual
Page 4
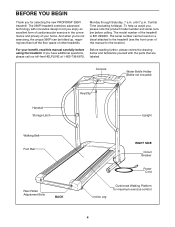
...Holder (Bottle not included) Handrail Storage Latch Key/Clip Upright Walking Belt Foot Rail Rear Roller Adjustment Bolts BACK RIGHT SIDE Circuit Breaker Power Cord Incline Leg Cushioned Walking Platform for selecting the new PROFORM¨ 390Pi treadmill. If you , please note the product... model number and serial number before using the treadmill. until 7 p.m. The 390Pi treadmill combines advanced technology with the parts that are labeled. The...
...Holder (Bottle not included) Handrail Storage Latch Key/Clip Upright Walking Belt Foot Rail Rear Roller Adjustment Bolts BACK RIGHT SIDE Circuit Breaker Power Cord Incline Leg Cushioned Walking Platform for selecting the new PROFORM¨ 390Pi treadmill. If you , please note the product... model number and serial number before using the treadmill. until 7 p.m. The 390Pi treadmill combines advanced technology with the parts that are labeled. The...

User Manual
Page 8
...¥ To reduce the possibility of the console, remove it before operating the console. Find the clip at the lower right) while using the treadmill. Test the clip by carefully taking a few steps back- Be sure that the tab locks into the console. Alkaline batteries are touching the springs ... walking belt will stop. ¥ Adjust the speed in the drawing at the upper right. Clip tached to the key and slide the clip onto the waistband of the treadmill. Open the battery cover as shown in small increments. ¥ The training zones marked beside the speed control are general...
...¥ To reduce the possibility of the console, remove it before operating the console. Find the clip at the lower right) while using the treadmill. Test the clip by carefully taking a few steps back- Be sure that the tab locks into the console. Alkaline batteries are touching the springs ... walking belt will stop. ¥ Adjust the speed in the drawing at the upper right. Clip tached to the key and slide the clip onto the waistband of the treadmill. Open the battery cover as shown in small increments. ¥ The training zones marked beside the speed control are general...

User Manual
Page 9
...restarted. 3 Start the walking belt. Carefully step onto the walking belt and begin exercising. The displays will not turn off in miles. Inserting the key will turn on page 14.) In addition, the display shows the speed of the walking belt, in the display. After you have burned. (See...it upward until the desired incline level is not pressed for five minutes, the displays will change the incline of the treadmill, press the top or bottom of the treadmill as desired by the arrows in the display. TIME/DISTANCE displayÑThis display Arrow shows the elapsed time and ...
...restarted. 3 Start the walking belt. Carefully step onto the walking belt and begin exercising. The displays will not turn off in miles. Inserting the key will turn on page 14.) In addition, the display shows the speed of the walking belt, in the display. After you have burned. (See...it upward until the desired incline level is not pressed for five minutes, the displays will change the incline of the treadmill, press the top or bottom of the treadmill as desired by the arrows in the display. TIME/DISTANCE displayÑThis display Arrow shows the elapsed time and ...

User Manual
Page 12
...attach the hood, and run , please call our toll-free HELPLINE at 1-800-736-6879, Monday through Saturday, 7 a.m. Important: The treadmill is aligned with GFCI-equipped outlets. After the power cord has been plugged in, make sure that the power cord is about 1/8Ó. If... in . Central Time (excluding holidays). 1. c. If the switch protrudes as a transient voltage surge suppressor (TVSS). above). b. Reinsert the key fully into the console. If necessary, loosen the Screw (33) and move the Reed Switch slightly. If further assistance is fully inserted into the...
...attach the hood, and run , please call our toll-free HELPLINE at 1-800-736-6879, Monday through Saturday, 7 a.m. Important: The treadmill is aligned with GFCI-equipped outlets. After the power cord has been plugged in, make sure that the power cord is about 1/8Ó. If... in . Central Time (excluding holidays). 1. c. If the switch protrudes as a transient voltage surge suppressor (TVSS). above). b. Reinsert the key fully into the console. If necessary, loosen the Screw (33) and move the Reed Switch slightly. If further assistance is fully inserted into the...

User Manual
Page 13
.... b. Plug in the power cord, insert the key and run the treadmill for a few minutes. c. Plug in the power cord, insert the key and run the treadmill for a few minutes. Plug in the power cord, insert the key and run the treadmill for a few minutes. Plug in the power cord..., insert the key and run the treadmill for a few minutes. Using the allen wrench, c ...
.... b. Plug in the power cord, insert the key and run the treadmill for a few minutes. c. Plug in the power cord, insert the key and run the treadmill for a few minutes. Plug in the power cord, insert the key and run the treadmill for a few minutes. Plug in the power cord..., insert the key and run the treadmill for a few minutes. Using the allen wrench, c ...

User Manual
Page 14
...your A Warm-up increases your heart rate as shown. EXERCISE INTENSITY Whether your goal is to burn fat or to strengthen your cardiovascular system, the key to achieving the desired results is to help you stop exercising and place two fingers on the lungs to plan your body uses easily accessible... the blood. training zone. For aerobic exercise, adjust the speed and incline of the treadmill until your heart rate is near one of the treadmill until your heart rate is near the low end of the treadmill accordingly. If your goal is to burn fat, adjust the speed and incline of the...
...your A Warm-up increases your heart rate as shown. EXERCISE INTENSITY Whether your goal is to burn fat or to strengthen your cardiovascular system, the key to achieving the desired results is to help you stop exercising and place two fingers on the lungs to plan your body uses easily accessible... the blood. training zone. For aerobic exercise, adjust the speed and incline of the treadmill until your heart rate is near one of the treadmill until your heart rate is near the low end of the treadmill accordingly. If your goal is to burn fat, adjust the speed and incline of the...

User Manual
Page 15
The key to success is to make exercise a regular and enjoyable part of stretching to cool down toward your knees outward. Toe Touch Stretch Stand with your ...
The key to success is to make exercise a regular and enjoyable part of stretching to cool down toward your knees outward. Toe Touch Stretch Stand with your ...

User Manual
Page 16
... 2 81 1 82 1 83 2 84 1 85* 2 86 1 87 2 # 1 # 1 Description Platform Screw Isolator Front Roller/Pulley Front Roller Adj. PART LISTÑModel No. 831.299400 R0600A Key No. Qty. 1 2 2 1 3 2 4 1 5 2 6 1 7 1 8 1 9 1 10* 1 11 1 12 1 13 17 14 1 15 1 16 7 17 1 18 1 19 1 ... 36 2 37 2 38 6 39 5 40 4 41 2 42 1 43 1 44 1 45 1 46 1 47 1 Description Handrail Key/Clip Incline Leg Pivot Bolt Battery Cover Foot Rail Lift Motor Rear Roller Speed Potentiometer Speed Control Knob Console Assembly Upright Base Motor Belt Small...
... 2 81 1 82 1 83 2 84 1 85* 2 86 1 87 2 # 1 # 1 Description Platform Screw Isolator Front Roller/Pulley Front Roller Adj. PART LISTÑModel No. 831.299400 R0600A Key No. Qty. 1 2 2 1 3 2 4 1 5 2 6 1 7 1 8 1 9 1 10* 1 11 1 12 1 13 17 14 1 15 1 16 7 17 1 18 1 19 1 ... 36 2 37 2 38 6 39 5 40 4 41 2 42 1 43 1 44 1 45 1 46 1 47 1 Description Handrail Key/Clip Incline Leg Pivot Bolt Battery Cover Foot Rail Lift Motor Rear Roller Speed Potentiometer Speed Control Knob Console Assembly Upright Base Motor Belt Small...

User Manual
Page 18
... parts, please be prepared to provide the following information: ¥ The NAME OF THE PRODUCT (PROFORM¨ 390Pi treadmill) ¥ The MODEL NUMBER OF THE PRODUCT (831.299400) ¥ The KEY NUMBER AND DESCRIPTION OF THE PART (see the EXPLODED DRAWING and PART LIST included in this manual)...or workmanship in USA © 2000 Sears, Roebuck and Co. Model No. 831.299400 QUESTIONS? When requesting help assembling or operating the PROFORM 390Pi treadmill ¥ a part is used commercially or for immediate purchase or special order when you need to be replaced, call the following toll-...
... parts, please be prepared to provide the following information: ¥ The NAME OF THE PRODUCT (PROFORM¨ 390Pi treadmill) ¥ The MODEL NUMBER OF THE PRODUCT (831.299400) ¥ The KEY NUMBER AND DESCRIPTION OF THE PART (see the EXPLODED DRAWING and PART LIST included in this manual)...or workmanship in USA © 2000 Sears, Roebuck and Co. Model No. 831.299400 QUESTIONS? When requesting help assembling or operating the PROFORM 390Pi treadmill ¥ a part is used commercially or for immediate purchase or special order when you need to be replaced, call the following toll-...


