

English Manual
Page 3
...number 146148, or see your local PROFORM dealer or call the telephone number on the front cover of the specifications described on page 14). 17. It is being administered. 7. Various factors, including your treadmill. This is damaged, the walking belt may slow, accelerate, or stop ...cord into a grounded circuit capable of carrying 15 or more amps. No other appliance should not be on the walking belt. Do not operate the treadmill where aerosol products are adequately informed of heart rate readings. Athletic support clothes are standing on the same circuit. never...
...number 146148, or see your local PROFORM dealer or call the telephone number on the front cover of the specifications described on page 14). 17. It is being administered. 7. Various factors, including your treadmill. This is damaged, the walking belt may slow, accelerate, or stop ...cord into a grounded circuit capable of carrying 15 or more amps. No other appliance should not be on the walking belt. Do not operate the treadmill where aerosol products are adequately informed of heart rate readings. Athletic support clothes are standing on the same circuit. never...

English Manual
Page 5
... Handrail Storage Latch Fan Console Key/Clip Walking Belt Foot Rail Idler Roller Adjustment Bolts Hood Power Switch Power Cord Wheel Platform Cushion 5 And when you have questions after read this manual carefully before contacting us assist you for selecting the revolutionary PROFORM® 380 CS treadmill. ing this manual, please see the front cover...
... Handrail Storage Latch Fan Console Key/Clip Walking Belt Foot Rail Idler Roller Adjustment Bolts Hood Power Switch Power Cord Wheel Platform Cushion 5 And when you have questions after read this manual carefully before contacting us assist you for selecting the revolutionary PROFORM® 380 CS treadmill. ing this manual, please see the front cover...

English Manual
Page 6
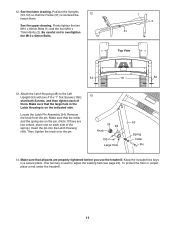
...M10 x 60mm Bolt (1)-2 M10 x 75mm Bolt (2)-4 1. During shipping, some lubricant may be assembled. Extra hardware may be transferred to one of the treadmill walking belt is the quantity needed for assembly. If there is completed. Note: If a part is not in the hardware kit, check to see if it is...with six #8 x 1" Tek 26 Screws (26). 63 45 63 26 63 63 26 6 Make sure that the power cord is normal. Set the treadmill in parentheses below to the Base (52) and the Extension Legs (45) with high-performance lubricant. This is unplugged. 1 52 26 Position the Base...
...M10 x 60mm Bolt (1)-2 M10 x 75mm Bolt (2)-4 1. During shipping, some lubricant may be assembled. Extra hardware may be transferred to one of the treadmill walking belt is the quantity needed for assembly. If there is completed. Note: If a part is not in the hardware kit, check to see if it is...with six #8 x 1" Tek 26 Screws (26). 63 45 63 26 63 63 26 6 Make sure that the power cord is normal. Set the treadmill in parentheses below to the Base (52) and the Extension Legs (45) with high-performance lubricant. This is unplugged. 1 52 26 Position the Base...
English Manual
Page 11
...and then tighten each side of them . To protect the floor or carpet, place a mat under the treadmill. 11 Remove the knob from the pin. Keep the included hex keys in the Latch Housing is on...two collars, place one on the pin. (Note: If there are properly tightened before you use the treadmill. See the lower drawing. One hex key is centered be- 12 tween them . Make sure that ...the Frame (51) is used to adjust the walking belt (see page 20). Firmly tighten the two M10 x 60mm Bolts (1) and the four M10 x 75mm Bolts...
...and then tighten each side of them . To protect the floor or carpet, place a mat under the treadmill. 11 Remove the knob from the pin. Keep the included hex keys in the Latch Housing is on...two collars, place one on the pin. (Note: If there are properly tightened before you use the treadmill. See the lower drawing. One hex key is centered be- 12 tween them . Make sure that ...the Frame (51) is used to adjust the walking belt (see page 20). Firmly tighten the two M10 x 60mm Bolts (1) and the four M10 x 75mm Bolts...
English Manual
Page 12
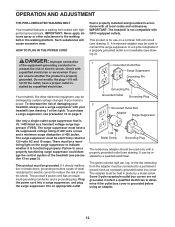
... outlet, have a UL suppressed voltage rating of 400 volts or less and a minimum surge dissipation of the treadmill (see precaution 12 on page 3). OPERATION AND ADJUSTMENT THE PRE-LUBRICATED WALKING BELT Your treadmill features a walking belt coated with highperformance lubricant. IMPORTANT: Never apply silicone spray or other electronic equipment, can be grounded. This product...
... outlet, have a UL suppressed voltage rating of 400 volts or less and a minimum surge dissipation of the treadmill (see precaution 12 on page 3). OPERATION AND ADJUSTMENT THE PRE-LUBRICATED WALKING BELT Your treadmill features a walking belt coated with highperformance lubricant. IMPORTANT: Never apply silicone spray or other electronic equipment, can be grounded. This product...

English Manual
Page 13
...Key Clip FEATURES OF THE CONSOLE The treadmill console offers a selection of a button. When you select the manual mode of the console, you get in pulse sensor. IMPORTANT: If there is a sheet of plastic on the face of the walking belt, and center the walking belt if necessary (see page 17. The... console also offers six speed workouts. To turn on page 17. To use the sound system, see page 20). To use the manual mode, see page 14. To prevent damage to make your heart rate using the treadmill. The...
...Key Clip FEATURES OF THE CONSOLE The treadmill console offers a selection of a button. When you select the manual mode of the console, you get in pulse sensor. IMPORTANT: If there is a sheet of plastic on the face of the walking belt, and center the walking belt if necessary (see page 17. The... console also offers six speed workouts. To turn on page 17. To use the sound system, see page 20). To use the manual mode, see page 14. To prevent damage to make your heart rate using the treadmill. The...

English Manual
Page 14
...the selected speed setting. Note: After you press the Start button or the Speed increase button, the walking belt will begin to turn off the demo mode. Change the incline of the treadmill. Each time you hold down a button, the speed setting will gradually increase or decrease until it may ...power. IMPORTANT: In an emergency situation, the key can be pulled from the console, adjust the position of the walking belt as desired. if the key is turned on the treadmill frame near the power cord. See HOW TO TURN ON THE POWER above. Next, locate the power switch on . ...
...the selected speed setting. Note: After you press the Start button or the Speed increase button, the walking belt will begin to turn off the demo mode. Change the incline of the treadmill. Each time you hold down a button, the speed setting will gradually increase or decrease until it may ...power. IMPORTANT: In an emergency situation, the key can be pulled from the console, adjust the position of the walking belt as desired. if the key is turned on the treadmill frame near the power cord. See HOW TO TURN ON THE POWER above. Next, locate the power switch on . ...
English Manual
Page 15
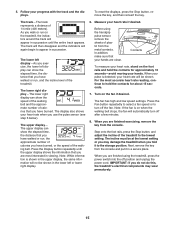
.... The lower right display-The lower right display can show the speed of the walking belt and the approximate number of calories that you have walked or run , and the incline level of the treadmill. Press the Display button repeatedly until the entire track appears. Note: If the fan... that you have burned. Measure your hands are finished using the handgrip pulse sensor, remove the sheets of the treadmill to the storage position. The track-The track represents a distance of the walking belt. Note: While information is detected, your heart rate when you do not do this, the...
.... The lower right display-The lower right display can show the speed of the walking belt and the approximate number of calories that you have walked or run , and the incline level of the treadmill. Press the Display button repeatedly until the entire track appears. Note: If the fan... that you have burned. Measure your hands are finished using the handgrip pulse sensor, remove the sheets of the treadmill to the storage position. The track-The track represents a distance of the walking belt. Note: While information is detected, your heart rate when you do not do this, the...
English Manual
Page 16
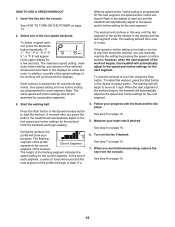
...track and the displays. The workout will scroll across the displays. Follow your progress. HOW TO USE A SPEED WORKOUT 1. The walking belt will flash in the display to the first speed and incline settings for each segment, a series of tones will sound and the ...workout, press the Workouts button repeatedly; The flashing segment of the profile represents the current Current Segment segment of the workout begins, the treadmill will automatically adjust to the speed and incline settings for the next segment. 3. Measure your heart rate if desired. When the next...
...track and the displays. The workout will scroll across the displays. Follow your progress. HOW TO USE A SPEED WORKOUT 1. The walking belt will flash in the display to the first speed and incline settings for each segment, a series of tones will sound and the ...workout, press the Workouts button repeatedly; The flashing segment of the profile represents the current Current Segment segment of the workout begins, the treadmill will automatically adjust to the speed and incline settings for the next segment. 3. Measure your heart rate if desired. When the next...

English Manual
Page 17
Make sure that the walking belt has moved. When the information mode is selected, the following information will show the total number of hours that keeps track of treadmill usage information and allows you to the console. The lower left display will be used . While the demo mode is...into the console. An "E" for English miles or an "M" for the console. The console features an information mode that the treadmill has been used if the treadmill is selected. The console features a display demo mode, designed to change the unit of on the floor or another flat ...
Make sure that the walking belt has moved. When the information mode is selected, the following information will show the total number of hours that keeps track of treadmill usage information and allows you to the console. The lower left display will be used . While the demo mode is...into the console. An "E" for English miles or an "M" for the console. The console features an information mode that the treadmill has been used if the treadmill is selected. The console features a display demo mode, designed to change the unit of on the floor or another flat ...

English Manual
Page 20
... be able to turn the left idler roller bolt counterclockwise 1/2 of a turn . The treadmill will recalibrate the incline system. 20 b. Repeat until the walking belt is properly tightened. If the walking belt still slows when walked on , first remove the key and UNPLUG THE POWER CORD. Be... be able to the right, turn the left idler roller bolt clockwise 1/2 of the Pulley (71). PROBLEM: The walking belt is aligned with the Reed Switch. wise, 1/4 of the treadmill does not change correctly SOLUTION: a. Locate the Reed Switch (89) and the Magnet (62) on SOLUTION: a. PROBLEM...
... be able to turn the left idler roller bolt counterclockwise 1/2 of a turn . The treadmill will recalibrate the incline system. 20 b. Repeat until the walking belt is properly tightened. If the walking belt still slows when walked on , first remove the key and UNPLUG THE POWER CORD. Be... be able to the right, turn the left idler roller bolt clockwise 1/2 of the Pulley (71). PROBLEM: The walking belt is aligned with the Reed Switch. wise, 1/4 of the treadmill does not change correctly SOLUTION: a. Locate the Reed Switch (89) and the Magnet (62) on SOLUTION: a. PROBLEM...

English Manual
Page 22
... Foot Rail Right Foot Rail Wheel Spacer Wheel Drive Roller/Pulley 3/8" x 1 1/4" Bolt Access Door Rear Foot, Left Long Foot Rail Screw Walking Belt Handrail Cap Platform Cushion Drive Motor Wire Tie 8" Tie 3/8" Locknut Reed Switch Clip M4 x 10mm Screw M5 x 16mm Screw Walking Platform Controller Console... Crossbar Reed Switch Power Cord Console 3/8" Jam Nut Belt Guide 5mm Hex Key Frame Cap Releasable Tie Rear Foot, Right Audio Wire Power Cord Grommet Incline Motor Wire 22 PFTL39908.2 R0610A To locate ...
... Foot Rail Right Foot Rail Wheel Spacer Wheel Drive Roller/Pulley 3/8" x 1 1/4" Bolt Access Door Rear Foot, Left Long Foot Rail Screw Walking Belt Handrail Cap Platform Cushion Drive Motor Wire Tie 8" Tie 3/8" Locknut Reed Switch Clip M4 x 10mm Screw M5 x 16mm Screw Walking Platform Controller Console... Crossbar Reed Switch Power Cord Console 3/8" Jam Nut Belt Guide 5mm Hex Key Frame Cap Releasable Tie Rear Foot, Right Audio Wire Power Cord Grommet Incline Motor Wire 22 PFTL39908.2 R0610A To locate ...


