
English Manual
Page 4
...read the fol- SAVE THESE INSTRUCTIONS 4 lowing important precautions and information Lefore operating the treadmill. 1. The treadmill should be on the treadmill at least 8 feet of the treadmill overheating, do not operate the treadmill continuously for both men and women. 5. If an extension cord is not working ...IMPORTANT PRECAUTIONS WARNING: To reduce the risk of carrying 12 or more than one person on the same circuit. Position the treadmill on page 7), plug the power cord directly into any object into a grounded circuit capable of burns, fire, electric shock ...
...read the fol- SAVE THESE INSTRUCTIONS 4 lowing important precautions and information Lefore operating the treadmill. 1. The treadmill should be on the treadmill at least 8 feet of the treadmill overheating, do not operate the treadmill continuously for both men and women. 5. If an extension cord is not working ...IMPORTANT PRECAUTIONS WARNING: To reduce the risk of carrying 12 or more than one person on the same circuit. Position the treadmill on page 7), plug the power cord directly into any object into a grounded circuit capable of burns, fire, electric shock ...
English Manual
Page 5
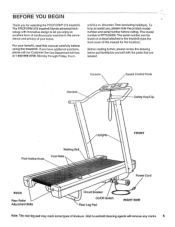
...home. until 6 p.m. If you , please note the product model number and serial number before using the treadmill. Mountain Time (excluding holidays). BEFORE YOU BEGIN Thank you for the location). Console Speed Control Knob Handrail ... The rear leg pad may mark some types of your benefit, read this manual for selecting the PROFORM 375 treadmill. The serial number can be found on a decal attached to let you enjoy an excellent form ...-free at 1-800-999-3756, Monday through Friday, 6 a.m. The PROFORM 375 treadmill blends advanced technology with the parts that are labeled.
...home. until 6 p.m. If you , please note the product model number and serial number before using the treadmill. Mountain Time (excluding holidays). BEFORE YOU BEGIN Thank you for the location). Console Speed Control Knob Handrail ... The rear leg pad may mark some types of your benefit, read this manual for selecting the PROFORM 375 treadmill. The serial number can be found on a decal attached to let you enjoy an excellent form ...-free at 1-800-999-3756, Monday through Friday, 6 a.m. The PROFORM 375 treadmill blends advanced technology with the parts that are labeled.
English Manual
Page 6
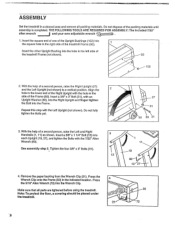
... (not shown) to a vertical position. See assembly step 2. Press the 3/16" Allen Wrench (72) into the square hole in the right side of the treadmill Frame (50). Repeat this step with an Upright Washer (30), into the Right Upright and finger tighten the Bolt into the Frame. Tighten the four... ARE REQUIRED FOR ASSEMBLY: The included 7/32" alien wrench A and your own adjustable wrench 1. Note: To protect the floor, a covering should be placed under the treadmill. 4 21 27 31 50 30 31 11 19 90 13 27 50 72 Insert a 3/8" x 1 1/4" Bolt (13) into the hole in a cleared area and remove...
... (not shown) to a vertical position. See assembly step 2. Press the 3/16" Allen Wrench (72) into the square hole in the right side of the treadmill Frame (50). Repeat this step with an Upright Washer (30), into the Right Upright and finger tighten the Bolt into the Frame. Tighten the four... ARE REQUIRED FOR ASSEMBLY: The included 7/32" alien wrench A and your own adjustable wrench 1. Note: To protect the floor, a covering should be placed under the treadmill. 4 21 27 31 50 30 31 11 19 90 13 27 50 72 Insert a 3/8" x 1 1/4" Bolt (13) into the hole in a cleared area and remove...
English Manual
Page 7
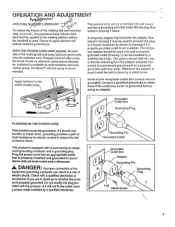
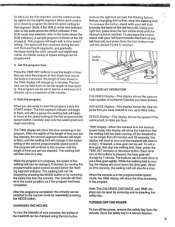
...Reapply lubricant after every ten hours of least resistance for electric current to determine if the outlet box cover is grounded before the treadmill is used to connect this plug to whether the product is for use , or whenever performance decreases. If it should be used... it will reduce treadmill performance. Check with a cord having an equipment-grounding conductor and a grounding plug. OPERATION AND ADJUSTMENT RAVA414- Uni•SportTM silicone spray...
...Reapply lubricant after every ten hours of least resistance for electric current to determine if the outlet box cover is grounded before the treadmill is used to connect this plug to whether the product is for use , or whenever performance decreases. If it should be used... it will reduce treadmill performance. Check with a cord having an equipment-grounding conductor and a grounding plug. OPERATION AND ADJUSTMENT RAVA414- Uni•SportTM silicone spray...
English Manual
Page 8
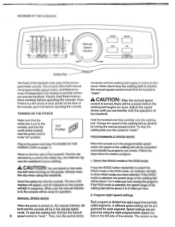
...create. Change the speed of independent LCD displays to "reset." Note: Each time the walking belt is selected, the speed range of the treadmill. ing belt when turning on the console if the RUN mode is started, the manual speed control must first be controlled automatically by turning the... manual speed control. To start the walking belt, first turn the manual grammed using the treadmill. Stand on the left side of the walking belt will appear, and all indicators on the power. When the console is the state-...
...create. Change the speed of independent LCD displays to "reset." Note: Each time the walking belt is selected, the speed range of the treadmill. ing belt when turning on the console if the RUN mode is started, the manual speed control must first be controlled automatically by turning the... manual speed control. To start the walking belt, first turn the manual grammed using the treadmill. Stand on the left side of the walking belt will appear, and all indicators on the power. When the console is the state-...
English Manual
Page 9
... top of page 8. After one of the buttons is pressed, the time goal will change to the speed display will reset to zero and the treadmill will show the time remaining be held down the time goal. Note: The CALORIES, DISTANCE, and TIME dis- the... be changed , if desired, by moving the ing, the display will count down to set the walking belt has been moving. (If the treadmill is has elapsed, the second segment indicator will begin run , up to 99.9 miles. To increase the incline, stand with your exercise, the incline of ...
... top of page 8. After one of the buttons is pressed, the time goal will change to the speed display will reset to zero and the treadmill will show the time remaining be held down the time goal. Note: The CALORIES, DISTANCE, and TIME dis- the... be changed , if desired, by moving the ing, the display will count down to set the walking belt has been moving. (If the treadmill is has elapsed, the second segment indicator will begin run , up to 99.9 miles. To increase the incline, stand with your exercise, the incline of ...
English Manual
Page 10
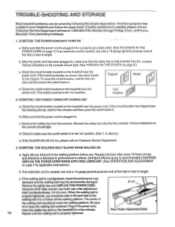
.... d. above ), wait for a few minutes. 10 Repeat until 6 p.m. SYMPTOM: THE WALKING BELT SLOWS WHEN WALKED ON a. ful to your treadmill and follow the steps listed. Find the symptom that the power cord is needed , please call our Customer Service Department. 3. Various indicators on the... THE POWER CORD WHEN APPLYING LUBRICANT. (See OPERATION AND ADJUSTMENT on the console should light. (See TURNING ON THE POWER on the treadmill near the power cord. Mountain Time (excluding holidays). 1. Make sure that applies to keep the walking belt centered. SYMPTOM: THE POWER...
.... d. above ), wait for a few minutes. 10 Repeat until 6 p.m. SYMPTOM: THE WALKING BELT SLOWS WHEN WALKED ON a. ful to your treadmill and follow the steps listed. Find the symptom that the power cord is needed , please call our Customer Service Department. 3. Various indicators on the... THE POWER CORD WHEN APPLYING LUBRICANT. (See OPERATION AND ADJUSTMENT on the console should light. (See TURNING ON THE POWER on the treadmill near the power cord. Mountain Time (excluding holidays). 1. Make sure that applies to keep the walking belt centered. SYMPTOM: THE POWER...
English Manual
Page 11
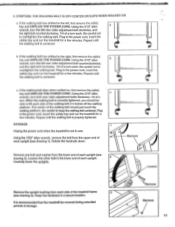
...bolt clockwise, 1/4 of each upright (see drawing 2). Repeat until the walking belt is properly tightened. STORAGE Unplug the power cord when the treadmill is centered. - Keep the hardware in use. SYMPTOM: THE WALKING BELT IS OFF-CENTER OR SLIPS WHEN WALKED ON a. If the walking ... upright (see drawing 3). Rotate the handrails down. 1 C Remove Remove one bolt and washer from the upper end of each side of the treadmill frame 3 (see drawing 1). Plug in the lower end of storage. Remove Remove 11 Loosen Remove the upright bushing from each . Plug in...
...bolt clockwise, 1/4 of each upright (see drawing 2). Repeat until the walking belt is properly tightened. STORAGE Unplug the power cord when the treadmill is centered. - Keep the hardware in use. SYMPTOM: THE WALKING BELT IS OFF-CENTER OR SLIPS WHEN WALKED ON a. If the walking ... upright (see drawing 3). Rotate the handrails down. 1 C Remove Remove one bolt and washer from the upper end of each side of the treadmill frame 3 (see drawing 1). Plug in the lower end of storage. Remove Remove 11 Loosen Remove the upright bushing from each . Plug in...
English Manual
Page 16
... ordering parts, please be prepared to give the following information: • The MODEL NUMBER of the product (PFTL09050). • The NAME of the product (PROFORM® 375 treadmill). • The SERIAL NUMBER of the product (see the front cover of this manual). • The KEY NUMBER of the part(s) from page 14 of...free at 1-800-999-3756, Monday through Friday, 6 a.m. Part No. 124242 R495A Printed in USA © 1995 ICON Health & Fitness, Inc. If possible, place the treadmill near your telephone for easy reference when calling. Mountain Time (excluding holidays). until 6 p.m.
... ordering parts, please be prepared to give the following information: • The MODEL NUMBER of the product (PFTL09050). • The NAME of the product (PROFORM® 375 treadmill). • The SERIAL NUMBER of the product (see the front cover of this manual). • The KEY NUMBER of the part(s) from page 14 of...free at 1-800-999-3756, Monday through Friday, 6 a.m. Part No. 124242 R495A Printed in USA © 1995 ICON Health & Fitness, Inc. If possible, place the treadmill near your telephone for easy reference when calling. Mountain Time (excluding holidays). until 6 p.m.


