

Uk Manual
Page 1
As a manufacturer, we are missing or damaged parts, please call: 08457 089 009 Or write: ICON Health & Fitness, Ltd. PETL37905.1 Serial No. Serial Number Decal QUESTIONS? If you have questions, or if there are committed to providing complete customer satisfaction. Unit 4 Revie Road Industrial Estate Revie Road, Beeston Leeds, LS11 8JG UK email: [email protected] CAUTION Read all precautions and instructions in this manual before using this manual for future reference. Save this equipment. Model No. USER'S MANUAL Visit our website at www.iconeurope.com
As a manufacturer, we are missing or damaged parts, please call: 08457 089 009 Or write: ICON Health & Fitness, Ltd. PETL37905.1 Serial No. Serial Number Decal QUESTIONS? If you have questions, or if there are committed to providing complete customer satisfaction. Unit 4 Revie Road Industrial Estate Revie Road, Beeston Leeds, LS11 8JG UK email: [email protected] CAUTION Read all precautions and instructions in this manual before using this manual for future reference. Save this equipment. Model No. USER'S MANUAL Visit our website at www.iconeurope.com

Uk Manual
Page 2
TABLE OF CONTENTS IMPORTANT PRECAUTIONS 3 BEFORE YOU BEGIN 5 ASSEMBLY 6 OPERATION AND ADJUSTMENT 11 HOW TO FOLD AND MOVE THE TREADMILL 17 TROUBLESHOOTING 19 CONDITIONING GUIDELINES 21 ORDERING REPLACEMENT PARTS Back Cover Note: An EXPLODED DRAWING and a PART LIST are attached in the center of this manual. 2
TABLE OF CONTENTS IMPORTANT PRECAUTIONS 3 BEFORE YOU BEGIN 5 ASSEMBLY 6 OPERATION AND ADJUSTMENT 11 HOW TO FOLD AND MOVE THE TREADMILL 17 TROUBLESHOOTING 19 CONDITIONING GUIDELINES 21 ORDERING REPLACEMENT PARTS Back Cover Note: An EXPLODED DRAWING and a PART LIST are attached in the center of this manual. 2
Uk Manual
Page 3
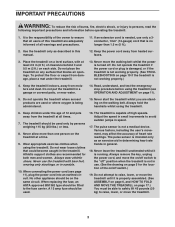
... to the fuse carrier. Wear appropriate exercise clothes when using the treadmill. 6. Do not wear loose clothes that all users of this treadmill are standing on page 19 if the treadmill is intended only as described in this manual. 12. Never use the treadmill with at least 2.5 m (8 ft.) of clearance behind it and 0.5 m (2 ft.) on...
... to the fuse carrier. Wear appropriate exercise clothes when using the treadmill. 6. Do not wear loose clothes that all users of this treadmill are standing on page 19 if the treadmill is intended only as described in this manual. 12. Never use the treadmill with at least 2.5 m (8 ft.) of clearance behind it and 0.5 m (2 ft.) on...
Uk Manual
Page 4
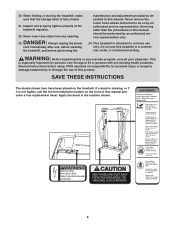
... using. SAVE THESE INSTRUCTIONS The decals shown here have been placed on the front of this treadmill in the location shown. 4 Servicing other than the procedures in this manual should be performed by an authorised service representative. ICON assumes no responsibility for persons over the ...closed. 21. 20. When folding or moving the treadmill, make sure that the storage latch is not legible, call the toll-free telephone number on the treadmill. Do not use of this or any opening. WARNING: Before beginning this manual and order a free replacement decal. Apply the decal...
... using. SAVE THESE INSTRUCTIONS The decals shown here have been placed on the front of this treadmill in the location shown. 4 Servicing other than the procedures in this manual should be performed by an authorised service representative. ICON assumes no responsibility for persons over the ...closed. 21. 20. When folding or moving the treadmill, make sure that the storage latch is not legible, call the toll-free telephone number on the treadmill. Do not use of this or any opening. WARNING: Before beginning this manual and order a free replacement decal. Apply the decal...

Uk Manual
Page 5
...PROFORM® 370 P treadmill. The 370 P treadmill offers an array of features designed to the treadmill (see the front of other treadmills. And when you're not exercising, the unique 370 P treadmill can be folded up, requiring less than half the floor space of this manual. The model number of this manual...exercise comfort 5 The serial number can be found on a decal attached to make your benefit, read this manual for the location). reading this manual, please see the front of the treadmill is PETL37905.1. For your workouts at home more enjoyable and effective.
...PROFORM® 370 P treadmill. The 370 P treadmill offers an array of features designed to the treadmill (see the front of other treadmills. And when you're not exercising, the unique 370 P treadmill can be folded up, requiring less than half the floor space of this manual. The model number of this manual...exercise comfort 5 The serial number can be found on a decal attached to make your benefit, read this manual for the location). reading this manual, please see the front of the treadmill is PETL37905.1. For your workouts at home more enjoyable and effective.
Uk Manual
Page 12
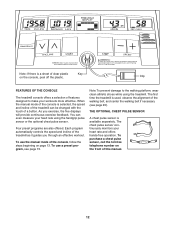
.... telephone number on the console, peel off the plastic. To use the manual mode of the console, follow the sensor, call the toll-free steps beginning on page 13. The first The treadmill console offers a selection of features time the treadmill is sensor or the optional chest pulse sensor. You can be changed...
.... telephone number on the console, peel off the plastic. To use the manual mode of the console, follow the sensor, call the toll-free steps beginning on page 13. The first The treadmill console offers a selection of features time the treadmill is sensor or the optional chest pulse sensor. You can be changed...
Uk Manual
Page 13
... speed setting will appear in the matrix in increments of 0.5 mph. 4 Change the incline of the treadmill as needed. As you walk or run and the number of the treadmill. If a button is inserted, the manual mode will show the time remaining in the program and the incline level of the... treadmill. When the manual mode is selected, this display will be selected. When the manual mode is selected, a 1/4-mile (400-meter) track will change in the Program display. tween one number and the other every few ...
... speed setting will appear in the matrix in increments of 0.5 mph. 4 Change the incline of the treadmill as needed. As you walk or run and the number of the treadmill. If a button is inserted, the manual mode will show the time remaining in the program and the incline level of the... treadmill. When the manual mode is selected, this display will be selected. When the manual mode is selected, a 1/4-mile (400-meter) track will change in the Program display. tween one number and the other every few ...

Uk Manual
Page 16
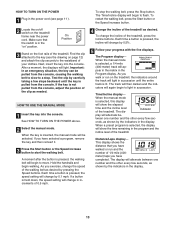
...Current Segment column, an additional indicator may appear or disappear in those columns as well.) Note: When the next segment of the program begins, the treadmill will appear or disappear in the Current Segment column. (If any time during the program, you are finished exercising, remove the key. See to... step 5 on page 14. 6 When you can manually override the setting by pressing the Speed or Incline buttons. See step 6 on page 13. 5 Measure your progress with the five displays. If the speed...
...Current Segment column, an additional indicator may appear or disappear in those columns as well.) Note: When the next segment of the program begins, the treadmill will appear or disappear in the Current Segment column. (If any time during the program, you are finished exercising, remove the key. See to... step 5 on page 14. 6 When you can manually override the setting by pressing the Speed or Incline buttons. See step 6 on page 13. 5 Measure your progress with the five displays. If the speed...
Uk Manual
Page 19
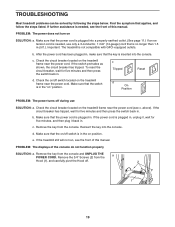
... the switch back in . c. PROBLEM: The displays of this manual. Remove the 3/4" Screws (2) from the a Hood (1), and carefully pivot the Hood off during use only a 3-conductor, 1 mm2 (14-gauge) cord that is plugged in. Important: The treadmill is inserted into the console. After the power cord has been...back in the "on /off switch is needed , use SOLUTION: a. If the treadmill still will not run, see the front of this manual. Find the symptom that the on/off switch located on the treadmill frame near the power cord (see the front of the console do not function properly...
... the switch back in . c. PROBLEM: The displays of this manual. Remove the 3/4" Screws (2) from the a Hood (1), and carefully pivot the Hood off during use only a 3-conductor, 1 mm2 (14-gauge) cord that is plugged in. Important: The treadmill is inserted into the console. After the power cord has been...back in the "on /off switch is needed , use SOLUTION: a. If the treadmill still will not run, see the front of this manual. Find the symptom that the on/off switch located on the treadmill frame near the power cord (see the front of the console do not function properly...

Uk Manual
Page 20
... b 2"-3" Rear Roller Bolts c. Make sure 3 mm 17 that is about 3 mm (1/8 in the power cord, insert the key, and carefully walk on the treadmill for a few minutes to overtighten the walking belt. Top View PROBLEM: The walking belt slows when walked on , remove the key and UNPLUG THE POWER... cord is off -centre or slips when walked on , see the front of the walking belt 5 to 7 cm (2 to lift each edge of this manual. Using the b hex key, turn both rear roller bolts counterclockwise, 1/4 of a turn . Remove the key and UNPLUG THE POWER CORD. Be careful not...
... b 2"-3" Rear Roller Bolts c. Make sure 3 mm 17 that is about 3 mm (1/8 in the power cord, insert the key, and carefully walk on the treadmill for a few minutes to overtighten the walking belt. Top View PROBLEM: The walking belt slows when walked on , remove the key and UNPLUG THE POWER... cord is off -centre or slips when walked on , see the front of the walking belt 5 to 7 cm (2 to lift each edge of this manual. Using the b hex key, turn both rear roller bolts counterclockwise, 1/4 of a turn . Remove the key and UNPLUG THE POWER CORD. Be careful not...
Uk Manual
Page 24
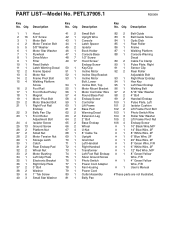
... 8" White Wire, 2F 6" Blue Wire, 2F 20" Blue Wire, 2F 8" Green Wire, F/R 6" White Wire, 2F 12" Red Wire, M/F 8" Green/Yellow Wire, F/R 4" Green/Yellow Wire, F/R User's Manual #These parts are not illustrated. PETL37905.1 R0506A Key No. Qty. PART LIST-Model No.
... 8" White Wire, 2F 6" Blue Wire, 2F 20" Blue Wire, 2F 8" Green Wire, F/R 6" White Wire, 2F 12" Red Wire, M/F 8" Green/Yellow Wire, F/R 4" Green/Yellow Wire, F/R User's Manual #These parts are not illustrated. PETL37905.1 R0506A Key No. Qty. PART LIST-Model No.

Uk Manual
Page 25
For information about ordering replacement parts, see the back cover of the User's Manual. 34 REMOVE THIS PART LIST/EXPLODED RDEMROAVWE ITNHLGIISSTEFXFRRPOLOOMMDTETHDHEDEMRAAMNWUAINANGLUAANDL!PART Save this EXPLODED DRAWING and PART LIST for future reference. Note: Specifications are subject to change without notice.
For information about ordering replacement parts, see the back cover of the User's Manual. 34 REMOVE THIS PART LIST/EXPLODED RDEMROAVWE ITNHLGIISSTEFXFRRPOLOOMMDTETHDHEDEMRAAMNWUAINANGLUAANDL!PART Save this EXPLODED DRAWING and PART LIST for future reference. Note: Specifications are subject to change without notice.

Uk Manual
Page 28
... following information: • the MODEL NUMBER of the product (PETL37905.1) • the NAME of the product (PROFORM 370 P treadmill) • the SERIAL NUMBER of the product (see the front of this manual) • the KEY NUMBER AND DESCRIPTION OF THE PART(S) (see the PART LIST and the EXPLODED DRAWING in... the centre of this manual) Part No. 230160 R0506A Printed in Canada © 2006 ICON IP, Inc. ...
... following information: • the MODEL NUMBER of the product (PETL37905.1) • the NAME of the product (PROFORM 370 P treadmill) • the SERIAL NUMBER of the product (see the front of this manual) • the KEY NUMBER AND DESCRIPTION OF THE PART(S) (see the PART LIST and the EXPLODED DRAWING in... the centre of this manual) Part No. 230160 R0506A Printed in Canada © 2006 ICON IP, Inc. ...


