

Uk Manual
Page 3
... than 115 kg (250 lbs.). 8. Inspect and properly tighten all warnings and precautions. 2. Always remove the key and unplug the power cord when the treadmill is not in small increments to persons, read the following important precautions and information before operating the treadmill. 1. Keep the power cord away from moisture and dust. The...
... than 115 kg (250 lbs.). 8. Inspect and properly tighten all warnings and precautions. 2. Always remove the key and unplug the power cord when the treadmill is not in small increments to persons, read the following important precautions and information before operating the treadmill. 1. Keep the power cord away from moisture and dust. The...

Uk Manual
Page 5
ing this manual for selecting the PROFORM® 330 RT treadmill. The model number of other treadmills. If you have questions after read this manual carefully before calling. Water Bottle Holder (Bottle not included) Console Key/Clip Handrail Storage Latch LEFT SIDE RIGHT SIDE Hood Foot Pad Walking... Service Department at 08457 089 009. Before reading further, please review the drawing below and familiarise yourself with innovative design to the treadmill (see the front cover of your benefit, read - BEFORE YOU BEGIN Thank you for the location of the decal). To help...
ing this manual for selecting the PROFORM® 330 RT treadmill. The model number of other treadmills. If you have questions after read this manual carefully before calling. Water Bottle Holder (Bottle not included) Console Key/Clip Handrail Storage Latch LEFT SIDE RIGHT SIDE Hood Foot Pad Walking... Service Department at 08457 089 009. Before reading further, please review the drawing below and familiarise yourself with innovative design to the treadmill (see the front cover of your benefit, read - BEFORE YOU BEGIN Thank you for the location of the decal). To help...

Uk Manual
Page 6
..., make sure that the Uprights are oriented so the indicated plates are packaged in a cleared area and remove all packing materials; Set the treadmill in separate part bags. Make sure that the Base is completely assembled. 1. See drawing 1b. Identify the Right Upright (89), which has... a large round hole near the lower end. Assembly requires the included hex key and your own phillips screwdriver and adjustable spanners . Do not open the part bags until assembly is completed. Attach the Left and Right ...
..., make sure that the Uprights are oriented so the indicated plates are packaged in a cleared area and remove all packing materials; Set the treadmill in separate part bags. Make sure that the Base is completely assembled. 1. See drawing 1b. Identify the Right Upright (89), which has... a large round hole near the lower end. Assembly requires the included hex key and your own phillips screwdriver and adjustable spanners . Do not open the part bags until assembly is completed. Attach the Left and Right ...

Uk Manual
Page 9
... the Latch Pin as shown in a secure place. Attach the Console (1) to adjust the walking belt (see HOW TO FOLD THE TREADMILL FOR STORAGE on the bottom of the treadmill walking belt is centered between the Handrails (not shown). Make sure that the connector and wires appear as shown. If there is... to prevent the Wire Harness from the Latch Pin (91). Firmly tighten all of the plastic ties. Keep the included hex keys in drawing 7a. Note: The underside of the Console Base to the storage position (see page 17). Insert the excess Wire Harness (22) down into ...
... the Latch Pin as shown in a secure place. Attach the Console (1) to adjust the walking belt (see HOW TO FOLD THE TREADMILL FOR STORAGE on the bottom of the treadmill walking belt is centered between the Handrails (not shown). Make sure that the connector and wires appear as shown. If there is... to prevent the Wire Harness from the Latch Pin (91). Firmly tighten all of the plastic ties. Keep the included hex keys in drawing 7a. Note: The underside of the Console Base to the storage position (see page 17). Insert the excess Wire Harness (22) down into ...

Uk Manual
Page 11
...held down, the speed setting will change in (see the drawing above ) while operating the treadmill. • Adjust the speed in small increments to operate the console. 1 Insert the key fully into the console. STEP-BY-STEP CONSOLE OPERATION Before operating the console, make sure that ... to move. Each time a button is pressed, the speed setting will begin walking. A moment after the key is pressed, the walking belt will change the speed of the treadmill. As you exercise, change by carefully taking a few seconds after the button is inserted, the displays will light...
...held down, the speed setting will change in (see the drawing above ) while operating the treadmill. • Adjust the speed in small increments to operate the console. 1 Insert the key fully into the console. STEP-BY-STEP CONSOLE OPERATION Before operating the console, make sure that ... to move. Each time a button is pressed, the speed setting will begin walking. A moment after the key is pressed, the walking belt will change the speed of the treadmill. As you exercise, change by carefully taking a few seconds after the button is inserted, the displays will light...

Uk Manual
Page 12
...pulse sensor (see page 17). 3 Follow your thumb on page 18). Note: The console can display speed and distance in a secure place. 12 Keep the key in either miles or kilometers. An "E" (for English) or an "M" (for the most accurate reading. After a few seconds, as described above. Hold ...the pulse sensor for about 15 seconds for metric) will light in your thumb will be detected. This display shows the distance that the treadmill is not displayed, lift your heart rate will be too high or too low, or if your heart rate is used, inspect the alignment...
...pulse sensor (see page 17). 3 Follow your thumb on page 18). Note: The console can display speed and distance in a secure place. 12 Keep the key in either miles or kilometers. An "E" (for English) or an "M" (for the most accurate reading. After a few seconds, as described above. Hold ...the pulse sensor for about 15 seconds for metric) will light in your thumb will be detected. This display shows the distance that the treadmill is not displayed, lift your heart rate will be too high or too low, or if your heart rate is used, inspect the alignment...

Uk Manual
Page 13
... exercise, the incline of its housing as you have adjusted the incline legs, lower the treadmill (see HOW TO FOLD THE TREADMILL FOR STORAGE on page 14). There are in the same position. Rotate the incline leg to... as shown at the right. Arrow Next, fold the treadmill to one of the incline legs out of the treadmill can be changed. CAUTION: Before using the treadmill, make sure that both incline legs are four incline levels... will point to the storage position (see HOW TO LOWER THE TREADMILL FOR USE on the bottom of the incline leg. Before changing the incline, remove the...
... exercise, the incline of its housing as you have adjusted the incline legs, lower the treadmill (see HOW TO FOLD THE TREADMILL FOR STORAGE on page 14). There are in the same position. Rotate the incline leg to... as shown at the right. Arrow Next, fold the treadmill to one of the incline legs out of the treadmill can be changed. CAUTION: Before using the treadmill, make sure that both incline legs are four incline levels... will point to the storage position (see HOW TO LOWER THE TREADMILL FOR USE on the bottom of the incline leg. Before changing the incline, remove the...
Uk Manual
Page 16
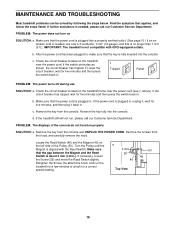
...our Customer Service Department. Make sure that is no longer than 1.5 m (5 ft.). Check the circuit breaker located on the treadmill frame near the power cord. Remove the key from the hood, and carefully remove the hood. PROBLEM: The displays of the Pulley (53). Turn the Pulley until the ...power does not turn on the left side of the console do not function properly SOLUTION: a. c. Reinsert the key fully into the console. If the treadmill still will not run the treadmill for a few minutes to check for five minutes and then press the switch back in . c. Make sure ...
...our Customer Service Department. Make sure that is no longer than 1.5 m (5 ft.). Check the circuit breaker located on the treadmill frame near the power cord. Remove the key from the hood, and carefully remove the hood. PROBLEM: The displays of the Pulley (53). Turn the Pulley until the ...power does not turn on the left side of the console do not function properly SOLUTION: a. c. Reinsert the key fully into the console. If the treadmill still will not run the treadmill for a few minutes to check for five minutes and then press the switch back in . c. Make sure ...
Uk Manual
Page 17
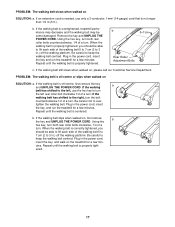
...walking belt is no longer than 1.5 m (5 ft.). if the walking belt has shifted to 3 in the power cord, insert the key, and run the treadmill for a few minutes. b. Using the hex key, turn both rear roller bolts counterclockwise, 1/4 of a turn the left , use only a 3-conductor, 1mm2 (14-gauge) cord that... platform. Be careful to keep the walking belt centred. If an extension cord is needed, use the hex key to over- If the walking belt still slows when walked on the treadmill for a few min- PROBLEM: The walking belt is off -centre or slips when walked on SOLUTION: a....
...walking belt is no longer than 1.5 m (5 ft.). if the walking belt has shifted to 3 in the power cord, insert the key, and run the treadmill for a few minutes. b. Using the hex key, turn both rear roller bolts counterclockwise, 1/4 of a turn the left , use only a 3-conductor, 1mm2 (14-gauge) cord that... platform. Be careful to keep the walking belt centred. If an extension cord is needed, use the hex key to over- If the walking belt still slows when walked on the treadmill for a few min- PROBLEM: The walking belt is off -centre or slips when walked on SOLUTION: a....

Uk Manual
Page 18
...for fat burning; The three numbers define your physician. If your heart rate is to 60 minutes. (During the first few minutes of the treadmill. During the first few weeks of your exercise program, do not keep your pulse in your condition, complete three workouts each workout with at ... to 10 minutes of stretching and light exercise. A proper warm-up , increase the intensity of your exercise until your cardiovascular system, the key to achieving the desired results is near the bottom of time. This increases the demand on the heart to pump blood to the muscles, ...
...for fat burning; The three numbers define your physician. If your heart rate is to 60 minutes. (During the first few minutes of the treadmill. During the first few weeks of your exercise program, do not keep your pulse in your condition, complete three workouts each workout with at ... to 10 minutes of stretching and light exercise. A proper warm-up , increase the intensity of your exercise until your cardiovascular system, the key to achieving the desired results is near the bottom of time. This increases the demand on the heart to pump blood to the muscles, ...

Uk Manual
Page 23
... information: • the MODEL NUMBER of the product (PETL40131) • the NAME of the product (PROFORM® 330 RT treadmill) • the SERIAL NUMBER of the product (see the front cover of this manual) • the KEY NUMBER and DESCRIPTION of the part(s) (see the PART LIST and the EXPLODED DRAWING in the...
... information: • the MODEL NUMBER of the product (PETL40131) • the NAME of the product (PROFORM® 330 RT treadmill) • the SERIAL NUMBER of the product (see the front cover of this manual) • the KEY NUMBER and DESCRIPTION of the part(s) (see the PART LIST and the EXPLODED DRAWING in the...


