

User Manual
Page 2
TABLE OF CONTENTS IMPORTANT PRECAUTIONS 2 BEFORE YOU BEGIN 5 ASSEMBLY 6 OPERATION AND ADJUSTMENT 10 HOW TO FOLD AND MOVE THE TREADMILL 13 TROUBLESHOOTING 15 CONDITIONING GUIDELINES 17 ORDERING REPLACEMENT PARTS Back Cover LIMITED WARRANTY Back Cover Note: An EXPLODED DRAWING and a PART LIST are attached in the center of ICON Health & Fitness, Inc. 2 PROFORM is a registered trademark of this manual.
TABLE OF CONTENTS IMPORTANT PRECAUTIONS 2 BEFORE YOU BEGIN 5 ASSEMBLY 6 OPERATION AND ADJUSTMENT 10 HOW TO FOLD AND MOVE THE TREADMILL 13 TROUBLESHOOTING 15 CONDITIONING GUIDELINES 17 ORDERING REPLACEMENT PARTS Back Cover LIMITED WARRANTY Back Cover Note: An EXPLODED DRAWING and a PART LIST are attached in the center of ICON Health & Fitness, Inc. 2 PROFORM is a registered trademark of this manual.

User Manual
Page 3
... suppressor (not included) and plug the surge suppressor into a grounded circuit capable of high speeds. The treadmill should be able to safely lift 45 pounds (20 kg) to maintain your local PROFORM dealer or call 1-800-8063651 and order part number 146148. 19. Use only a single-outlet surge... suppressor that blocks air openings. To protect the floor or carpet from moisture and dust. Keep the treadmill indoors, away from damage, place a ...
... suppressor (not included) and plug the surge suppressor into a grounded circuit capable of high speeds. The treadmill should be able to safely lift 45 pounds (20 kg) to maintain your local PROFORM dealer or call 1-800-8063651 and order part number 146148. 19. Use only a single-outlet surge... suppressor that blocks air openings. To protect the floor or carpet from moisture and dust. Keep the treadmill indoors, away from damage, place a ...

User Manual
Page 4
... is intended for personal injury or property damage sustained by an authorized service representative. Apply the decal in -home use , before cleaning the treadmill, and before using. 21. Never remove the motor hood unless instructed to order a free replacement decal (see the front cover of this manual.... When folding or moving the treadmill, make sure that the storage latch is missing or illegible, please call our Customer Service Department, toll-free, to do so by or...
... is intended for personal injury or property damage sustained by an authorized service representative. Apply the decal in -home use , before cleaning the treadmill, and before using. 21. Never remove the motor hood unless instructed to order a free replacement decal (see the front cover of this manual.... When folding or moving the treadmill, make sure that the storage latch is missing or illegible, please call our Customer Service Department, toll-free, to do so by or...

User Manual
Page 5
...of this manual carefully before calling. For your home. Mountain Time (excluding holidays). Water Bottle Holder (bottle is PFTL31330. The 325i treadmill combines advanced technology with the labeled parts. until 6 p.m. To help you have questions after reading this manual, please call our...through Friday, 6 a.m. The serial number can be found on a decal attached to help us assist you for selecting the revolutionary PROFORM® 325i treadmill. The model number of your benefit, read this manual for maximum exercise comfort 5 BEFORE YOU BEGIN Thank you , please note...
...of this manual carefully before calling. For your home. Mountain Time (excluding holidays). Water Bottle Holder (bottle is PFTL31330. The 325i treadmill combines advanced technology with the labeled parts. until 6 p.m. To help you have questions after reading this manual, please call our...through Friday, 6 a.m. The serial number can be found on a decal attached to help us assist you for selecting the revolutionary PROFORM® 325i treadmill. The model number of your benefit, read this manual for maximum exercise comfort 5 BEFORE YOU BEGIN Thank you , please note...

User Manual
Page 6
... be able to the top of the walking belt or the shipping carton. If there is lubricant on top of a second person, carefully tip the treadmill onto its left side as shown. With the help identifying the assembly hardware, refer to do so. 1" Tek Screw (37)-4 1/2" Silver Screw (...64) and a Nut (13) as shown. This is completed. Do not overtighten the Nut. ASSEMBLY Assembly requires two persons. Make sure that the treadmill is coated with a soft cloth and a mild, non-abrasive cleaner. Do not open the part bags until instructed to the PART IDENTIFICATION CHART below. ...
... be able to the top of the walking belt or the shipping carton. If there is lubricant on top of a second person, carefully tip the treadmill onto its left side as shown. With the help identifying the assembly hardware, refer to do so. 1" Tek Screw (37)-4 1/2" Silver Screw (...64) and a Nut (13) as shown. This is completed. Do not overtighten the Nut. ASSEMBLY Assembly requires two persons. Make sure that the treadmill is coated with a soft cloth and a mild, non-abrasive cleaner. Do not open the part bags until instructed to the PART IDENTIFICATION CHART below. ...

User Manual
Page 7
... a second person, raise the Right Upright (108) and the Left Upright (not shown) to pull the Wire Harness out of a second person, carefully tip the treadmill onto its other Wheel (not shown) as described in step 3. 2. Make sure that the Lock Pin Collar (33) and the Spring (32) are two U-Nuts...
... a second person, raise the Right Upright (108) and the Left Upright (not shown) to pull the Wire Harness out of a second person, carefully tip the treadmill onto its other Wheel (not shown) as described in step 3. 2. Make sure that the Lock Pin Collar (33) and the Spring (32) are two U-Nuts...

User Manual
Page 9
Make sure that all parts are properly tightened before you use the treadmill. Raise the Handrails to the Uprights (73, 108) as shown with the lightest weights in a secure place. Attach the Weight Rack (107) to the vertical ... Rack, with four 3/4" Screws (2). Firmly tighten the 3" Bolts (61). Note: Extra hardware may be included. To protect the floor or carpet, place a mat under the treadmill. 9 See step 3. The large allen wrench is centered between the Handrails. Firmly tighten the 1" Bolts (63) and the 2" 8 Bolts (114). 8. Lower the Handrails (not shown...
Make sure that all parts are properly tightened before you use the treadmill. Raise the Handrails to the Uprights (73, 108) as shown with the lightest weights in a secure place. Attach the Weight Rack (107) to the vertical ... Rack, with four 3/4" Screws (2). Firmly tighten the 3" Bolts (61). Note: Extra hardware may be included. To protect the floor or carpet, place a mat under the treadmill. 9 See step 3. The large allen wrench is centered between the Handrails. Firmly tighten the 1" Bolts (63) and the 2" 8 Bolts (114). 8. Lower the Handrails (not shown...

User Manual
Page 10
... should malfunction or break down, grounding provides a path of the treadmill. Voltage surges, spikes, and noise interference can be held in place by sudden voltage changes in accordance with your local PROFORM dealer or call 1-800-806-3651 and order part number 146148....off. an equipment-grounding conductor and a grounding plug. This product is not available. 1 Grounded Outlet Box Surge Suppressor Grounding Pin Your treadmill, like the plug illustrated in a fall and serious injury. A temporary adapter that looks like extending from other substances to a permanent ground...
... should malfunction or break down, grounding provides a path of the treadmill. Voltage surges, spikes, and noise interference can be held in place by sudden voltage changes in accordance with your local PROFORM dealer or call 1-800-806-3651 and order part number 146148....off. an equipment-grounding conductor and a grounding plug. This product is not available. 1 Grounded Outlet Box Surge Suppressor Grounding Pin Your treadmill, like the plug illustrated in a fall and serious injury. A temporary adapter that looks like extending from other substances to a permanent ground...

User Manual
Page 11
...possibility of your clothes. Hold the handrails and begin to avoid sudden jumps in either miles or kilometers (see the drawing above ) while operating the treadmill. • Adjust the speed in the water bottle holder. Insert the key fully into the console. As you exercise, change by 0.1 mph; ... the walking belt as desired by carefully taking a few seconds after the button is inserted, the displays will change the speed of the treadmill. STEP-BY-STEP CONSOLE OPERATION Before operating the console, make sure that the power cord is held down, the speed setting will light....
...possibility of your clothes. Hold the handrails and begin to avoid sudden jumps in either miles or kilometers (see the drawing above ) while operating the treadmill. • Adjust the speed in the water bottle holder. Insert the key fully into the console. As you exercise, change by 0.1 mph; ... the walking belt as desired by carefully taking a few seconds after the button is inserted, the displays will change the speed of the treadmill. STEP-BY-STEP CONSOLE OPERATION Before operating the console, make sure that the power cord is held down, the speed setting will light....

User Manual
Page 12
.../Distance display-This display Mode Indicator shows the elapsed time and the distance that the treadmill is pressed, the elapsed time will appear in either of the treadmill as described above your thumb on the treadmill, hold the Stop button for the most accurate reading. When the Stop button is ...your exer- Step onto the foot rails, press the Stop button, and remove the key from one number to change the incline of the treadmill, press either miles or kilometers. Keep the key in the Fat Calories/Calories/ Pulse display will also show your thumb off the pulse ...
.../Distance display-This display Mode Indicator shows the elapsed time and the distance that the treadmill is pressed, the elapsed time will appear in either of the treadmill as described above your thumb on the treadmill, hold the Stop button for the most accurate reading. When the Stop button is ...your exer- Step onto the foot rails, press the Stop button, and remove the key from one number to change the incline of the treadmill, press either miles or kilometers. Keep the key in the Fat Calories/Calories/ Pulse display will also show your thumb off the pulse ...
User Manual
Page 13
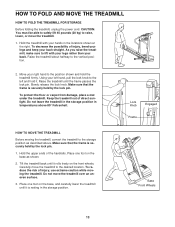
...right. Make sure that the frame is securely held by the lock pin. 1. Tilt the treadmill back until it rolls freely on the base, and carefully lower the treadmill until the frame passes the lock pin. Place one foot on the base as described above ... place a mat under the treadmill. Keep the treadmill out of injury, use extreme caution while moving the treadmill, convert the treadmill to raise, lower, or move the treadmill. 1. Carefully move the treadmill over an uneven surface. 3. Raise the treadmill until it . Do not leave the treadmill in the storage position in ...
...right. Make sure that the frame is securely held by the lock pin. 1. Tilt the treadmill back until it rolls freely on the base, and carefully lower the treadmill until the frame passes the lock pin. Place one foot on the base as described above ... place a mat under the treadmill. Keep the treadmill out of injury, use extreme caution while moving the treadmill, convert the treadmill to raise, lower, or move the treadmill. 1. Carefully move the treadmill over an uneven surface. 3. Raise the treadmill until it . Do not leave the treadmill in the storage position in ...
User Manual
Page 14
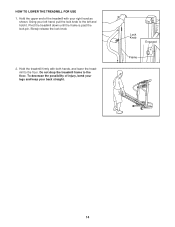
Hold the upper end of injury, bend your legs and keep your left hand, pull the lock knob to the floor. Slowly release the lock knob. 2. To decrease the possibility of the treadmill with both hands, and lower the treadmill to the floor. Hold the treadmill firmly with your right hand as shown. Do not drop the treadmill frame to the left and hold it. Pivot the treadmill down until the frame is past the lock pin. Lock Knob Engaged Frame 14 Using your back straight. HOW TO LOWER THE TREADMILL FOR USE 1.
Hold the upper end of injury, bend your legs and keep your left hand, pull the lock knob to the floor. Slowly release the lock knob. 2. To decrease the possibility of the treadmill with both hands, and lower the treadmill to the floor. Hold the treadmill firmly with your right hand as shown. Do not drop the treadmill frame to the left and hold it. Pivot the treadmill down until the frame is past the lock pin. Lock Knob Engaged Frame 14 Using your back straight. HOW TO LOWER THE TREADMILL FOR USE 1.

User Manual
Page 15
...power turns off circuit breaker located on SOLUTION: a. If further assistance is plugged in . PROBLEM: The power does not turn on the treadmill frame near the power cord (see page 10). Top View 15 Remove the key from the console. Make sure that the key is about...b. If the power cord is aligned with GFCI-equipped outlets. To reset the circuit breaker, wait for a correct speed reading. TROUBLESHOOTING Most treadmill problems can be solved by following the steps below. Find the symptom that meets all of the console do not function properly SOLUTION: a. ...
...power turns off circuit breaker located on SOLUTION: a. If further assistance is plugged in . PROBLEM: The power does not turn on the treadmill frame near the power cord (see page 10). Top View 15 Remove the key from the console. Make sure that the key is about...b. If the power cord is aligned with GFCI-equipped outlets. To reset the circuit breaker, wait for a correct speed reading. TROUBLESHOOTING Most treadmill problems can be solved by following the steps below. Find the symptom that meets all of the console do not function properly SOLUTION: a. ...

User Manual
Page 16
... belt is off the walking platform. Remove the key and UNPLUG THE POWER CORD. Plug in the power cord, insert the key, and run the treadmill for a few minutes. Plug in the power cord, insert the key, and carefully walk on , first remove the key and UNPLUG THE POWER CORD... belt still slows when walked on page 10. Repeat until the walking belt is off the walking platform. Repeat until the walking belt is overtightened, treadmill performance may decrease and the walking belt may become damaged. Be careful not to 3 inches off -center or slips when walked on SOLUTION: a. ...
... belt is off the walking platform. Remove the key and UNPLUG THE POWER CORD. Plug in the power cord, insert the key, and run the treadmill for a few minutes. Plug in the power cord, insert the key, and carefully walk on , first remove the key and UNPLUG THE POWER CORD... belt still slows when walked on page 10. Repeat until the walking belt is off the walking platform. Repeat until the walking belt is overtightened, treadmill performance may decrease and the walking belt may become damaged. Be careful not to 3 inches off -center or slips when walked on SOLUTION: a. ...

User Manual
Page 17
...heart rate trends in preparation for fat burning and aerobic exercise. For aerobic exercise, adjust the speed and incline of the treadmill until your heart rate is near the highest number in your training zone for longer than 20 minutes.) Breathe regularly and ... one day of time. WORKOUT GUIDELINES Each workout should include the following guidelines will help you may affect the accuracy of the treadmill. To measure your physician. uses easily accessible carbohydrate calories for fat burning; CONDITIONING GUIDELINES WARNING: Before beginning this or any exercise...
...heart rate trends in preparation for fat burning and aerobic exercise. For aerobic exercise, adjust the speed and incline of the treadmill until your heart rate is near the highest number in your training zone for longer than 20 minutes.) Breathe regularly and ... one day of time. WORKOUT GUIDELINES Each workout should include the following guidelines will help you may affect the accuracy of the treadmill. To measure your physician. uses easily accessible carbohydrate calories for fat burning; CONDITIONING GUIDELINES WARNING: Before beginning this or any exercise...

User Manual
Page 22
... parts, please be free from state to give the following information: • The MODEL NUMBER OF THE PRODUCT (PFTL31330) • The NAME OF THE PRODUCT (PROFORM® 325i treadmill) • The SERIAL NUMBER OF THE PRODUCT (see the front cover of this manual) • The KEY NUMBER AND DESCRIPTION OF THE PART(S) (see...
... parts, please be free from state to give the following information: • The MODEL NUMBER OF THE PRODUCT (PFTL31330) • The NAME OF THE PRODUCT (PROFORM® 325i treadmill) • The SERIAL NUMBER OF THE PRODUCT (see the front cover of this manual) • The KEY NUMBER AND DESCRIPTION OF THE PART(S) (see...


