

User Manual
Page 2
PROFORM is a registered trademark of this manual. TABLE OF CONTENTS IMPORTANT PRECAUTIONS 2 BEFORE YOU BEGIN 5 ASSEMBLY 6 OPERATION AND ADJUSTMENT 10 HOW TO FOLD AND MOVE THE TREADMILL 13 TROUBLESHOOTING 15 CONDITIONING GUIDELINES 17 ORDERING REPLACEMENT PARTS Back Cover LIMITED WARRANTY Back Cover Note: An EXPLODED DRAWING and a PART LIST are attached in the center of ICON Health & Fitness, Inc. 2
PROFORM is a registered trademark of this manual. TABLE OF CONTENTS IMPORTANT PRECAUTIONS 2 BEFORE YOU BEGIN 5 ASSEMBLY 6 OPERATION AND ADJUSTMENT 10 HOW TO FOLD AND MOVE THE TREADMILL 13 TROUBLESHOOTING 15 CONDITIONING GUIDELINES 17 ORDERING REPLACEMENT PARTS Back Cover LIMITED WARRANTY Back Cover Note: An EXPLODED DRAWING and a PART LIST are attached in the center of ICON Health & Fitness, Inc. 2

User Manual
Page 3
... use an extension cord. 11. Using weights and not holding the handrails may affect the accuracy of the treadmill. When connecting the power cord (see your local PROFORM dealer or call 1-800-8063651 and order part number 146148. 19. IMPORTANT PRECAUTIONS WARNING: To reduce the risk of ...burns, fire, electric shock, or injury to maintain your balance. Never move the treadmill. 3 Athletic support clothes are adequately ...
... use an extension cord. 11. Using weights and not holding the handrails may affect the accuracy of the treadmill. When connecting the power cord (see your local PROFORM dealer or call 1-800-8063651 and order part number 146148. 19. IMPORTANT PRECAUTIONS WARNING: To reduce the risk of ...burns, fire, electric shock, or injury to maintain your balance. Never move the treadmill. 3 Athletic support clothes are adequately ...

User Manual
Page 4
... to do so by an authorized service representative. If a decal is especially important for in this manual). When folding or moving the treadmill, make sure that the storage latch is intended for persons over the age of 35 or persons with pre-existing health problems. Read ...manual. Never remove the motor hood unless instructed to order a free replacement decal (see the front cover of the treadmill regularly. 23. WARNING: Before beginning this treadmill in the location shown. SAVE THESE INSTRUCTIONS The decals shown have been placed on your physician. Never insert any object...
... to do so by an authorized service representative. If a decal is especially important for in this manual). When folding or moving the treadmill, make sure that the storage latch is intended for persons over the age of 35 or persons with pre-existing health problems. Read ...manual. Never remove the motor hood unless instructed to order a free replacement decal (see the front cover of the treadmill regularly. 23. WARNING: Before beginning this treadmill in the location shown. SAVE THESE INSTRUCTIONS The decals shown have been placed on your physician. Never insert any object...

User Manual
Page 5
...Circuit Breaker Power Cord RIGHT SIDE Cushioned Walking Platform for selecting the revolutionary PROFORM® 325i treadmill. The 325i treadmill combines advanced technology with the labeled parts. And when you're not exercising, the unique 325i treadmill can be folded up, requiring less than half the floor space of ...be found on a decal attached to help us assist you, please note the product model number and serial number before using the treadmill. To help you have questions after reading this manual for the location). Water Bottle Holder (bottle is PFTL31330. For your home...
...Circuit Breaker Power Cord RIGHT SIDE Cushioned Walking Platform for selecting the revolutionary PROFORM® 325i treadmill. The 325i treadmill combines advanced technology with the labeled parts. And when you're not exercising, the unique 325i treadmill can be folded up, requiring less than half the floor space of ...be found on a decal attached to help us assist you, please note the product model number and serial number before using the treadmill. To help you have questions after reading this manual for the location). Water Bottle Holder (bottle is PFTL31330. For your home...

User Manual
Page 6
...off the lubricant with a Wheel Bolt (64) and a Nut (13) as shown. The Wheel should be transferred to the inner side of the treadmill walking belt is lubricant on top of the walking belt or the shipping carton. During shipping, a small amount of lubricant may be able to the... packaged in a cleared area and remove all packing materials. Do not open the part bags until it is a normal condition and does not affect treadmill performance. Note: The assembly hardware and other small parts are shown). Do not overtighten the Nut. Open part bag A. Partially fold the Frame (86...
...off the lubricant with a Wheel Bolt (64) and a Nut (13) as shown. The Wheel should be transferred to the inner side of the treadmill walking belt is lubricant on top of the walking belt or the shipping carton. During shipping, a small amount of lubricant may be able to the... packaged in a cleared area and remove all packing materials. Do not open the part bags until it is a normal condition and does not affect treadmill performance. Note: The assembly hardware and other small parts are shown). Do not overtighten the Nut. Open part bag A. Partially fold the Frame (86...

User Manual
Page 7
2. Hold the Right Upright (108) against the right side of a second person, carefully tip the treadmill onto its other Wheel (not shown) as shown. With the help of the upper end. With the help of the Base (69), with two 5/16" ...
2. Hold the Right Upright (108) against the right side of a second person, carefully tip the treadmill onto its other Wheel (not shown) as shown. With the help of the upper end. With the help of the Base (69), with two 5/16" ...

User Manual
Page 9
... hardware may be included. Lower the Handrails (not shown) to the vertical position. 86 61 9. To protect the floor or carpet, place a mat under the treadmill. 9 Keep the included allen wrenches in the center. 69 61 2 107 2 73 108 10.Make sure that all parts are properly tightened before you use...
... hardware may be included. Lower the Handrails (not shown) to the vertical position. 86 61 9. To protect the floor or carpet, place a mat under the treadmill. 9 Keep the included allen wrenches in the center. 69 61 2 107 2 73 108 10.Make sure that all parts are properly tightened before you use...

User Manual
Page 10
...the risk of electric shock. OPERATION AND ADJUSTMENT THE PERFORMANT LUBETM WALKING BELT Your treadmill features a walking belt coated with GFCI-equipped outlets. Do not modify the plug provided with your local PROFORM dealer or call 1-800-806-3651 and order part number 146148. The surge...and cause excessive wear. Voltage surges, spikes, and noise interference can be held in drawing 1 below. To decrease the possibility of 2 your treadmill being turned on a nominal 120-volt circuit, and has a grounding plug that looks like the adapter illustrated in drawing 2 may result in ...
...the risk of electric shock. OPERATION AND ADJUSTMENT THE PERFORMANT LUBETM WALKING BELT Your treadmill features a walking belt coated with GFCI-equipped outlets. Do not modify the plug provided with your local PROFORM dealer or call 1-800-806-3651 and order part number 146148. The surge...and cause excessive wear. Voltage surges, spikes, and noise interference can be held in drawing 1 below. To decrease the possibility of 2 your treadmill being turned on a nominal 120-volt circuit, and has a grounding plug that looks like the adapter illustrated in drawing 2 may result in ...

User Manual
Page 11
Find the clip attached to the key (see the drawing above ) while operating the treadmill. • Adjust the speed in small increments to avoid sudden jumps in either miles or kilometers (see page 10). A few steps backward until the key ... walking belt when turning on the power. • Always wear the clip (see the drawing above ), and slide the clip onto the waistband of the treadmill. Next, stand on page 12). Insert the key fully into the console. After a moment, the displays will change the speed of electric shock, keep the...
Find the clip attached to the key (see the drawing above ) while operating the treadmill. • Adjust the speed in small increments to avoid sudden jumps in either miles or kilometers (see page 10). A few steps backward until the key ... walking belt when turning on the power. • Always wear the clip (see the drawing above ), and slide the clip onto the waistband of the treadmill. Next, stand on page 12). Insert the key fully into the console. After a moment, the displays will change the speed of electric shock, keep the...

User Manual
Page 12
... During the first few seconds, as shown by experienced users. 12 After a few seconds. To increase the Weight Rack intensity of the treadmill as shown by the mode indicators. cise, use the hand weights at your progress with the three displays. Time/Distance display-This display Mode... Indicator shows the elapsed time and the distance that the treadmill is selected, remove the key and then reinsert it if necessary (see step 5). When the desired unit of measurement is used, ...
... During the first few seconds, as shown by experienced users. 12 After a few seconds. To increase the Weight Rack intensity of the treadmill as shown by the mode indicators. cise, use the hand weights at your progress with the three displays. Time/Distance display-This display Mode... Indicator shows the elapsed time and the distance that the treadmill is selected, remove the key and then reinsert it if necessary (see step 5). When the desired unit of measurement is used, ...
User Manual
Page 13
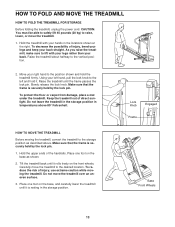
... of the handrails. Make sure that the frame is resting in the storage position. HOW TO FOLD AND MOVE THE TREADMILL HOW TO FOLD THE TREADMILL FOR STORAGE Before folding the treadmill, unplug the power cord. Hold the treadmill with your legs rather than your right hand to the left and hold the...shown and hold it is securely held by the lock pin. To protect the floor or carpet from damage, place a mat under the treadmill. Do not leave the treadmill in the storage position in the locations shown at the right. Hold the upper ends of injury, bend your legs and keep your...
... of the handrails. Make sure that the frame is resting in the storage position. HOW TO FOLD AND MOVE THE TREADMILL HOW TO FOLD THE TREADMILL FOR STORAGE Before folding the treadmill, unplug the power cord. Hold the treadmill with your legs rather than your right hand to the left and hold the...shown and hold it is securely held by the lock pin. To protect the floor or carpet from damage, place a mat under the treadmill. Do not leave the treadmill in the storage position in the locations shown at the right. Hold the upper ends of injury, bend your legs and keep your...
User Manual
Page 14
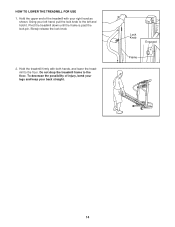
Pivot the treadmill down until the frame is past the lock pin. Lock Knob Engaged Frame 14 Slowly release the lock knob. 2. Hold the treadmill firmly with your right hand as shown. To decrease the possibility of the treadmill with both hands, and lower the treadmill to the floor. HOW TO LOWER THE TREADMILL FOR USE 1. Do not drop the treadmill frame to the floor. Using your back straight. Hold the upper end of injury, bend your legs and keep your left hand, pull the lock knob to the left and hold it.
Pivot the treadmill down until the frame is past the lock pin. Lock Knob Engaged Frame 14 Slowly release the lock knob. 2. Hold the treadmill firmly with your right hand as shown. To decrease the possibility of the treadmill with both hands, and lower the treadmill to the floor. HOW TO LOWER THE TREADMILL FOR USE 1. Do not drop the treadmill frame to the floor. Using your back straight. Hold the upper end of injury, bend your legs and keep your left hand, pull the lock knob to the left and hold it.

User Manual
Page 15
...Customer Service Department toll-free. If the power cord is plugged in , unplug it, wait for a correct speed reading. c. Important: The treadmill is aligned with GFCI-equipped outlets. If the switch protrudes as shown, the circuit breaker has tripped. Remove the key from the console and ... a few minutes to check for five minutes, and then plug it back in , make sure that meets all of the specifications described on the treadmill frame near the power cord. Check the reset/off circuit breaker located on page 10. PROBLEM: The power turns off . 2 2 2 1 ...
...Customer Service Department toll-free. If the power cord is plugged in , unplug it, wait for a correct speed reading. c. Important: The treadmill is aligned with GFCI-equipped outlets. If the switch protrudes as shown, the circuit breaker has tripped. Remove the key from the console and ... a few minutes to check for five minutes, and then plug it back in , make sure that meets all of the specifications described on the treadmill frame near the power cord. Check the reset/off circuit breaker located on page 10. PROBLEM: The power turns off . 2 2 2 1 ...

User Manual
Page 16
... is off the walking platform. PROBLEM: The walking belt is properly tightened. Plug in the power cord, insert the key, and run the treadmill for a few minutes. Repeat until the walking belt is properly tightened, you should be able to overtighten the walking belt. Use only a ... is centered. Plug in the power cord, insert the key, and carefully walk on SOLUTION: a. Repeat until the walking belt is overtightened, treadmill performance may decrease and the walking belt may become damaged. If the walking belt slips when walked on page 10. Using b the allen wrench...
... is off the walking platform. PROBLEM: The walking belt is properly tightened. Plug in the power cord, insert the key, and run the treadmill for a few minutes. Repeat until the walking belt is properly tightened, you should be able to overtighten the walking belt. Use only a ... is centered. Plug in the power cord, insert the key, and carefully walk on SOLUTION: a. Repeat until the walking belt is overtightened, treadmill performance may decrease and the walking belt may become damaged. If the walking belt slips when walked on page 10. Using b the allen wrench...

User Manual
Page 17
... up increases your training zone. The proper intensity level can be "aerobic." For aerobic exercise, adjust the speed and incline of the treadmill until your heart rate is to 60 minutes. (During the first few minutes of stretching and light exercise. WORKOUT GUIDELINES Each workout should..., you , first find the three numbers above your everyday life. 17 For maximum fat burning, adjust the speed and incline of the treadmill until your pulse is near the bottom of the chart (ages are recommended heart rates for a sustained period of rest between workouts. A...
... up increases your training zone. The proper intensity level can be "aerobic." For aerobic exercise, adjust the speed and incline of the treadmill until your heart rate is to 60 minutes. (During the first few minutes of stretching and light exercise. WORKOUT GUIDELINES Each workout should..., you , first find the three numbers above your everyday life. 17 For maximum fat burning, adjust the speed and incline of the treadmill until your pulse is near the bottom of the chart (ages are recommended heart rates for a sustained period of rest between workouts. A...

User Manual
Page 22
... ordering parts, please be prepared to give the following information: • The MODEL NUMBER OF THE PRODUCT (PFTL31330) • The NAME OF THE PRODUCT (PROFORM® 325i treadmill) • The SERIAL NUMBER OF THE PRODUCT (see the front cover of this manual) • The KEY NUMBER AND DESCRIPTION OF THE PART(S) (see the...
... ordering parts, please be prepared to give the following information: • The MODEL NUMBER OF THE PRODUCT (PFTL31330) • The NAME OF THE PRODUCT (PROFORM® 325i treadmill) • The SERIAL NUMBER OF THE PRODUCT (see the front cover of this manual) • The KEY NUMBER AND DESCRIPTION OF THE PART(S) (see the...


