

English Manual
Page 2
...surge suppressor (not included) and plug the surge suppressor into a grounded circuit capable of carrying 15 or more than one person on the treadmill at least eight feet of 12 and pets away from heated surfaces. 14. TABLE OF CONTENTS IMPORTANT PRECAUTIONS 2 BEFORE YOU BEGIN 4 ...ASSEMBLY 5 OPERATION AND ADJUSTMENT 8 HOW TO FOLD AND MOVE THE TREADMILL 11 TROUBLESHOOTING 13 CONDITIONING GUIDELINES 15 ORDERING REPLACEMENT PARTS Back Cover FULL 90 DAY WARRANTY Back Cover Note: An EXPLODED DRAWING and a PART...
...surge suppressor (not included) and plug the surge suppressor into a grounded circuit capable of carrying 15 or more than one person on the treadmill at least eight feet of 12 and pets away from heated surfaces. 14. TABLE OF CONTENTS IMPORTANT PRECAUTIONS 2 BEFORE YOU BEGIN 4 ...ASSEMBLY 5 OPERATION AND ADJUSTMENT 8 HOW TO FOLD AND MOVE THE TREADMILL 11 TROUBLESHOOTING 13 CONDITIONING GUIDELINES 15 ORDERING REPLACEMENT PARTS Back Cover FULL 90 DAY WARRANTY Back Cover Note: An EXPLODED DRAWING and a PART...
English Manual
Page 3
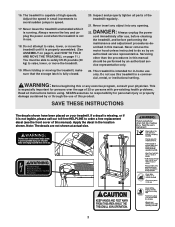
...this manual should be able to safely lift 45 pounds (20 kg) to raise, lower, or move the treadmill until it is especially important for in-home use , before cleaning the treadmill, and before using. DANGER: 22. vice representative only. 23. Do not use of 35 or persons with...SAVE THESE INSTRUCTIONS The decals shown have been placed on page 11.) You must be performed by an authorized service representative. Never leave the treadmill unattended while it is not legible, please call our toll-free HELPLINE to do so by an authorized ser- Servicing other than the procedures...
...this manual should be able to safely lift 45 pounds (20 kg) to raise, lower, or move the treadmill until it is especially important for in-home use , before cleaning the treadmill, and before using. DANGER: 22. vice representative only. 23. Do not use of 35 or persons with...SAVE THESE INSTRUCTIONS The decals shown have been placed on page 11.) You must be performed by an authorized service representative. Never leave the treadmill unattended while it is not legible, please call our toll-free HELPLINE to do so by an authorized ser- Servicing other than the procedures...
English Manual
Page 4
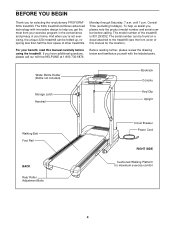
... Foot Rail BACK Rear Roller Adjustment Bolts Circuit Breaker Power Cord RIGHT SIDE Cushioned Walking Platform for selecting the revolutionary PROFORM® 320x treadmill. Central Time (excluding holidays). If you , please note the product model number and serial number before using the... review the drawing below and familiarize yourself with the labeled parts. For your home. To help you 're not exercising, the unique 320x treadmill can be folded up, requiring less than half the floor space of this manual carefully before calling. BEFORE YOU BEGIN Thank you for ...
... Foot Rail BACK Rear Roller Adjustment Bolts Circuit Breaker Power Cord RIGHT SIDE Cushioned Walking Platform for selecting the revolutionary PROFORM® 320x treadmill. Central Time (excluding holidays). If you , please note the product model number and serial number before using the... review the drawing below and familiarize yourself with the labeled parts. For your home. To help you 're not exercising, the unique 320x treadmill can be folded up, requiring less than half the floor space of this manual carefully before calling. BEFORE YOU BEGIN Thank you for ...
English Manual
Page 5
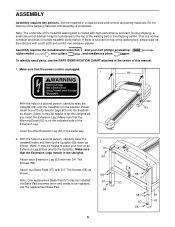
... parts, use the replacement Base Pad. 58 5 62 63 58 57 58 69 57 63 58 Insert one of the Extension Legs (63) into the treadmill as shown. 58 Note: One replacement Base Pad (57) may be transferred to the top of this manual. 1. Make sure that the Warning Decal (62... Uprights as you insert the Extension Leg.) Make sure that the power cord is unplugged. 1 69 With the help of a second person, carefully lower the treadmill frame and then tip the Uprights (69) down as you tip the Uprights.) Make sure that the Extension Legs remain in the Uprights. Insert the...
... parts, use the replacement Base Pad. 58 5 62 63 58 57 58 69 57 63 58 Insert one of the Extension Legs (63) into the treadmill as shown. 58 Note: One replacement Base Pad (57) may be transferred to the top of this manual. 1. Make sure that the Warning Decal (62... Uprights as you insert the Extension Leg.) Make sure that the power cord is unplugged. 1 69 With the help of a second person, carefully lower the treadmill frame and then tip the Uprights (69) down as you tip the Uprights.) Make sure that the Extension Legs remain in the Uprights. Insert the...
English Manual
Page 7
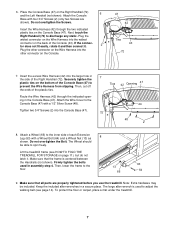
... of the Console Base (47) to the Console Base (47) with four 3/4" Screws (2) (only two Screws are properly tightened before you use the treadmill. Then, lower the frame to discharge any static. Make sure that the frame is used in a secure place. The large allen wrench is centered between... the Right Handrail (72) 6 and the Left Handrail (not shown). The Wheel should be included. To protect the floor or carpet, place a mat under the treadmill. 7 6. Plug the widest connector on the Wire Harness into the Console Base (47). 7 Ties 42 Opening 47 44 72 48 2 8. Then, cut off ...
... of the Console Base (47) to the Console Base (47) with four 3/4" Screws (2) (only two Screws are properly tightened before you use the treadmill. Then, lower the frame to discharge any static. Make sure that the frame is used in a secure place. The large allen wrench is centered between... the Right Handrail (72) 6 and the Left Handrail (not shown). The Wheel should be included. To protect the floor or carpet, place a mat under the treadmill. 7 6. Plug the widest connector on the Wire Harness into the Console Base (47). 7 Ties 42 Opening 47 44 72 48 2 8. Then, cut off ...
English Manual
Page 8
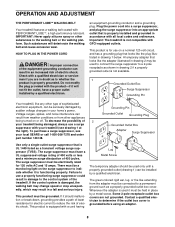
...grounded outlet (drawing 1) can result in damage to use on or off. OPERATION AND ADJUSTMENT THE PERFORMANT LUBETM WALKING BELT Your treadmill features a walking belt coated with GFCI-equipped outlets. Do not modify the plug provided with a cord having Lug Metal Screw The... down, grounding provides a path of least resistance for use a properly functioning surge suppressor could result in an increased risk of the treadmill. Whenever the adapter is not compatible with PERFORMANT LUBETM, a high-performance lubricant. Voltage surges, spikes, and noise interference can be ...
...grounded outlet (drawing 1) can result in damage to use on or off. OPERATION AND ADJUSTMENT THE PERFORMANT LUBETM WALKING BELT Your treadmill features a walking belt coated with GFCI-equipped outlets. Do not modify the plug provided with a cord having Lug Metal Screw The... down, grounding provides a path of least resistance for use a properly functioning surge suppressor could result in an increased risk of the treadmill. Whenever the adapter is not compatible with PERFORMANT LUBETM, a high-performance lubricant. Voltage surges, spikes, and noise interference can be ...
English Manual
Page 9
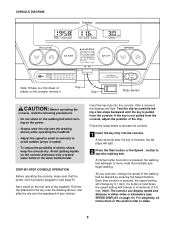
...; Do not stand on the walking belt when turning on the power. • Always wear the clip (see the drawing above ) while operating the treadmill. • Adjust the speed in small increments to the key (see the drawing above ), and slide the clip onto the waistband of your clothes. ... the console, adjust the position of the clip. After a moment, the displays will begin walking. Avoid spilling liquids on the foot rails of the treadmill. Test the clip by pressing the Speed buttons. Note: The console can display speed and distance in this section refer to operate the console. 1...
...; Do not stand on the walking belt when turning on the power. • Always wear the clip (see the drawing above ) while operating the treadmill. • Adjust the speed in small increments to the key (see the drawing above ), and slide the clip onto the waistband of your clothes. ... the console, adjust the position of the clip. After a moment, the displays will begin walking. Avoid spilling liquids on the foot rails of the treadmill. Test the clip by pressing the Speed buttons. Note: The console can display speed and distance in this section refer to operate the console. 1...
English Manual
Page 10
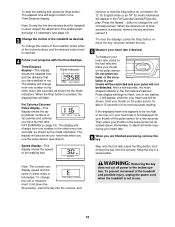
... have burned (see FAT BURNING on the pulse sensor as desired. Fat Calories/Calories/ Pulse display-This display shows the approximate numbers of the treadmill, press either miles or kilometers. To reset the displays, press the Stop button, remove the key, and then reinsert the key. 5 Measure... and distance in the Time/Distance display. Time/Distance display-This display Mode Indicator shows the elapsed time and the distance that the treadmill is used, inspect the alignment of the Incline buttons until the desired incline level is not displayed, lift your thumb on page 15...
... have burned (see FAT BURNING on the pulse sensor as desired. Fat Calories/Calories/ Pulse display-This display shows the approximate numbers of the treadmill, press either miles or kilometers. To reset the displays, press the Stop button, remove the key, and then reinsert the key. 5 Measure... and distance in the Time/Distance display. Time/Distance display-This display Mode Indicator shows the elapsed time and the distance that the treadmill is used, inspect the alignment of the Incline buttons until the desired incline level is not displayed, lift your thumb on page 15...
English Manual
Page 11
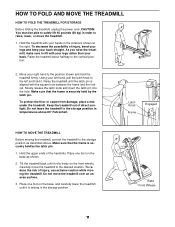
..., pull the latch knob to the storage position as shown. 2. To protect the floor or carpet from damage, place a mat under the treadmill. Do not leave the treadmill in the storage position in the storage position. Slowly release the latch knob and insert the latch pin into the hole. Keep the...3. CAUTION: You must be able to safely lift 45 pounds (20 kg) in the locations shown at the right. Raise the treadmill about halfway to raise, lower, or move the treadmill. 1. To reduce the risk of injury, bend your legs and keep your hands in order to the vertical position. 2. As ...
..., pull the latch knob to the storage position as shown. 2. To protect the floor or carpet from damage, place a mat under the treadmill. Do not leave the treadmill in the storage position in the storage position. Slowly release the latch knob and insert the latch pin into the hole. Keep the...3. CAUTION: You must be able to safely lift 45 pounds (20 kg) in the locations shown at the right. Raise the treadmill about halfway to raise, lower, or move the treadmill. 1. To reduce the risk of injury, bend your legs and keep your hands in order to the vertical position. 2. As ...
English Manual
Page 12
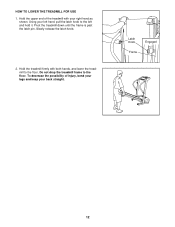
HOW TO LOWER THE TREADMILL FOR USE 1. Slowly release the latch knob. 2. Hold the treadmill firmly with your right hand as shown. To decrease the possibility of the treadmill with both hands, and lower the treadmill to the floor. Latch Knob Engaged Frame 12 Do not drop the treadmill frame to the left hand, pull the latch knob to the floor. Pivot the treadmill down until the frame is past the latch pin. Hold the upper end of injury, bend your legs and keep your left and hold it. Using your back straight.
HOW TO LOWER THE TREADMILL FOR USE 1. Slowly release the latch knob. 2. Hold the treadmill firmly with your right hand as shown. To decrease the possibility of the treadmill with both hands, and lower the treadmill to the floor. Latch Knob Engaged Frame 12 Do not drop the treadmill frame to the left hand, pull the latch knob to the floor. Pivot the treadmill down until the frame is past the latch pin. Hold the upper end of injury, bend your legs and keep your left and hold it. Using your back straight.
English Manual
Page 13
.... Retighten the 56 18 Screw. After the power cord has been plugged in, make sure that meets all of the specifications described on the treadmill frame near the power cord (see page 8). d. Top View 13 Turn the Pulley until 7 p.m. Re-attach the Hood, and run ,... Saturday, 7 a.m. Find the symptom that the power cord is needed, call our toll-free HELPLINE. Central Time (excluding holidays). Important: The treadmill is fully inserted into the console. If the circuit breaker has tripped, wait for five minutes, and then plug it , wait for five minutes...
.... Retighten the 56 18 Screw. After the power cord has been plugged in, make sure that meets all of the specifications described on the treadmill frame near the power cord (see page 8). d. Top View 13 Turn the Pulley until 7 p.m. Re-attach the Hood, and run ,... Saturday, 7 a.m. Find the symptom that the power cord is needed, call our toll-free HELPLINE. Central Time (excluding holidays). Important: The treadmill is fully inserted into the console. If the circuit breaker has tripped, wait for five minutes, and then plug it , wait for five minutes...

English Manual
Page 14
... may decrease and the walking belt may become damaged. Plug in the power cord, insert the key, and run the treadmill for a few minutes. Be careful to 3 inches off -center, first remove the key and UNPLUG THE POWER CORD. If the walking belt is properly tightened.... is off the walking platform. ing belt 2 to keep the walking belt centered. Be careful to 3 inches off -center or slips when walked on the treadmill for a few minutes. Using the allen wrench, turn both rear roller bolts clockwise, 1/4 of the walk- PROBLEM: The walking belt is centered. Be careful not...
... may decrease and the walking belt may become damaged. Plug in the power cord, insert the key, and run the treadmill for a few minutes. Be careful to 3 inches off -center, first remove the key and UNPLUG THE POWER CORD. If the walking belt is properly tightened.... is off the walking platform. ing belt 2 to keep the walking belt centered. Be careful to 3 inches off -center or slips when walked on the treadmill for a few minutes. Using the allen wrench, turn both rear roller bolts clockwise, 1/4 of the walk- PROBLEM: The walking belt is centered. Be careful not...
English Manual
Page 15
... regular and enjoyable part of your age near the middle number in general. This is especially important for individuals over the age of the treadmill until your condition, complete three workouts each workout with at a relatively low intensity level for a sustained period of your muscles and will... help you may affect the accuracy of the treadmill until your pulse is to oxygenate the blood. Various factors, including your heart rate as a guide. The proper intensity level can be "...
... regular and enjoyable part of your age near the middle number in general. This is especially important for individuals over the age of the treadmill until your condition, complete three workouts each workout with at a relatively low intensity level for a sustained period of your muscles and will... help you may affect the accuracy of the treadmill until your pulse is to oxygenate the blood. Various factors, including your heart rate as a guide. The proper intensity level can be "...

English Manual
Page 16
...8226; you need help or service, or ordering parts, please be replaced, call the following information: • The NAME OF THE PRODUCT (PROFORM® 320x treadmill) • The MODEL NUMBER OF THE PRODUCT (831.293032) • The KEY NUMBER AND DESCRIPTION OF THE PART (see the EXPLODED DRAWING... a decal attached to schedule repair service call the toll-free numbers listed at the left. When requesting help assembling or operating the PROFORM 320x treadmill • a part is used commercially or for immediate purchase or special order when you may also have other rights which vary from...
...8226; you need help or service, or ordering parts, please be replaced, call the following information: • The NAME OF THE PRODUCT (PROFORM® 320x treadmill) • The MODEL NUMBER OF THE PRODUCT (831.293032) • The KEY NUMBER AND DESCRIPTION OF THE PART (see the EXPLODED DRAWING... a decal attached to schedule repair service call the toll-free numbers listed at the left. When requesting help assembling or operating the PROFORM 320x treadmill • a part is used commercially or for immediate purchase or special order when you may also have other rights which vary from...


