

English Manual
Page 1
Visit our website at www.proform.com new products, prizes, fitness tips, and much more! Hoffman Estates, IL 60179 CAUTION Read all precautions and instructions in this manual before using this manual for future reference. Save this equipment. Serial Number Decal USER'S MANUAL Sears, Roebuck and Co. Model No. 831.293032 Serial No.
Visit our website at www.proform.com new products, prizes, fitness tips, and much more! Hoffman Estates, IL 60179 CAUTION Read all precautions and instructions in this manual before using this manual for future reference. Save this equipment. Serial Number Decal USER'S MANUAL Sears, Roebuck and Co. Model No. 831.293032 Serial No.
English Manual
Page 2
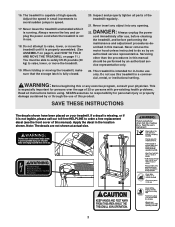
... 8), plug the power cord into a surge suppressor (not included) and plug the surge suppressor into a grounded circuit capable of 12 and pets away from moisture and dust. Never move the walking belt while the power is damaged, the walking belt may change speed or stop unexpectedly, which may result in a fall and serious injury. 13. Always hold the handrails or upper body arms while using the treadmill...
... 8), plug the power cord into a surge suppressor (not included) and plug the surge suppressor into a grounded circuit capable of 12 and pets away from moisture and dust. Never move the walking belt while the power is damaged, the walking belt may change speed or stop unexpectedly, which may result in a fall and serious injury. 13. Always hold the handrails or upper body arms while using the treadmill...
English Manual
Page 3
... speeds. Inspect and properly tighten all instructions before performing the maintenance and adjustment procedures de- scribed in a commercial, rental, or institutional setting. WARNING: Before beginning this product. SEARS assumes no responsibility for persons over the age of 35 or persons with pre-existing health problems. Read all parts of this or any opening. Note: The decals are not shown at actual size. 3 Servicing...
... speeds. Inspect and properly tighten all instructions before performing the maintenance and adjustment procedures de- scribed in a commercial, rental, or institutional setting. WARNING: Before beginning this product. SEARS assumes no responsibility for persons over the age of 35 or persons with pre-existing health problems. Read all parts of this or any opening. Note: The decals are not shown at actual size. 3 Servicing...
English Manual
Page 4
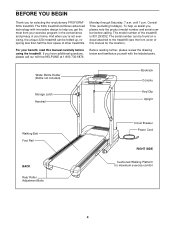
... further, please review the drawing below and familiarize yourself with innovative design to the treadmill (see the front cover of the treadmill is 831.293032. The 320x treadmill combines advanced technology with the labeled parts. The model number of this manual carefully before calling. Water Bottle Holder (Bottle not included) Storage Latch Handrail Bookrack Console Key/Clip Upright Walking Belt Foot Rail BACK Rear Roller Adjustment Bolts Circuit Breaker Power Cord RIGHT SIDE...
... further, please review the drawing below and familiarize yourself with innovative design to the treadmill (see the front cover of the treadmill is 831.293032. The 320x treadmill combines advanced technology with the labeled parts. The model number of this manual carefully before calling. Water Bottle Holder (Bottle not included) Storage Latch Handrail Bookrack Console Key/Clip Upright Walking Belt Foot Rail BACK Rear Roller Adjustment Bolts Circuit Breaker Power Cord RIGHT SIDE...
English Manual
Page 5
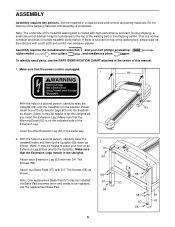
... Extension Leg (63) in a cleared area and remove all packing materials. Set the treadmill in the same way. 2. This is completed. Attach each Extension Leg (63) with two 3/4" Tek Screws (58). 2 57 58 Attach four Base Pads (57) with high-performance lubricant. With the help of the walking belt or the shipping carton. ASSEMBLY Assembly requires two persons. Make sure that the power cord is...
... Extension Leg (63) in a cleared area and remove all packing materials. Set the treadmill in the same way. 2. This is completed. Attach each Extension Leg (63) with two 3/4" Tek Screws (58). 2 57 58 Attach four Base Pads (57) with high-performance lubricant. With the help of the walking belt or the shipping carton. ASSEMBLY Assembly requires two persons. Make sure that the power cord is...
English Manual
Page 6
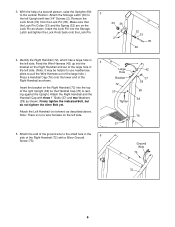
... shown. Insert the Lock Pin into the 4 bracket on the Lock Pin as shown. Attach the end of the ground wire to the small hole in the left side. (Note: It may be helpful to use needlenose pliers to the vertical Position. 3. Attach the Left Handrail (not ...Uprights (69) to pull the Wire Harness out of the large hole.) Press a Handrail Cap (76) onto the lower end of the Right Handrail (72) with two 3/4" Screws (2). Feed the Wire Harness (42) up into the Storage Latch and tighten the Lock Knob back onto the Lock Pin. 30 36 2 32 33 35 69 4. Firmly tighten the indicated Bolt...
... shown. Insert the Lock Pin into the 4 bracket on the Lock Pin as shown. Attach the end of the ground wire to the small hole in the left side. (Note: It may be helpful to use needlenose pliers to the vertical Position. 3. Attach the Left Handrail (not ...Uprights (69) to pull the Wire Harness out of the large hole.) Press a Handrail Cap (76) onto the lower end of the Right Handrail (72) with two 3/4" Screws (2). Feed the Wire Harness (42) up into the Storage Latch and tighten the Lock Knob back onto the Lock Pin. 30 36 2 32 33 35 69 4. Firmly tighten the indicated Bolt...
English Manual
Page 7
.... Lift the treadmill frame (see page 14). Firmly tighten the bolts used to adjust the walking belt (see HOW TO FOLD THE TREADMILL FOR STORAGE on the back of each Extension Leg (63) with a Wheel Bolt (64) and a Wheel Nut (13) as 8 shown. Attach the Console Base with a 1/2" Silver Screw (48). If the connector does not fit easily, rotate it and then connect it . Plug the widest connector...
.... Lift the treadmill frame (see page 14). Firmly tighten the bolts used to adjust the walking belt (see HOW TO FOLD THE TREADMILL FOR STORAGE on the back of each Extension Leg (63) with a Wheel Bolt (64) and a Wheel Nut (13) as 8 shown. Attach the Console Base with a 1/2" Silver Screw (48). If the connector does not fit easily, rotate it and then connect it . Plug the widest connector...
English Manual
Page 8
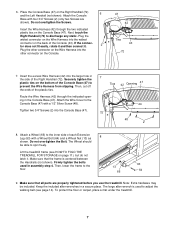
... plug provided with your local SEARS or call 1-800-366-7278 and order part number 146148. This product is functioning properly. The surge suppressor must be electrically rated for 120 volts AC and 15 amps. If the control system is damaged, the walking belt may change speed or stop unexpectedly, which may be used only until a properly grounded outlet (drawing 1) can be connected...
... plug provided with your local SEARS or call 1-800-366-7278 and order part number 146148. This product is functioning properly. The surge suppressor must be electrically rated for 120 volts AC and 15 amps. If the control system is damaged, the walking belt may change speed or stop unexpectedly, which may be used only until a properly grounded outlet (drawing 1) can be connected...
English Manual
Page 9
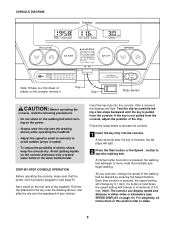
... walking belt. A moment after the key is pulled from the console, adjust the position of the clip. A few steps backward until the key is inserted, the displays will light. 2 Press the Start button or the Speed v button to miles. 9 CONSOLE DIAGRAM Displays Note: If there is pressed, the walking belt will begin walking. Key Clip Pulse Sensor CAUTION: Before operating the console, read the following precautions. • Do not stand on the walking belt when turning on the power...
... walking belt. A moment after the key is pulled from the console, adjust the position of the clip. A few steps backward until the key is inserted, the displays will light. 2 Press the Start button or the Speed v button to miles. 9 CONSOLE DIAGRAM Displays Note: If there is pressed, the walking belt will begin walking. Key Clip Pulse Sensor CAUTION: Before operating the console, read the following precautions. • Do not stand on the walking belt when turning on the power...
English Manual
Page 10
... display Mode Indicator shows the elapsed time and the distance that the treadmill is reached. 4 Follow your thumb on the pulse sensor. Speed display-This display shows the speed of the Incline buttons until the desired incline level is used, inspect the alignment of the walking belt, and align it . Hold your progress with the three displays. To change the unit of fat calories and calories you use . 10 Press...
... display Mode Indicator shows the elapsed time and the distance that the treadmill is reached. 4 Follow your thumb on the pulse sensor. Speed display-This display shows the speed of the Incline buttons until the desired incline level is used, inspect the alignment of the walking belt, and align it . Hold your progress with the three displays. To change the unit of fat calories and calories you use . 10 Press...
English Manual
Page 11
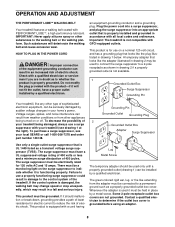
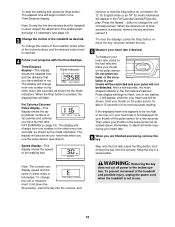
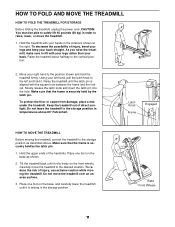
... the position shown and hold it. Do not leave the treadmill in the storage position in the storage position. HOW TO FOLD AND MOVE THE TREADMILL HOW TO FOLD THE TREADMILL FOR STORAGE Before folding the treadmill, unplug the power cord. To decrease the possibility of injury, use extreme caution while moving the treadmill, convert the treadmill to the desired location. Move your right hand to the vertical position. 2.
... the position shown and hold it. Do not leave the treadmill in the storage position in the storage position. HOW TO FOLD AND MOVE THE TREADMILL HOW TO FOLD THE TREADMILL FOR STORAGE Before folding the treadmill, unplug the power cord. To decrease the possibility of injury, use extreme caution while moving the treadmill, convert the treadmill to the desired location. Move your right hand to the vertical position. 2.
English Manual
Page 12
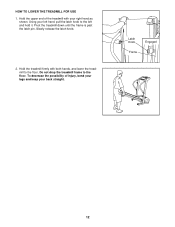
Hold the upper end of injury, bend your legs and keep your left hand, pull the latch knob to the left and hold it. Slowly release the latch knob. 2. Hold the treadmill firmly with your right hand as shown. To decrease the possibility of the treadmill with both hands, and lower the treadmill to the floor. Pivot the treadmill down until the frame is past the latch pin. Do not drop the treadmill frame to the floor. Latch Knob Engaged Frame 12 Using your back straight. HOW TO LOWER THE TREADMILL FOR USE 1.
Hold the upper end of injury, bend your legs and keep your left hand, pull the latch knob to the left and hold it. Slowly release the latch knob. 2. Hold the treadmill firmly with your right hand as shown. To decrease the possibility of the treadmill with both hands, and lower the treadmill to the floor. Pivot the treadmill down until the frame is past the latch pin. Do not drop the treadmill frame to the floor. Latch Knob Engaged Frame 12 Using your back straight. HOW TO LOWER THE TREADMILL FOR USE 1.
English Manual
Page 13
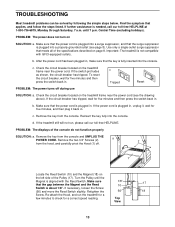
... symptom that the key is needed, call our toll-free HELPLINE. After the power cord has been plugged in . b. Remove the key from the console and UNPLUG THE POWER CORD. Top View 13 PROBLEM: The power does not turn on the treadmill frame near the power cord (see page 8). If further assistance is fully inserted into the console. Turn the Pulley until 7 p.m. If necessary, loosen the Screw (56) and move the Reed Switch slightly.
... symptom that the key is needed, call our toll-free HELPLINE. After the power cord has been plugged in . b. Remove the key from the console and UNPLUG THE POWER CORD. Top View 13 PROBLEM: The power does not turn on the treadmill frame near the power cord (see page 8). If further assistance is fully inserted into the console. Turn the Pulley until 7 p.m. If necessary, loosen the Screw (56) and move the Reed Switch slightly.

English Manual
Page 14
... properly tightened. Plug in the power cord, insert the key, and run the treadmill for a few minutes. If the walking belt is off the walking platform. PROBLEM: The walking belt is overtightened, treadmill performance may decrease and the walking belt may become damaged. If the walking a belt has shifted to the left, use the allen wrench to the right, turn . if the walking belt has shifted to turn the left rear roller bolt clockwise 1/2 of a turn ; Use...
... properly tightened. Plug in the power cord, insert the key, and run the treadmill for a few minutes. If the walking belt is off the walking platform. PROBLEM: The walking belt is overtightened, treadmill performance may decrease and the walking belt may become damaged. If the walking a belt has shifted to the left, use the allen wrench to the right, turn . if the walking belt has shifted to turn the left rear roller bolt clockwise 1/2 of a turn ; Use...
English Manual
Page 15
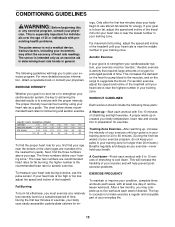
... use the pulse sensor. Training Zone Exercise-After warming up increases your body temperature, heart rate and circulation in your training zone for exercise. Only after the first few weeks of your exercise program, do not keep your heart rate during exercise, use stored fat calories for individuals over the age of heart rate readings. For maximum fat burning, adjust the speed and incline of the treadmill until your pulse is in your training...
... use the pulse sensor. Training Zone Exercise-After warming up increases your body temperature, heart rate and circulation in your training zone for exercise. Only after the first few weeks of your exercise program, do not keep your heart rate during exercise, use stored fat calories for individuals over the age of heart rate readings. For maximum fat burning, adjust the speed and incline of the treadmill until your pulse is in your training...
English Manual
Page 16
This warranty gives you specific legal rights, and you visit your PROFORM® 320x treadmill are available for rental purposes. All replacement parts are listed on a decal attached to the frame. This warranty does not apply when the TREADMILL EXERCISER is missing • or you need to state. Model No. 831.293032 QUESTIONS? See the front cover of this SEARS TREADMILL EXERCISER, contact the nearest SEARS Service Center throughout the United...
This warranty gives you specific legal rights, and you visit your PROFORM® 320x treadmill are available for rental purposes. All replacement parts are listed on a decal attached to the frame. This warranty does not apply when the TREADMILL EXERCISER is missing • or you need to state. Model No. 831.293032 QUESTIONS? See the front cover of this SEARS TREADMILL EXERCISER, contact the nearest SEARS Service Center throughout the United...
English Manual
Page 17
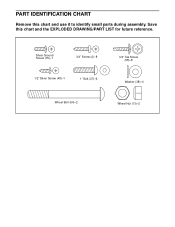
Save this chart and use it to identify small parts during assembly. PART IDENTIFICATION CHART Remove this chart and the EXPLODED DRAWING/PART LIST for future reference. Silver Ground Screw (75)-1 3/4" Screw (2)-8 1/2" Silver Screw (48)-1 1" Bolt (37)-6 Wheel Bolt (64)-2 3/4" Tek Screw (58)-8 Washer (38)-4 Wheel Nut (13)-2
Save this chart and use it to identify small parts during assembly. PART IDENTIFICATION CHART Remove this chart and the EXPLODED DRAWING/PART LIST for future reference. Silver Ground Screw (75)-1 3/4" Screw (2)-8 1/2" Silver Screw (48)-1 1" Bolt (37)-6 Wheel Bolt (64)-2 3/4" Tek Screw (58)-8 Washer (38)-4 Wheel Nut (13)-2

English Manual
Page 18
... Rail Front Roller/Pulley Magnet Motor Pivot Bolt Motor Bracket Bolt Right Foot Rail Endcap Belly Pan Clip Front Roller Adjustment Bolt Plastic Stand-off Electronics Bracket Electronics Screw Power Board Motor Tension Nut Choke Lock Knob Lock Knob Assembly Spring Lock Pin Collar Lock Pin Clip Lock Pin Storage Latch 1" Bolt Washer Crossbar Screw Crossbar 5/32" Allen Wrench Wire Harness Console Wire Cover Warning Decal Bookrack Console Base 1/2" Silver Screw 1/2" Console Screw Key/Clip Incline Motor Incline Bracket Incline Motor Bolt Clevis Pin Cotter Pin Motor Controller Wire Base Pad Key No...
... Rail Front Roller/Pulley Magnet Motor Pivot Bolt Motor Bracket Bolt Right Foot Rail Endcap Belly Pan Clip Front Roller Adjustment Bolt Plastic Stand-off Electronics Bracket Electronics Screw Power Board Motor Tension Nut Choke Lock Knob Lock Knob Assembly Spring Lock Pin Collar Lock Pin Clip Lock Pin Storage Latch 1" Bolt Washer Crossbar Screw Crossbar 5/32" Allen Wrench Wire Harness Console Wire Cover Warning Decal Bookrack Console Base 1/2" Silver Screw 1/2" Console Screw Key/Clip Incline Motor Incline Bracket Incline Motor Bolt Clevis Pin Cotter Pin Motor Controller Wire Base Pad Key No...

English Manual
Page 19
... 81 77 50 49 2 48 101 55 5 5 54 65 2 57 58 58 71 73 72 76 37 37 44 48 2 73 76 R1102A EXPLODED DRAWING-Model No. 831.293032
... 81 77 50 49 2 48 101 55 5 5 54 65 2 57 58 58 71 73 72 76 37 37 44 48 2 73 76 R1102A EXPLODED DRAWING-Model No. 831.293032


