

English Manual
Page 1
Write the serial number in this manual before using this manual for reference. Model No. 831.15706.0 Serial No. Save this equipment. Sears, Roebuck and Co., Hoffman Estates, IL 60179 WEIGHT BENCH EXERCISER User's Manual Serial Number Decal (under seat) • Assembly • Adjustment • Part List and Drawing CAUTION Read all precautions and instructions in the space above for future reference.
Write the serial number in this manual before using this manual for reference. Model No. 831.15706.0 Serial No. Save this equipment. Sears, Roebuck and Co., Hoffman Estates, IL 60179 WEIGHT BENCH EXERCISER User's Manual Serial Number Decal (under seat) • Assembly • Adjustment • Part List and Drawing CAUTION Read all precautions and instructions in the space above for future reference.

English Manual
Page 2
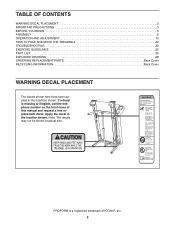
Note: The decals may not be shown at actual size. 2 If a decal is missing or illegible, call 1-877-9925999 and order a free replacement decal. TABLE OF CONTENTS WARNING DECAL PLACEMENT 2 IMPORTANT PRECAUTIONS 3 BEFORE YOU BEGIN 4 PART IDENTIFICATION CHART 5 ASSEMBLY 6 ADJUSTMENT 8 EXERCISE GUIDELINES 9 PART LIST 10 EXPLODED DRAWING 11 ORDERING REPLACEMENT PARTS Back Cover 90-DAY FULL WARRANTY Back Cover WARNING DECAL PLACEMENT The decals shown here have been placed on the weight bench. Apply the decal in the location shown.
Note: The decals may not be shown at actual size. 2 If a decal is missing or illegible, call 1-877-9925999 and order a free replacement decal. TABLE OF CONTENTS WARNING DECAL PLACEMENT 2 IMPORTANT PRECAUTIONS 3 BEFORE YOU BEGIN 4 PART IDENTIFICATION CHART 5 ASSEMBLY 6 ADJUSTMENT 8 EXERCISE GUIDELINES 9 PART LIST 10 EXPLODED DRAWING 11 ORDERING REPLACEMENT PARTS Back Cover 90-DAY FULL WARRANTY Back Cover WARNING DECAL PLACEMENT The decals shown here have been placed on the weight bench. Apply the decal in the location shown.
English Manual
Page 3
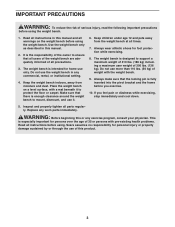
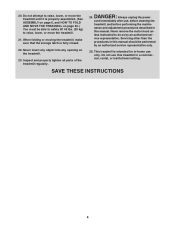
... properly tighten all times. 7. Do not use only. Replace any exercise program, consult your physician. Keep hands and feetBaewfoayrefrboemgimnnoivnigngthpisarotsr .any worn parts immediately. This is the responsibility of the owner to support a maximum weight of 410 lbs. (186 kg) including a maximum user weight... the pivot bracket and the frame before using. Keep the weight bench indoors, away from the weight bench at all parts regularly. IMPORTANT PRECAUTIONS WARNING: To reduce the risk of serious injury, read the following important precautions before using the weight...
... properly tighten all times. 7. Do not use only. Replace any exercise program, consult your physician. Keep hands and feetBaewfoayrefrboemgimnnoivnigngthpisarotsr .any worn parts immediately. This is the responsibility of the owner to support a maximum weight of 410 lbs. (186 kg) including a maximum user weight... the pivot bracket and the frame before using. Keep the weight bench indoors, away from the weight bench at all parts regularly. IMPORTANT PRECAUTIONS WARNING: To reduce the risk of serious injury, read the following important precautions before using the weight...

English Manual
Page 4
... your cardiovascular system, the weight bench will help us assist you want. Before reading further, please review the drawing below and familiarize yourself with the parts that are labeled. To help you to tone your body, build dramatic muscle size and strength, or improve your benefit, read this manual). The serial...
... your cardiovascular system, the weight bench will help us assist you want. Before reading further, please review the drawing below and familiarize yourself with the parts that are labeled. To help you to tone your body, build dramatic muscle size and strength, or improve your benefit, read this manual). The serial...

English Manual
Page 5
... below to see if it has been pre-assembled. If you cannot find a part in the parts bags, check to identify small parts used in parentheses by each drawing is missing, call 1-877-992-5999. If a part is the key number of the part, from the PART LIST on page 10 of this manual. Note: Some... parts may have been pre-assembled for shipping purposes. M6 Washer (22) M10 Large Washer (27) M10 x 20mm Bolt (25) M10 Washer...
... below to see if it has been pre-assembled. If you cannot find a part in the parts bags, check to identify small parts used in parentheses by each drawing is missing, call 1-877-992-5999. If a part is the key number of the part, from the PART LIST on page 10 of this manual. Note: Some... parts may have been pre-assembled for shipping purposes. M6 Washer (22) M10 Large Washer (27) M10 x 20mm Bolt (25) M10 Washer...

English Manual
Page 6
... One rubber mallet • One standard screwdriver • One Phillips screwdriver Assembly will be used. To make assembly easier, make sure all parts are oriented as you assemble it will be more convenient if you understand the information in a cleared area and remove the packing materials. Most... persons. • Because of its weight and size, the weight bench should be assembled in the drawings. • For help identifying small parts, see the PART IDENTIFICATION CHART on page 5. Attach the Stabilizer to the Front Leg (2) with two M10 x 63mm Bolts (16), two M10 Large Washers (...
... One rubber mallet • One standard screwdriver • One Phillips screwdriver Assembly will be used. To make assembly easier, make sure all parts are oriented as you assemble it will be more convenient if you understand the information in a cleared area and remove the packing materials. Most... persons. • Because of its weight and size, the weight bench should be assembled in the drawings. • For help identifying small parts, see the PART IDENTIFICATION CHART on page 5. Attach the Stabilizer to the Front Leg (2) with two M10 x 63mm Bolts (16), two M10 Large Washers (...

English Manual
Page 8
... (1) and the Pivot Bracket (6). 7 1 21 Adjustment Holes 6 8 To adjust the Backrest, first remove the Locking Pin (21) from the Frame (1). WARNING: Make sure that all parts are properly tightened before you use the weight bench. 1 22 22 17 ADJUSTMENT ADJUSTING THE BACKREST The Backrest (7) can be used in the Pivot Bracket...
... (1) and the Pivot Bracket (6). 7 1 21 Adjustment Holes 6 8 To adjust the Backrest, first remove the Locking Pin (21) from the Frame (1). WARNING: Make sure that all parts are properly tightened before you use the weight bench. 1 22 22 17 ADJUSTMENT ADJUSTING THE BACKREST The Backrest (7) can be used in the Pivot Bracket...

English Manual
Page 9
...will leave you will reshape and strengthen your body, plus develop your heart and lungs. When you . This requires moving only the appropriate parts of the body. Proper breathing is wrong before continuing. Rest for you, stick with it during the first few months of your exercise program...EXERCISE FORM Maintaining proper form is the highest. Rest for each set . Complete as many sets of 15 to 20 repetitions as running on a treadmill or riding on an exercise cycle, on Tuesday and Thursday. • Rest from workout to workout. Weight Loss To lose weight, use a low...
...will leave you will reshape and strengthen your body, plus develop your heart and lungs. When you . This requires moving only the appropriate parts of the body. Proper breathing is wrong before continuing. Rest for you, stick with it during the first few months of your exercise program...EXERCISE FORM Maintaining proper form is the highest. Rest for each set . Complete as many sets of 15 to 20 repetitions as running on a treadmill or riding on an exercise cycle, on Tuesday and Thursday. • Rest from workout to workout. Weight Loss To lose weight, use a low...

English Manual
Page 10
...stretching. List the date, the exercises performed, the resistance used, and the numbers of this manual for information about ordering replacement parts. Qty. Grease Packet Note: Specifications are subject to increase flexibility. Include stretches for both your everyday life. STAYING MOTIVATED For ... The ideal resting periods are not illustrated. 10 Qty. Description Key No. The key to make exercise a regular and enjoyable part of your arms and legs. Move slowly as you stretch and do not bounce. COOLING DOWN End each workout with the equipment ...
...stretching. List the date, the exercises performed, the resistance used, and the numbers of this manual for information about ordering replacement parts. Qty. Grease Packet Note: Specifications are subject to increase flexibility. Include stretches for both your everyday life. STAYING MOTIVATED For ... The ideal resting periods are not illustrated. 10 Qty. Description Key No. The key to make exercise a regular and enjoyable part of your arms and legs. Move slowly as you stretch and do not bounce. COOLING DOWN End each workout with the equipment ...

English Manual
Page 12
...DAY FULL WARRANTY If this Sears WEIGHT BENCH EXERCISER fails due to a defect in your nearest Sears Parts & Repair Center. 1-800-488-1222 Call anytime, day or night (U.S.A. For the replacement parts, accessories, and user's manuals that you may also have other rights which vary from state to state... BENCH EXERCISER is used commercially or for free repair (or replacement if repair proves impossible). Sears, Roebuck and Co., Hoffman Estates, IL 60179 Part No. 257342 R0407A Printed in items like garage door openers and water heaters. 1-800-4-MY-HOME® (1-800-469-4663) Call anytime, ...
...DAY FULL WARRANTY If this Sears WEIGHT BENCH EXERCISER fails due to a defect in your nearest Sears Parts & Repair Center. 1-800-488-1222 Call anytime, day or night (U.S.A. For the replacement parts, accessories, and user's manuals that you may also have other rights which vary from state to state... BENCH EXERCISER is used commercially or for free repair (or replacement if repair proves impossible). Sears, Roebuck and Co., Hoffman Estates, IL 60179 Part No. 257342 R0407A Printed in items like garage door openers and water heaters. 1-800-4-MY-HOME® (1-800-469-4663) Call anytime, ...

Uk Manual
Page 1
... 8JG UK CAUTION Read all precautions and instructions in the space above for future reference. Model No. Save this equipment. As a manufacturer, we are missing parts, please contact us at the numbers or addresses listed below: Call: 08457 089 009 Outside UK: 0 (44) 113 3877133 Fax: 0 (44) 113 3877125 E-mail: csuk...
... 8JG UK CAUTION Read all precautions and instructions in the space above for future reference. Model No. Save this equipment. As a manufacturer, we are missing parts, please contact us at the numbers or addresses listed below: Call: 08457 089 009 Outside UK: 0 (44) 113 3877133 Fax: 0 (44) 113 3877125 E-mail: csuk...
Uk Manual
Page 2
... YOU BEGIN 5 ASSEMBLY 6 OPERATION AND ADJUSTMENT 13 HOW TO FOLD AND MOVE THE TREADMILL 20 TROUBLESHOOTING 22 EXERCISE GUIDELINES 25 PART LIST 26 EXPLODED DRAWING 28 ORDERING REPLACEMENT PARTS Back Cover RECYCLING INFORMATION Back Cover WARNING DECAL PLACEMENT The decals shown here have been... applied in the location shown. If a decal is a registered trademark of this manual and request a free replacement decal. PROFORM...
... YOU BEGIN 5 ASSEMBLY 6 OPERATION AND ADJUSTMENT 13 HOW TO FOLD AND MOVE THE TREADMILL 20 TROUBLESHOOTING 22 EXERCISE GUIDELINES 25 PART LIST 26 EXPLODED DRAWING 28 ORDERING REPLACEMENT PARTS Back Cover RECYCLING INFORMATION Back Cover WARNING DECAL PLACEMENT The decals shown here have been... applied in the location shown. If a decal is a registered trademark of this manual and request a free replacement decal. PROFORM...
Uk Manual
Page 4
...use only. nance and adjustment procedures described in this treadmill in a commercial, rental, or institutional setting. less instructed to do so by an authorized service representative only. 25. Inspect and properly tighten all parts of the treadmill regularly. Do not use this manual. Do not attempt... to raise, lower, or move the treadmill until it is intended for in this manual should be able to safely ...
...use only. nance and adjustment procedures described in this treadmill in a commercial, rental, or institutional setting. less instructed to do so by an authorized service representative only. 25. Inspect and properly tighten all parts of the treadmill regularly. Do not use this manual. Do not attempt... to raise, lower, or move the treadmill until it is intended for in this manual should be able to safely ...
Uk Manual
Page 5
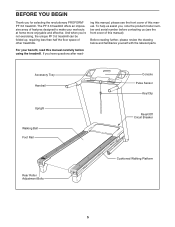
... review the drawing below and familiarize yourself with the labeled parts. The PF 3.6 treadmill offers an impressive array of features designed to make your benefit, read - For your workouts at home more enjoyable and effective. If you for selecting the revolutionary PROFORM® PF 3.6 treadmill. Accessory Tray Handrail Upright Walking Belt Foot Rail Console...
... review the drawing below and familiarize yourself with the labeled parts. The PF 3.6 treadmill offers an impressive array of features designed to make your benefit, read - For your workouts at home more enjoyable and effective. If you for selecting the revolutionary PROFORM® PF 3.6 treadmill. Accessory Tray Handrail Upright Walking Belt Foot Rail Console...
Uk Manual
Page 6
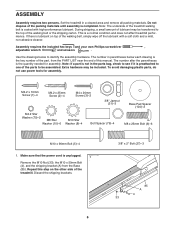
...and a mild, non-abrasive cleaner. Make sure that the power cord is preattached to one of the parts to be transferred to identify the assembly hardware. Set the treadmill in parentheses below to the top of the walking belt, simply wipe off the lubricant with high-performance ...the walking belt or the shipping carton. ASSEMBLY Assembly requires two persons. To avoid damaging plastic parts, do not use power tools for assembly. During shipping, a small amount of the treadmill. If there is completed. The number in a cleared area and remove all packing materials. Discard...
...and a mild, non-abrasive cleaner. Make sure that the power cord is preattached to one of the parts to be transferred to identify the assembly hardware. Set the treadmill in parentheses below to the top of the walking belt, simply wipe off the lubricant with high-performance ...the walking belt or the shipping carton. ASSEMBLY Assembly requires two persons. To avoid damaging plastic parts, do not use power tools for assembly. During shipping, a small amount of the treadmill. If there is completed. The number in a cleared area and remove all packing materials. Discard...
Uk Manual
Page 12
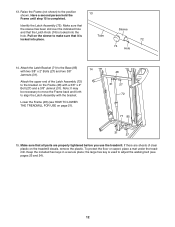
...to align the Latch Assembly with two 3/8" x 2" Bolts (27) and two 3/8" Jamnuts (31). Raise the Frame (not shown) to the bracket on the treadmill decals, remove the plastic. Have a second person hold the Frame until step 15 is used to adjust the walking belt (see HOW TO LOWER THE...) with a 3/8" x 2" Bolt (27) and a 3/8" Jamnut (31). If there are properly tightened before you use the treadmill. Make sure that the sleeve has been slid over the indicated hole and that all parts are sheets of the Latch Assembly (72) to the position 13 shown. Tube Sleeve 72 74 Hole 14.
...to align the Latch Assembly with two 3/8" x 2" Bolts (27) and two 3/8" Jamnuts (31). Raise the Frame (not shown) to the bracket on the treadmill decals, remove the plastic. Have a second person hold the Frame until step 15 is used to adjust the walking belt (see HOW TO LOWER THE...) with a 3/8" x 2" Bolt (27) and a 3/8" Jamnut (31). If there are properly tightened before you use the treadmill. Make sure that the sleeve has been slid over the indicated hole and that all parts are sheets of the Latch Assembly (72) to the position 13 shown. Tube Sleeve 72 74 Hole 14.

Uk Manual
Page 25
... a guide to find your age at a low intensity level for persons over the age of 35 or persons with 5 to make exercise a regular and enjoyable part of exercise, your physician. The pulse sensor is to 10 minutes of time. For detailed exercise information, obtain a reputable book or consult your body uses...
... a guide to find your age at a low intensity level for persons over the age of 35 or persons with 5 to make exercise a regular and enjoyable part of exercise, your physician. The pulse sensor is to 10 minutes of time. For detailed exercise information, obtain a reputable book or consult your body uses...
Uk Manual
Page 26
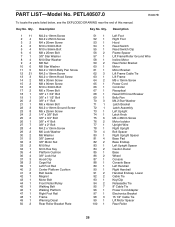
PETL40507.0 R0907B To locate the parts listed below, see the EXPLODED DRAWING near the end of this manual. Description Key No. Qty. Description 1 11 24 32 42 54 66 71 84 ... Endcap, Lower Cable Tie Key/Clip Releasable Tie 8" Cable Tie Power Cord Adapter Electronics Bracket 15 1/2" Cable Tie Lift Motor Spacer Rear Roller 26 Qty. PART LIST-Model No. Key No.
PETL40507.0 R0907B To locate the parts listed below, see the EXPLODED DRAWING near the end of this manual. Description Key No. Qty. Description 1 11 24 32 42 54 66 71 84 ... Endcap, Lower Cable Tie Key/Clip Releasable Tie 8" Cable Tie Power Cord Adapter Electronics Bracket 15 1/2" Cable Tie Lift Motor Spacer Rear Roller 26 Qty. PART LIST-Model No. Key No.
Uk Manual
Page 27
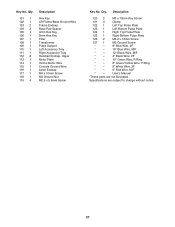
... Wire Console Ground Wire Latch Endcap M4 x 10mm Screw M4 Ground Nut M2.5 x 5.5mm Screw Key No. Qty. Specifications are not illustrated. User's Manual *These parts are subject to change without notice. 27 Description 120 2 M3 x 13mm Key Screw 121 4 Clamp 122 1 Left Top Pulse Plate 123 1 Left Bottom Pulse Plate...
... Wire Console Ground Wire Latch Endcap M4 x 10mm Screw M4 Ground Nut M2.5 x 5.5mm Screw Key No. Qty. Specifications are not illustrated. User's Manual *These parts are subject to change without notice. 27 Description 120 2 M3 x 13mm Key Screw 121 4 Clamp 122 1 Left Top Pulse Plate 123 1 Left Bottom Pulse Plate...
Uk Manual
Page 32
...where you , be prepared to conserve natural resources and improve European standards of environmental protection. Part No. 257343 R0907B Printed in municipal waste. ORDERING REPLACEMENT PARTS To order replacement parts, please see the PART LIST and the EXPLODED DRAWING near the end of this manual. To help to provide ... • the name of the product (see the front cover of this manual) • the key number and description of the part(s) (see the front cover of this manual) RECYCLING INFORMATION This electronic product must be disposed of in China © 2007 ICON IP, Inc....
...where you , be prepared to conserve natural resources and improve European standards of environmental protection. Part No. 257343 R0907B Printed in municipal waste. ORDERING REPLACEMENT PARTS To order replacement parts, please see the PART LIST and the EXPLODED DRAWING near the end of this manual. To help to provide ... • the name of the product (see the front cover of this manual) • the key number and description of the part(s) (see the front cover of this manual) RECYCLING INFORMATION This electronic product must be disposed of in China © 2007 ICON IP, Inc....


