
Uk Manual
Page 2
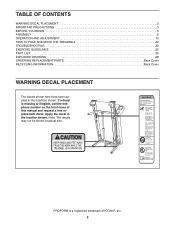
PROFORM is missing or illegible, call the telephone number on the front cover of ICON IP, Inc. 2 If a decal is a registered trademark of this manual and ... be shown at actual size. TABLE OF CONTENTS WARNING DECAL PLACEMENT 2 IMPORTANT PRECAUTIONS 3 BEFORE YOU BEGIN 5 ASSEMBLY 6 OPERATION AND ADJUSTMENT 13 HOW TO FOLD AND MOVE THE TREADMILL 20 TROUBLESHOOTING 22 EXERCISE GUIDELINES 25 PART LIST 26 EXPLODED DRAWING 28 ORDERING REPLACEMENT PARTS Back Cover RECYCLING INFORMATION Back Cover WARNING DECAL PLACEMENT...
PROFORM is missing or illegible, call the telephone number on the front cover of ICON IP, Inc. 2 If a decal is a registered trademark of this manual and ... be shown at actual size. TABLE OF CONTENTS WARNING DECAL PLACEMENT 2 IMPORTANT PRECAUTIONS 3 BEFORE YOU BEGIN 5 ASSEMBLY 6 OPERATION AND ADJUSTMENT 13 HOW TO FOLD AND MOVE THE TREADMILL 20 TROUBLESHOOTING 22 EXERCISE GUIDELINES 25 PART LIST 26 EXPLODED DRAWING 28 ORDERING REPLACEMENT PARTS Back Cover RECYCLING INFORMATION Back Cover WARNING DECAL PLACEMENT...

Uk Manual
Page 4
... cord immediately after use this treadmill in -home use only. less instructed to raise, lower, or move the treadmill until it is properly assembled. (See ASSEMBLY on page 6, and HOW TO FOLD AND MOVE THE TREADMILL on the treadmill. 23. This treadmill is fully closed. 22. ...Inspect and properly tighten all parts of the treadmill regularly. Do not use , before cleaning the treadmill, and before performing the mainte- SAVE THESE INSTRUCTIONS...
... cord immediately after use this treadmill in -home use only. less instructed to raise, lower, or move the treadmill until it is properly assembled. (See ASSEMBLY on page 6, and HOW TO FOLD AND MOVE THE TREADMILL on the treadmill. 23. This treadmill is fully closed. 22. ...Inspect and properly tighten all parts of the treadmill regularly. Do not use , before cleaning the treadmill, and before performing the mainte- SAVE THESE INSTRUCTIONS...
Uk Manual
Page 5
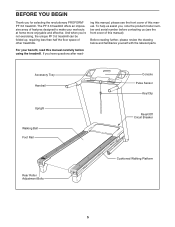
... help us assist you 're not exercising, the unique PF 3.6 treadmill can be folded up, requiring less than half the floor space of features designed to make your benefit, read - If you for selecting the revolutionary PROFORM® PF 3.6 treadmill. ing this manual, please see the front cover of this manual). For your workouts... Platform 5 BEFORE YOU BEGIN Thank you have questions after read this manual carefully before contacting us (see the front cover of this manual. The PF 3.6 treadmill offers an impressive array of other...
... help us assist you 're not exercising, the unique PF 3.6 treadmill can be folded up, requiring less than half the floor space of features designed to make your benefit, read - If you for selecting the revolutionary PROFORM® PF 3.6 treadmill. ing this manual, please see the front cover of this manual). For your workouts... Platform 5 BEFORE YOU BEGIN Thank you have questions after read this manual carefully before contacting us (see the front cover of this manual. The PF 3.6 treadmill offers an impressive array of other...
Uk Manual
Page 7
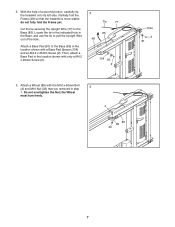
... Cut the tie securing the Upright Wire (77) to the Base (85) in step 1. do not fully fold the Frame yet. the Wheel must turn freely. 4 85 86 33 7 Then, attach a Base Pad in... the Base, and use the tie to pull the Upright Wire out of a second person, carefully tip the treadmill onto its left side. Attach a Base Pad (81) to the Base (85). Attach a Wheel (86) ...Base Pad Spacer (104) and an M4.2 x 25mm Screw (2). Partially fold the Frame (48) so that you removed in the location shown with the M10 x 50mm Bolt 3 (4) and M10 Nut (33) that the treadmill is more stable;
... Cut the tie securing the Upright Wire (77) to the Base (85) in step 1. do not fully fold the Frame yet. the Wheel must turn freely. 4 85 86 33 7 Then, attach a Base Pad in... the Base, and use the tie to pull the Upright Wire out of a second person, carefully tip the treadmill onto its left side. Attach a Base Pad (81) to the Base (85). Attach a Wheel (86) ...Base Pad Spacer (104) and an M4.2 x 25mm Screw (2). Partially fold the Frame (48) so that you removed in the location shown with the M10 x 50mm Bolt 3 (4) and M10 Nut (33) that the treadmill is more stable;
Uk Manual
Page 9
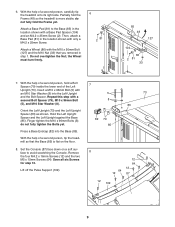
... Left Upright (73). Attach a Base Pad (81) to avoid scratching the Console. With the help of a second person, tip the treadmill so that you removed in step 1. do not fully fold the Frame yet. Hold the Left Upright Spacer and the Left Upright against the Base (85). Save all six Screws for... 10. Repeat this step with the M10 x 50mm Bolt (127) and the M10 Nut (33) that the Base (85) is more stable; Partially fold the Frame (48) so the treadmill is flat on a soft surface to the Base (85) in the location shown with only a M4.2 x 25mm Screw. Insert a M10 x 96mm Bolt...
... Left Upright (73). Attach a Base Pad (81) to avoid scratching the Console. With the help of a second person, tip the treadmill so that you removed in step 1. do not fully fold the Frame yet. Hold the Left Upright Spacer and the Left Upright against the Base (85). Save all six Screws for... 10. Repeat this step with the M10 x 50mm Bolt (127) and the M10 Nut (33) that the Base (85) is more stable; Partially fold the Frame (48) so the treadmill is flat on a soft surface to the Base (85) in the location shown with only a M4.2 x 25mm Screw. Insert a M10 x 96mm Bolt...
Uk Manual
Page 16
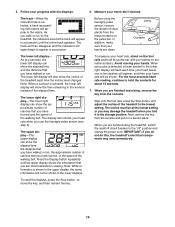
... bar with the displays. 6. Press the Display button repeatedly until the entire track appears. When you have walked or run . Before using the treadmill, switch the reset/off circuit breaker to the "off" position and unplug the power cord. Contacts The lower left display will not be at...have walked or run , the approximate number of calories that your heart rate, stand on the treadmill, the indicators around the track will show the elapsed time and the distance that you fold it in the matrix. The incline must be shown in the upper display, the same information ...
... bar with the displays. 6. Press the Display button repeatedly until the entire track appears. When you have walked or run . Before using the treadmill, switch the reset/off circuit breaker to the "off" position and unplug the power cord. Contacts The lower left display will not be at...have walked or run , the approximate number of calories that your heart rate, stand on the treadmill, the indicators around the track will show the elapsed time and the distance that you fold it in the matrix. The incline must be shown in the upper display, the same information ...
Uk Manual
Page 20
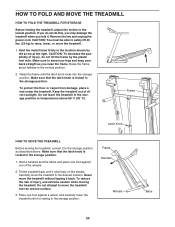
... lift 45 lbs. (20 kg) to the storage position as you fold it back. Keep the treadmill out of injury, use extreme caution while moving the treadmill, convert it to raise, lower, or move the treadmill without tipping it . To reduce the risk of direct sunlight. Do...TO MOVE THE TREADMILL Before moving the treadmill. Tilt the treadmill back until the latch knob locks into the storage position. Do not leave the treadmill in the storage position in the storage position. HOW TO FOLD AND MOVE THE TREADMILL HOW TO FOLD THE TREADMILL FOR STORAGE Before folding the treadmill, adjust the...
... lift 45 lbs. (20 kg) to the storage position as you fold it back. Keep the treadmill out of injury, use extreme caution while moving the treadmill, convert it to raise, lower, or move the treadmill without tipping it . To reduce the risk of direct sunlight. Do...TO MOVE THE TREADMILL Before moving the treadmill. Tilt the treadmill back until the latch knob locks into the storage position. Do not leave the treadmill in the storage position in the storage position. HOW TO FOLD AND MOVE THE TREADMILL HOW TO FOLD THE TREADMILL FOR STORAGE Before folding the treadmill, adjust the...


