
Uk Manual
Page 1
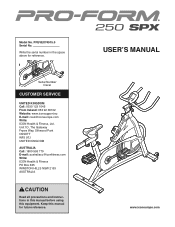
....com Write: ICON Health & Fitness PO Box 635 WINSTON HILLS NSW 2153 AUSTRALIA CAUTION Read all precautions and instructions in the space above for future reference. PFEVEX74915.0 Serial No. Serial Number Decal CUSTOMER SERVICE UNITED KINGDOM Call: 0330 123 1045 From Ireland: 053 92 36102 Website: www.iconsupport.eu E-mail: [email protected] Write: ICON Health & Fitness, Ltd. Model No. USER'S MANUAL www.iconeurope.com...
....com Write: ICON Health & Fitness PO Box 635 WINSTON HILLS NSW 2153 AUSTRALIA CAUTION Read all precautions and instructions in the space above for future reference. PFEVEX74915.0 Serial No. Serial Number Decal CUSTOMER SERVICE UNITED KINGDOM Call: 0330 123 1045 From Ireland: 053 92 36102 Website: www.iconsupport.eu E-mail: [email protected] Write: ICON Health & Fitness, Ltd. Model No. USER'S MANUAL www.iconeurope.com...
Uk Manual
Page 2
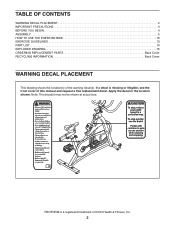
... 2 IMPORTANT PRECAUTIONS 3 BEFORE YOU BEGIN 4 ASSEMBLY 5 HOW TO USE THE EXERCISE BIKE 10 EXERCISE GUIDELINES 13 PART LIST 14 EXPLODED DRAWING 15 ORDERING REPLACEMENT PARTS Back Cover RECYCLING INFORMATION Back Cover WARNING DECAL PLACEMENT This drawing shows the location(s) of ICON Health & Fitness, Inc. 2 Apply the decal in the location shown. PROFORM is missing or illegible, see the front cover of this manual and request a free replacement decal. Note: The decal(s) may...
... 2 IMPORTANT PRECAUTIONS 3 BEFORE YOU BEGIN 4 ASSEMBLY 5 HOW TO USE THE EXERCISE BIKE 10 EXERCISE GUIDELINES 13 PART LIST 14 EXPLODED DRAWING 15 ORDERING REPLACEMENT PARTS Back Cover RECYCLING INFORMATION Back Cover WARNING DECAL PLACEMENT This drawing shows the location(s) of ICON Health & Fitness, Inc. 2 Apply the decal in the location shown. PROFORM is missing or illegible, see the front cover of this manual and request a free replacement decal. Note: The decal(s) may...
Uk Manual
Page 3
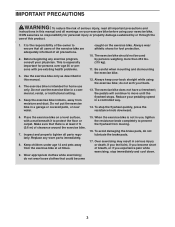
... experience pain while exercising, stop the flywheel quickly, press the resistance knob downward. 6. It is at all parts regularly. To avoid damaging the brake pads, do not arch your pedaling speed in a controlled way. 14. the pedals will continue to ensure that could become short of the owner to move until the flywheel stops. Always wear athletic shoes for home use , tighten the resistance knob completely to protect...
... experience pain while exercising, stop the flywheel quickly, press the resistance knob downward. 6. It is at all parts regularly. To avoid damaging the brake pads, do not arch your pedaling speed in a controlled way. 14. the pedals will continue to ensure that could become short of the owner to move until the flywheel stops. Always wear athletic shoes for home use , tighten the resistance knob completely to protect...
Uk Manual
Page 4
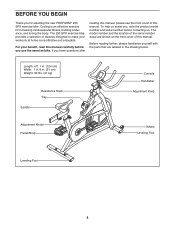
... the drawing below. To help us . Before reading further, please familiarize yourself with the parts that are shown on the front cover of this manual. The 250 SPX exercise bike provides a selection of this manual. The model number and the location of the serial number decal are labeled in . (51 cm) Weight: 90 lbs. (41 kg) Saddle Resistance Knob Tray Console Handlebar Adjustment Knob Adjustment Knobs Pedal/Strap Wheel Leveling Foot Leveling Foot 4
... the drawing below. To help us . Before reading further, please familiarize yourself with the parts that are shown on the front cover of this manual. The 250 SPX exercise bike provides a selection of this manual. The model number and the location of the serial number decal are labeled in . (51 cm) Weight: 90 lbs. (41 kg) Saddle Resistance Knob Tray Console Handlebar Adjustment Knob Adjustment Knobs Pedal/Strap Wheel Leveling Foot Leveling Foot 4
Uk Manual
Page 5
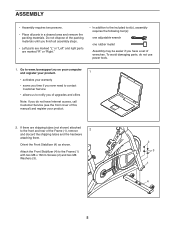
... Note: If you have Internet access, call Customer Service (see the front cover of this manual) and register your warranty • saves you time if you ever need to contact Customer Service • allows us to the included tool(s), assembly requires the following tool(s): one adjustable wrench one rubber mallet Assembly may be easier if you do not use power tools. 1.
... Note: If you have Internet access, call Customer Service (see the front cover of this manual) and register your warranty • saves you time if you ever need to contact Customer Service • allows us to the included tool(s), assembly requires the following tool(s): one adjustable wrench one rubber mallet Assembly may be easier if you do not use power tools. 1.

Uk Manual
Page 6
... adjustment holes in an adjustment hole. 6 15 6 Attach the Rear Stabilizer (5) to the desired position, release the Adjustment Knob (15) into the Saddle Post. Make sure that the Adjustment Knob is firmly engaged in the Saddle Carriage, and then tighten the Adjustment Knob. Loosen the Adjustment Knob and pull it downward. Slide the Saddle Carriage (32) to the Frame (1) with two M8 x 16mm Screws...
... adjustment holes in an adjustment hole. 6 15 6 Attach the Rear Stabilizer (5) to the desired position, release the Adjustment Knob (15) into the Saddle Post. Make sure that the Adjustment Knob is firmly engaged in the Saddle Carriage, and then tighten the Adjustment Knob. Loosen the Adjustment Knob and pull it downward. Slide the Saddle Carriage (32) to the Frame (1) with two M8 x 16mm Screws...
Uk Manual
Page 7
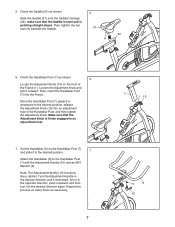
.... 31 32 A 6. Move the Handlebar Post (7) upward or downward to the Handlebar Post (7) with the Adjustment Handle (10) and an M10 Washer (9). Loosen the Adjustment Knob and pull it in the Handlebar Post, and then tighten the Adjustment Knob. Set the Handlebar (8) on the front of the Frame (1). Turn the Adjustment Handle in the desired direction, pull it downward, turn it in...
.... 31 32 A 6. Move the Handlebar Post (7) upward or downward to the Handlebar Post (7) with the Adjustment Handle (10) and an M10 Washer (9). Loosen the Adjustment Knob and pull it in the Handlebar Post, and then tighten the Adjustment Knob. Set the Handlebar (8) on the front of the Frame (1). Turn the Adjustment Handle in the desired direction, pull it downward, turn it in...

Uk Manual
Page 8
... batteries (not included); Remove the battery cover from the back of the console, and insert the batteries into the Right Crank Arm (49). Firmly tighten the Left Pedal (not shown) counterclockwise into the Left Crank Arm (not shown). IMPORTANT: If the Console has been exposed to room temperature before you may damage the console displays or other electronic components. Otherwise, you insert batteries. IMPORTANT: You must turn...
... batteries (not included); Remove the battery cover from the back of the console, and insert the batteries into the Right Crank Arm (49). Firmly tighten the Left Pedal (not shown) counterclockwise into the Left Crank Arm (not shown). IMPORTANT: If the Console has been exposed to room temperature before you may damage the console displays or other electronic components. Otherwise, you insert batteries. IMPORTANT: You must turn...
Uk Manual
Page 9
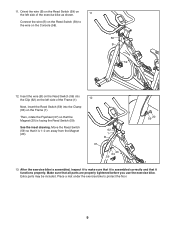
...Extra parts may be included. Place a mat under the exercise bike to make sure that it is facing the Reed Switch (59). 11. Move the Reed Switch (59) so that it is 1-2 cm away from the Magnet (20). 12 62 1 B 37 59 63 20 59 20 13. Orient the wire (B) on the Reed Switch (59...) on the left side of the exercise bike as shown. 11 Connect the wire (B) on the Reed Switch (59) to the wire on the Console (58). 58 B 59 12. Make sure that the Magnet (20) is assembled correctly and that it functions properly. Insert the wire (B) on the Reed Switch (59...
...Extra parts may be included. Place a mat under the exercise bike to make sure that it is facing the Reed Switch (59). 11. Move the Reed Switch (59) so that it is 1-2 cm away from the Magnet (20). 12 62 1 B 37 59 63 20 59 20 13. Orient the wire (B) on the Reed Switch (59...) on the left side of the exercise bike as shown. 11 Connect the wire (B) on the Reed Switch (59) to the wire on the Console (58). 58 B 59 12. Make sure that the Magnet (20) is assembled correctly and that it functions properly. Insert the wire (B) on the Reed Switch (59...
Uk Manual
Page 10
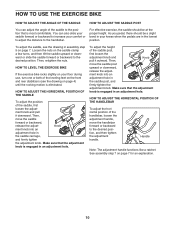
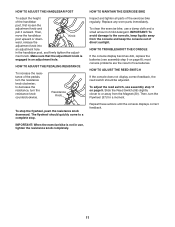
... the adjust- Then, Knob move the saddle forward or backward, release the adjust- See assembly step 7 on page 4) until the rocking motion is most comfortable. HOW TO USE THE EXERCISE BIKE HOW TO ADJUST THE ANGLE OF THE SADDLE HOW TO ADJUST THE SADDLE POST You can also slide your saddle forward or backward to increase your comfort or to adjust the distance...
... the adjust- Then, Knob move the saddle forward or backward, release the adjust- See assembly step 7 on page 4) until the rocking motion is most comfortable. HOW TO USE THE EXERCISE BIKE HOW TO ADJUST THE ANGLE OF THE SADDLE HOW TO ADJUST THE SADDLE POST You can also slide your saddle forward or backward to increase your comfort or to adjust the distance...
Uk Manual
Page 11
... ADJUST THE PEDALING RESISTANCE To increase the resistance of direct sunlight. to a complete stop the flywheel, push the resistance knob downward. HOW TO TROUBLESHOOT THE CONSOLE If the console display becomes dim, replace the batteries (see assembly step 11 on page 8); HOW TO MAINTAIN THE EXERCISE BIKE Inspect and tighten all parts of mild detergent. Then, move the handlebar post upward or down- To clean the exercise bike, use , tighten the resistance knob completely. Knob ward, release the adjustment knob...
... ADJUST THE PEDALING RESISTANCE To increase the resistance of direct sunlight. to a complete stop the flywheel, push the resistance knob downward. HOW TO TROUBLESHOOT THE CONSOLE If the console display becomes dim, replace the batteries (see assembly step 11 on page 8); HOW TO MAINTAIN THE EXERCISE BIKE Inspect and tighten all parts of mild detergent. Then, move the handlebar post upward or down- To clean the exercise bike, use , tighten the resistance knob completely. Knob ward, release the adjustment knob...
Uk Manual
Page 12
... workout, in kilometers. To set a distance goal (see step 2 on the console, remove the plastic. 1. As you exercise, the console will count down the Set button. if you reach your progress with the displays. If the pedals do not move for continuous display, press the Mode button repeatedly until zeroes appear in the display. 3. If the pedals do not move and the console buttons are finished exercising, the console will turn off automatically. Next, press the Set button...
... workout, in kilometers. To set a distance goal (see step 2 on the console, remove the plastic. 1. As you exercise, the console will count down the Set button. if you reach your progress with the displays. If the pedals do not move for continuous display, press the Mode button repeatedly until zeroes appear in the display. 3. If the pedals do not move and the console buttons are finished exercising, the console will turn off automatically. Next, press the Set button...
Uk Manual
Page 13
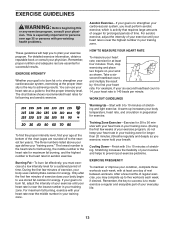
... exercise until your heart rate is especially important for 20 to plan your training zone. You can use stored fat calories for energy. Then, stop exercising and place two fingers on your heart rate as shown. WORKOUT GUIDELINES Warming Up-Start with 5 to strengthen your body uses carbohydrate calories for energy. If your goal is to burn fat, adjust the intensity of rest between workouts...
... exercise until your heart rate is especially important for 20 to plan your training zone. You can use stored fat calories for energy. Then, stop exercising and place two fingers on your heart rate as shown. WORKOUT GUIDELINES Warming Up-Start with 5 to strengthen your body uses carbohydrate calories for energy. If your goal is to burn fat, adjust the intensity of rest between workouts...

Uk Manual
Page 14
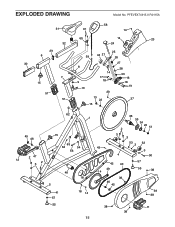
... Screw Brake Bracket Pad Crank Cap M8 x 18mm Flange Screw Left Crank Arm Bottom Bracket Right Crank Arm/Sprocket M8 x 45mm Bolt Frame Sleeve Wheel M8 Locknut M8 Nut Leveling Foot M8 x 40mm Bolt 3/8" Nut Console Reed Switch/Wire Console Bracket Bracket Screw Clip Clamp M4 x 12mm Screw Assembly Tool User's Manual Note: Specifications are not illustrated. 14 For information about ordering replacement parts, see the back cover of this manual. *These parts are subject to change...
... Screw Brake Bracket Pad Crank Cap M8 x 18mm Flange Screw Left Crank Arm Bottom Bracket Right Crank Arm/Sprocket M8 x 45mm Bolt Frame Sleeve Wheel M8 Locknut M8 Nut Leveling Foot M8 x 40mm Bolt 3/8" Nut Console Reed Switch/Wire Console Bracket Bracket Screw Clip Clamp M4 x 12mm Screw Assembly Tool User's Manual Note: Specifications are not illustrated. 14 For information about ordering replacement parts, see the back cover of this manual. *These parts are subject to change...
Uk Manual
Page 15
EXPLODED DRAWING Model No. PFEVEX74915.0 R0115A 58 31 61 14 60 14 23 32 24 29 6 30 7 15 51 51 59 44 21 25 26 8 9 10 14 17 18 20 27 28 33 16 18 19 13 22 37 15 45 46 12 2 47 32 62 1 15 64 63 54 56 48 5 41 57 55 18 18 14 15 36 2 35 34 22 13 3 3 53 3 52 43 3 4 50 42 40 14 49 57 55 38 38 46 45 39 38 38 11 38
EXPLODED DRAWING Model No. PFEVEX74915.0 R0115A 58 31 61 14 60 14 23 32 24 29 6 30 7 15 51 51 59 44 21 25 26 8 9 10 14 17 18 20 27 28 33 16 18 19 13 22 37 15 45 46 12 2 47 32 62 1 15 64 63 54 56 48 5 41 57 55 18 18 14 15 36 2 35 34 22 13 3 3 53 3 52 43 3 4 50 42 40 14 49 57 55 38 38 46 45 39 38 38 11 38
Uk Manual
Page 16
... China © 2015 ICON Health & Fitness, Inc. Part No. 369473 R0115A Printed in your local city office or the establishment where you , be prepared to conserve natural resources and improve European standards of environmental protection. ORDERING REPLACEMENT PARTS To order replacement parts, please see the PART LIST and the EXPLODED DRAWING near the end of this manual) RECYCLING INFORMATION This electronic product...
... China © 2015 ICON Health & Fitness, Inc. Part No. 369473 R0115A Printed in your local city office or the establishment where you , be prepared to conserve natural resources and improve European standards of environmental protection. ORDERING REPLACEMENT PARTS To order replacement parts, please see the PART LIST and the EXPLODED DRAWING near the end of this manual) RECYCLING INFORMATION This electronic product...

