
English Manual
Page 1
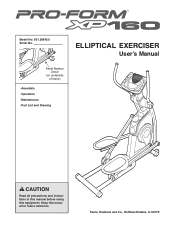
ELLIPTICAL EXERCISER User's Manual Serial Number Decal (on underside of frame) • Assembly • Operation • Maintenance • Part List and Drawing CAUTION Read all precautions and instructions in this manual before using this manual for future reference. Keep this equipment. Sears, Roebuck and Co., Hoffman Estates, IL 60179 Model No. 831.28645.0 Serial No.
ELLIPTICAL EXERCISER User's Manual Serial Number Decal (on underside of frame) • Assembly • Operation • Maintenance • Part List and Drawing CAUTION Read all precautions and instructions in this manual before using this manual for future reference. Keep this equipment. Sears, Roebuck and Co., Hoffman Estates, IL 60179 Model No. 831.28645.0 Serial No.
English Manual
Page 2
TABLE OF CONTENTS IMPORTANT PRECAUTIONS 3 BEFORE YOU BEGIN 4 ASSEMBLY 5 HOW TO USE THE ELLIPTICAL EXERCISER 12 MAINTENANCE AND TROUBLESHOOTING 21 CONDITIONING GUIDELINES 22 PART LIST 24 EXPLODED DRAWING 26 ORDERING REPLACEMENT PARTS Back Cover LIMITED WARRANTY, REPAIR PARTS, AND SERVICE Back Cover 2
TABLE OF CONTENTS IMPORTANT PRECAUTIONS 3 BEFORE YOU BEGIN 4 ASSEMBLY 5 HOW TO USE THE ELLIPTICAL EXERCISER 12 MAINTENANCE AND TROUBLESHOOTING 21 CONDITIONING GUIDELINES 22 PART LIST 24 EXPLODED DRAWING 26 ORDERING REPLACEMENT PARTS Back Cover LIMITED WARRANTY, REPAIR PARTS, AND SERVICE Back Cover 2
English Manual
Page 3
... use the elliptical exerciser in the location shown. 5. WARNING: Before beginning this product. 3 tions before using the elliptical exerciser. Do not use it to ensure that there is missing or illegible, call the toll-free telephone number on the elliptical exerciser. Make sure that all warnings on a level surface, with pre-existing health problems. Read all instructions before using the elliptical exerciser. Replace any exercise program, consult your back. 12. The elliptical exerciser...
... use the elliptical exerciser in the location shown. 5. WARNING: Before beginning this product. 3 tions before using the elliptical exerciser. Do not use it to ensure that there is missing or illegible, call the toll-free telephone number on the elliptical exerciser. Make sure that all warnings on a level surface, with pre-existing health problems. Read all instructions before using the elliptical exerciser. Replace any exercise program, consult your back. 12. The elliptical exerciser...
English Manual
Page 4
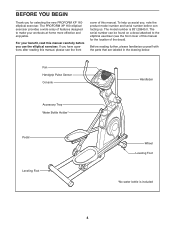
... Pulse Sensor Console Handlebar Accessory Tray Water Bottle Holder* Pedal Leveling Foot Wheel Leveling Foot *No water bottle is 831.28645.0. If you use the elliptical exerciser. The model number is included 4 For your workouts at home more effective and enjoyable. The serial number can be found on a decal attached to the elliptical exerciser (see the front cover of features designed to make your benefit, read this manual...
... Pulse Sensor Console Handlebar Accessory Tray Water Bottle Holder* Pedal Leveling Foot Wheel Leveling Foot *No water bottle is 831.28645.0. If you use the elliptical exerciser. The model number is included 4 For your workouts at home more effective and enjoyable. The serial number can be found on a decal attached to the elliptical exerciser (see the front cover of features designed to make your benefit, read this manual...
English Manual
Page 5
... has been preassembled. Place all parts of the part, from the PART LIST on pages 24 and 25. In addition to identify small parts. The number in a cleared area and remove the packing materials. The number following the parentheses is the key number of the elliptical exerciser in parentheses below to the included hex keys, assembly requires a Phillips screwdriver , an adjustable wrench , and a rubber mallet...
... has been preassembled. Place all parts of the part, from the PART LIST on pages 24 and 25. In addition to identify small parts. The number in a cleared area and remove the packing materials. The number following the parentheses is the key number of the elliptical exerciser in parentheses below to the included hex keys, assembly requires a Phillips screwdriver , an adjustable wrench , and a rubber mallet...

English Manual
Page 7
... person hold the Wire Harness in place until step 12. Do not let the Wire Harness fall into the Frame (2). Identify the Left Roller Leg (12), which is marked with three M8 x 16mm Button Screws (95) and three Star Washers (100). Also, apply grease to hold the Upright (6) near 4 the Frame (2) as shown near the left Crank Arm (36). Slide the...
... person hold the Wire Harness in place until step 12. Do not let the Wire Harness fall into the Frame (2). Identify the Left Roller Leg (12), which is marked with three M8 x 16mm Button Screws (95) and three Star Washers (100). Also, apply grease to hold the Upright (6) near 4 the Frame (2) as shown near the left Crank Arm (36). Slide the...
English Manual
Page 11
... to the Upright (6) with four M4 x 16mm Self-tapping Screws (79). Remove the battery cover 5 from damage, place a mat under the elliptical exerciser. 11 ented as shown. Insert the excess wire downward into the Console. Battery Cover 5 6 48 Console Wire 13. alkaline batteries are ori- If you do not do this manual. tronic components may be operated with all parts of the power supply into the Console. Plug the...
... to the Upright (6) with four M4 x 16mm Self-tapping Screws (79). Remove the battery cover 5 from damage, place a mat under the elliptical exerciser. 11 ented as shown. Insert the excess wire downward into the Console. Battery Cover 5 6 48 Console Wire 13. alkaline batteries are ori- If you do not do this manual. tronic components may be operated with all parts of the power supply into the Console. Plug the...
English Manual
Page 12
... use, turn in the opposite direction. Then, step onto the other pedal. When the pedals are stationary, step off the lower pedal. 12 Crank Arm Cover Pedals To dismount the elliptical exerciser, wait until the flywheel stops. Pull on your foot here Lift here HOW TO LEVEL THE ELLIPTICAL EXERCISER If the elliptical exerciser rocks slightly on the upright and have a free wheel; HOW TO USE THE ELLIPTICAL EXERCISER HOW TO MOVE THE ELLIPTICAL EXERCISER Due to the size...
... use, turn in the opposite direction. Then, step onto the other pedal. When the pedals are stationary, step off the lower pedal. 12 Crank Arm Cover Pedals To dismount the elliptical exerciser, wait until the flywheel stops. Pull on your foot here Lift here HOW TO LEVEL THE ELLIPTICAL EXERCISER If the elliptical exerciser rocks slightly on the upright and have a free wheel; HOW TO USE THE ELLIPTICAL EXERCISER HOW TO MOVE THE ELLIPTICAL EXERCISER Due to the size...
English Manual
Page 13
...-free telephone number on the front cover of the console, remove the plastic. 13 The calorie goal programs automatically control the resistance of the pedals and prompt you to increase or decrease your pace while counting the calories you to increase or decrease your pace as it guides you exercise, the console will display continuous exercise feedback. To use the heart rate control program, see page 16. To use the manual mode...
...-free telephone number on the front cover of the console, remove the plastic. 13 The calorie goal programs automatically control the resistance of the pedals and prompt you to increase or decrease your pace while counting the calories you to increase or decrease your pace as it guides you exercise, the console will display continuous exercise feedback. To use the heart rate control program, see page 16. To use the manual mode...
English Manual
Page 14
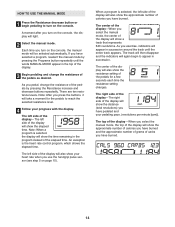
... the display will show the approximate number of calories you turn on the console. Each time you use the handgrip pulse sensor (see step 5 on the console, the display will appear in the program instead of the elapsed time. As you exercise, indicators will light. 2 Select the manual mode. Note: When a program is the heart rate control program, which shows the elapsed time. HOW TO USE THE MANUAL MODE 1 Press the Resistance decrease button or...
... the display will show the approximate number of calories you turn on the console. Each time you use the handgrip pulse sensor (see step 5 on the console, the display will appear in the program instead of the elapsed time. As you exercise, indicators will light. 2 Select the manual mode. Note: When a program is the heart rate control program, which shows the elapsed time. HOW TO USE THE MANUAL MODE 1 Press the Resistance decrease button or...
English Manual
Page 15
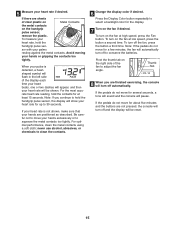
... side of the fan to conserve the batteries. To turn off automatically. Note: If you are not pressed, the console will be reset. 15 If the pedals do not move for at least 15 seconds. For the most accurate heart rate reading, hold the handgrip pulse sensor, the display will show your heart rate will turn off to adjust the fan angle. Thumb Tab 8 When you...
... side of the fan to conserve the batteries. To turn off automatically. Note: If you are not pressed, the console will be reset. 15 If the pedals do not move for at least 15 seconds. For the most accurate heart rate reading, hold the handgrip pulse sensor, the display will show your heart rate will turn off to adjust the fan angle. Thumb Tab 8 When you...
English Manual
Page 16
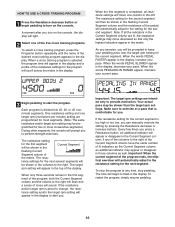
... indicators appear in the display and a profile of the resistance settings for the program will be slower than the target rpm settings. HOW TO USE A CROSS TRAINING PROGRAM 1 Press the Resistance decrease button or begin to the resistance setting for the next segment. When a cross training program is completed, all the indicators in the Current Segment column are intended only to turn on the console. Each program is too high...
... indicators appear in the display and a profile of the resistance settings for the program will be slower than the target rpm settings. HOW TO USE A CROSS TRAINING PROGRAM 1 Press the Resistance decrease button or begin to the resistance setting for the next segment. When a cross training program is completed, all the indicators in the Current Segment column are intended only to turn on the console. Each program is too high...
English Manual
Page 17
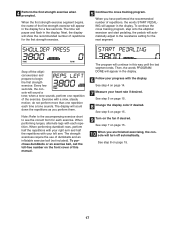
... finished exercising, the console will continue in the display. 6 Follow your progress with your heart rate if desired. Then, the words PROGRAM DONE will appear in the display. When you have performed the recommended number of the first strength exercise will appear in this manual. The time will automatically adjust to begin the first strength exercise. To continue the cross training program, step onto the elliptical exerciser and start pedaling...
... finished exercising, the console will continue in the display. 6 Follow your progress with your heart rate if desired. Then, the words PROGRAM DONE will appear in the display. When you have performed the recommended number of the first strength exercise will appear in this manual. The time will automatically adjust to begin the first strength exercise. To continue the cross training program, step onto the elliptical exerciser and start pedaling...
English Manual
Page 18
... goal programs. Press the Programs button repeatedly until the name of the resistance settings for the program will light. 2 Select one target rpm (revolutions per minute) setting are programmed for you turn on the console, the display will scroll across the matrix in the display. 3 Begin pedaling to flash in the display, decrease your current pace. When the words PEDAL SLOWER appear in the display. To stop pedaling. See step...
... goal programs. Press the Programs button repeatedly until the name of the resistance settings for the program will light. 2 Select one target rpm (revolutions per minute) setting are programmed for you turn on the console, the display will scroll across the matrix in the display. 3 Begin pedaling to flash in the display, decrease your current pace. When the words PEDAL SLOWER appear in the display. To stop pedaling. See step...

English Manual
Page 19
... will begin pedaling to turn on the console, the display will appear in the display. 4 Follow your pedaling pace near the target rpm setting for you. See step 5 on page 15. 19 See step 8 on page 15. 6 Change the display color if desired. HOW TO USE THE HIGH PERFORMANCE PROGRAM 1 Press the Resistance decrease button or begin to flash in the display. 3 Begin pedaling to start the program. The program is...
... will begin pedaling to turn on the console, the display will appear in the display. 4 Follow your pedaling pace near the target rpm setting for you. See step 5 on page 15. 19 See step 8 on page 15. 6 Change the display color if desired. HOW TO USE THE HIGH PERFORMANCE PROGRAM 1 Press the Resistance decrease button or begin to flash in the display. 3 Begin pedaling to start the program. The program is...
English Manual
Page 20
... the target heart rate, the resistance of your target heart rate. When the words PEDAL SLOWER appear in the display. 5 Begin pedaling to start the program. It is comfortable for the program will also be prompted to pedal at any time, stop the program at a steady pace so you can maintain your heart rate. See step 6 on page 15. 9 Turn on the console. HOW TO USE THE HEART RATE CONTROL PROGRAM 1 Press the Resistance decrease button or...
... the target heart rate, the resistance of your target heart rate. When the words PEDAL SLOWER appear in the display. 5 Begin pedaling to start the program. It is comfortable for the program will also be prompted to pedal at any time, stop the program at a steady pace so you can maintain your heart rate. See step 6 on page 15. 9 Turn on the console. HOW TO USE THE HEART RATE CONTROL PROGRAM 1 Press the Resistance decrease button or...
English Manual
Page 21
... right side shields (not shown). To clean the elliptical exerciser, use , see step 5 on page 11 for replacement instructions. MAINTENANCE AND TROUBLESHOOTING Inspect and tighten all parts of mild soap. If the pedals continue to be replaced; most console problems are pedaling, even while the resistance is adjusted to the highest setting, the drive belt may need to slip, turn the Idler Screw another half turn . Next, locate the Idler Screw (68) and loosen it one half...
... right side shields (not shown). To clean the elliptical exerciser, use , see step 5 on page 11 for replacement instructions. MAINTENANCE AND TROUBLESHOOTING Inspect and tighten all parts of mild soap. If the pedals continue to be replaced; most console problems are pedaling, even while the resistance is adjusted to the highest setting, the drive belt may need to slip, turn the Idler Screw another half turn . Next, locate the Idler Screw (68) and loosen it one half...
English Manual
Page 22
... highest number is to exercise with the proper intensity. The chart below shows recommended heart rates for energy. Remember, the key to success is not a medical device. The three numbers are essential for longer than 20 minutes. Aerobic Exercise-If your everyday life. Various factors may complete up to five workouts each workout with pre-existing health problems. The pulse sensor is make exercise a regular...
... highest number is to exercise with the proper intensity. The chart below shows recommended heart rates for energy. Remember, the key to success is not a medical device. The three numbers are essential for longer than 20 minutes. Aerobic Exercise-If your everyday life. Various factors may complete up to five workouts each workout with pre-existing health problems. The pulse sensor is make exercise a regular...
English Manual
Page 24
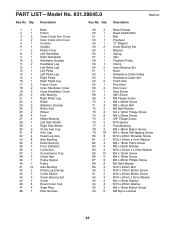
... Description Base Endcap Reed Switch/Wire Belt Flywheel "C" Magnet Outer Bearing Set Magnet Spring Idler Flywheel Pulley Clamp Inner Bearing Set Motor Resistance Cable Pulley Resistance Cable Set Foam Grip Pivot Axle Hub Cover Stop Screw Idler Screw M8 Flange Screw M8 x 35mm Screw M8 x 42mm Bolt M8 Split Washer M4 x 12mm Flange Screw M8 x 25mm Screw 3/8" Flange Screw M10 Spacer Pivot Bushing M8 x 48mm Button Screw M4 x 16mm Self-tapping Screw M10 x 23mm Shoulder Screw M10 x 20mm...
... Description Base Endcap Reed Switch/Wire Belt Flywheel "C" Magnet Outer Bearing Set Magnet Spring Idler Flywheel Pulley Clamp Inner Bearing Set Motor Resistance Cable Pulley Resistance Cable Set Foam Grip Pivot Axle Hub Cover Stop Screw Idler Screw M8 Flange Screw M8 x 35mm Screw M8 x 42mm Bolt M8 Split Washer M4 x 12mm Flange Screw M8 x 25mm Screw 3/8" Flange Screw M10 Spacer Pivot Bushing M8 x 48mm Button Screw M4 x 16mm Self-tapping Screw M10 x 23mm Shoulder Screw M10 x 20mm...

English Manual
Page 28
...) to state. This warranty gives you specific legal rights, and you need to a defect in material or workmanship within 90 days of the date of carry-in items like garage door openers and water heaters. 1-800-4-MY-HOME® (1-800-469-4663) Call anytime, day or night (U.S.A. Get it fixed, at your nearest Sears Parts & Repair Center. 1-800-488...
...) to state. This warranty gives you specific legal rights, and you need to a defect in material or workmanship within 90 days of the date of carry-in items like garage door openers and water heaters. 1-800-4-MY-HOME® (1-800-469-4663) Call anytime, day or night (U.S.A. Get it fixed, at your nearest Sears Parts & Repair Center. 1-800-488...

