
English Manual
Page 1
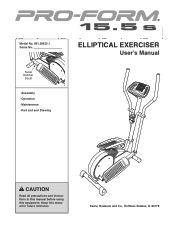
Sears, Roebuck and Co., Hoffman Estates, IL 60179 Serial Number Decal • Assembly • Operation • Maintenance • Part List and Drawing ELLIPTICAL EXERCISER User's Manual CAUTION Read all precautions and instructions in this manual before using this manual for future reference. Keep this equipment. 258868 258869 258870 258871 Model No. 831.28622.1 Serial No.
Sears, Roebuck and Co., Hoffman Estates, IL 60179 Serial Number Decal • Assembly • Operation • Maintenance • Part List and Drawing ELLIPTICAL EXERCISER User's Manual CAUTION Read all precautions and instructions in this manual before using this manual for future reference. Keep this equipment. 258868 258869 258870 258871 Model No. 831.28622.1 Serial No.
English Manual
Page 2
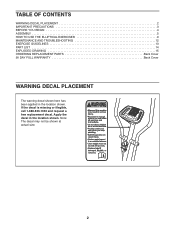
If the decal is missing or illegible, call 1-888-533-1333 and request a free replacement decal. Note: The decal may not be shown at actual size. 2 Apply the decal in the location shown. TABLE OF CONTENTS WARNING DECAL PLACEMENT 2 IMPORTANT PRECAUTIONS 3 BEFORE YOU BEGIN 4 ASSEMBLY 5 HOW TO USE THE ELLIPTICAL EXERCISER 9 MAINTENANCE AND TROUBLESHOOTING 12 EXERCISE GUIDELINES 13 PART LIST 14 EXPLODED DRAWING 15 ORDERING REPLACEMENT PARTS Back Cover 90 DAY FULL WARRANTY Back Cover WARNING DECAL PLACEMENT The warning decal shown here has been applied in the location shown.
If the decal is missing or illegible, call 1-888-533-1333 and request a free replacement decal. Note: The decal may not be shown at actual size. 2 Apply the decal in the location shown. TABLE OF CONTENTS WARNING DECAL PLACEMENT 2 IMPORTANT PRECAUTIONS 3 BEFORE YOU BEGIN 4 ASSEMBLY 5 HOW TO USE THE ELLIPTICAL EXERCISER 9 MAINTENANCE AND TROUBLESHOOTING 12 EXERCISE GUIDELINES 13 PART LIST 14 EXPLODED DRAWING 15 ORDERING REPLACEMENT PARTS Back Cover 90 DAY FULL WARRANTY Back Cover WARNING DECAL PLACEMENT The warning decal shown here has been applied in the location shown.
English Manual
Page 3
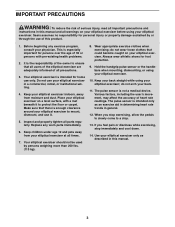
... setting. 4. Keep your back straight while using your elliptical exerciser at all parts regularly. do not arch your elliptical exerciser in this manual and all warnings on a level surface, with pre-existing health problems. 2. Do not use only. Before beginning any worn parts immediately. 6. Sears assumes no responsibility for foot protection. 9. Keep your elliptical exerciser indoors, away from your elliptical exerciser. 10. The pulse sensor is especially important for home use...
... setting. 4. Keep your back straight while using your elliptical exerciser at all parts regularly. do not arch your elliptical exerciser in this manual and all warnings on a level surface, with pre-existing health problems. 2. Do not use only. Before beginning any worn parts immediately. 6. Sears assumes no responsibility for foot protection. 9. Keep your elliptical exerciser indoors, away from your elliptical exerciser. 10. The pulse sensor is especially important for home use...
English Manual
Page 4
And the unique PROFORM 15.5 S features adjustable resistance and a simple-to-use the elliptical exerciser. tions after reading this manual, please see the back cover of this manual. The model number and the location of the serial number decal are labeled in a natural elliptical path, minimizing the impact on the front cover of this manual carefully before contacting us assist you, note the product model number and serial number before you use console to help...
And the unique PROFORM 15.5 S features adjustable resistance and a simple-to-use the elliptical exerciser. tions after reading this manual, please see the back cover of this manual. The model number and the location of the serial number decal are labeled in a natural elliptical path, minimizing the impact on the front cover of this manual carefully before contacting us assist you, note the product model number and serial number before you use console to help...

English Manual
Page 5
... rubber mallet . , adjustable As you assemble the elliptical exerciser, use the drawings below each drawing is the key number of the part, from the PART LIST near the end of this manual. Place all parts of the packing materials until assembly is missing, call 1-888-533-1333. Do not dispose of the elliptical exerciser in a cleared area and remove the packing materials. The number following the parentheses...
... rubber mallet . , adjustable As you assemble the elliptical exerciser, use the drawings below each drawing is the key number of the part, from the PART LIST near the end of this manual. Place all parts of the packing materials until assembly is missing, call 1-888-533-1333. Do not dispose of the elliptical exerciser in a cleared area and remove the packing materials. The number following the parentheses...
English Manual
Page 6
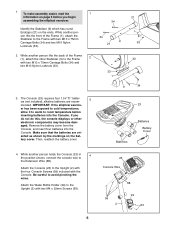
..., connect the console wire to the Frame with two M4 x 22mm Screws (63). 23 Console Wire 59 2 68 29 63 6 While another person lifts the back of the Frame (1), attach the Stabilizer to the Extension Wire (68). If you do not do this, the console displays or other Stabilizer (9) to room temperature before you begin assembling the elliptical exerciser. Then, reattach the battery cover. 23 Batteries Batteries Battery Cover...
..., connect the console wire to the Frame with two M4 x 22mm Screws (63). 23 Console Wire 59 2 68 29 63 6 While another person lifts the back of the Frame (1), attach the Stabilizer to the Extension Wire (68). If you do not do this, the console displays or other Stabilizer (9) to room temperature before you begin assembling the elliptical exerciser. Then, reattach the battery cover. 23 Batteries Batteries Battery Cover...

English Manual
Page 7
... (1). Assemble the Right Handlebar (8) and the other Handlebar Leg (5) in the position shown, connect the Extension Wire (68) to the Handlebar Leg with two M8 x 45mm Button Bolts (50) and two M8 Nylon Locknuts (38). While another person holds the Upright (2) in the same way. 8 Grease 6 55 56 69 46 50 26 47 2 38 5 Hexagonal Holes 5 7 Do not tighten the Button Bolts...
... (1). Assemble the Right Handlebar (8) and the other Handlebar Leg (5) in the position shown, connect the Extension Wire (68) to the Handlebar Leg with two M8 x 45mm Button Bolts (50) and two M8 Nylon Locknuts (38). While another person holds the Upright (2) in the same way. 8 Grease 6 55 56 69 46 50 26 47 2 38 5 Hexagonal Holes 5 7 Do not tighten the Button Bolts...

English Manual
Page 8
... tightened. Grease 25 Grease 25 11 35 40 74 76 16 11 See step 5. the Handlebar Leg must pivot freely. See step 6. Make sure that all parts of the elliptical exerciser in the Handlebar Legs (5). 9. Attach the Right Pedal (not shown) in the Upright (2). Identify the Left Pedal Leg (11), which is completed. Attach the Right Pedal Leg (not shown) to the Left Pedal Leg with a sticker. 7. Tighten the M10 x 74mm Button Bolts...
... tightened. Grease 25 Grease 25 11 35 40 74 76 16 11 See step 5. the Handlebar Leg must pivot freely. See step 6. Make sure that all parts of the elliptical exerciser in the Handlebar Legs (5). 9. Attach the Right Pedal (not shown) in the Upright (2). Identify the Left Pedal Leg (11), which is completed. Attach the Right Pedal Leg (not shown) to the Left Pedal Leg with a sticker. 7. Tighten the M10 x 74mm Button Bolts...
English Manual
Page 9
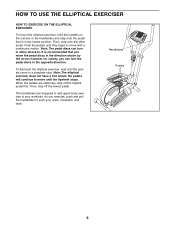
... pedals come to your arms, shoulders, and back. As you move the pedal discs in the opposite direction. HOW TO USE THE ELLIPTICAL EXERCISER HOW TO EXERCISE ON THE ELLIPTICAL EXERCISER To mount the elliptical exerciser, hold the handles on the console or the handlebars and step onto the pedal that is recommended that you exercise, push and pull the handlebars to work your workouts. Note: The pedal discs can turn...
... pedals come to your arms, shoulders, and back. As you move the pedal discs in the opposite direction. HOW TO USE THE ELLIPTICAL EXERCISER HOW TO EXERCISE ON THE ELLIPTICAL EXERCISER To mount the elliptical exerciser, hold the handles on the console or the handlebars and step onto the pedal that is recommended that you exercise, push and pull the handlebars to work your workouts. Note: The pedal discs can turn...
English Manual
Page 10
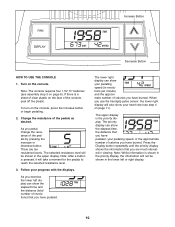
... pedaled. The lower right display can show the elapsed time and the distance (total number of clear plastic on page 11). The upper display is a sheet of revolutions) that you have burned. Change the resistance of the pedals by pressing the increase or decrease button. Turn on the console, press the increase button or begin pedaling. 2. To turn on the console. Follow your pedaling speed, or the approximate number of the console...
... pedaled. The lower right display can show the elapsed time and the distance (total number of clear plastic on page 11). The upper display is a sheet of revolutions) that you have burned. Change the resistance of the pedals by pressing the increase or decrease button. Turn on the console, press the increase button or begin pedaling. 2. To turn on the console. Follow your pedaling speed, or the approximate number of the console...
English Manual
Page 11
... conserve the batteries. 11 grips with other feedback modes. 6. Note: When you are finished exercising, the console will flash. grips, peel off the fan, press the button a third time. If there are not moved for thirty seconds, the fan will turn off to the desired angle. ed, the heart-shaped indicator in the lower right display will show your heart beats. When...
... conserve the batteries. 11 grips with other feedback modes. 6. Note: When you are finished exercising, the console will flash. grips, peel off the fan, press the button a third time. If there are not moved for thirty seconds, the fan will turn off to the desired angle. ed, the heart-shaped indicator in the lower right display will show your heart beats. When...

English Manual
Page 12
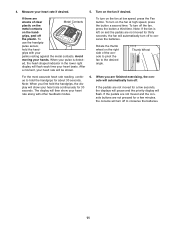
... ADJUST THE DRIVE BELT If you can feel the pedals slip while you are pedaling, even when the resistance is tight. Then, reattach the side shields. 12 MAINTENANCE AND TROUBLESHOOTING Inspect and tighten all Screws (52) from the Magnet (58) on the flywheel. BATTERY REPLACEMENT Next, see the drawing below and locate the Reed Switch (53). Remove all parts of mild dish soap. If the console display becomes dim, the batteries...
... ADJUST THE DRIVE BELT If you can feel the pedals slip while you are pedaling, even when the resistance is tight. Then, reattach the side shields. 12 MAINTENANCE AND TROUBLESHOOTING Inspect and tighten all Screws (52) from the Magnet (58) on the flywheel. BATTERY REPLACEMENT Next, see the drawing below and locate the Reed Switch (53). Remove all parts of mild dish soap. If the console display becomes dim, the batteries...
English Manual
Page 13
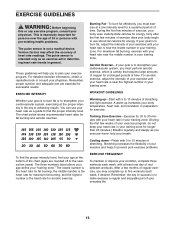
... plan your heart rate as you to five workouts each week, with pre-existing health problems. The pulse sensor is near the highest number in your cardiovascular system, exercising at a low intensity level for a sustained period of stretching and light exercise. Training Zone Exercise-Exercise for persons over the age of heart rate readings. After a few weeks of your exercise program, do not keep your heart rate in your...
... plan your heart rate as you to five workouts each week, with pre-existing health problems. The pulse sensor is near the highest number in your cardiovascular system, exercising at a low intensity level for a sustained period of stretching and light exercise. Training Zone Exercise-Exercise for persons over the age of heart rate readings. After a few weeks of your exercise program, do not keep your heart rate in your...
English Manual
Page 14
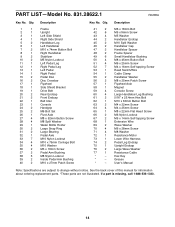
...-tapping Screw Reed Switch/Wire Cable Clamp Handlebar Washer M8 x 25mm Patch Screw Flywheel Axle Magnet Console Screw Large Handlebar Leg Bushing 5/16" x 25.4mm Hex Bolt M10 x 60mm Button Bolt M4 x 22mm Screw M4 x 25mm Screw M8 x 22mm Flat Head Screw M6 Nylon Locknut M5 x 14mm Self-tapping Screw Extension Wire Wave Washer M6 x 28mm Screw M8 Washer Resistance Motor Lower Wire Harness Pedal Leg Endcap Upright Endcap Large Wave Washer Resistance Cable Hex Key Grease User's Manual Note: Specifications are...
...-tapping Screw Reed Switch/Wire Cable Clamp Handlebar Washer M8 x 25mm Patch Screw Flywheel Axle Magnet Console Screw Large Handlebar Leg Bushing 5/16" x 25.4mm Hex Bolt M10 x 60mm Button Bolt M4 x 22mm Screw M4 x 25mm Screw M8 x 22mm Flat Head Screw M6 Nylon Locknut M5 x 14mm Self-tapping Screw Extension Wire Wave Washer M6 x 28mm Screw M8 Washer Resistance Motor Lower Wire Harness Pedal Leg Endcap Upright Endcap Large Wave Washer Resistance Cable Hex Key Grease User's Manual Note: Specifications are...
English Manual
Page 15
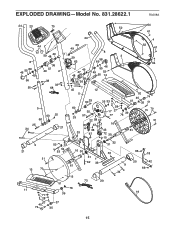
EXPLODED DRAWING-Model No. 831.28622.1 R0208A 24 23 75 64 52 41 24 4 44 6 55 69 46 49 56 50 59 48 49 36 47 49 2 38 33 68 5 60 60 25 34 25 21 26 49 29 63 8 3 56 69 49 47 48 38 45 36 55 46 49 52 50 14 52 41 64 7 45 12 5 60 25 35 33 71 52 40 74 37 35 51 60 35 25 57 22 58 42 28 17 27 39 77 76 15 70 51 65 43 16 38 43 61 33 67 72 30 10 9 21 51 13 70 52 33 54 53 16 30 31 1 62 33 61 31 32 33 9 34 66 18 20 42 66 15 73 20 51 11 71 76 39 19 28 40 27 37 74 35 15
EXPLODED DRAWING-Model No. 831.28622.1 R0208A 24 23 75 64 52 41 24 4 44 6 55 69 46 49 56 50 59 48 49 36 47 49 2 38 33 68 5 60 60 25 34 25 21 26 49 29 63 8 3 56 69 49 47 48 38 45 36 55 46 49 52 50 14 52 41 64 7 45 12 5 60 25 35 33 71 52 40 74 37 35 51 60 35 25 57 22 58 42 28 17 27 39 77 76 15 70 51 65 43 16 38 43 61 33 67 72 30 10 9 21 51 13 70 52 33 54 53 16 30 31 1 62 33 61 31 32 33 9 34 66 18 20 42 66 15 73 20 51 11 71 76 39 19 28 40 27 37 74 35 15

English Manual
Page 16
... location of carry-in China © 2008 ICON IP, Inc. and Canada) www.sears.com www.sears.ca Our Home For repair of your home or ours! This warranty gives you specific legal rights, and you need to arrange for rental purposes. This warranty does not apply when the Elliptical Exerciser is used commercially or for free repair (or replacement if repair proves impossible). For the replacement parts, accessories, and user's manuals...
... location of carry-in China © 2008 ICON IP, Inc. and Canada) www.sears.com www.sears.ca Our Home For repair of your home or ours! This warranty gives you specific legal rights, and you need to arrange for rental purposes. This warranty does not apply when the Elliptical Exerciser is used commercially or for free repair (or replacement if repair proves impossible). For the replacement parts, accessories, and user's manuals...

