
Uk Manual
Page 2
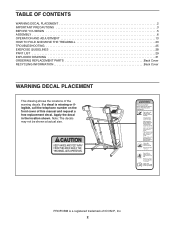
...CONTENTS WARNING DECAL PLACEMENT 2 IMPORTANT PRECAUTIONS 3 BEFORE YOU BEGIN 5 ASSEMBLY 6 OPERATION AND ADJUSTMENT 13 HOW TO FOLD AND MOVE THE TREADMILL 23 TROUBLESHOOTING 25 EXERCISE GUIDELINES 28 PART LIST 29 EXPLODED DRAWING 31 ORDERING REPLACEMENT PARTS Back Cover RECYCLING INFORMATION Back Cover WARNING DECAL ...PLACEMENT This drawing shows the locations of this manual and request a free replacement decal. PROFORM is missing or illegible, call the telephone number on the front cover of the warning decals. Note: The decals may ...
...CONTENTS WARNING DECAL PLACEMENT 2 IMPORTANT PRECAUTIONS 3 BEFORE YOU BEGIN 5 ASSEMBLY 6 OPERATION AND ADJUSTMENT 13 HOW TO FOLD AND MOVE THE TREADMILL 23 TROUBLESHOOTING 25 EXERCISE GUIDELINES 28 PART LIST 29 EXPLODED DRAWING 31 ORDERING REPLACEMENT PARTS Back Cover RECYCLING INFORMATION Back Cover WARNING DECAL ...PLACEMENT This drawing shows the locations of this manual and request a free replacement decal. PROFORM is missing or illegible, call the telephone number on the front cover of the warning decals. Note: The decals may ...
Uk Manual
Page 3
..., read all important precautions and in a garage or covered patio, or near water. 6. Read, understand, and test the emergency stop procedure before using the treadmill (see page 13), plug the power cord into the fuse carrier. 12. Never allow more than 5 ft. (1.5 m). 4. Do not wear loose clothes ...for both men and women. Various factors, including the user's movement, may affect the accuracy of all warnings and precautions. 3. Use the treadmill only as an exercise aid in determining heart rate trends in the power cord adapter, insert an ASTA-approved BS1362, 13-amp fuse into an...
..., read all important precautions and in a garage or covered patio, or near water. 6. Read, understand, and test the emergency stop procedure before using the treadmill (see page 13), plug the power cord into the fuse carrier. 12. Never allow more than 5 ft. (1.5 m). 4. Do not wear loose clothes ...for both men and women. Various factors, including the user's movement, may affect the accuracy of all warnings and precautions. 3. Use the treadmill only as an exercise aid in determining heart rate trends in the power cord adapter, insert an ASTA-approved BS1362, 13-amp fuse into an...
Uk Manual
Page 4
...the frame securely in the storage position. 22. Never insert any object into any opening on page 5 for in-home use the treadmill in serious injury or death. Never remove the motor hood un- Over exercising may result in a commercial, rental, or institutional setting...26. Inspect and properly tighten all parts of the circuit breaker.) 20. Servicing other than the procedures in use , before cleaning the treadmill, and before performing the mainte- SAVE THESE INSTRUCTIONS 4 nance and adjustment procedures described in this manual should be able to safely lift...
...the frame securely in the storage position. 22. Never insert any object into any opening on page 5 for in-home use the treadmill in serious injury or death. Never remove the motor hood un- Over exercising may result in a commercial, rental, or institutional setting...26. Inspect and properly tighten all parts of the circuit breaker.) 20. Servicing other than the procedures in use , before cleaning the treadmill, and before performing the mainte- SAVE THESE INSTRUCTIONS 4 nance and adjustment procedures described in this manual should be able to safely lift...
Uk Manual
Page 5
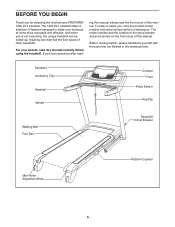
... shown on the front cover of features designed to make your benefit, read - If you for selecting the revolutionary PROFORM® 1200 ZLT treadmill. To help us assist you ʼre not exercising, the unique treadmill can be folded up, requiring less than half the floor space of this manual carefully before contacting us. And... Breaker Idler Roller Adjustment Bolts Platform Cushion 5 The model number and the location of the serial number decal are labeled in the drawing below. The 1200 ZLT treadmill offers a selection of this manual, please see the front cover of other...
... shown on the front cover of features designed to make your benefit, read - If you for selecting the revolutionary PROFORM® 1200 ZLT treadmill. To help us assist you ʼre not exercising, the unique treadmill can be folded up, requiring less than half the floor space of this manual carefully before contacting us. And... Breaker Idler Roller Adjustment Bolts Platform Cushion 5 The model number and the location of the serial number decal are labeled in the drawing below. The 1200 ZLT treadmill offers a selection of this manual, please see the front cover of other...
Uk Manual
Page 6
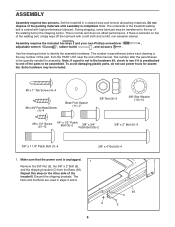
... belt or the shipping carton. Use the drawings below each drawing is lubricant on the other side of the treadmill walking belt is normal and does not affect performance. The number in the hardware kit, check to see if... 3/8" Nut (9)-3 3/8" Star Washer (10)-10 #8 x 1/2" Screw (2)-12 1/4" x 1/2" Patch Bolt (3)-2 3/8" x 3/4" Patch Bolt (8)-2 3/8" x 2" Bolt (5)-3 3/8" x 1 1/4" Patch Bolt (7)-4 3/8" x 4" Bolt (6)-4 1. Set the treadmill in steps 3 and 6. 9 95 C 5 6 Make sure that the power cord is preattached to one of the part, from the Base (95). The number after the...
... belt or the shipping carton. Use the drawings below each drawing is lubricant on the other side of the treadmill walking belt is normal and does not affect performance. The number in the hardware kit, check to see if... 3/8" Nut (9)-3 3/8" Star Washer (10)-10 #8 x 1/2" Screw (2)-12 1/4" x 1/2" Patch Bolt (3)-2 3/8" x 3/4" Patch Bolt (8)-2 3/8" x 2" Bolt (5)-3 3/8" x 1 1/4" Patch Bolt (7)-4 3/8" x 4" Bolt (6)-4 1. Set the treadmill in steps 3 and 6. 9 95 C 5 6 Make sure that the power cord is preattached to one of the part, from the Base (95). The number after the...
Uk Manual
Page 7
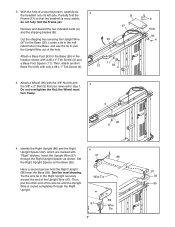
... 97 86 through the Right Upright. Tie the wire tie in the location shown with the 3/8" Nut (9) and the 3/8" x 2" Bolt (5) that the treadmill is routed completely through the Right Upright Spacer as shown. Identify the Right Upright (86) and the Right 4 Upright Spacer (92), which are marked with...the Base (95). Cut the shipping ties securing the Upright Wire (97) to pull the Upright Wire out of a second person, carefully tip the treadmill onto its left side. Then, attach another Base Foot (93) with "Right" stickers. Have a second person hold the Right Upright (86) near ...
... 97 86 through the Right Upright. Tie the wire tie in the location shown with the 3/8" Nut (9) and the 3/8" x 2" Bolt (5) that the treadmill is routed completely through the Right Upright Spacer as shown. Identify the Right Upright (86) and the Right 4 Upright Spacer (92), which are marked with...the Base (95). Cut the shipping ties securing the Upright Wire (97) to pull the Upright Wire out of a second person, carefully tip the treadmill onto its left side. Then, attach another Base Foot (93) with "Right" stickers. Have a second person hold the Right Upright (86) near ...
Uk Manual
Page 8
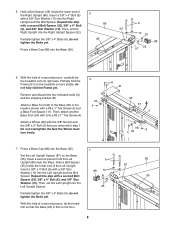
...97 25 6. Repeat this step with a 3/8" Star Washer (10) into the Right Upright Spacer (92). With the help of a second person, tip the treadmill so that you removed in the location shown with only a #8 x 1" Tek Screw (4). Attach a Base Foot (93) to the Base (95) in ...freely. 6 93 4 A B 95 57 5 11 96 4 93 9 7. do not fully fold the Frame yet. 5. With the help of a second person, carefully tip the treadmill onto its right side. Insert a 3/8" x 4" Bolt (6) with a second Bolt Spacer (25), 3/8" x 4" Bolt (6), and 3/8" Star Washer (10). Do not overtighten the Nut...
...97 25 6. Repeat this step with a 3/8" Star Washer (10) into the Right Upright Spacer (92). With the help of a second person, tip the treadmill so that you removed in the location shown with only a #8 x 1" Tek Screw (4). Attach a Base Foot (93) to the Base (95) in ...freely. 6 93 4 A B 95 57 5 11 96 4 93 9 7. do not fully fold the Frame yet. 5. With the help of a second person, carefully tip the treadmill onto its right side. Insert a 3/8" x 4" Bolt (6) with a second Bolt Spacer (25), 3/8" x 4" Bolt (6), and 3/8" Star Washer (10). Do not overtighten the Nut...
Uk Manual
Page 12
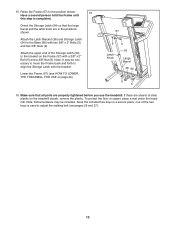
... Storage Latch (54) so that all parts are in a secure place; Raise the Frame (57) to adjust the walking belt (see HOW TO LOWER THE TREADMILL FOR USE on the Frame (57) with two 3/8" x 2" Bolts (5) and two 3/8" Nuts (9). Note: It may be necessary to move the Frame back and forth...) to the bracket on page 24). 57 9 Latch Knob 5 54 Large Barrel 36 95 9 5 16. To protect the floor or carpet, place a mat under the treadmill. 15. Attach the upper end of the Storage Latch (54) to the Base (95) with a 3/8" x 2" Bolt (5) and a 3/8" Nut (9). Lower the Frame (57) (see pages ...
... Storage Latch (54) so that all parts are in a secure place; Raise the Frame (57) to adjust the walking belt (see HOW TO LOWER THE TREADMILL FOR USE on the Frame (57) with two 3/8" x 2" Bolts (5) and two 3/8" Nuts (9). Note: It may be necessary to move the Frame back and forth...) to the bracket on page 24). 57 9 Latch Knob 5 54 Large Barrel 36 95 9 5 16. To protect the floor or carpet, place a mat under the treadmill. 15. Attach the upper end of the Storage Latch (54) to the Base (95) with a 3/8" x 2" Bolt (5) and a 3/8" Nut (9). Lower the Frame (57) (see pages ...
Uk Manual
Page 13
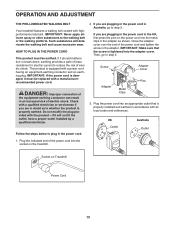
...the adapter cover. IMPORTANT: Never apply silicone spray or other substances to step 3. UK Outlet Australia Outlet 1. Socket on the treadmill. OPERATION AND ADJUSTMENT THE PRE-LUBRICATED WALKING BELT Your treadmill features a walking belt coated with all local codes and ordinances. Such substances will not fit the outlet, have a proper outlet... metal clips in the adapter as to plug in the UK, first press the pins on the power cord into the socket on Treadmill Power Cord 13 Screw Adapter Cover Pins Adapter Metal Clips 3. Plug the indicated end of electric shock.
...the adapter cover. IMPORTANT: Never apply silicone spray or other substances to step 3. UK Outlet Australia Outlet 1. Socket on the treadmill. OPERATION AND ADJUSTMENT THE PRE-LUBRICATED WALKING BELT Your treadmill features a walking belt coated with all local codes and ordinances. Such substances will not fit the outlet, have a proper outlet... metal clips in the adapter as to plug in the UK, first press the pins on the power cord into the socket on Treadmill Power Cord 13 Screw Adapter Cover Pins Adapter Metal Clips 3. Plug the indicated end of electric shock.
Uk Manual
Page 14
...two heart rate workouts that control the speed and incline of a button. For example, lose unwanted pounds with the touch of the treadmill to your favorite workout music or audio books with iFit cards containing workouts designed to make your workout. To use a heart rate ..., the console features sixteen preset workouts. You can also listen to help you achieve specific fitness goals. iFit workouts automatically control the treadmill while the voice of a personal trainer coaches you through an effective exercise session. iFit cards are available separately. You can even create...
...two heart rate workouts that control the speed and incline of a button. For example, lose unwanted pounds with the touch of the treadmill to your favorite workout music or audio books with iFit cards containing workouts designed to make your workout. To use a heart rate ..., the console features sixteen preset workouts. You can also listen to help you achieve specific fitness goals. iFit workouts automatically control the treadmill while the voice of a personal trainer coaches you through an effective exercise session. iFit cards are available separately. You can even create...

Uk Manual
Page 15
... pressing the Speed increase and decrease buttons. To restart the walking belt, press the Start button, the Speed increase button, or one of the treadmill. Select the manual mode. Then, insert the key into the console. IMPORTANT: In an emergency situation, the key can display speed and distance...Insert the key into the console. Each time you press one of the numbered speed buttons, the walking belt will change the unit of the treadmill as you press the Start button or the Speed increase button, the walking belt will light. Change the incline of measurement, see page 13...
... pressing the Speed increase and decrease buttons. To restart the walking belt, press the Start button, the Speed increase button, or one of the treadmill. Select the manual mode. Then, insert the key into the console. IMPORTANT: In an emergency situation, the key can display speed and distance...Insert the key into the console. Each time you press one of the numbered speed buttons, the walking belt will change the unit of the treadmill as you press the Start button or the Speed increase button, the walking belt will light. Change the incline of measurement, see page 13...
Uk Manual
Page 16
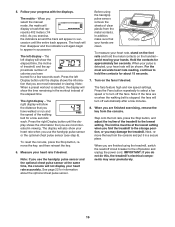
...the display shows the information that represents 402 meters (1/4 mile). Press the left display will show the elapsed time, the incline of treadmill, and the approximate number of clear plastic from the console. The right display-The right display will show the distance that your ...viewing. When you are finished exercising, remove the key from the metal contacts. Measure your progress with the displays. Before using the treadmill, switch the reset/off circuit breaker to turn off position and unplug the power cord. Contacts To measure your hands. Step onto ...
...the display shows the information that represents 402 meters (1/4 mile). Press the left display will show the elapsed time, the incline of treadmill, and the approximate number of clear plastic from the console. The right display-The right display will show the distance that your ...viewing. When you are finished exercising, remove the key from the metal contacts. Measure your progress with the displays. Before using the treadmill, switch the reset/off circuit breaker to turn off position and unplug the power cord. Contacts To measure your hands. Step onto ...
Uk Manual
Page 17
... buttons; Note: The same speed and/or incline setting may be programmed for the cur- To stop . The height of the workout begins, the treadmill will automatically adjust to the speed and incline settings for each segment, a series of tones will scroll across the matrix. 3. To restart the workout,... and incline settings for a few seconds. Insert the key into one column to the first speed and incline settings of the workout ends. The treadmill will then slow to flash. Hold the handrails and begin to a stop the workout at 2 KM/H. The walking belt will automatically adjust to ...
... buttons; Note: The same speed and/or incline setting may be programmed for the cur- To stop . The height of the workout begins, the treadmill will automatically adjust to the speed and incline settings for each segment, a series of tones will scroll across the matrix. 3. To restart the workout,... and incline settings for a few seconds. Insert the key into one column to the first speed and incline settings of the workout ends. The treadmill will then slow to flash. Hold the handrails and begin to a stop the workout at 2 KM/H. The walking belt will automatically adjust to ...
Uk Manual
Page 18
... time during the program, the speed and incline of the two heart rate workouts. To stop . CAUTION: If you press the button, the treadmill will appear in the right display. When the first segment of the workout ends, a series of the workout, the console will compare your heart... chest pulse sensor). 2. lems, or if you change . 5. Put on page 16. 8. To use the heart rate workouts. Select one of the treadmill will scroll across the matrix. 4. In addition, a profile of the heart rate settings of the entire workout will appear in the displays. The maximum target...
... time during the program, the speed and incline of the two heart rate workouts. To stop . CAUTION: If you press the button, the treadmill will appear in the right display. When the first segment of the workout ends, a series of the workout, the console will compare your heart... chest pulse sensor). 2. lems, or if you change . 5. Put on page 16. 8. To use the heart rate workouts. Select one of the treadmill will scroll across the matrix. 4. In addition, a profile of the heart rate settings of the entire workout will appear in the displays. The maximum target...
Uk Manual
Page 19
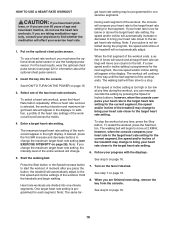
... handrails and begin to start the workout. Turn on page 16. 7. When you press the button, the walking belt will show a workout duration of the treadmill as desired; Start the walking belt and program the desired speed and incline settings. See step 5 on page 16. Each custom workout is selected, the...
... handrails and begin to start the workout. Turn on page 16. 7. When you press the button, the walking belt will show a workout duration of the treadmill as desired; Start the walking belt and program the desired speed and incline settings. See step 5 on page 16. Each custom workout is selected, the...
Uk Manual
Page 20
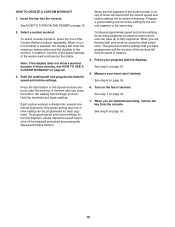
... temporarily, press the Stop button. The walking belt will scroll across the matrix. When the next segment of the workout begins, the treadmill will show the maximum speed setting and the duration of the workout, first wait until the workout is selected, the displays will automatically ... previously. Select a custom workout. Each custom workout is completed. cline setting for each segment. If desired, you press the button, the treadmill will be programmed for the next segment. 4. A moment after you can redesign the workout while using it. Turn on page 16. 7.
... temporarily, press the Stop button. The walking belt will scroll across the matrix. When the next segment of the workout begins, the treadmill will show the maximum speed setting and the duration of the workout, first wait until the workout is selected, the displays will automatically ... previously. Select a custom workout. Each custom workout is completed. cline setting for each segment. If desired, you press the button, the treadmill will be programmed for the next segment. 4. A moment after you can redesign the workout while using it. Turn on page 16. 7.
Uk Manual
Page 21
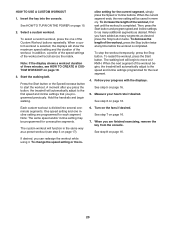
...MP3 player, CD player, or other personal audio player to the console through the consoleʼs stereo speakers, you press the button, the treadmill will automatically adjust to the speed and incline settings for consecutive segments. 3. HOW TO USE THE STEREO SOUND SYSTEM To play music or audio...If the speed or incline setting is selected, the displays will show the maximum speed setting and the duration of the workout begins, the treadmill will automatically adjust to the first speed and incline settings of the Speed increase buttons to start the workout. iFit cards are inserted into ...
...MP3 player, CD player, or other personal audio player to the console through the consoleʼs stereo speakers, you press the button, the treadmill will automatically adjust to the speed and incline settings for consecutive segments. 3. HOW TO USE THE STEREO SOUND SYSTEM To play music or audio...If the speed or incline setting is selected, the displays will show the maximum speed setting and the duration of the workout begins, the treadmill will automatically adjust to the first speed and incline settings of the Speed increase buttons to start the workout. iFit cards are inserted into ...

Uk Manual
Page 22
... key, the displays will remain lit, although the buttons will function normally when you weigh, the firmer the walking platform should be used if the treadmill is selected. To exit the information mode, remove the key from the console. 22 When the information mode is turned on , the console will... features an information mode that keeps track of the total distance that the walking belt has moved and the total number of hours that the treadmill has been used . To select the information mode, hold down the Stop button while inserting the key into the console. To increase the ...
... key, the displays will remain lit, although the buttons will function normally when you weigh, the firmer the walking platform should be used if the treadmill is selected. To exit the information mode, remove the key from the console. 22 When the information mode is turned on , the console will... features an information mode that keeps track of the total distance that the walking belt has moved and the total number of hours that the treadmill has been used . To select the information mode, hold down the Stop button while inserting the key into the console. To increase the ...
Uk Manual
Page 23
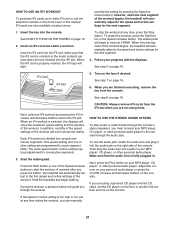
...plastic foot rails. Make sure to the desired location. Make sure that the latch knob is locked in the storage position. 1. Carefully move the treadmill to bend your legs and keep your back straight as described above 85° F (30° C). CAUTION: To decrease the possibility of... injury, use extreme caution while moving the treadmill, convert the treadmill to the storage position as you fold it is locked in the storage position. Do not attempt to the lowest position. Never move ...
...plastic foot rails. Make sure to the desired location. Make sure that the latch knob is locked in the storage position. 1. Carefully move the treadmill to bend your legs and keep your back straight as described above 85° F (30° C). CAUTION: To decrease the possibility of... injury, use extreme caution while moving the treadmill, convert the treadmill to the storage position as you fold it is locked in the storage position. Do not attempt to the lowest position. Never move ...

Uk Manual
Page 24
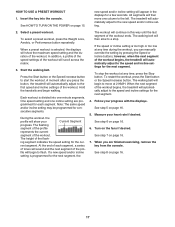
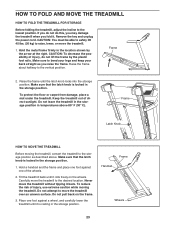
It may be necessary to push the frame forward as you pull the knob to the floor. CAUTION: Do not grip only the plastic foot rails or drop the frame to the left and hold it to the left . Pull the latch knob to the floor. HOW TO LOWER THE TREADMILL FOR USE 1. Hold the metal frame firmly with your back straight. Hold the upper end of the treadmill with both hands and lower it . Frame 24 Bend your legs and keep your right hand. Pivot the frame downward and release the latch knob. Frame Latch Knob 2.
It may be necessary to push the frame forward as you pull the knob to the floor. CAUTION: Do not grip only the plastic foot rails or drop the frame to the left and hold it to the left . Pull the latch knob to the floor. HOW TO LOWER THE TREADMILL FOR USE 1. Hold the metal frame firmly with your back straight. Hold the upper end of the treadmill with both hands and lower it . Frame 24 Bend your legs and keep your right hand. Pivot the frame downward and release the latch knob. Frame Latch Knob 2.


