

Uk Manual
Page 1
... Group PLC, Express Way Whitwood, West Yorkshire WF10 5QJ UK In Australia: Please contact the store where you have questions, or if there are missing parts, please contact us: Call: 08457 089 009 From Ireland: 053 92 36102 E-mail: www.iconsupport.eu Write: ICON Health & Fitness, Ltd. Model No...
... Group PLC, Express Way Whitwood, West Yorkshire WF10 5QJ UK In Australia: Please contact the store where you have questions, or if there are missing parts, please contact us: Call: 08457 089 009 From Ireland: 053 92 36102 E-mail: www.iconsupport.eu Write: ICON Health & Fitness, Ltd. Model No...
Uk Manual
Page 2
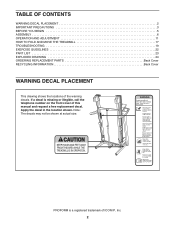
PROFORM is missing or illegible, call the telephone number on the front cover of this manual and request a free replacement decal. Note: The decals may not ... DECAL PLACEMENT 2 IMPORTANT PRECAUTIONS 3 BEFORE YOU BEGIN 5 ASSEMBLY 6 OPERATION AND ADJUSTMENT 11 HOW TO FOLD AND MOVE THE TREADMILL 17 TROUBLESHOOTING 19 EXERCISE GUIDELINES 22 PART LIST 23 EXPLODED DRAWING 24 ORDERING REPLACEMENT PARTS Back Cover RECYCLING INFORMATION Back Cover WARNING DECAL PLACEMENT This drawing shows the locations of ICON IP, Inc. 2 Apply...
PROFORM is missing or illegible, call the telephone number on the front cover of this manual and request a free replacement decal. Note: The decals may not ... DECAL PLACEMENT 2 IMPORTANT PRECAUTIONS 3 BEFORE YOU BEGIN 5 ASSEMBLY 6 OPERATION AND ADJUSTMENT 11 HOW TO FOLD AND MOVE THE TREADMILL 17 TROUBLESHOOTING 19 EXERCISE GUIDELINES 22 PART LIST 23 EXPLODED DRAWING 24 ORDERING REPLACEMENT PARTS Back Cover RECYCLING INFORMATION Back Cover WARNING DECAL PLACEMENT This drawing shows the locations of ICON IP, Inc. 2 Apply...

Uk Manual
Page 4
... performed by an authorized service representative. DANGER: 24. Always unplug the power cord immediately after use, before cleaning the treadmill, and before performing the maintenance and adjustment procedures described in this manual. Never remove the motor hood unless instructed to ... in a commercial, rental, or institutional setting. 26. Inspect and properly tighten all parts of the treadmill regularly. SAVE THESE INSTRUCTIONS 4 This treadmill is intended for in-home use this treadmill in serious injury or death. Do not attempt to raise, lower, or move the...
... performed by an authorized service representative. DANGER: 24. Always unplug the power cord immediately after use, before cleaning the treadmill, and before performing the maintenance and adjustment procedures described in this manual. Never remove the motor hood unless instructed to ... in a commercial, rental, or institutional setting. 26. Inspect and properly tighten all parts of the treadmill regularly. SAVE THESE INSTRUCTIONS 4 This treadmill is intended for in-home use this treadmill in serious injury or death. Do not attempt to raise, lower, or move the...
Uk Manual
Page 5
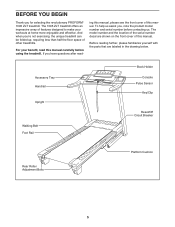
...this manual. And when you have questions after read this manual carefully before contacting us assist you for selecting the revolutionary PROFORM® 1095 ZLT treadmill. Accessory Tray Handrail Upright Walking Belt Foot Rail Book Holder Console Pulse Sensor Key/Clip Reset/Off Circuit Breaker Rear ... are labeled in the drawing below. The 1095 ZLT treadmill offers an impressive array of this manual. To help us . For your workouts at home more enjoyable and effective. Before reading further, please familiarize yourself with the parts that are shown on the front cover of...
...this manual. And when you have questions after read this manual carefully before contacting us assist you for selecting the revolutionary PROFORM® 1095 ZLT treadmill. Accessory Tray Handrail Upright Walking Belt Foot Rail Book Holder Console Pulse Sensor Key/Clip Reset/Off Circuit Breaker Rear ... are labeled in the drawing below. The 1095 ZLT treadmill offers an impressive array of this manual. To help us . For your workouts at home more enjoyable and effective. Before reading further, please familiarize yourself with the parts that are shown on the front cover of...
Uk Manual
Page 6
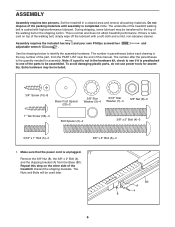
... wipe off the lubricant with high-performance lubricant. Repeat this manual. If there is the key number of the parts to the top of this step on top of the treadmill. Make sure that the power cord is completed. The Nuts and Bolts will be transferred to be included. 3/4"... kit, check to see if it is normal and does not affect treadmill performance. Extra hardware may be used later. 8 80 A 4 6 ASSEMBLY Assembly requires two persons. Set the treadmill in parentheses below to one of the part, from the Base (80). Assembly requires the included hex key and ...
... wipe off the lubricant with high-performance lubricant. Repeat this manual. If there is the key number of the parts to the top of this step on top of the treadmill. Make sure that the power cord is completed. The Nuts and Bolts will be transferred to be included. 3/4"... kit, check to see if it is normal and does not affect treadmill performance. Extra hardware may be used later. 8 80 A 4 6 ASSEMBLY Assembly requires two persons. Set the treadmill in parentheses below to one of the part, from the Base (80). Assembly requires the included hex key and ...
Uk Manual
Page 10
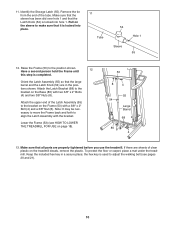
Raise the Frame (53) to make sure that the large barrel and the Latch Knob (54) are properly tightened before you use the treadmill. Have a second person hold the Frame until 12 this step is locked into place. 11 Tube 54 Hole 1 Sleeve 55 12. If there are sheets ... plastic on page 18). 53 8 4 55 54 Large Barrel 68 80 8 4 13. Make sure that the sleeve has been slid over hole 1 and that all parts are in a secure place; Lower the Frame (53) (see pages 20 and 21). 10 Remove the tie from the end of the Latch Assembly (55...
Raise the Frame (53) to make sure that the large barrel and the Latch Knob (54) are properly tightened before you use the treadmill. Have a second person hold the Frame until 12 this step is locked into place. 11 Tube 54 Hole 1 Sleeve 55 12. If there are sheets ... plastic on page 18). 53 8 4 55 54 Large Barrel 68 80 8 4 13. Make sure that the sleeve has been slid over hole 1 and that all parts are in a secure place; Lower the Frame (53) (see pages 20 and 21). 10 Remove the tie from the end of the Latch Assembly (55...
Uk Manual
Page 22
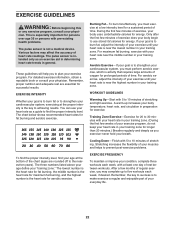
... aid in determining heart rate trends in preparation for prolonged periods of heart rate readings. Cooling Down-Finish with 5 to make exercise a regular and enjoyable part of stretching. Remember, the key to success is not a medical device. These guidelines will help you may affect the accuracy of time. WORKOUT GUIDELINES Warming...
... aid in determining heart rate trends in preparation for prolonged periods of heart rate readings. Cooling Down-Finish with 5 to make exercise a regular and enjoyable part of stretching. Remember, the key to success is not a medical device. These guidelines will help you may affect the accuracy of time. WORKOUT GUIDELINES Warming...
Uk Manual
Page 23
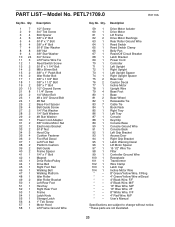
... Wire, F/F 4" Black Wire, M/F 10" Blue Wire, M/F 10" Blue Wire, 2F 8" White Wire, F/F 4" Red Wire, M/F Userʼs Manual Specifications are subject to change without notice. *These parts are not illustrated. 23 Qty. 59 1 60 1 61 1 62 2 63 1 64 1 65 1 66 1 67 1 68 1 69 1 70 1 71 1 72 1 73 1 74 1 75 2 76 2 77 1 78... 4 80 1 81 2 82 1 83 7 84 1 85 1 86 1 87 1 88 1 89 1 90 1 91 1 92 1 93 1 94 1 95 1 96 1 97 1 98 1 99 1 100 1 101 1 102 1 103 1 104 1 * - * - * - * - * - * - * - * - * - PART LIST-Model No.
... Wire, F/F 4" Black Wire, M/F 10" Blue Wire, M/F 10" Blue Wire, 2F 8" White Wire, F/F 4" Red Wire, M/F Userʼs Manual Specifications are subject to change without notice. *These parts are not illustrated. 23 Qty. 59 1 60 1 61 1 62 2 63 1 64 1 65 1 66 1 67 1 68 1 69 1 70 1 71 1 72 1 73 1 74 1 75 2 76 2 77 1 78... 4 80 1 81 2 82 1 83 7 84 1 85 1 86 1 87 1 88 1 89 1 90 1 91 1 92 1 93 1 94 1 95 1 96 1 97 1 98 1 99 1 100 1 101 1 102 1 103 1 104 1 * - * - * - * - * - * - * - * - * - PART LIST-Model No.

Uk Manual
Page 28
... cover of this manual) • the name of the product (see the front cover of this manual) • the key number and description of the part(s) (see the front cover of this manual. Please use recycling facilities that are authorized to collect this product must not be recycled after its useful.... In doing so, you purchased this manual) RECYCLING INFORMATION This electronic product must be disposed of in China © 2010 ICON IP, Inc. ORDERING REPLACEMENT PARTS To order replacement parts, see the PART LIST and the EXPLODED DRAWING near the end of this product...
... cover of this manual) • the name of the product (see the front cover of this manual) • the key number and description of the part(s) (see the front cover of this manual. Please use recycling facilities that are authorized to collect this product must not be recycled after its useful.... In doing so, you purchased this manual) RECYCLING INFORMATION This electronic product must be disposed of in China © 2010 ICON IP, Inc. ORDERING REPLACEMENT PARTS To order replacement parts, see the PART LIST and the EXPLODED DRAWING near the end of this product...


