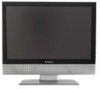
User Guide
Page 2
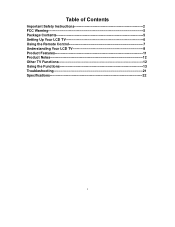
Table of Contents Important Safety Instructions 2 FCC Warning 5 Package Contents 5 Setting Up Your LCD TV 6 Using the Remote Control 7 Understanding Your LCD TV 8 Product Features 11 Product Notes 12 Other TV Functions 12 Using the Functions 13 Troubleshooting 21 Specifications 22 1
Table of Contents Important Safety Instructions 2 FCC Warning 5 Package Contents 5 Setting Up Your LCD TV 6 Using the Remote Control 7 Understanding Your LCD TV 8 Product Features 11 Product Notes 12 Other TV Functions 12 Using the Functions 13 Troubleshooting 21 Specifications 22 1
User Guide
Page 3
... in the instructions must be observed closely. 4. Improper adjustment of fire or electric shock. 9. For added protection for this can result in a risk of controls not described in the product, and inserting an object can cause damage, which often requires extensive adjustment work by a listed power supply indicated on safety. b. c. When the product does not operate properly as power-supply cord or plug is...
... in the instructions must be observed closely. 4. Improper adjustment of fire or electric shock. 9. For added protection for this can result in a risk of controls not described in the product, and inserting an object can cause damage, which often requires extensive adjustment work by a listed power supply indicated on safety. b. c. When the product does not operate properly as power-supply cord or plug is...

User Guide
Page 4
... heat. 21. Therefore, it can block ventilation openings. f. When the product displays an abnormal condition or exhibits a distinct change in accordance with the apparatus. Any noticeable abnormality in proper operating condition. Replacement parts---In case the product needs replacement parts, make sure that the product needs servicing. 12. Use of time. Safety checks---Upon completion of glass. Do not place the product...
... heat. 21. Therefore, it can block ventilation openings. f. When the product displays an abnormal condition or exhibits a distinct change in accordance with the apparatus. Any noticeable abnormality in proper operating condition. Replacement parts---In case the product needs replacement parts, make sure that the product needs servicing. 12. Use of time. Safety checks---Upon completion of glass. Do not place the product...
User Guide
Page 5
... symbol indicates important instructions accompanying the product. A grounding-type plug has two blades and a third grounding prong. Caution: To reduce the risk of the obsolete outlet. Please note that presents a risk of fire or electric shock, do not remove cover (or back). Pixel defect---The LCD panel is used as a fixed point of your safety. No user serviceable parts inside the...
... symbol indicates important instructions accompanying the product. A grounding-type plug has two blades and a third grounding prong. Caution: To reduce the risk of the obsolete outlet. Please note that presents a risk of fire or electric shock, do not remove cover (or back). Pixel defect---The LCD panel is used as a fixed point of your safety. No user serviceable parts inside the...
User Guide
Page 6
...user's authority to operate the equipment. This equipment generates, uses, and can be used in accordance with the instructions, may find the following measures: 1) Reorient or relocate the receiving antenna. 2) Increase the separation between the equipment and unit. 3) Connect... particular installation. PACKAGE CONTENTS LCD TV 1 Audio cord 1 User manual 1 Video cord 1 Quick start guide 1 Component cable 1 Remote control 1 AAA batteries 2 Remote control guide 1 Warranty Card 1 AC power cord 1 5 FCC Warning Class B Computing Device Information to User This equipment...
...user's authority to operate the equipment. This equipment generates, uses, and can be used in accordance with the instructions, may find the following measures: 1) Reorient or relocate the receiving antenna. 2) Increase the separation between the equipment and unit. 3) Connect... particular installation. PACKAGE CONTENTS LCD TV 1 Audio cord 1 User manual 1 Video cord 1 Quick start guide 1 Component cable 1 Remote control 1 AAA batteries 2 Remote control guide 1 Warranty Card 1 AC power cord 1 5 FCC Warning Class B Computing Device Information to User This equipment...
User Guide
Page 7
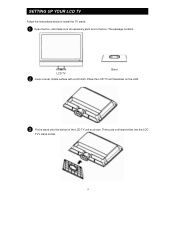
SETTING UP YOUR LCD TV Follow the instructions below to install the TV stand: 1 Open the box, and make sure all necessary parts are in the box: The package contains: LCD TV Stand 2 Cover a level, stable surface with a soft cloth. Place the LCD TV unit facedown on the cloth. 3 Fit the stand onto the bottom of the LCD TV unit as shown. Then push until stand clicks into the LCD TV's stand socket. 6
SETTING UP YOUR LCD TV Follow the instructions below to install the TV stand: 1 Open the box, and make sure all necessary parts are in the box: The package contains: LCD TV Stand 2 Cover a level, stable surface with a soft cloth. Place the LCD TV unit facedown on the cloth. 3 Fit the stand onto the bottom of the LCD TV unit as shown. Then push until stand clicks into the LCD TV's stand socket. 6
User Guide
Page 8
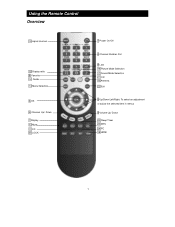
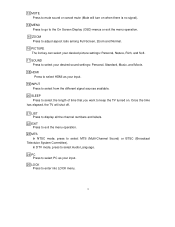
Using the Remote Control Overview 19 signal sources 15 Display ratio 8 Favorite 12 Guide 14 Menu Selection 6 OK 3 Channel Up/ Down 7 Display 13 Mute 11 CC 25 LOCK 1 Power On/Off 2 Channel Number, Dot 9 Last 16 Picture Mode Selection 17 Sound Mode Selection 21 List 10 Antenna 22 Exit 5 Up/Down/Left/Right: To select an adjustment or adjust the selected item in menus 4 Volume Up/ Down 20 Sleep Timer 23 MTS 24 PC 18 HDMI 7
Using the Remote Control Overview 19 signal sources 15 Display ratio 8 Favorite 12 Guide 14 Menu Selection 6 OK 3 Channel Up/ Down 7 Display 13 Mute 11 CC 25 LOCK 1 Power On/Off 2 Channel Number, Dot 9 Last 16 Picture Mode Selection 17 Sound Mode Selection 21 List 10 Antenna 22 Exit 5 Up/Down/Left/Right: To select an adjustment or adjust the selected item in menus 4 Volume Up/ Down 20 Sleep Timer 23 MTS 24 PC 18 HDMI 7
User Guide
Page 9
... the channel; In analog NTSC mode, edit the favorite channel in red display the sub-picture information). 8 Favorite Press to list and select the favorite channel. Remote Button Descriptions 1【 】POWER ON/OFF Press to turn on mute (when you mute the audio), Off. 12 GUIDE Press to view the Electronic Programming Guide (EPG) information in a digital program. 8 Press【Enter】 to change the channel. 4 VOL+/Press to adjust the volume. 5 Up...
... the channel; In analog NTSC mode, edit the favorite channel in red display the sub-picture information). 8 Favorite Press to list and select the favorite channel. Remote Button Descriptions 1【 】POWER ON/OFF Press to turn on mute (when you mute the audio), Off. 12 GUIDE Press to view the Electronic Programming Guide (EPG) information in a digital program. 8 Press【Enter】 to change the channel. 4 VOL+/Press to adjust the volume. 5 Up...
User Guide
Page 10
... desired sound settings: Personal, Standard, Music, and Movie. 18 HDMI Press to select HDMI as your input. 25 LOCK Press to enter into LOCK menu. 9 Once the time has elapsed, the TV will turn on . 13 MUTE Press to mute sound or cancel mute (Mute will shut off. 21 LIST Press to display all the channel numbers and labels. 22 EXIT Press to exit the menu operation. 23...
... desired sound settings: Personal, Standard, Music, and Movie. 18 HDMI Press to select HDMI as your input. 25 LOCK Press to enter into LOCK menu. 9 Once the time has elapsed, the TV will turn on . 13 MUTE Press to mute sound or cancel mute (Mute will shut off. 21 LIST Press to display all the channel numbers and labels. 22 EXIT Press to exit the menu operation. 23...
User Guide
Page 11
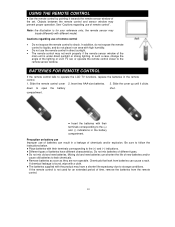
... conditions. BATTERIES FOR REMOTE CONTROL If the remote control fails to follow the instructions below. ● Place batteries with different model. Be sure to operate the LCD TV functions, replace the batteries in a leakage of the main unit is for an extended period of time, remove the batteries from batteries can result in the remote control. 1. Precaution on battery use Improper use of different types. ● Do...
... conditions. BATTERIES FOR REMOTE CONTROL If the remote control fails to follow the instructions below. ● Place batteries with different model. Be sure to operate the LCD TV functions, replace the batteries in a leakage of the main unit is for an extended period of time, remove the batteries from batteries can result in the remote control. 1. Precaution on battery use Improper use of different types. ● Do...
User Guide
Page 12
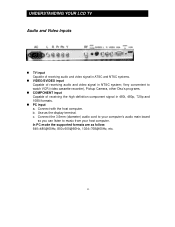
.... 11 Connect the 3.5mm (diameter) audio cord to your computer's audio main board so you can listen to watch VCR (video cassette recorder), Pickup Camera, other Disc's programs. „ COMPONENT input Capable of receiving audio and video signal in 480i, 480p, 720p and 1080i formats. „ PC input a. In PC mode the supported formats are as the display terminal. c. UNDERSTANDING YOUR LCD TV Audio and Video Inputs „ TV input Capable of receiving audio and video signal in ATSC...
.... 11 Connect the 3.5mm (diameter) audio cord to your computer's audio main board so you can listen to watch VCR (video cassette recorder), Pickup Camera, other Disc's programs. „ COMPONENT input Capable of receiving audio and video signal in 480i, 480p, 720p and 1080i formats. „ PC input a. In PC mode the supported formats are as the display terminal. c. UNDERSTANDING YOUR LCD TV Audio and Video Inputs „ TV input Capable of receiving audio and video signal in ATSC...
User Guide
Page 13
... Standby Mode if there is no signal input In TV mode, the LCD TV will automatically power off within 15 minutes and enters into the wrong input because this may not be properly installed according to view the corresponding channel. 6. Some remote control button functions may cause damage to a new location. 4. When using the component IN jacks, you can connect a set-top box or DVD to enjoy the improved audio/video quality offered by these programs...
... Standby Mode if there is no signal input In TV mode, the LCD TV will automatically power off within 15 minutes and enters into the wrong input because this may not be properly installed according to view the corresponding channel. 6. Some remote control button functions may cause damage to a new location. 4. When using the component IN jacks, you can connect a set-top box or DVD to enjoy the improved audio/video quality offered by these programs...

User Guide
Page 14
... of time to shut off the TV and shut into the Standby mode. ※ When activating the Sleep Timer Off function, press【SLEEP】to view the set sleep, press again to enable the Sleep Timer function. Unplug the power cord from the AC outlet when the power is no program signal transmitted from the TV station or no commands from the remote control). Sleep Press 【SLEEP】to reset the sleep timer...
... of time to shut off the TV and shut into the Standby mode. ※ When activating the Sleep Timer Off function, press【SLEEP】to view the set sleep, press again to enable the Sleep Timer function. Unplug the power cord from the AC outlet when the power is no program signal transmitted from the TV station or no commands from the remote control). Sleep Press 【SLEEP】to reset the sleep timer...
User Guide
Page 15
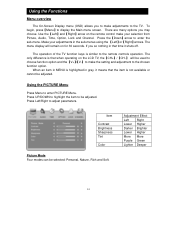
... when operating on the LCD TV, the【CH+】/【CH-】 will remain on the remote control make adjustments to the TV. Adjustment Effect Left Right Lower Higher Darker Brighter Lower Higher More More Purple Green Lighter Deeper 14 Press the【Down】arrow to display the Main menu screen. The menu display will be adjusted. Item Contrast Brightness Sharpness Tint Color Picture Mode Four modes...
... when operating on the LCD TV, the【CH+】/【CH-】 will remain on the remote control make adjustments to the TV. Adjustment Effect Left Right Lower Higher Darker Brighter Lower Higher More More Purple Green Lighter Deeper 14 Press the【Down】arrow to display the Main menu screen. The menu display will be adjusted. Item Contrast Brightness Sharpness Tint Color Picture Mode Four modes...
User Guide
Page 16
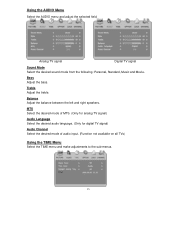
... the left and right speakers. MTS Select the desired mode of MTS. (Only for analog TV signal) Audio Language Select the desired audio language. (Only for digital TV signal) Audio Channel Select the desired mode of audio input. (Function not available on all TVs) Using the TIME Menu Select the TIME menu and make adjustments to the sub-menus. 15 Treble Adjust the treble. Bass Adjust the bass. Analog TV signal Digital TV signal Sound Mode Select the desired sound mode from the following...
... the left and right speakers. MTS Select the desired mode of MTS. (Only for analog TV signal) Audio Language Select the desired audio language. (Only for digital TV signal) Audio Channel Select the desired mode of audio input. (Function not available on all TVs) Using the TIME Menu Select the TIME menu and make adjustments to the sub-menus. 15 Treble Adjust the treble. Bass Adjust the bass. Analog TV signal Digital TV signal Sound Mode Select the desired sound mode from the following...
User Guide
Page 17
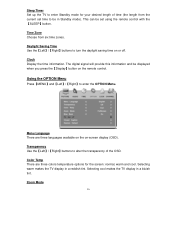
... press the【Display】button on -screen display (OSD). Time Zone Choose from the current set using the remote control with the 【SLEEP】button. Selecting cool makes the TV display in a reddish tint. Clock Display the time information. The digital signal will provide this information and be set time to enter the OPTION Menu. Sleep Timer Set up the TV to enter Standby mode for the screen: normal, warm and cool. Color Temp There are...
... press the【Display】button on -screen display (OSD). Time Zone Choose from the current set using the remote control with the 【SLEEP】button. Selecting cool makes the TV display in a reddish tint. Clock Display the time information. The digital signal will provide this information and be set time to enter the OPTION Menu. Sleep Timer Set up the TV to enter Standby mode for the screen: normal, warm and cool. Color Temp There are...
User Guide
Page 18
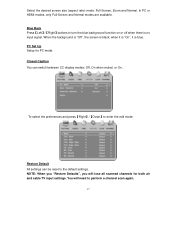
... cable TV input settings. Closed Caption You can be reset to turn the blue background function on or off when there is no input signal. When the background is "Off", the screen is blue. Off, On when muted, or On. To select the preferences and press【Right】/【Down】to enter the edit mode: Restore Default All settings can switch between CC display modes...
... cable TV input settings. Closed Caption You can be reset to turn the blue background function on or off when there is no input signal. When the background is "Off", the screen is blue. Off, On when muted, or On. To select the preferences and press【Right】/【Down】to enter the edit mode: Restore Default All settings can switch between CC display modes...
User Guide
Page 19
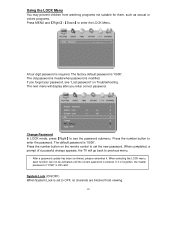
... digit password is "0000". Change Password In LOCK mode, press【Right】to set to previous menu. ※ After a password update has been confirmed, please remember it is forgotten, the master password of successful change appears, the TV will display after you forget your password, see the password submenu. Press the number button on the remote control to see "Lost password" on Troubleshooting. The factory default password is required. Press the number button to enter the LOCK Menu...
... digit password is "0000". Change Password In LOCK mode, press【Right】to set to previous menu. ※ After a password update has been confirmed, please remember it is forgotten, the master password of successful change appears, the TV will display after you forget your password, see the password submenu. Press the number button on the remote control to see "Lost password" on Troubleshooting. The factory default password is required. Press the number button to enter the LOCK Menu...
User Guide
Page 21
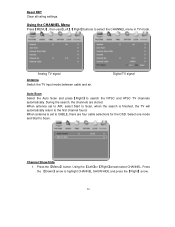
...;MENU】, then use【Left】/【Right】buttons to search the NTSC and ATSC TV channels automatically. Using the 【Left】or 【Right】arrows select CHANNEL. Analog TV signal Antenna Switch the TV input mode between cable and air. Digital TV signal Auto Scan Select the Auto Scan and press【Right】to select the CHANNEL menu in TV mode. Press the 【Menu】 button. Channel Show/Hide 1. Reset RRT Clear all rating settings...
...;MENU】, then use【Left】/【Right】buttons to search the NTSC and ATSC TV channels automatically. Using the 【Left】or 【Right】arrows select CHANNEL. Analog TV signal Antenna Switch the TV input mode between cable and air. Digital TV signal Auto Scan Select the Auto Scan and press【Right】to select the CHANNEL menu in TV mode. Press the 【Menu】 button. Channel Show/Hide 1. Reset RRT Clear all rating settings...
User Guide
Page 23
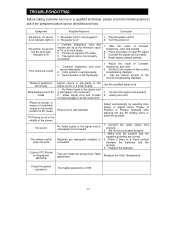
... connected 1. Plug the power cord in PC mode 3. Turn the power on display are all at the same time Picture is not well adjusted No Audio signal or the signal cord is set improperly 3. Adjust the value of contrast, sharpness, color and volume 2. Connect the signal cord properly 2. Symptoms Possible Reasons Correction No picture, no sound, & no indicator light on No picture, no signal in 2. Make sure the positive and the negative polarities are set improperly 1. Reset factory default settings Poor picture & sound 1. Set the Color...
... connected 1. Plug the power cord in PC mode 3. Turn the power on display are all at the same time Picture is not well adjusted No Audio signal or the signal cord is set improperly 3. Adjust the value of contrast, sharpness, color and volume 2. Connect the signal cord properly 2. Symptoms Possible Reasons Correction No picture, no sound, & no indicator light on No picture, no signal in 2. Make sure the positive and the negative polarities are set improperly 1. Reset factory default settings Poor picture & sound 1. Set the Color...


