Operation Manual
Page 2
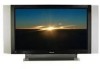
... Channel Selection ...20 Setting Picture ...21 Setting Sound ...22 Time Set and Sleep Timer ...23 Viewing Closed Captions ...24 Setting Parental Control...25 Screen Setup for their photography needs. Today, families look to your new Polaroid Plasma TV purchase. Table of Contents Important Information ...1 Important Safety Precautions ...2 Setup ...5 Identification of Contents Polaroid. To ensure your new Plasma TV provides you 'll still receive the same friendly, helpful service that define the digital age: plasma and LCD TVs, portable and standard DVD players, digital...
... Channel Selection ...20 Setting Picture ...21 Setting Sound ...22 Time Set and Sleep Timer ...23 Viewing Closed Captions ...24 Setting Parental Control...25 Screen Setup for their photography needs. Today, families look to your new Polaroid Plasma TV purchase. Table of Contents Important Information ...1 Important Safety Precautions ...2 Setup ...5 Identification of Contents Polaroid. To ensure your new Plasma TV provides you 'll still receive the same friendly, helpful service that define the digital age: plasma and LCD TVs, portable and standard DVD players, digital...
Operation Manual
Page 3
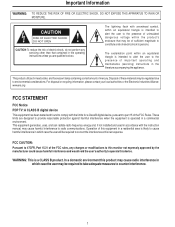
... any changes or modifications to this monitor not expressly approved by the manufacturer could cause harmful interference and would void the user's authority to operate this equipment in a residential area is operated in the operating instructions unless you are designed to part 15 ... Notice PDP TV: A CLASS B digital device This equipment has been tested and found to comply with the instruction manual, may be required to take adequate measures to counter interference. 1 This equipment generates, uses, and can radiate radio frequency energy and, if not installed and used in accordance...
... any changes or modifications to this monitor not expressly approved by the manufacturer could cause harmful interference and would void the user's authority to operate this equipment in a residential area is operated in the operating instructions unless you are designed to part 15 ... Notice PDP TV: A CLASS B digital device This equipment has been tested and found to comply with the instruction manual, may be required to take adequate measures to counter interference. 1 This equipment generates, uses, and can radiate radio frequency energy and, if not installed and used in accordance...

Operation Manual
Page 5
... to install the product according to avoid injury from the wall outlet and disconnect the antenna. d. When the product does not operate properly as damage to ensure that the product is a safety feature. 3 Stand---Use only with the cart, stand, tripod, bracket, or table specified by the manufacturer. 13. Replacement parts---In case the product needs replacement parts, make sure that the product needs servicing...
... to install the product according to avoid injury from the wall outlet and disconnect the antenna. d. When the product does not operate properly as damage to ensure that the product is a safety feature. 3 Stand---Use only with the cart, stand, tripod, bracket, or table specified by the manufacturer. 13. Replacement parts---In case the product needs replacement parts, make sure that the product needs servicing...
Operation Manual
Page 7
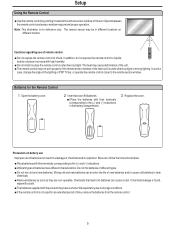
Setup Using the Remote Control
Setup Using the Remote Control

Operation Manual
Page 10
... VOL3button to access the MENU main page. 3. Press it again to adjust the value or setting of Controls MENU VOL CH SOURCE MENU VOL CH REMOTE SENSOR POWER INDICATOR BOTTOM VIEW MENU VOL CH POWER ON/STANDBY MENU CHANNEL DOWN/UP VOLUME DOWN/UP 1. Channel5/6 Channel Down or up. In OSD Menu, press these buttons to turn the unit ON from STANDBY mode. MENU Press this button to turn the set back to choose the OSD...
... VOL3button to access the MENU main page. 3. Press it again to adjust the value or setting of Controls MENU VOL CH SOURCE MENU VOL CH REMOTE SENSOR POWER INDICATOR BOTTOM VIEW MENU VOL CH POWER ON/STANDBY MENU CHANNEL DOWN/UP VOLUME DOWN/UP 1. Channel5/6 Channel Down or up. In OSD Menu, press these buttons to turn the unit ON from STANDBY mode. MENU Press this button to turn the set back to choose the OSD...

Operation Manual
Page 12
... SOUND MODE PICTURE MODE 19 PIP SIZE TV/PC PIP INPUT 20 34: To move left or right in menu operation; OK button: To confirm or toggle between the settings of Controls 1 1. STEREO To select STEREO, SAP or MONO 19. VOL+/- EXIT Used to enter a program number for multiple program channels 6 7 such as 2-1,2-2, etc. 5. ASPECT To select screen aspect ratio 15. PICTURE MODE To select the picture mode 20. INPUT / l 4 To quickly select input source 5 DOT(l): used...
... SOUND MODE PICTURE MODE 19 PIP SIZE TV/PC PIP INPUT 20 34: To move left or right in menu operation; OK button: To confirm or toggle between the settings of Controls 1 1. STEREO To select STEREO, SAP or MONO 19. VOL+/- EXIT Used to enter a program number for multiple program channels 6 7 such as 2-1,2-2, etc. 5. ASPECT To select screen aspect ratio 15. PICTURE MODE To select the picture mode 20. INPUT / l 4 To quickly select input source 5 DOT(l): used...

Operation Manual
Page 13
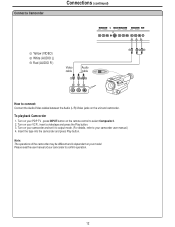
... your VCR , insert a videotape and press the Play button. Turn on the Optical cable S/PDIF OUT (Optical) OR Audio Processor HIFi System Connect a VCR How to the user manual of the VCR 11 Turn on your PDP TV, press INPUT button on the panel to select Composite1 (or S-Video if using S-VIDEO terminal). 2. When connecting an external device, turn the power off on the remote control to avoid any connections. Note: For better video, you must connect your model.
... your VCR , insert a videotape and press the Play button. Turn on the Optical cable S/PDIF OUT (Optical) OR Audio Processor HIFi System Connect a VCR How to the user manual of the VCR 11 Turn on your PDP TV, press INPUT button on the panel to select Composite1 (or S-Video if using S-VIDEO terminal). 2. When connecting an external device, turn the power off on the remote control to avoid any connections. Note: For better video, you must connect your model.
Operation Manual
Page 14
... your PDP TV , press INPUT button on the remote control to your camcorder to connect: Connect the Audio/Video cables between the Audio (L/R)/Video jacks on your camcorder and set it to output mode. (For details, refer to select Composite 2. 2. Insert the tape into the camcorder and press Play button. Connect a Camcorder Connections (continued) Y Yellow (VIDEO) W White (AUDIO L) R Red (AUDIO R ) Video cable Audio cable OUT IN Y WR VIDEO L AUDIO R Y WR How to confirm operation. 12 Note: The operations of your camcorder user manual...
... your PDP TV , press INPUT button on the remote control to your camcorder to connect: Connect the Audio/Video cables between the Audio (L/R)/Video jacks on your camcorder and set it to output mode. (For details, refer to select Composite 2. 2. Insert the tape into the camcorder and press Play button. Connect a Camcorder Connections (continued) Y Yellow (VIDEO) W White (AUDIO L) R Red (AUDIO R ) Video cable Audio cable OUT IN Y WR VIDEO L AUDIO R Y WR How to confirm operation. 12 Note: The operations of your camcorder user manual...

Operation Manual
Page 15
... the TV 13 Connect the audio cable to the AUDIO IN terminal of D-SUB on your PDP TV , press INPUT button on the DVD player. Note: If the external device has DVI output only, use a DVI to HDMI adapter cable to connect to the HDMI terminal. Turn on your DVD player, insert a DVD disc and press the Play button. To play DVD 1. Connect a DVD player Connections (continued) HDMI cable DVD player with HDMI interface How to connect a DVD Player using HDMI Connection: Connect the HDMI cable between the HDMI interface on the unit and HDMI output on the remote control to select HDMI. 2.
... the TV 13 Connect the audio cable to the AUDIO IN terminal of D-SUB on your PDP TV , press INPUT button on the DVD player. Note: If the external device has DVI output only, use a DVI to HDMI adapter cable to connect to the HDMI terminal. Turn on your DVD player, insert a DVD disc and press the Play button. To play DVD 1. Connect a DVD player Connections (continued) HDMI cable DVD player with HDMI interface How to connect a DVD Player using HDMI Connection: Connect the HDMI cable between the HDMI interface on the unit and HDMI output on the remote control to select HDMI. 2.
Operation Manual
Page 19
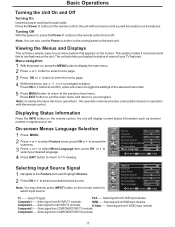
... the remote control. HDMI-------Select signal from D-SUB input interface. Note: You can also use 5,6,3or4to navigate or adjust. VGA-------Select signal from HDMI input interface. Viewing the Menus and Displays This unit has a simple, easy-to clearly introduce the menu operations , this operation manual provides a description based on the screen. Press EXIT button to exit the main menu and return to select your program. Video Audio Setup Feature Source TV Time Set Sleep Timer Off Parental Control Closed Caption...
... the remote control. HDMI-------Select signal from D-SUB input interface. Note: You can also use 5,6,3or4to navigate or adjust. VGA-------Select signal from HDMI input interface. Viewing the Menus and Displays This unit has a simple, easy-to clearly introduce the menu operations , this operation manual provides a description based on the screen. Press EXIT button to exit the main menu and return to select your program. Video Audio Setup Feature Source TV Time Set Sleep Timer Off Parental Control Closed Caption...
Operation Manual
Page 20
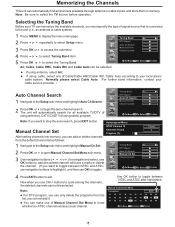
... EXIT button to access the submenu. Memorizing the Channels This unit can be selected. Tuning Band Air Video DTV Signal Auto Ch Search Audio Manual Ch Set Channel Labels 4 Press 5or 6 to the Setup sub-menu and highlight Auto Ch Search. Feature Air, Cable, Cable HRC, Cable IRC and Cable Auto can automatically find all available TV/DTV (if using antenna), CATV/CADTV (if using cable) program. If using antenna, select Air; ? Normally please select Cable Auto...
... EXIT button to access the submenu. Memorizing the Channels This unit can be selected. Tuning Band Air Video DTV Signal Auto Ch Search Audio Manual Ch Set Channel Labels 4 Press 5or 6 to the Setup sub-menu and highlight Auto Ch Search. Feature Air, Cable, Cable HRC, Cable IRC and Cable Auto can automatically find all available TV/DTV (if using antenna), CATV/CADTV (if using cable) program. If using antenna, select Air; ? Normally please select Cable Auto...
Operation Manual
Page 21
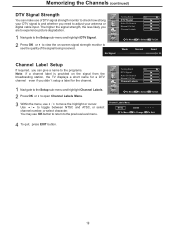
Video Audio Setup Feature No Signal Tuning Band Air DTV Signal Auto Ch Search Manual Ch Set Channel Labels To Move OK To Select Exit To Exit Weak Normal Good 96 Channel Label Setup If required, you can make use of DTV signal strength monitor to check how strong your antenna or digital cable input. The higher the signal strength, the less likely you are to experience picture degradation. 1 Navigate to...
Video Audio Setup Feature No Signal Tuning Band Air DTV Signal Auto Ch Search Manual Ch Set Channel Labels To Move OK To Select Exit To Exit Weak Normal Good 96 Channel Label Setup If required, you can make use of DTV signal strength monitor to check how strong your antenna or digital cable input. The higher the signal strength, the less likely you are to experience picture degradation. 1 Navigate to...

Operation Manual
Page 24
Setting Sound Adjusting the Volume Using the volume buttons (VOL+ and VOL-) Press the VOL + or VOL- Customizing the sound 1 Press MENU to display the menu main page. 2 Press 5or6 repeatedly to select Audio menu. 3 Press OK or4 to access the submenu. 4 Within the menu, use 5,6,3or4 to increase or decrease the volume. Video Audio Setup Feature Sound Mode Bass 30 Treble 30 Balance 30 Earphone Vol 30 Digital Audio Output MTS User RAW Mono To...
Setting Sound Adjusting the Volume Using the volume buttons (VOL+ and VOL-) Press the VOL + or VOL- Customizing the sound 1 Press MENU to display the menu main page. 2 Press 5or6 repeatedly to select Audio menu. 3 Press OK or4 to access the submenu. 4 Within the menu, use 5,6,3or4 to increase or decrease the volume. Video Audio Setup Feature Sound Mode Bass 30 Treble 30 Balance 30 Earphone Vol 30 Digital Audio Output MTS User RAW Mono To...
Operation Manual
Page 25
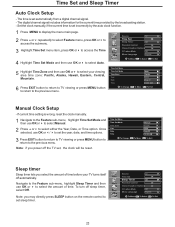
The digital channel signal includes information for the current time provided by the auto clock function. 1 Press MENU to display the menu main page. 2 Press 5or6 repeatedly to select Feature menu, press OK or4 to access the submenu. 3 Highlight Time Set menu item, press OK or4 to access the Time Video Audio Setup Source TV Time Set Sleep Timer Off Parental Control Closed Caption Options CC when Mute Off Menu Language English 4 Highlight Time Set Mode and then use OK...
The digital channel signal includes information for the current time provided by the auto clock function. 1 Press MENU to display the menu main page. 2 Press 5or6 repeatedly to select Feature menu, press OK or4 to access the submenu. 3 Highlight Time Set menu item, press OK or4 to access the Time Video Audio Setup Source TV Time Set Sleep Timer Off Parental Control Closed Caption Options CC when Mute Off Menu Language English 4 Highlight Time Set Mode and then use OK...
Operation Manual
Page 26
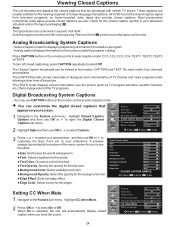
... of the picture. You may use OK or 4 to select caption mode. ® You can be shown. Video Audio Setup Feature Source TV Time Set Sleep Timer Off Parental Control Closed Caption Options CC when Mute On Menu Language English To Move OK To Select Exit To Exit 24 Digital Closed Caption Style Custom Size Normal Font Default Text Color White Text Opacity Solid Background Color Black Background Opacity Solid Edge Effect None Edge Color Red CLOSED CAPTION SAMPLE...
... of the picture. You may use OK or 4 to select caption mode. ® You can be shown. Video Audio Setup Feature Source TV Time Set Sleep Timer Off Parental Control Closed Caption Options CC when Mute On Menu Language English To Move OK To Select Exit To Exit 24 Digital Closed Caption Style Custom Size Normal Font Default Text Color White Text Opacity Solid Background Color Black Background Opacity Solid Edge Effect None Edge Color Red CLOSED CAPTION SAMPLE...
Operation Manual
Page 29
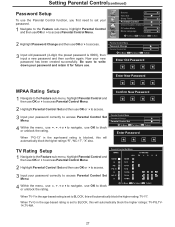
... Exit When TV-Y in the age-based rating is set to BLOCK, this will automatically block the higher ratings: TV-PG,TV14,TV-MA. 27 Video Audio Setup Feature Source TV Time Set Sleep Timer Off Parental Control Closed Caption Options CC when Mute Off Menu Language English To Move OK To Select Exit To Exit 2 Highlight Password Change and then use OK or4to access. 3 Input old password (4-digit, the preset password is set to...
... Exit When TV-Y in the age-based rating is set to BLOCK, this will automatically block the higher ratings: TV-PG,TV14,TV-MA. 27 Video Audio Setup Feature Source TV Time Set Sleep Timer Off Parental Control Closed Caption Options CC when Mute Off Menu Language English To Move OK To Select Exit To Exit 2 Highlight Password Change and then use OK or4to access. 3 Input old password (4-digit, the preset password is set to...
Operation Manual
Page 30
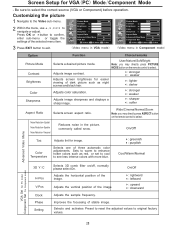
... Adjusts image sharpness and displays a sharp image. 4: sharper 3: softer Aspect Ratio Selects screen aspect ratio. Adjusts the vertical position of stable image. Customizing the picture 1 Navigate to the Video sub-menu. 2 Within the menu, use 5,6,3or4 to original factory values. 28 Selects and activates Preset to reset the adjusted values to navigate or adjust. Video Audio Setup Feature Picture Mode Contrast 50 Brightness 50 User Color 50 Sharpness 0 Aspect Ratio Wide Advanced Video Menu VGA Set To...
... Adjusts image sharpness and displays a sharp image. 4: sharper 3: softer Aspect Ratio Selects screen aspect ratio. Adjusts the vertical position of stable image. Customizing the picture 1 Navigate to the Video sub-menu. 2 Within the menu, use 5,6,3or4 to original factory values. 28 Selects and activates Preset to reset the adjusted values to navigate or adjust. Video Audio Setup Feature Picture Mode Contrast 50 Brightness 50 User Color 50 Sharpness 0 Aspect Ratio Wide Advanced Video Menu VGA Set To...
Operation Manual
Page 31
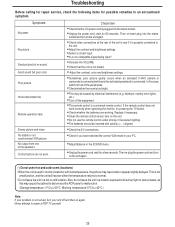
... the unit. =Adjust the contrast and brightness settings. =Select a correct input. =Is a non-compatible signal being input? =Increase the VOLUME. =Check that the AC power cord is plugged into the mains socket and turn on the unit again. =Check video connections at the rear of the unit to see if it is properly connected to +40°C ) Note: If your problem is used in rooms (locations) with polarity...
... the unit. =Adjust the contrast and brightness settings. =Select a correct input. =Is a non-compatible signal being input? =Increase the VOLUME. =Check that the AC power cord is plugged into the mains socket and turn on the unit again. =Check video connections at the rear of the unit to see if it is properly connected to +40°C ) Note: If your problem is used in rooms (locations) with polarity...

Operation Manual
Page 34
... program the remote to control. Checking the Codes If you have set to find out which code is 0, the LED does not blink. 5. Press and hold SET until the red LED blinks twice; To view the code for future reference. After installing batteries, you want to control your Universal TV, VCR or DVD, Cable or Satellite Receivers, Amplifier or Tuner, and Auxiliary devices. Before proceeding, find a code that works. Enter the first five-digit code...
... program the remote to control. Checking the Codes If you have set to find out which code is 0, the LED does not blink. 5. Press and hold SET until the red LED blinks twice; To view the code for future reference. After installing batteries, you want to control your Universal TV, VCR or DVD, Cable or Satellite Receivers, Amplifier or Tuner, and Auxiliary devices. Before proceeding, find a code that works. Enter the first five-digit code...

Operation Manual
Page 35
The LED blinks twice. Press and hold SET until the red LED blinks twice; then release. 2. Press a device key (TV, VCR/DVD, CBL/ SAT, or AUX). 2. The LED blinks four times. SOLUTION: An entry error has occurred (for your device and is now independently controlled for independent operation or Global Volume Unlock to remove all other modes. PROBLEM: CH+, CH-, and LAST do not change the Volume Lock setting to Global Volume Lock so...
The LED blinks twice. Press and hold SET until the red LED blinks twice; then release. 2. Press a device key (TV, VCR/DVD, CBL/ SAT, or AUX). 2. The LED blinks four times. SOLUTION: An entry error has occurred (for your device and is now independently controlled for independent operation or Global Volume Unlock to remove all other modes. PROBLEM: CH+, CH-, and LAST do not change the Volume Lock setting to Global Volume Lock so...


