
User Guide
Page 5
... and Precautions Important Safety Instructions 2 Antenna Safety Instructions 4 Chapter 1 Introducing the LCD TV Key Features ...6 Package Contents ...7 Setting Your LCD TV...8 Your LCD TV...10 Your Remote Control 12 Chapter 2 Installing the LCD TV Connecting a TV Cable or an Antenna 14 Connecting a VCR ...18 Connecting a Video Camera or... 3 USING THE FEATURES Using Picture-In-Picture ...27 Wide Screen Viewing...29 Operating the Menu...30 Setting up the HDTV Function ...32 Customizing the VIDEO Settings...36 Customizing the AUDIO Settings...38 Customizing the SETUP Settings ...39 Using the V-...
... and Precautions Important Safety Instructions 2 Antenna Safety Instructions 4 Chapter 1 Introducing the LCD TV Key Features ...6 Package Contents ...7 Setting Your LCD TV...8 Your LCD TV...10 Your Remote Control 12 Chapter 2 Installing the LCD TV Connecting a TV Cable or an Antenna 14 Connecting a VCR ...18 Connecting a Video Camera or... 3 USING THE FEATURES Using Picture-In-Picture ...27 Wide Screen Viewing...29 Operating the Menu...30 Setting up the HDTV Function ...32 Customizing the VIDEO Settings...36 Customizing the AUDIO Settings...38 Customizing the SETUP Settings ...39 Using the V-...

User Guide
Page 6
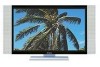
...and audio in a single cable. This system eliminates the cost, complexity and confusion of multiple cables used to connect current A/V systems. HDTV Component Video Inputs ▪ Offers the best video quality for external equipment connection ▪ 2 sets of composite A/V input terminals &#...top box. PIP Function ▪ Provides viewing of two programs simultaneously, in either picture-in TV tuner to provide better picture quality. Chapter 1 Introducing the LCD TV Chapter 1 Introducing the LCD TV Key Features Various Audio/Video terminals for DVD(480p) and digital set-top-box (HD1080i,...
...and audio in a single cable. This system eliminates the cost, complexity and confusion of multiple cables used to connect current A/V systems. HDTV Component Video Inputs ▪ Offers the best video quality for external equipment connection ▪ 2 sets of composite A/V input terminals &#...top box. PIP Function ▪ Provides viewing of two programs simultaneously, in either picture-in TV tuner to provide better picture quality. Chapter 1 Introducing the LCD TV Chapter 1 Introducing the LCD TV Key Features Various Audio/Video terminals for DVD(480p) and digital set-top-box (HD1080i,...

User Guide
Page 11
... all digital AV equipment with VGA and AUDIO(L/R) output jacks. VHF/UHF IN-HDTV-AIR Connects RF input from VHF/UHF antenna or cable. VGA IN Connects the...OPTICAL/COAXIAL Connects to the AUDIO(L/R) input jacks on the digital/standard 5.1 audio system. VHF/UHF IN-TV-CABLE Connects RF input from VHF/UHF antenna or cable to receive high/standard definition television. .... The AUDIO(L/R) of HDMI IN is for DVI connection. Rear View and Jacks Chapter 1 Introducing the LCD TV ENGLISH VIDEO2 IN Connects to the AC power cord. 11 AC IN Connects to the composite VIDEO and ...
... all digital AV equipment with VGA and AUDIO(L/R) output jacks. VHF/UHF IN-HDTV-AIR Connects RF input from VHF/UHF antenna or cable. VGA IN Connects the...OPTICAL/COAXIAL Connects to the AUDIO(L/R) input jacks on the digital/standard 5.1 audio system. VHF/UHF IN-TV-CABLE Connects RF input from VHF/UHF antenna or cable to receive high/standard definition television. .... The AUDIO(L/R) of HDMI IN is for DVI connection. Rear View and Jacks Chapter 1 Introducing the LCD TV ENGLISH VIDEO2 IN Connects to the AC power cord. 11 AC IN Connects to the composite VIDEO and ...

User Guide
Page 12
... 8 Receiver DVD Controls DVD player or Video player 10 9 11 13 AUX Controls Audio Amplifier 12 14 25 SLEEP Cycles through the LCD TV sleep time: 15 OFF/30/60/90/120 mins 6 ► Other device function keys 16 17 18 7 VOL+- Pressing again restores audio 10... code setup.For more information on and off 12 Chapter 1 Introducing the LCD TV Your Remote Control This package includes a Polaroid remote that enables control of up to previously selected channel 12 GUIDE 123 PIP In HDTV mode, pressing GUIDE displays the Program Guide on the screen Turns PIP/POP...
... 8 Receiver DVD Controls DVD player or Video player 10 9 11 13 AUX Controls Audio Amplifier 12 14 25 SLEEP Cycles through the LCD TV sleep time: 15 OFF/30/60/90/120 mins 6 ► Other device function keys 16 17 18 7 VOL+- Pressing again restores audio 10... code setup.For more information on and off 12 Chapter 1 Introducing the LCD TV Your Remote Control This package includes a Polaroid remote that enables control of up to previously selected channel 12 GUIDE 123 PIP In HDTV mode, pressing GUIDE displays the Program Guide on the screen Turns PIP/POP...

User Guide
Page 13
... source list, use ▲▼buttons to select the video equipment connected to the video inputs of your LCD TV: TV/HDTV/VIDEO1/ 19 VIDEO2/VIDEO3/VIDEO4/VIDEO5/ VIDEO6/COMPUTER ▪ In HDTV mode, use with 0-9 and ENTER buttons to select a digital 20 channels Effective range: The remote can ...options and selects 4 individual menu items. OK confirms option 5 settings OK In HDTV mode, pressing OK to 5m away, if pointed directly at the receiver. 13 ENGLISH Chapter 2 Installing the LCD TV 14 MENU Displays the OSD menu on the screen. 2 1 3 15 OK Cycles ...
... source list, use ▲▼buttons to select the video equipment connected to the video inputs of your LCD TV: TV/HDTV/VIDEO1/ 19 VIDEO2/VIDEO3/VIDEO4/VIDEO5/ VIDEO6/COMPUTER ▪ In HDTV mode, use with 0-9 and ENTER buttons to select a digital 20 channels Effective range: The remote can ...options and selects 4 individual menu items. OK confirms option 5 settings OK In HDTV mode, pressing OK to 5m away, if pointed directly at the receiver. 13 ENGLISH Chapter 2 Installing the LCD TV 14 MENU Displays the OSD menu on the screen. 2 1 3 15 OK Cycles ...
User Guide
Page 17
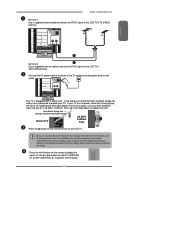
.... Firm Plastic Prying Tool D (Using a metal tool may cause shock) Back of the TV and connect the power cord to the LCD TV's HDTV AIR terminal. Press the INPUT button on the LCD TV. Main: TV(CABLE/AIR) HDTV (CABLE/AIR) VIDEO1 (SIDE) VIDEO2 (REAR) VIDEO3 (S-VIDEO) VIDEO4 (YPbPr1) VIDEO5 ...front panel is equipped with a safety fuse. Chapter 2 Installing the LCD TV METHOD A: Use a supplied antenna cable to connect the NTSC signal to select TV (METHOD A), or HDTV (METHOD B), and press the OK button. ENGLISH TV CABLE HDTV AIR VHF/UHF IN B A METHOD B: Use a supplied antenna ...
.... Firm Plastic Prying Tool D (Using a metal tool may cause shock) Back of the TV and connect the power cord to the LCD TV's HDTV AIR terminal. Press the INPUT button on the LCD TV. Main: TV(CABLE/AIR) HDTV (CABLE/AIR) VIDEO1 (SIDE) VIDEO2 (REAR) VIDEO3 (S-VIDEO) VIDEO4 (YPbPr1) VIDEO5 ...front panel is equipped with a safety fuse. Chapter 2 Installing the LCD TV METHOD A: Use a supplied antenna cable to connect the NTSC signal to select TV (METHOD A), or HDTV (METHOD B), and press the OK button. ENGLISH TV CABLE HDTV AIR VHF/UHF IN B A METHOD B: Use a supplied antenna ...

User Guide
Page 26
Note: Above mentioned function is only available under HDTV (cable/air) mode. Rear of the LCD TV or other connected equipment. Press the POWER button on the power switch of TV AUDIO Cable B A Audio Receievr Audio Amplifier Connecting to Audio Receiver: Use an audio cable to connect the ...audio receiver's audio LINE IN jacks to turn on the LCD TV. 26 Connect all AC power sources, before turning on the remote to LCD TV's AUDIO OUT jacks. Chapter 3 Using the LCD TV Connecting an Audio Receiver or a Dolby Digital 5.1 Sound System For better sound...
Note: Above mentioned function is only available under HDTV (cable/air) mode. Rear of the LCD TV or other connected equipment. Press the POWER button on the power switch of TV AUDIO Cable B A Audio Receievr Audio Amplifier Connecting to Audio Receiver: Use an audio cable to connect the ...audio receiver's audio LINE IN jacks to turn on the LCD TV. 26 Connect all AC power sources, before turning on the remote to LCD TV's AUDIO OUT jacks. Chapter 3 Using the LCD TV Connecting an Audio Receiver or a Dolby Digital 5.1 Sound System For better sound...

User Guide
Page 30
... the Menu Press the button to turn the LCD TV on the screen. Use the ◄► buttons to select your picture settings. ▪ If the signal source is TV/HDTV/VIDEO/SVIDEO/ YPbPr/HDMI, the VIDEO MENU appears as: ▪ If the signal source is VGA, the VIDEO MENU appears as: Picture ... 50 Bass 50 Treble 0 Balance Off Sound Effect MTS System 50 50 0 Off Stereo Audio Select Exit Audio ▪ If the signal source is HDTV, the AUDIO MENU appears as: Bass 50 Treble 50 Balance 0 Sound Effect Off Select Exit Audio Select Exit 30 Press the MENU button on the...
... the Menu Press the button to turn the LCD TV on the screen. Use the ◄► buttons to select your picture settings. ▪ If the signal source is TV/HDTV/VIDEO/SVIDEO/ YPbPr/HDMI, the VIDEO MENU appears as: ▪ If the signal source is VGA, the VIDEO MENU appears as: Picture ... 50 Bass 50 Treble 0 Balance Off Sound Effect MTS System 50 50 0 Off Stereo Audio Select Exit Audio ▪ If the signal source is HDTV, the AUDIO MENU appears as: Bass 50 Treble 50 Balance 0 Sound Effect Off Select Exit Audio Select Exit 30 Press the MENU button on the...

User Guide
Page 31
...; English ► Time Zone Eastern Time SPDIF Type PCM Manual Scan Channel Skip Channel Block Caption TV Select Exit HDTV Select Exit Use the ▲▼ buttons to set up the HDTV program function. ENGLISH Chapter 3 Using the LCD TV SETUP MENU: Allows you to set up a variety of features: Language, Closed Caption, factory reset...
...; English ► Time Zone Eastern Time SPDIF Type PCM Manual Scan Channel Skip Channel Block Caption TV Select Exit HDTV Select Exit Use the ▲▼ buttons to set up the HDTV program function. ENGLISH Chapter 3 Using the LCD TV SETUP MENU: Allows you to set up a variety of features: Language, Closed Caption, factory reset...

User Guide
Page 32
... Transparent Default AIR English on the remote to display the INPUT list. Chapter 3 Using the LCD TV Setting up the HDTV Function Automatically scans and stores all the TV channels With the LCD TV connected to a television programming source, press the TV button on Setup Select Exit Press the ▼ button to select Auto Scan, and press...
... Transparent Default AIR English on the remote to display the INPUT list. Chapter 3 Using the LCD TV Setting up the HDTV Function Automatically scans and stores all the TV channels With the LCD TV connected to a television programming source, press the TV button on Setup Select Exit Press the ▼ button to select Auto Scan, and press...

User Guide
Page 33
...Skip Channel Block Scan Mode From Channel To Channel Range Mode 1 8 HDTV( CABLE/AIR) Select Back Allows addition / removal of digital channels Allows to set up TV channel manually Scan with a range of the LCD TV ▪ Dolby Digital: The external audio system is connected to the AUDIO... external audio system is 0000 33 ENGLISH The HDTV menu includes the following options: Audio Language Time Zone SPDIF Type Manual Scan Channel Skip Channel Block Caption ◄ English ► Eastern Time PCM Chapter 3 Using the LCD TV HDTV( CABLE/AIR) Audio Language Time Zone SPDIF ...
...Skip Channel Block Scan Mode From Channel To Channel Range Mode 1 8 HDTV( CABLE/AIR) Select Back Allows addition / removal of digital channels Allows to set up TV channel manually Scan with a range of the LCD TV ▪ Dolby Digital: The external audio system is connected to the AUDIO... external audio system is 0000 33 ENGLISH The HDTV menu includes the following options: Audio Language Time Zone SPDIF Type Manual Scan Channel Skip Channel Block Caption ◄ English ► Eastern Time PCM Chapter 3 Using the LCD TV HDTV( CABLE/AIR) Audio Language Time Zone SPDIF ...

User Guide
Page 34
Chapter 3 Using the LCD TV Caption Allows to set closed caption: Analog Closed Caption Digital Closed Caption Caption style ◄ OFF ► OFF HDTV( CABLE/AIR) Select Back ▪ Analog Closed Caption: Press the ◄► buttons to select the basic analog closed caption options: OFF/CC1/CC2/CC3/... Style Font Size Font Color Font Opacity Background Color Background Opacity Window Color Window Opacity ◄ Custom ► Large White Solid Black Solid Black Translucent HDTV( CABLE/AIR) Select Back 34
Chapter 3 Using the LCD TV Caption Allows to set closed caption: Analog Closed Caption Digital Closed Caption Caption style ◄ OFF ► OFF HDTV( CABLE/AIR) Select Back ▪ Analog Closed Caption: Press the ◄► buttons to select the basic analog closed caption options: OFF/CC1/CC2/CC3/... Style Font Size Font Color Font Opacity Background Color Background Opacity Window Color Window Opacity ◄ Custom ► Large White Solid Black Solid Black Translucent HDTV( CABLE/AIR) Select Back 34


