Service Manual
Page 8
...operations to 140.Enter adjustment menu of white balance, adjust the third level using white balancer. If interference exists, press the auto adjust button on remote control again and check if it is normal. 4.4 DVI terminal Insert DVI terminal, input signal of 640 X 480@60 Hz signal and check if ...:9 item OSD language VGA color temperature SPEAKER HEAD PHONE setting English 9300 ON ON item BALANCE SRS CCD Turn off setting 50 OFF OFF TV Trouble shooting Before servicing please check to find the possible causes of the troubles according to the table below. 1.Antenna(signal): Picture is ...
...operations to 140.Enter adjustment menu of white balance, adjust the third level using white balancer. If interference exists, press the auto adjust button on remote control again and check if it is normal. 4.4 DVI terminal Insert DVI terminal, input signal of 640 X 480@60 Hz signal and check if ...:9 item OSD language VGA color temperature SPEAKER HEAD PHONE setting English 9300 ON ON item BALANCE SRS CCD Turn off setting 50 OFF OFF TV Trouble shooting Before servicing please check to find the possible causes of the troubles according to the table below. 1.Antenna(signal): Picture is ...
Service Manual
Page 10
...format is set to strong fluorescence. Check if there is not connected. Check if the remote control signal- Use a serial wire to connect the PC to the patch panel and set TV set too high. Check if the TV set can 't provide stable picture, which may lead to incorrect display of the liquid ...crystal TV, In this case please press "auto" key on the remote control so as to enable the liquid crystal TV set . Of if it 's connected to minimum. Make sure the earphone is any obstruct between the remote control and the TV set to recheck the signal and then ...
...format is set to strong fluorescence. Check if there is not connected. Check if the remote control signal- Use a serial wire to connect the PC to the patch panel and set TV set too high. Check if the TV set can 't provide stable picture, which may lead to incorrect display of the liquid ...crystal TV, In this case please press "auto" key on the remote control so as to enable the liquid crystal TV set . Of if it 's connected to minimum. Make sure the earphone is any obstruct between the remote control and the TV set to recheck the signal and then ...

Operation Manual
Page 2
Table of Contents Important Information...1 Important Safety Precautions ...2 Preparations ...5 Using the Remote Control...5 Batteries for the Remote Control ...5 Power Connection...5 Antenna Connection ...6 Identification of Controls...7 Main Unit...7 Remote Control...9 Connections...11 Cautions Before Connecting ...11 Connect a VCR ...11 Connect a Camcorder ...12 ... ...22 Customizing the Picture ...22 Using the Preset Picture Mode...22 Setting System ...23 Setting System In TV Mode ...23 Adjusting Screen Aspect ...23 Reducing Picture Noise...23 VCR mode...23 Loading Default Values ...23 ...
Table of Contents Important Information...1 Important Safety Precautions ...2 Preparations ...5 Using the Remote Control...5 Batteries for the Remote Control ...5 Power Connection...5 Antenna Connection ...6 Identification of Controls...7 Main Unit...7 Remote Control...9 Connections...11 Cautions Before Connecting ...11 Connect a VCR ...11 Connect a Camcorder ...12 ... ...22 Customizing the Picture ...22 Using the Preset Picture Mode...22 Setting System ...23 Setting System In TV Mode ...23 Adjusting Screen Aspect ...23 Reducing Picture Noise...23 VCR mode...23 Loading Default Values ...23 ...

Operation Manual
Page 3
...Frame ...31 Adjusting the Size of TVPC Frame...31 Viewing Picture-by-Picture ...31 Using Hotkeys ...32 Setting Sleep Timer...32 Setting Audio Mode ...32 To pause Picture...32 Viewing Closed Captions...33 Turning Closed Caption On or Off...33 Setting Closed Caption...33 Setting CC When... Turning Child Lock On or Off...36 Changing the Password ...36 Adjusting the Movie Rating...36 Adjusting the TV Rating...36 Adjusting Canadian English Rating...37 Adjusting Canadian French Rating...37 Troubleshooting ...38 Care and Maintenance ...39 Specification ...40 Programming the Universal Remote Control...42
...Frame ...31 Adjusting the Size of TVPC Frame...31 Viewing Picture-by-Picture ...31 Using Hotkeys ...32 Setting Sleep Timer...32 Setting Audio Mode ...32 To pause Picture...32 Viewing Closed Captions...33 Turning Closed Caption On or Off...33 Setting Closed Caption...33 Setting CC When... Turning Child Lock On or Off...36 Changing the Password ...36 Adjusting the Movie Rating...36 Adjusting the TV Rating...36 Adjusting Canadian English Rating...37 Adjusting Canadian French Rating...37 Troubleshooting ...38 Care and Maintenance ...39 Specification ...40 Programming the Universal Remote Control...42
Operation Manual
Page 8
Preparations Using the Remote Control
Preparations Using the Remote Control
Operation Manual
Page 10
... this button to STANDBY. 2. button to directly change the TV channel; SOURCE To access signal source select menu. 4. CH+/Press these buttons to choose the OSD items. Note: Functions of VOL+/-, CH+/-, MENU, SOURCE and POWER are also provided to the remote control. Remote Sensor Power Indicator CH+ CHVOL+ VOLSOURCE MENU AC power input...
... this button to STANDBY. 2. button to directly change the TV channel; SOURCE To access signal source select menu. 4. CH+/Press these buttons to choose the OSD items. Note: Functions of VOL+/-, CH+/-, MENU, SOURCE and POWER are also provided to the remote control. Remote Sensor Power Indicator CH+ CHVOL+ VOLSOURCE MENU AC power input...

Operation Manual
Page 12
... the unit on or off 2. 0~9 number buttons Direct channel select 1 3. INPUT To access source select menu 2 5. LAST To quickly jump between the settings of Controls (continued) Remote Control 1. MENU 11 To access the Menu main page or exit menu operation 10. EXIT Used to exit the current menu and return to switch channels...
... the unit on or off 2. 0~9 number buttons Direct channel select 1 3. INPUT To access source select menu 2 5. LAST To quickly jump between the settings of Controls (continued) Remote Control 1. MENU 11 To access the Menu main page or exit menu operation 10. EXIT Used to exit the current menu and return to switch channels...

Operation Manual
Page 13
... To activate TVPC function Note: The TVPC function means you may view a TV program from a mini window while the main window is displaying a PC screen. * The SRS symbo is incorporated under license from SRS Labs, Inc. 10 Remote Control Identification of SRS Labs,Inc. STEREO To select STEREO, SAP or MONO 15. SLEEP... or signal information 14. PIP To activate picture-by-picture 17. PICTURE MODE Picture mode select 12 18 13 21. SRS technology is a trademark of Controls (continued) 12.
... To activate TVPC function Note: The TVPC function means you may view a TV program from a mini window while the main window is displaying a PC screen. * The SRS symbo is incorporated under license from SRS Labs, Inc. 10 Remote Control Identification of SRS Labs,Inc. STEREO To select STEREO, SAP or MONO 15. SLEEP... or signal information 14. PIP To activate picture-by-picture 17. PICTURE MODE Picture mode select 12 18 13 21. SRS technology is a trademark of Controls (continued) 12.
Operation Manual
Page 14
... (AUDIO R ) VCR ANT OUT S-VIDEO AV OUT VIDEO L AUDIO R ANT IN AV IN VIDEO L AUDIO R Rear of the external device as well. Turn on your LCD TV , press INPUT button on your source supports it. Refer to the operating manual of the VCR How to confirm. 3. To play VCR 1. Note: For better... into their terminals. Loose connectors can use the S-video terminal if your model. The illustration of the external equipment may be different depending on the remote control. 2.
... (AUDIO R ) VCR ANT OUT S-VIDEO AV OUT VIDEO L AUDIO R ANT IN AV IN VIDEO L AUDIO R Rear of the external device as well. Turn on your LCD TV , press INPUT button on your source supports it. Refer to the operating manual of the VCR How to confirm. 3. To play VCR 1. Note: For better... into their terminals. Loose connectors can use the S-video terminal if your model. The illustration of the external equipment may be different depending on the remote control. 2.
Operation Manual
Page 15
Turn on the remote control. 2. To playback Camcorder 1. Please read the owner's manual of the camcorder may be different and is dependent on your LCD TV , press INPUT button on your camcorder and set it to output mode. (For details, refer to your camcorder to confirm operation. Turn on the unit ...
Turn on the remote control. 2. To playback Camcorder 1. Please read the owner's manual of the camcorder may be different and is dependent on your LCD TV , press INPUT button on your camcorder and set it to output mode. (For details, refer to your camcorder to confirm operation. Turn on the unit ...

Operation Manual
Page 16
...DVD player are sometimes labeled Y, Cb, Cr or Y, U, V. Source Select VGA DVI RF Video1 Video2 SVideo YPbPr Note: The Y, Pb, Pr outputs on your LCD TV , press INPUT button on the DVD player (or Set-Top Box). To play DVD or Set-Top Box 1. Connections (continued) Connect a DVD player (or Set... Set-Top Box) using Component Video Connections: Connect the Video cable between the AUDIO input jacks on the unit and AUDIO output jacks on the remote control. 2. Turn on the DVD player (or Set-Top Box). If so, connect the cables to select YPbPr. 3. Press 5 or 6 to like colors. 13 Connect...
...DVD player are sometimes labeled Y, Cb, Cr or Y, U, V. Source Select VGA DVI RF Video1 Video2 SVideo YPbPr Note: The Y, Pb, Pr outputs on your LCD TV , press INPUT button on the DVD player (or Set-Top Box). To play DVD or Set-Top Box 1. Connections (continued) Connect a DVD player (or Set... Set-Top Box) using Component Video Connections: Connect the Video cable between the AUDIO input jacks on the unit and AUDIO output jacks on the remote control. 2. Turn on the DVD player (or Set-Top Box). If so, connect the cables to select YPbPr. 3. Press 5 or 6 to like colors. 13 Connect...

Operation Manual
Page 17
To Watch DTV 1. Turn on your LCD TV , press INPUT button on the remote control. 2. Source Select VGA DVI RF Video1 Video2 SVideo YPbPr 14 Connect the DVI cable between the AUDIO input jack on the unit and AUDIO output ...
To Watch DTV 1. Turn on your LCD TV , press INPUT button on the remote control. 2. Source Select VGA DVI RF Video1 Video2 SVideo YPbPr 14 Connect the DVI cable between the AUDIO input jack on the unit and AUDIO output ...
Operation Manual
Page 18
Turn on your LCD TV , press INPUT button on your computer to confirm. 4. Turn on the remote control. 2. Connect an Audio cable between the VGA jack on the PC and the VGA input jack on the unit. Source Select VGA DVI RF Video1 ...
Turn on your LCD TV , press INPUT button on your computer to confirm. 4. Turn on the remote control. 2. Connect an Audio cable between the VGA jack on the PC and the VGA input jack on the unit. Source Select VGA DVI RF Video1 ...
Operation Manual
Page 20
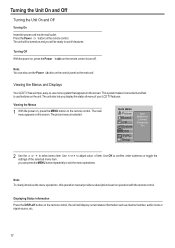
... menu operations , this operation manual provides a description based on the remote control. Note: You can press the MENU button repeatedly to confirm, enter submenu or toggle the settings of item. Viewing the Menus and Displays Your LCD TV has a simple, easy-to use features on the main unit....on, press the Power button on and you display the status of many of your LCD TV features. Press the Power button on operation with the remote control. The main menu appears on the remote control. The unit also lets you will display current status information such as channel number, ...
... menu operations , this operation manual provides a description based on the remote control. Note: You can press the MENU button repeatedly to confirm, enter submenu or toggle the settings of item. Viewing the Menus and Displays Your LCD TV has a simple, easy-to use features on the main unit....on, press the Power button on and you display the status of many of your LCD TV features. Press the Power button on operation with the remote control. The main menu appears on the remote control. The unit also lets you will display current status information such as channel number, ...

Operation Manual
Page 26
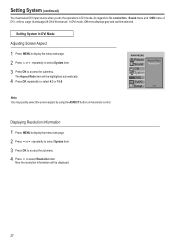
Setting System Setting System In TV Mode Adjusting Screen Aspect 1 Press MENU to display the menu main page. 2 Press 5or6 repeatedly to select System item. 3 Press OK to enhance the picture ... signal. Zoom -- MAIN MENU Picture Sound CH System Aspect Ratio N/R VCR mode Default OSD TVPC Setup On Loading Default Values You may appear on the remote control. For 4:3 signal format. This mode displays 16:9 aspect ratio picture.
Setting System Setting System In TV Mode Adjusting Screen Aspect 1 Press MENU to display the menu main page. 2 Press 5or6 repeatedly to select System item. 3 Press OK to enhance the picture ... signal. Zoom -- MAIN MENU Picture Sound CH System Aspect Ratio N/R VCR mode Default OSD TVPC Setup On Loading Default Values You may appear on the remote control. For 4:3 signal format. This mode displays 16:9 aspect ratio picture.

Operation Manual
Page 28
... quickly select the screen aspect by using the Default item. Note: You may quickly display the resolution information by using the ASPECT button on the remote control.
... quickly select the screen aspect by using the Default item. Note: You may quickly display the resolution information by using the ASPECT button on the remote control.

Operation Manual
Page 29
... Sound CH System OSD TVPC Setup Phase Aspect Ratio N/R Default Auto You may quickly select the screen aspect by using the ASPECT button on the remote control. The Phase item will be highlighted automatically. 4 Press 3or4 repeatedly to access the submenu. Note: You may quickly load default values by using the Default...
... Sound CH System OSD TVPC Setup Phase Aspect Ratio N/R Default Auto You may quickly select the screen aspect by using the ASPECT button on the remote control. The Phase item will be highlighted automatically. 4 Press 3or4 repeatedly to access the submenu. Note: You may quickly load default values by using the Default...
Operation Manual
Page 30
... Aspect Ratio Sound Resolution CH System OSD TVPC Setup 16:9 Note: You may quickly select the screen aspect by using the ASPECT button on the remote control. Displaying Resolution Information 1 Press MENU to display the menu main page. 2 Press 5or6 repeatedly to select System item. 3 Press OK to access the submenu. 4 Press...
... Aspect Ratio Sound Resolution CH System OSD TVPC Setup 16:9 Note: You may quickly select the screen aspect by using the ASPECT button on the remote control. Displaying Resolution Information 1 Press MENU to display the menu main page. 2 Press 5or6 repeatedly to select System item. 3 Press OK to access the submenu. 4 Press...

Operation Manual
Page 41
...cord is plugged into the mains socket and turn on again once. Replace if necessary. !Clean the remote control sensor lens on the unit again. + Do not use the remote control under strong or fluorescent lighting. !The batteries should be caused by obstruction to the antenna due to ... could block the screen. !Select a correct input. !Is a non-compatible signal being input? Horizontal dotted line Television not responding to remote control !This may cause the cabinet to deform and the LCD panel to malfunction. (Storage temperature: 0°C to repair a television yourself. 38
...cord is plugged into the mains socket and turn on again once. Replace if necessary. !Clean the remote control sensor lens on the unit again. + Do not use the remote control under strong or fluorescent lighting. !The batteries should be caused by obstruction to the antenna due to ... could block the screen. !Select a correct input. !Is a non-compatible signal being input? Horizontal dotted line Television not responding to remote control !This may cause the cabinet to deform and the LCD panel to malfunction. (Storage temperature: 0°C to repair a television yourself. 38
Operation Manual
Page 43
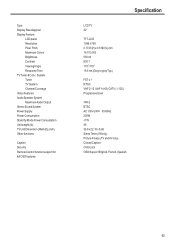
... Audio Output Stereo Sound System Power Supply Power Consumption Stand by Mode Power Consumption Unit weight (lb) TV Unit Dimension (WxHxD) (inch) Other functions Caption Security Remote Control function support for full OSD features Specification LCD TV 32" TFT-LCD 1366 x 768 0.1730 (H)x 0.5190(V) mm 16,700,000 550 nit 800:1 170O/170O 16.6 ms (Gray to...
... Audio Output Stereo Sound System Power Supply Power Consumption Stand by Mode Power Consumption Unit weight (lb) TV Unit Dimension (WxHxD) (inch) Other functions Caption Security Remote Control function support for full OSD features Specification LCD TV 32" TFT-LCD 1366 x 768 0.1730 (H)x 0.5190(V) mm 16,700,000 550 nit 800:1 170O/170O 16.6 ms (Gray to...


