Operation Manual
Page 3
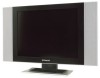
We recommend that you thoroughly read this manual before use to fully enjoy the many functions and excellent features of this LCD TV. Contents Congratulations on your purchase of this set. Retain this manual may differ from the actual ones for future reference. * Screen displays and illustrations in ...
We recommend that you thoroughly read this manual before use to fully enjoy the many functions and excellent features of this LCD TV. Contents Congratulations on your purchase of this set. Retain this manual may differ from the actual ones for future reference. * Screen displays and illustrations in ...
Operation Manual
Page 5
...replacement parts specified by the manufacturer, or those with the same characteristics and performance as this TV set . High Voltage exists in this can cause the product to be moved with water on the TV set . In case the product needs replacement parts, make sure that they exit from ...fire or electric shock. The power cords must be walked on or snagged by items placed upon by other equipment as the original parts. The LCD panel used in this television equipment during a lightning storm, or when it is made of time, unplug it from resting on them. Sudden ...
...replacement parts specified by the manufacturer, or those with the same characteristics and performance as this TV set . High Voltage exists in this can cause the product to be moved with water on the TV set . In case the product needs replacement parts, make sure that they exit from ...fire or electric shock. The power cords must be walked on or snagged by items placed upon by other equipment as the original parts. The LCD panel used in this television equipment during a lightning storm, or when it is made of time, unplug it from resting on them. Sudden ...
Operation Manual
Page 9
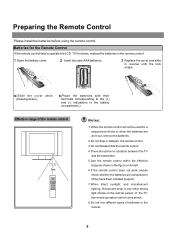
Preparing the Remote Control Please install the batteries before using the remote control. Batteries for the Remote Control If the remote control fails to operate the LCD TV functions, replace the batteries in the remote control. 1 Open the battery cover. 2 Insert two size-AAA batteries. 3 Replace the cover and slide in reverse until the lock snaps.
Preparing the Remote Control Please install the batteries before using the remote control. Batteries for the Remote Control If the remote control fails to operate the LCD TV functions, replace the batteries in the remote control. 1 Open the battery cover. 2 Insert two size-AAA batteries. 3 Replace the cover and slide in reverse until the lock snaps.

Operation Manual
Page 12
Connecting the male plug to the AC socket on AC adapter. 2. Note: Connecting the female plug to the wall outlet as illustrated. Connecting the AC adapter to the DC power input of the product. Be sure to fully insert plug into the socket and confirm it is secure. 1. Installation(continued) Power connection Household power outlet Power cord Adapter To power input (DC 12V) DC 12V Connect to the DC input socket of the back of the set. 3.
Connecting the male plug to the AC socket on AC adapter. 2. Note: Connecting the female plug to the wall outlet as illustrated. Connecting the AC adapter to the DC power input of the product. Be sure to fully insert plug into the socket and confirm it is secure. 1. Installation(continued) Power connection Household power outlet Power cord Adapter To power input (DC 12V) DC 12V Connect to the DC input socket of the back of the set. 3.
Operation Manual
Page 13
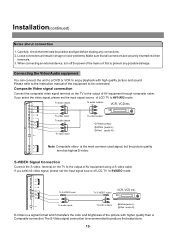
Composite Video signal connection Connect the composite video signal terminal on the TV to the output of LCD TV to SVIDEO mode. To video input To video output To audio inputs R w Y To video input Y Yellow (video) w White (audio L) R Red (audio R) Note: Composite ... or color problems. Make sure that all connectors are securely inserted into their terminals. 3. When connecting an external device, turn off the power of LCD TV to AV1/AV2 mode. Please refer to prevent any connections. 2. If you select S-video signal, please set the input signal source of AV equipment...
Composite Video signal connection Connect the composite video signal terminal on the TV to the output of LCD TV to SVIDEO mode. To video input To video output To audio inputs R w Y To video input Y Yellow (video) w White (audio L) R Red (audio R) Note: Composite ... or color problems. Make sure that all connectors are securely inserted into their terminals. 3. When connecting an external device, turn off the power of LCD TV to AV1/AV2 mode. Please refer to prevent any connections. 2. If you select S-video signal, please set the input signal source of AV equipment...
Operation Manual
Page 14
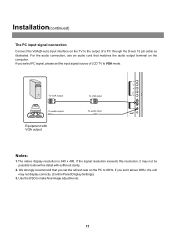
If you set the input signal source of a PC through the D-sub 15 pin cable as illustrated. Use the OSD to the output of LCD TV to VGA mode. If the signal resolution exceeds this resolution, it above 60Hz, the unit may not be possible to 60Hz. We strongly recommend that ... set it may not display correctly. (Control Panel/Display Settings) 3. Installation(continued) The PC input signal connection Connect the VGA(D-sub) input interface on the TV to make final image adjustments. 11
If you set the input signal source of a PC through the D-sub 15 pin cable as illustrated. Use the OSD to the output of LCD TV to VGA mode. If the signal resolution exceeds this resolution, it above 60Hz, the unit may not be possible to 60Hz. We strongly recommend that ... set it may not display correctly. (Control Panel/Display Settings) 3. Installation(continued) The PC input signal connection Connect the VGA(D-sub) input interface on the TV to make final image adjustments. 11
Operation Manual
Page 15
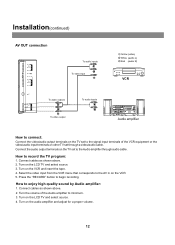
... the audio amplifier and adjust for a proper volume. 12 Turn on the VCR and insert the tape. 4. Connect cables as shown above . 2. Turn on the LCD TV and select source. 3. Installation(continued) AV OUT connection To audio inputs R W To video input Y Y Yellow (video) w White (audio L) R Red (audio R) VCR ...inputs R W Audio amplifier How to connect: Connect the video/audio output terminals on the TV set to the signal input terminals of the Audio amplifier to minimum. 3. Turn on the LCD TV and select source. 4. Select the video input from the VCR menu that corresponds to enjoy...
... the audio amplifier and adjust for a proper volume. 12 Turn on the VCR and insert the tape. 4. Connect cables as shown above . 2. Turn on the LCD TV and select source. 3. Installation(continued) AV OUT connection To audio inputs R W To video input Y Y Yellow (video) w White (audio L) R Red (audio R) VCR ...inputs R W Audio amplifier How to connect: Connect the video/audio output terminals on the TV set to the signal input terminals of the Audio amplifier to minimum. 3. Turn on the LCD TV and select source. 4. Select the video input from the VCR menu that corresponds to enjoy...
Operation Manual
Page 16
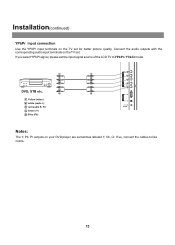
Connect the audio outputs with the corresponding audio input terminals on your DVD player are sometimes labeled Y, Cb, Cr. If so, connect the cables to YPbPr / YCbCr mode. w w Y Yellow (video) W white (audio L) R red (audio R, Pr) G Green (Y) B Blue (Pb) Notes: The Y, Pb, Pr outputs on the TV set. If you select YPbPr signal, please set for better picture quality. G G B B R R R R DVD, STB etc. Installation(continued) YPbPr input connection Use the YPbPr input terminals on the TV set the input signal source of the LCD TV to like colors. 13
Connect the audio outputs with the corresponding audio input terminals on your DVD player are sometimes labeled Y, Cb, Cr. If so, connect the cables to YPbPr / YCbCr mode. w w Y Yellow (video) W white (audio L) R red (audio R, Pr) G Green (Y) B Blue (Pb) Notes: The Y, Pb, Pr outputs on the TV set. If you select YPbPr signal, please set for better picture quality. G G B B R R R R DVD, STB etc. Installation(continued) YPbPr input connection Use the YPbPr input terminals on the TV set the input signal source of the LCD TV to like colors. 13
Operation Manual
Page 32
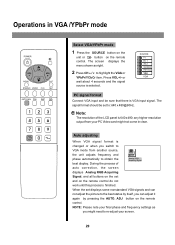
...you might not come in VGA /YPbPr mode Select VGA/YPbPr mode 1 Press the SOURCE button on the SOURCE unit or button on the remote TV control. CLK PC signal format Connect VGA input and be set and on the remote control. The signal format should be sure that there is... finished. ADJ button on the remote control do not work until this process is VGA input signal. During the process of the LCD panel is selected. Note: The resolution of Analog RGB Acquiring Signal auto correction, the screen displays Analog RGB Acquiring Signal, and all buttons on ...
...you might not come in VGA /YPbPr mode Select VGA/YPbPr mode 1 Press the SOURCE button on the SOURCE unit or button on the remote TV control. CLK PC signal format Connect VGA input and be set and on the remote control. The signal format should be sure that there is... finished. ADJ button on the remote control do not work until this process is VGA input signal. During the process of the LCD panel is selected. Note: The resolution of Analog RGB Acquiring Signal auto correction, the screen displays Analog RGB Acquiring Signal, and all buttons on ...


