User Manual
Page 2
For service, support and warranty information, visit www.polaroid.com. As a consumer, you are responsible for your country listed in subsequent editions. Changes are trademarks of properly. This product contains electrical or electronic materials. ©2007...service number for ensuring that this document. The presence of these materials may, if not disposed of HDMI Licensing LLC. HDMI, the HDMI logo and High-Definition Multimedia Interface are trademarks of as unsorted waste and must be corrected in the instruction manual. Confidential unpublished works...
For service, support and warranty information, visit www.polaroid.com. As a consumer, you are responsible for your country listed in subsequent editions. Changes are trademarks of properly. This product contains electrical or electronic materials. ©2007...service number for ensuring that this document. The presence of these materials may, if not disposed of HDMI Licensing LLC. HDMI, the HDMI logo and High-Definition Multimedia Interface are trademarks of as unsorted waste and must be corrected in the instruction manual. Confidential unpublished works...
User Manual
Page 4
.... Before operating this equipment, please read this equipment from the type of power source indicated on the 3-prong plug is intended to alert the user to overturn. ▪ Do not disable the 3-wire grounding type plug. Quick stops, excessive force, and uneven surfaces may cause the equipment and cart/stand to avoid the risk of the serial/model plate. ▪ Never overload wall outlets...
.... Before operating this equipment, please read this equipment from the type of power source indicated on the 3-prong plug is intended to alert the user to overturn. ▪ Do not disable the 3-wire grounding type plug. Quick stops, excessive force, and uneven surfaces may cause the equipment and cart/stand to avoid the risk of the serial/model plate. ▪ Never overload wall outlets...
User Manual
Page 6
Direct contact with power lines. Warnings and Precautions Outdoor Antenna Safety Instructions If an outdoor antenna is connected, follow the precautions below: ▪ An outdoor antenna should not be located in any area where it could come in contact with overhead power lines, or any other electric light or power circuits. ▪ When installing an outdoor antenna system, extreme caution should be avoided...
Direct contact with power lines. Warnings and Precautions Outdoor Antenna Safety Instructions If an outdoor antenna is connected, follow the precautions below: ▪ An outdoor antenna should not be located in any area where it could come in contact with overhead power lines, or any other electric light or power circuits. ▪ When installing an outdoor antenna system, extreme caution should be avoided...
User Manual
Page 7
... Your Remote Control 15 Chapter 2 Installing the LCD TV Connecting a TV Cable or an Antenna 17 Connecting a VCR ...22 Connecting a Video Camera or Game Console 23 Connecting a DVD Player 24 Connecting a Digital TV Cable Box or Digital Satellite Receiver 26 Connecting an AV Equipment with HDMI Connector 27 Connecting an AV Equipment with DVI Connector 28 Connecting a PC...29 Connecting an Audio Receiver or a Dolby Digital 5.1 Sound System 30 Chapter 3 USING THE FEATURES Wide Screen Viewing...31 Operating the Menu...32 Customizing the VIDEO Settings...34...
... Your Remote Control 15 Chapter 2 Installing the LCD TV Connecting a TV Cable or an Antenna 17 Connecting a VCR ...22 Connecting a Video Camera or Game Console 23 Connecting a DVD Player 24 Connecting a Digital TV Cable Box or Digital Satellite Receiver 26 Connecting an AV Equipment with HDMI Connector 27 Connecting an AV Equipment with DVI Connector 28 Connecting a PC...29 Connecting an Audio Receiver or a Dolby Digital 5.1 Sound System 30 Chapter 3 USING THE FEATURES Wide Screen Viewing...31 Operating the Menu...32 Customizing the VIDEO Settings...34...
User Manual
Page 8
... natural-looking, clearer image of multiple cables used to connect current A/V systems. HDTV Component Video Inputs ▪ Offers the best video quality for external equipment connection ▪ 2 sets of composite A/V input terminals ▪ 1 set of S-VIDEO terminals ▪ 2 sets of component Video input terminals ▪ 1 VGA/ Audio input terminals ▪ 2 HDMI/Audio input terminals ▪ 1 set of Audio(L/R) output terminals ▪ 2 SPDIF output terminals (Optical x 1 /Coaxial x 1) ▪ 1 Headphone terminal The built-in TV tuner to receive HD ATSC ▪ This function...
... natural-looking, clearer image of multiple cables used to connect current A/V systems. HDTV Component Video Inputs ▪ Offers the best video quality for external equipment connection ▪ 2 sets of composite A/V input terminals ▪ 1 set of S-VIDEO terminals ▪ 2 sets of component Video input terminals ▪ 1 VGA/ Audio input terminals ▪ 2 HDMI/Audio input terminals ▪ 1 set of Audio(L/R) output terminals ▪ 2 SPDIF output terminals (Optical x 1 /Coaxial x 1) ▪ 1 Headphone terminal The built-in TV tuner to receive HD ATSC ▪ This function...
User Manual
Page 9
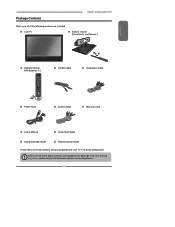
...;guration. LCD TV Bottom Stand / Screw Driver and Screws 4 ENGLISH Remote Control/ AAA Batteries x 2 SET UP TV CAB/ SAT DVD AUX SLEEP DVD MENU VOL CH PAGE MUTE ASPECT LAST GUIDE LIVE TV PIP MENU OK INFO CC EXIT DVR 1 2 3 ABC DEF 4 5 6 GHI JKL MNO 7 8 9 PQRS TUV WXYZ INPUT . 0 ENTER Power Cord VIDEO Cable Component Cable AUDIO Cable Warranty Card User's Manual Quick Start Guide Stand Assembly Guide Remote control Guide These items are all you are missing any items, please contact the Polaroid customer service department...
...;guration. LCD TV Bottom Stand / Screw Driver and Screws 4 ENGLISH Remote Control/ AAA Batteries x 2 SET UP TV CAB/ SAT DVD AUX SLEEP DVD MENU VOL CH PAGE MUTE ASPECT LAST GUIDE LIVE TV PIP MENU OK INFO CC EXIT DVR 1 2 3 ABC DEF 4 5 6 GHI JKL MNO 7 8 9 PQRS TUV WXYZ INPUT . 0 ENTER Power Cord VIDEO Cable Component Cable AUDIO Cable Warranty Card User's Manual Quick Start Guide Stand Assembly Guide Remote control Guide These items are all you are missing any items, please contact the Polaroid customer service department...

User Manual
Page 14
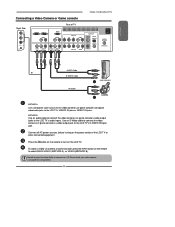
... AUDIO AUDIO OUT STEREO DIGITAL OPTICAL L R Y Pb Pr L COAXIAL L R VIDEO AUDIO VIDEO2 IN S-VIDEO L AUDIO R S-VIDEO IN L R R YPbPr2 IN AUDIO YPbPr1 IN/YPbPr2 IN Connects to the DVD player, Digital Set-Top-Box, or other AV equipment with HDMI connector.HDMI supports enhanced, high-definition video and two-channel digital audio. HDTV/TV Air/CABLE VHF/UHF IN TV CABLE/AIR Connects RF input from VHF/UHF antenna or cable to the AC power cord. 14 Chapter 1 Introducing the LCD TV Rear View...
... AUDIO AUDIO OUT STEREO DIGITAL OPTICAL L R Y Pb Pr L COAXIAL L R VIDEO AUDIO VIDEO2 IN S-VIDEO L AUDIO R S-VIDEO IN L R R YPbPr2 IN AUDIO YPbPr1 IN/YPbPr2 IN Connects to the DVD player, Digital Set-Top-Box, or other AV equipment with HDMI connector.HDMI supports enhanced, high-definition video and two-channel digital audio. HDTV/TV Air/CABLE VHF/UHF IN TV CABLE/AIR Connects RF input from VHF/UHF antenna or cable to the AC power cord. 14 Chapter 1 Introducing the LCD TV Rear View...
User Manual
Page 15
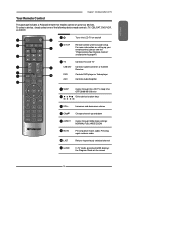
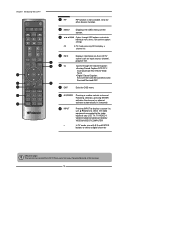
... TV GUIDE PIP MENU 11 OK INFO CC EXIT DVR 1 2 3 ABC DEF 4 5 6 GHI JKL MNO 7 8 9 PQRS TUV WXYZ INPUT . 0 ENTER TV CAB/SAT DVD AUX Controls this LCD TV Controls Cable Converter or Satellite Receiver Controls DVD player or Video player Controls Audio Amplifier SLEEP ► Cycles through Wide mode settings: NORMAL/FULL/WIDE/ZOOM 9 MUTE Pressing once mutes audio. Increases and decreases volume CH▲▼ Change channel up your remote control, please...
... TV GUIDE PIP MENU 11 OK INFO CC EXIT DVR 1 2 3 ABC DEF 4 5 6 GHI JKL MNO 7 8 9 PQRS TUV WXYZ INPUT . 0 ENTER TV CAB/SAT DVD AUX Controls this LCD TV Controls Cable Converter or Satellite Receiver Controls DVD player or Video player Controls Audio Amplifier SLEEP ► Cycles through Wide mode settings: NORMAL/FULL/WIDE/ZOOM 9 MUTE Pressing once mutes audio. Increases and decreases volume CH▲▼ Change channel up your remote control, please...
User Manual
Page 16
... buttons to select a digital channels Effective range: The remote can control the LCD TV from up to display a channel list 15 INFO Displays information on the LCD TV MUTE ASPECT LAST LIVE TV 12 screen such as input source, channel, program title. Chapter 1 Introducing the LCD TV 12 PIP PIP function is not available. SET UP TV CAB/ SAT DVD AUX SLEEP DVD MENU 13 MENU Displays the OSD menu on the screen. 14 OK Cycles through the Closed Caption: Analog Closed Caption...
... buttons to select a digital channels Effective range: The remote can control the LCD TV from up to display a channel list 15 INFO Displays information on the LCD TV MUTE ASPECT LAST LIVE TV 12 screen such as input source, channel, program title. Chapter 1 Introducing the LCD TV 12 PIP PIP function is not available. SET UP TV CAB/ SAT DVD AUX SLEEP DVD MENU 13 MENU Displays the OSD menu on the screen. 14 OK Cycles through the Closed Caption: Analog Closed Caption...
User Manual
Page 19
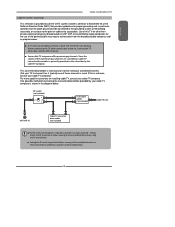
...; The RF switch (not included) is required to the subscriber by the cable TV company. Use of this is used. This converter/descrambler is necessary for normal viewing of scrambled channels. (Set your TV to the point of cable entry as close to channel 3 or 4, typically one of these premium pay channels. ENGLISH Chapter 2 Installing the LCD TV Cable TV (CATV) Connection This reminder is...
...; The RF switch (not included) is required to the subscriber by the cable TV company. Use of this is used. This converter/descrambler is necessary for normal viewing of scrambled channels. (Set your TV to the point of cable entry as close to channel 3 or 4, typically one of these premium pay channels. ENGLISH Chapter 2 Installing the LCD TV Cable TV (CATV) Connection This reminder is...
User Manual
Page 20
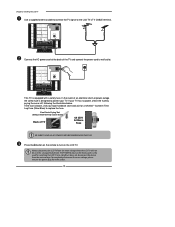
... fuse. Press the button on the remote to the LCD TV's TV CABLE terminal. Chapter 2 Installing the LCD TV Use a supplied antenna cable to connect the TV signal to turn on the front panel is only used for switching the LCD TV into standby, it does not disconnect the device from the main voltage. The POWER button on the LCD TV. HDTV/TV Air/CABLE VHF/UHF IN Connect the AC power cord at the back...
... fuse. Press the button on the remote to the LCD TV's TV CABLE terminal. Chapter 2 Installing the LCD TV Use a supplied antenna cable to connect the TV signal to turn on the front panel is only used for switching the LCD TV into standby, it does not disconnect the device from the main voltage. The POWER button on the LCD TV. HDTV/TV Air/CABLE VHF/UHF IN Connect the AC power cord at the back...
User Manual
Page 21
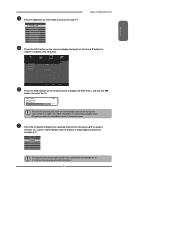
... LCD TV Press the button on the remote to display the Input List. Channel Scan Tuner Mode Channel Skip Favorite List Time Zone Cable Eastern Time TV Select Exit Press the MENU button on the LCD TV. Analog Channels: 25 Digital Channels: 0 Cable 47% The Channel Scanning will be required to run Channel Scanning for each RF input to create a list of receivable channels for example 9-1, 92..) that are showing program at the same time. 21 Main TV(CABLE/AIR) VIDEO1 (SIDE) VIDEO2 (REAR) VIDEO3 (S-VIDEO...
... LCD TV Press the button on the remote to display the Input List. Channel Scan Tuner Mode Channel Skip Favorite List Time Zone Cable Eastern Time TV Select Exit Press the MENU button on the LCD TV. Analog Channels: 25 Digital Channels: 0 Cable 47% The Channel Scanning will be required to run Channel Scanning for each RF input to create a list of receivable channels for example 9-1, 92..) that are showing program at the same time. 21 Main TV(CABLE/AIR) VIDEO1 (SIDE) VIDEO2 (REAR) VIDEO3 (S-VIDEO...
User Manual
Page 22
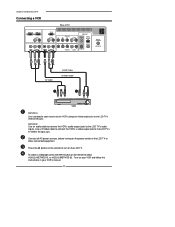
... DIGITAL OPTICAL L R Y Pb Pr L COAXIAL L R R YPbPr2 IN AUDIO HDTV/TV Air/CABLE VHF/UHF IN AV Cable AUDIO Cable S-VIDEO Cable METHOD A: Use a composite cable to connect the VCR's composite video/audio jacks to turn on the LCD TV. Connect all AC power sources, before turning on your VCR and follow the instructions in your VCR's manual. 22 To watch a videotape, press the INPUT button on the remote to the LCD TV's S-VIDEO IN input jack. METHOD B: Use an audio cable to connect...
... DIGITAL OPTICAL L R Y Pb Pr L COAXIAL L R R YPbPr2 IN AUDIO HDTV/TV Air/CABLE VHF/UHF IN AV Cable AUDIO Cable S-VIDEO Cable METHOD A: Use a composite cable to connect the VCR's composite video/audio jacks to turn on the LCD TV. Connect all AC power sources, before turning on your VCR and follow the instructions in your VCR's manual. 22 To watch a videotape, press the INPUT button on the remote to the LCD TV's S-VIDEO IN input jack. METHOD B: Use an audio cable to connect...
User Manual
Page 23
... or game console, press the INPUT button on the LCD TV. Not all AC power sources, before turning on the power switch of TV HDMI 2 IN HDMI 1 IN AUDIO L R VGA IN AUDIO L R VIDEO L R AUDIO VIDEO2 IN S-VIDEO L AUDIO R S-VIDEO IN YPbPr1 IN Y Pb Pr AUDIO AUDIO OUT STEREO DIGITAL OPTICAL L R Y Pb Pr L COAXIAL L R R YPbPr2 IN AUDIO HDTV/TV Air/CABLE VHF/UHF IN AUDIO Cable or S-VIDEO Cable GAME CONSOLE AV Cable METHOD A: Use a composite cable to connect the video camera's or game console's composite video/audio jacks...
... or game console, press the INPUT button on the LCD TV. Not all AC power sources, before turning on the power switch of TV HDMI 2 IN HDMI 1 IN AUDIO L R VGA IN AUDIO L R VIDEO L R AUDIO VIDEO2 IN S-VIDEO L AUDIO R S-VIDEO IN YPbPr1 IN Y Pb Pr AUDIO AUDIO OUT STEREO DIGITAL OPTICAL L R Y Pb Pr L COAXIAL L R R YPbPr2 IN AUDIO HDTV/TV Air/CABLE VHF/UHF IN AUDIO Cable or S-VIDEO Cable GAME CONSOLE AV Cable METHOD A: Use a composite cable to connect the video camera's or game console's composite video/audio jacks...
User Manual
Page 29
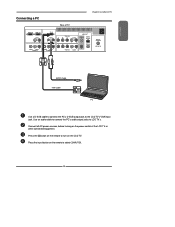
.... Use an audio cable to connect the PC's audio output jacks to select COMPUTER. 29 Press the Input button on the remote to LCD TV's. ENGLISH Connecting a PC Rear of the LCD TV or other connected equipment. Press the button on the power switch of TV Chapter 3 Using the LCD TV HDMI 2 IN HDMI 1 IN AUDIO L R VGA IN AUDIO L R VIDEO L R AUDIO VIDEO2 IN S-VIDEO L AUDIO R S-VIDEO IN YPbPr1 IN Y Pb Pr AUDIO AUDIO OUT STEREO DIGITAL OPTICAL L R Y Pb Pr L COAXIAL L R R YPbPr2 IN AUDIO HDTV...
.... Use an audio cable to connect the PC's audio output jacks to select COMPUTER. 29 Press the Input button on the remote to LCD TV's. ENGLISH Connecting a PC Rear of the LCD TV or other connected equipment. Press the button on the power switch of TV Chapter 3 Using the LCD TV HDMI 2 IN HDMI 1 IN AUDIO L R VGA IN AUDIO L R VIDEO L R AUDIO VIDEO2 IN S-VIDEO L AUDIO R S-VIDEO IN YPbPr1 IN Y Pb Pr AUDIO AUDIO OUT STEREO DIGITAL OPTICAL L R Y Pb Pr L COAXIAL L R R YPbPr2 IN AUDIO HDTV...
User Manual
Page 33
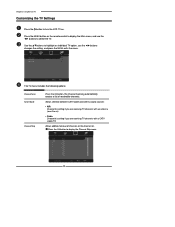
... in adjustment mode, and use the ◄► buttons to exit the menu. 33 Channel Scan Tuner Mode Channel Skip Time Zone Cable Eastern Time Chapter 3 Using the LCD TV TV Select Exit SETUP MENU: Allows you to edit and label channels. Press the EXIT button to change the value of the sub-menu, and press the OK button. ENGLISH TV MENU: Allows you to set up a variety of features: Language, Closed Caption, factory reset, Parental Control sleep timer. ▪ If the signal source...
... in adjustment mode, and use the ◄► buttons to exit the menu. 33 Channel Scan Tuner Mode Channel Skip Time Zone Cable Eastern Time Chapter 3 Using the LCD TV TV Select Exit SETUP MENU: Allows you to edit and label channels. Press the EXIT button to change the value of the sub-menu, and press the OK button. ENGLISH TV MENU: Allows you to set up a variety of features: Language, Closed Caption, factory reset, Parental Control sleep timer. ▪ If the signal source...
User Manual
Page 35
... of connected equipment: Medium/ Strong/Off/Low. ENGLISH Chapter 3 Using the LCD TV Color temperature Adjusts color components independently to achieve a warm or cool effect: Cool/Middle/Warm/User ▪ Warm: Increases red tint ▪ Nature : Increases natural tint ▪ Cool : Increases blue tint ▪ User : Allows the user to reduce the noise level of the picture based on the VGA mode Controls the signal phase...
... of connected equipment: Medium/ Strong/Off/Low. ENGLISH Chapter 3 Using the LCD TV Color temperature Adjusts color components independently to achieve a warm or cool effect: Cool/Middle/Warm/User ▪ Warm: Increases red tint ▪ Nature : Increases natural tint ▪ Cool : Increases blue tint ▪ User : Allows the user to reduce the noise level of the picture based on the VGA mode Controls the signal phase...
User Manual
Page 38
... antenna (over the air) ▪ Cable Choose this setting if you are receiving TV channels with a CATV (cable TV) Allows addition/removal of receivable channels. Use the ▲▼buttons to turn the LCD TV on. Channel Scan Tuner Mode Channel Skip Cable TV Select Exit The TV menu includes the following options: Channel Scan Tuner Mode Channel Skip Press the OK button, the Channel Scanning automatically creates a list of channels on the remote control to display the Main menu, and use the ◄► buttons changes...
... antenna (over the air) ▪ Cable Choose this setting if you are receiving TV channels with a CATV (cable TV) Allows addition/removal of receivable channels. Use the ▲▼buttons to turn the LCD TV on. Channel Scan Tuner Mode Channel Skip Cable TV Select Exit The TV menu includes the following options: Channel Scan Tuner Mode Channel Skip Press the OK button, the Channel Scanning automatically creates a list of channels on the remote control to display the Main menu, and use the ◄► buttons changes...
User Manual
Page 48
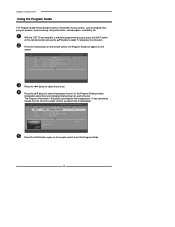
... Press the GUIDE button again on the remote control and use the ▲▼ buttons to exit the Program Guide 48 With the LCD TV connected to a television programming source, press the INPUT button on the remote control to select TV and press the OK button. Chapter 3 Using the LCD TV Using the Program Guide The Program Guide feature brings all sorts of information to your screen, such as program title, program duration, time remaining, rating information, closed caption, availability, etc...
... Press the GUIDE button again on the remote control and use the ▲▼ buttons to exit the Program Guide 48 With the LCD TV connected to a television programming source, press the INPUT button on the remote control to select TV and press the OK button. Chapter 3 Using the LCD TV Using the Program Guide The Program Guide feature brings all sorts of information to your screen, such as program title, program duration, time remaining, rating information, closed caption, availability, etc...
User Manual
Page 52
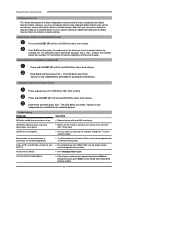
... not change channels, press Enter on a device. See "Changing Volume Lock". Locking Volume Control to One Mode (Global Volume Lock) Press and hold SET UP until the red LED blinks twice; The LED blinks twice. then release. Unlocking a Single Device's Volume Control Press a device key (TV, VCR/DVD, CBL/ SAT, or AUX). Replace battery with an infrared remote control. Try entry sequence again. No volume on this remote after entering the channel number. 52 If the original remote control required...
... not change channels, press Enter on a device. See "Changing Volume Lock". Locking Volume Control to One Mode (Global Volume Lock) Press and hold SET UP until the red LED blinks twice; The LED blinks twice. then release. Unlocking a Single Device's Volume Control Press a device key (TV, VCR/DVD, CBL/ SAT, or AUX). Replace battery with an infrared remote control. Try entry sequence again. No volume on this remote after entering the channel number. 52 If the original remote control required...


