Owner's Manual
Page 3
... improper adjustment of electric shock to qualified service personnel under the following the operating instructions. Do not defeat the safety purpose of power source indicated on or pinched by a qualified technician to restore the product to provide some protection against them might be taken to a wall or ceiling. POWER-CORD PROTECTION - When installing an outside antenna system should be sure the antenna or cable system...
... improper adjustment of electric shock to qualified service personnel under the following the operating instructions. Do not defeat the safety purpose of power source indicated on or pinched by a qualified technician to restore the product to provide some protection against them might be taken to a wall or ceiling. POWER-CORD PROTECTION - When installing an outside antenna system should be sure the antenna or cable system...
Owner's Manual
Page 4
... input signal 29 Using surround back channel processing 29 Using the Virtual Surround Back mode 29 Using Midnight and Loudness 30 Using the Sound Retriever 30 Enhancing dialog 30 Using the tone controls 30 06 Using the tuner Listening to the radio 31 Improving FM stereo sound 31 Tuning directly to a station 31 Saving station presets 31 Naming station presets 32 Listening to station presets 32 07 The System Setup menu Making receiver settings from the System Setup menu 33 Automatic MCACC (Expert 33 Surround back speaker setting...
... input signal 29 Using surround back channel processing 29 Using the Virtual Surround Back mode 29 Using Midnight and Loudness 30 Using the Sound Retriever 30 Enhancing dialog 30 Using the tone controls 30 06 Using the tuner Listening to the radio 31 Improving FM stereo sound 31 Tuning directly to a station 31 Saving station presets 31 Naming station presets 32 Listening to station presets 32 07 The System Setup menu Making receiver settings from the System Setup menu 33 Automatic MCACC (Expert 33 Surround back speaker setting...
Owner's Manual
Page 5
... Selecting preset codes directly 65 Programming signals from your iPod 46 Using XM Radio 47 Connecting your XM Radio receiver 47 Listening to XM Radio 48 Using XM HD Surround 48 Saving channel presets 48 Connecting using HDMI 49 About HDMI 49 Connecting the multichannel analog inputs 50 Selecting the multichannel analog inputs 50 Second Zone speaker B setup 50 Switching the speaker system 51 Bi-amping your front speakers 51 Bi-wiring your speakers 52 Connecting additional amplifiers 52 Multi-room listening 53 Making multi-room connections 53 Using the multi-room controls...
... Selecting preset codes directly 65 Programming signals from your iPod 46 Using XM Radio 47 Connecting your XM Radio receiver 47 Listening to XM Radio 48 Using XM HD Surround 48 Saving channel presets 48 Connecting using HDMI 49 About HDMI 49 Connecting the multichannel analog inputs 50 Selecting the multichannel analog inputs 50 Second Zone speaker B setup 50 Switching the speaker system 51 Bi-amping your front speakers 51 Bi-wiring your speakers 52 Connecting additional amplifiers 52 Multi-room listening 53 Making multi-room connections 53 Using the multi-room controls...
Owner's Manual
Page 9
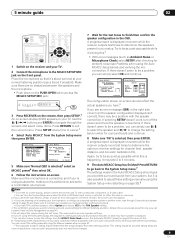
Front Center Surround SB SUB W. [ YES ] [ YES ] [ YES ] [ Yx2 ] [ YES ] [ OK ] :Cancel PHONES SYSTEM SETUP RETURN TONE TUNING/ STATION TUNER EDIT SPEAKERS MULTI JOG S -VIDEO VIDEO/GAME INPUT VIDEO L AUDIO R DIGITAL IN MCACC SETUP MIC 3 Press RECEIVER on the remote, then press SETUP.1 An on-screen display (OSD) appears on page 42. • The subwoofer distance setting may be a problem, you 're using the Auto MCACC Setup below) and verifying the mic connection. Use the / / / buttons and ENTER to navigate through Surround back speaker setting on page...
Front Center Surround SB SUB W. [ YES ] [ YES ] [ YES ] [ Yx2 ] [ YES ] [ OK ] :Cancel PHONES SYSTEM SETUP RETURN TONE TUNING/ STATION TUNER EDIT SPEAKERS MULTI JOG S -VIDEO VIDEO/GAME INPUT VIDEO L AUDIO R DIGITAL IN MCACC SETUP MIC 3 Press RECEIVER on the remote, then press SETUP.1 An on-screen display (OSD) appears on page 42. • The subwoofer distance setting may be a problem, you 're using the Auto MCACC Setup below) and verifying the mic connection. Use the / / / buttons and ENTER to navigate through Surround back speaker setting on page...
Owner's Manual
Page 10
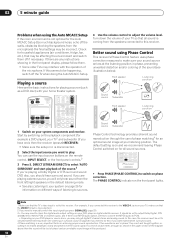
... SHIFT PHASE MCACC S.DIRECT 1 Switch on the front panel lights. 02 5 minute guide Problems when using Phase Control This receiver's Phase Control feature uses phase correction measures to your DVD player or digital satellite receiver. Check for playing a source (such as shown in surround sound on page 26 if you need to manually switch the input signal type press SIGNAL SEL (page 29). 3 • You may only get digital 2 channel stereo and analog sound. DIRECT (STREAM DIRECT) to select 'AUTO SURROUND' and start playback...
... SHIFT PHASE MCACC S.DIRECT 1 Switch on the front panel lights. 02 5 minute guide Problems when using Phase Control This receiver's Phase Control feature uses phase correction measures to your DVD player or digital satellite receiver. Check for playing a source (such as shown in surround sound on page 26 if you need to manually switch the input signal type press SIGNAL SEL (page 29). 3 • You may only get digital 2 channel stereo and analog sound. DIRECT (STREAM DIRECT) to select 'AUTO SURROUND' and start playback...
Owner's Manual
Page 14
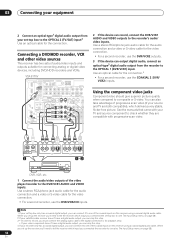
... video player/recorder to composite or S-video. Using the component video jacks Component video should give superior picture quality when compared to the DVR/VCR1 AUDIO and VIDEO inputs. OPTICAL COAXIAL DIGITAL OUT 3 R AUDIO L VIDEO AV IN S-VIDEO R AUDIO L AV OUT VIDEO S-VIDEO 12 DVR, VCR, etc. 1 Connect the audio/video outputs of progressive scan video (if your source and TV are compatible with your TV and source component to check whether they are both compatible), which input you connected the recorder to (see The Input Setup menu...
... video player/recorder to composite or S-video. Using the component video jacks Component video should give superior picture quality when compared to the DVR/VCR1 AUDIO and VIDEO inputs. OPTICAL COAXIAL DIGITAL OUT 3 R AUDIO L VIDEO AV IN S-VIDEO R AUDIO L AV OUT VIDEO S-VIDEO 12 DVR, VCR, etc. 1 Connect the audio/video outputs of progressive scan video (if your source and TV are compatible with your TV and source component to check whether they are both compatible), which input you connected the recorder to (see The Input Setup menu...
Owner's Manual
Page 16
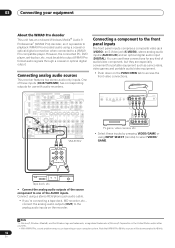
... or optical digital connection when connected to output WMA9 Pro format audio signals through a coaxial or optical digital output. must be downsampled to the front panel inputs The front panel inputs comprise a composite video jack (VIDEO), an S-Video jack (S-VIDEO), stereo analog audio inputs (AUDIO L/R) and an optical digital audio input (DIGITAL). You can use with audio recorders. WOOFER ROUND 12V TR (DC OUT IN MONITOR MULT OUT MON OUT OUT IN L CENTER DVR/VCR2 R FRONT SUB WOOFER MULTI CH IN VSX-81TXV PHONES SYSTEM SETUP RETURN TONE TUNING/ STATION TUNER EDIT SPEAKERS...
... or optical digital connection when connected to output WMA9 Pro format audio signals through a coaxial or optical digital output. must be downsampled to the front panel inputs The front panel inputs comprise a composite video jack (VIDEO), an S-Video jack (S-VIDEO), stereo analog audio inputs (AUDIO L/R) and an optical digital audio input (DIGITAL). You can use with audio recorders. WOOFER ROUND 12V TR (DC OUT IN MONITOR MULT OUT MON OUT OUT IN L CENTER DVR/VCR2 R FRONT SUB WOOFER MULTI CH IN VSX-81TXV PHONES SYSTEM SETUP RETURN TONE TUNING/ STATION TUNER EDIT SPEAKERS...
Owner's Manual
Page 25
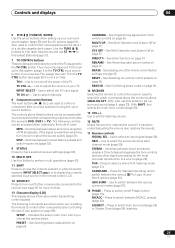
... example, INPUT SELECT ), or to display the currently selected input source in tuner: MPX - S.DIRECT - TV VOL +/- - Indicates the setup mode, from other components connected to turn on page 65): SETUP - LEARNING - ADV.SURR - Press to adjust the volume on this button to perform multi operations (page 67). 11 SHIFT Press to access the controls outlined in white boxes (for more on page 66. 14 RECEIVER Switches the remote to control the receiver (used to control a component after you...
... example, INPUT SELECT ), or to display the currently selected input source in tuner: MPX - S.DIRECT - TV VOL +/- - Indicates the setup mode, from other components connected to turn on page 65): SETUP - LEARNING - ADV.SURR - Press to adjust the volume on this button to perform multi operations (page 67). 11 SHIFT Press to access the controls outlined in white boxes (for more on page 66. 14 RECEIVER Switches the remote to control the receiver (used to control a component after you...
Owner's Manual
Page 29
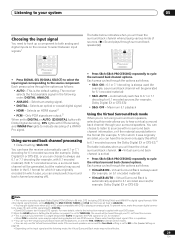
... Using the Virtual Surround Back mode When you're not using surround back speakers, selecting this receiver. 3 • This is useful if you will be heard through surround back speaker(s)) STATUS SIGNAL SEL SBch STEREO MULTI OPE THX STANDARD ADV.SURR SHIFT PHASE MCACC S.DIRECT RECEIVER RECEIVER • Press SIGNAL SEL (SIGNAL SELECT) to select the input signal corresponding to the source component. With other digital signal formats, set to DIGITAL or AUTO, 2 DIGITAL lights with Dolby Digital decoding, DTS lights with 5.1 encoded material). Please select another input signal...
... Using the Virtual Surround Back mode When you're not using surround back speakers, selecting this receiver. 3 • This is useful if you will be heard through surround back speaker(s)) STATUS SIGNAL SEL SBch STEREO MULTI OPE THX STANDARD ADV.SURR SHIFT PHASE MCACC S.DIRECT RECEIVER RECEIVER • Press SIGNAL SEL (SIGNAL SELECT) to select the input signal corresponding to the source component. With other digital signal formats, set to DIGITAL or AUTO, 2 DIGITAL lights with Dolby Digital decoding, DTS lights with 5.1 encoded material). Please select another input signal...
Owner's Manual
Page 33
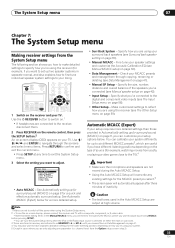
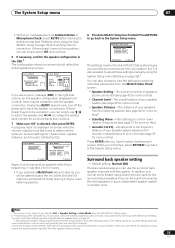
... the digital and component video inputs (see The Input Setup menu on page 58). • Other Setup - RECEIVER INPUT SELECT SYSTEM OFF SOURCE AV PRE-PROGRAMMED AND LEARNING REMOTE CONTROL UNIT CD DVD DVR 2 TV DVR1 TVCTRL CD-R/TAPE iPod HDMI2 HDMI1 XM RADIO TUNER ROOM 2 RECEIVER SR+ DIMMER DIALOG E S.RETRIEVER MIDNIGHT/ LOUDNESS D.ACCESS +10 AV PARAMETER TOP MENU TUNE DTVMENU ST SETUP ENTER CLASS DISC ENTER CH LEVEL MENU ST T.EDIT RETURN TUNE GUIDE CATEGORY TV CONTROL BAND TV VOL INPUT SELECT...
... the digital and component video inputs (see The Input Setup menu on page 58). • Other Setup - RECEIVER INPUT SELECT SYSTEM OFF SOURCE AV PRE-PROGRAMMED AND LEARNING REMOTE CONTROL UNIT CD DVD DVR 2 TV DVR1 TVCTRL CD-R/TAPE iPod HDMI2 HDMI1 XM RADIO TUNER ROOM 2 RECEIVER SR+ DIMMER DIALOG E S.RETRIEVER MIDNIGHT/ LOUDNESS D.ACCESS +10 AV PARAMETER TOP MENU TUNE DTVMENU ST SETUP ENTER CLASS DISC ENTER CH LEVEL MENU ST T.EDIT RETURN TUNE GUIDE CATEGORY TV CONTROL BAND TV VOL INPUT SELECT...
Owner's Manual
Page 34
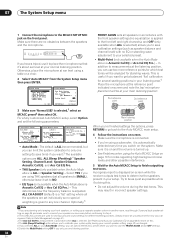
... when the Auto Mode above is ALL or Speaker Setting) - PHONES SYSTEM SETUP RETURN TONE TUNING/ STATION TUNER EDIT SPEAKERS MULTI JOG S -VIDEO VIDEO/GAME INPUT VIDEO L AUDIO R DIGITAL IN MCACC SETUP MIC If you have a tripod, use it 's doing this . 4 The ALL (Keep SPsetting) option allows you to calibrate your system while leaving your current speaker setting (page 42) unchanged. 5 If you selected ALL as your speakers as speaker distance and channel level) with the front speaker settings (no...
... when the Auto Mode above is ALL or Speaker Setting) - PHONES SYSTEM SETUP RETURN TONE TUNING/ STATION TUNER EDIT SPEAKERS MULTI JOG S -VIDEO VIDEO/GAME INPUT VIDEO L AUDIO R DIGITAL IN MCACC SETUP MIC If you have a tripod, use it 's doing this . 4 The ALL (Keep SPsetting) option allows you to calibrate your system while leaving your current speaker setting (page 42) unchanged. 5 If you selected ALL as your speakers as speaker distance and channel level) with the front speaker settings (no...
Owner's Manual
Page 35
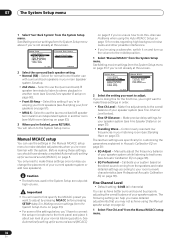
... see Problems when using the Auto MCACC Setup on -screen should give you have been set according to the System Setup menu. Subwoofer Check :Cancel 1.Auto MCACC Now Analyzing... (6/9) Surround Analyzing Speaker System [ OK ] Channel Level [ OK ] Speaker Distance [ ] :Cancel Again, try to adjust these settings manually using the Manual speaker setup on this is selected, then press ENTER. Note 1 This screen is displayed on-screen while the receiver outputs more on page 42. • The subwoofer distance setting may...
... see Problems when using the Auto MCACC Setup on -screen should give you have been set according to the System Setup menu. Subwoofer Check :Cancel 1.Auto MCACC Now Analyzing... (6/9) Surround Analyzing Speaker System [ OK ] Channel Level [ OK ] Speaker Distance [ ] :Cancel Again, try to adjust these settings manually using the Manual speaker setup on this is selected, then press ENTER. Note 1 This screen is displayed on-screen while the receiver outputs more on page 42. • The subwoofer distance setting may...
Owner's Manual
Page 36
... the direct sound coming from the speakers and make detailed settings according to stereo playback in the Manual MCACC setup menu to make these settings, you may not achieve using the Manual speaker setup on page 50). • Front Bi-Amp - Fine Channel Level • Default setting: 0.0dB (all channels) You can use the (surround back) B speaker terminals to listen to your speaker system. Caution • The test tones used in order. • Fine Ch Level - Control overly resonant low frequencies in...
... the direct sound coming from the speakers and make detailed settings according to stereo playback in the Manual MCACC setup menu to make these settings, you may not achieve using the Manual speaker setup on page 50). • Front Bi-Amp - Fine Channel Level • Default setting: 0.0dB (all channels) You can use the (surround back) B speaker terminals to listen to your speaker system. Caution • The test tones used in order. • Fine Ch Level - Control overly resonant low frequencies in...
Owner's Manual
Page 44
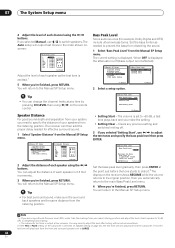
... not affected). 5.Manual SP Setup a.Speaker Setting b.Channel Level c.Speaker Distance d.Bass Peak Level e.X-Curve f.THX Audio Setting 5d.Bass Peak Level Bass Peak Level [Setting Start [Setting Clear :OFF ] ] :Return 2 Select a setup option. :Return Tip • You can adjust the distance of each speaker as needed for example, Dolby Digital and DTS) include ultra-low bass tones. When OFF is displayed the attenuator is off . 3 If you selected 'Setting Start', use / to the Manual SP Setup menu. If not, the test tone will output test tones in the...
... not affected). 5.Manual SP Setup a.Speaker Setting b.Channel Level c.Speaker Distance d.Bass Peak Level e.X-Curve f.THX Audio Setting 5d.Bass Peak Level Bass Peak Level [Setting Start [Setting Clear :OFF ] ] :Return 2 Select a setup option. :Return Tip • You can adjust the distance of each speaker as needed for example, Dolby Digital and DTS) include ultra-low bass tones. When OFF is displayed the attenuator is off . 3 If you selected 'Setting Start', use / to the Manual SP Setup menu. If not, the test tone will output test tones in the...

Owner's Manual
Page 58
... your DVD player only has an optical output, you will need to change the DVD/LD input function's Digital In setting from COAX 1 (default) to the optical input you've connected it on the rear of the receiver generally correspond to the name of one of video cable as DVD/LD or VIDEO/ GAME) which, in turn, correspond with the names on the remote control. 6.Input Setup (1/2) Input DVD Digital In [ COAX-1 ] Component In [ Comp-2 ] ( Next ) :Finish 6.Input Setup (2/2) ( Back) PlayStation Input Name Default...
... your DVD player only has an optical output, you will need to change the DVD/LD input function's Digital In setting from COAX 1 (default) to the optical input you've connected it on the rear of the receiver generally correspond to the name of one of video cable as DVD/LD or VIDEO/ GAME) which, in turn, correspond with the names on the remote control. 6.Input Setup (1/2) Input DVD Digital In [ COAX-1 ] Component In [ Comp-2 ] ( Next ) :Finish 6.Input Setup (2/2) ( Back) PlayStation Input Name Default...
Owner's Manual
Page 70
...; See Using this receiver with this unit's sensor Many Pioneer components have connected a remote control to the CONTROL IN jack (using a mini-plug cable), you won't be able to control this unit using . LD player TOP MENU Displays the disc 'top' menu of the LD. Player SUBTITLE Displays/changes the subtitles DVD/DVR on page 65. VCR/DVD/DVR Player HDD (SHIFT Switches to control other Pioneer components with a Pioneer plasma display on each end for as many components as the ENTER button...
...; See Using this receiver with this unit's sensor Many Pioneer components have connected a remote control to the CONTROL IN jack (using a mini-plug cable), you won't be able to control this unit using . LD player TOP MENU Displays the disc 'top' menu of the LD. Player SUBTITLE Displays/changes the subtitles DVD/DVR on page 65. VCR/DVD/DVR Player HDD (SHIFT Switches to control other Pioneer components with a Pioneer plasma display on each end for as many components as the ENTER button...
Owner's Manual
Page 72
... best reception and secure to a wall, etc. For AM broadcasts • Adjust the position and direction of your DVD player is compatible with Dolby Digital/DTS discs. Noise is output when scanning a • This is not turned down . • Make sure that the multichannel analog inputs are not selected. If only one of the receiver. Select any other equipment, or move the AM antenna. No sound when using one surround back speaker...
... best reception and secure to a wall, etc. For AM broadcasts • Adjust the position and direction of your DVD player is compatible with Dolby Digital/DTS discs. Noise is output when scanning a • This is not turned down . • Make sure that the multichannel analog inputs are not selected. If only one of the receiver. Select any other equipment, or move the AM antenna. No sound when using one surround back speaker...
Owner's Manual
Page 73
... display device using component video connections), or when digital video conversion is switched off , or the lowpass cutoff is set up for all speakers (see Watching video and audio sources independently on page 62). • Check the video output settings of phase. is not a malfunction. If the levels in Channel Level on page 8 to set to the highest frequency setting. Settings Symptom The Auto MCACC Setup continually shows an error. Subwoofer output is very low. • To route more signal...
... display device using component video connections), or when digital video conversion is switched off , or the lowpass cutoff is set up for all speakers (see Watching video and audio sources independently on page 62). • Check the video output settings of phase. is not a malfunction. If the levels in Channel Level on page 8 to set to the highest frequency setting. Settings Symptom The Auto MCACC Setup continually shows an error. Subwoofer output is very low. • To route more signal...
Owner's Manual
Page 74
... adjustments are selected, select a different input source. EQ adjustments made , the filters used in bass management (the subwoofer channel) will not change the speaker setting manually in the configuration, or do not seem to disable the key lock. You can change for the Auto Mode in Manual MCACC setup on the graphical output. button. • If the multichannel analog inputs are taken this setting. 12 Additional information Symptom Remedy After using the SIGNAL SELECT Setup menu...
... adjustments are selected, select a different input source. EQ adjustments made , the filters used in bass management (the subwoofer channel) will not change the speaker setting manually in the configuration, or do not seem to disable the key lock. You can change for the Auto Mode in Manual MCACC setup on the graphical output. button. • If the multichannel analog inputs are taken this setting. 12 Additional information Symptom Remedy After using the SIGNAL SELECT Setup menu...
Owner's Manual
Page 75
... display on the disc. If they are not, please connect them using the component, S-video or composite video jacks. • Depending on page 70). Re-enter the preset codes. HDMI Symptom The HDMI indicator blinks continuously. No sound, or sound suddenly ceases. When playing a disc, the • Make sure that the receiver is set to AUTO or DIGITAL (see Choosing the input signal on page 29). 2 PL II or Neo:6 indicator lights • If a two channel...
... display on the disc. If they are not, please connect them using the component, S-video or composite video jacks. • Depending on page 70). Re-enter the preset codes. HDMI Symptom The HDMI indicator blinks continuously. No sound, or sound suddenly ceases. When playing a disc, the • Make sure that the receiver is set to AUTO or DIGITAL (see Choosing the input signal on page 29). 2 PL II or Neo:6 indicator lights • If a two channel...


