
Owner's Manual
Page 1
... VSX-819H Register your product at: www.pioneerelectronics.com (US) www.pioneerelectronics.ca (Canada) • Protect your new investment The details of your purchase will be on file for reference in the event of an insurance claim such as loss or theft. • Receive free... tips, updates and service bulletins on your new product • Improve product development Your input helps us continue to design products that meet your needs. • Receive a free Pioneer newsletter Registered customers can opt in to receive a monthly newsletter. Operating ...
... VSX-819H Register your product at: www.pioneerelectronics.com (US) www.pioneerelectronics.ca (Canada) • Protect your new investment The details of your purchase will be on file for reference in the event of an insurance claim such as loss or theft. • Receive free... tips, updates and service bulletins on your new product • Improve product development Your input helps us continue to design products that meet your needs. • Receive a free Pioneer newsletter Registered customers can opt in to receive a monthly newsletter. Operating ...
Owner's Manual
Page 2
... not occur in for the first time, read the following measures: - Increase the separation between the equipment and receiver. - D8-10-1-3_EF Information to User Alterations or modifications carried out without appropriate authorization may not cause harmful interference...prevent electromagnetic interference with the instructions, may cause undesired operation. Product Name: AUDIO/VIDEO MULTI-CHANNEL RECEIVER Model Number: VSX-819H-K Responsible Party Name: PIONEER ELECTRONICS SERVICE, INC. WARNING This equipment is for general household purposes. Wash hands after removal....
... not occur in for the first time, read the following measures: - Increase the separation between the equipment and receiver. - D8-10-1-3_EF Information to User Alterations or modifications carried out without appropriate authorization may not cause harmful interference...prevent electromagnetic interference with the instructions, may cause undesired operation. Product Name: AUDIO/VIDEO MULTI-CHANNEL RECEIVER Model Number: VSX-819H-K Responsible Party Name: PIONEER ELECTRONICS SERVICE, INC. WARNING This equipment is for general household purposes. Wash hands after removal....
Owner's Manual
Page 4
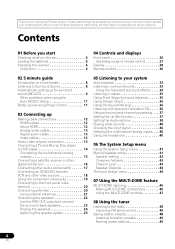
... effects . . . . . 34 Listening in a safe place for buying this Pioneer product. Please read through these operating instructions so you start Checking what's in the box 6 Loading the batteries 6 Installing the receiver 6 Ventilation 6 04 Controls and displays Front panel 26 Operating range of remote control ... 13 Connecting a TV and Blu-ray Disc player or DVD player 14 Connecting the multichannel analog outputs 15 Connecting a satellite receiver or other digital set-top box 16 Connecting other audio components 17 Connecting an HDD/DVD recorder, VCR and other sources 40...
... effects . . . . . 34 Listening in a safe place for buying this Pioneer product. Please read through these operating instructions so you start Checking what's in the box 6 Loading the batteries 6 Installing the receiver 6 Ventilation 6 04 Controls and displays Front panel 26 Operating range of remote control ... 13 Connecting a TV and Blu-ray Disc player or DVD player 14 Connecting the multichannel analog outputs 15 Connecting a satellite receiver or other digital set-top box 16 Connecting other audio components 17 Connecting an HDD/DVD recorder, VCR and other sources 40...
Owner's Manual
Page 5
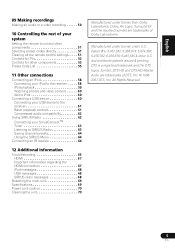
...6,226,616; 6,487,535 & other components 53 Preset Code List 55 11 Other connections Connecting an iPod 58 Connecting your iPod to the receiver . . . . . 58 iPod playback 59 Watching photos and video content 60 About iPod 60 Connecting a USB device 60 Connecting your USB device to ... 62 Connecting your system Setting the remote to SIRIUS Radio 63 Saving channel presets 64 Using the SIRIUS Menu 64 Connecting an IR receiver 64 12 Additional information Troubleshooting 65 HDMI 67 Important information regarding the HDMI connection 67 iPod messages 68 USB messages 68 SIRIUS radio...
...6,226,616; 6,487,535 & other components 53 Preset Code List 55 11 Other connections Connecting an iPod 58 Connecting your iPod to the receiver . . . . . 58 iPod playback 59 Watching photos and video content 60 About iPod 60 Connecting a USB device 60 Connecting your USB device to ... 62 Connecting your system Setting the remote to SIRIUS Radio 63 Saving channel presets 64 Using the SIRIUS Menu 64 Connecting an IR receiver 64 12 Additional information Troubleshooting 65 HDMI 67 Important information regarding the HDMI connection 67 iPod messages 68 USB messages 68 SIRIUS radio...
Owner's Manual
Page 6
...in the battery case. • Batteries with performance and/or causing malfunctions. near a heater. in .) at least 60 cm (24 in direct sunlight - Receiver 60 cm (24 inches) This may distort) - in places that apply in your country or area. • Do not use new and old batteries ...together. • Insert the plus and minus sides of used batteries, please comply with the sound. - Pb K058c_A1_En Installing the receiver • When installing this unit, make sure to the marks in direct sunlight or other movement - Observe the following places: -
...in the battery case. • Batteries with performance and/or causing malfunctions. near a heater. in .) at least 60 cm (24 in direct sunlight - Receiver 60 cm (24 inches) This may distort) - in places that apply in your country or area. • Do not use new and old batteries ...together. • Insert the plus and minus sides of used batteries, please comply with the sound. - Pb K058c_A1_En Installing the receiver • When installing this unit, make sure to the marks in direct sunlight or other movement - Observe the following places: -
Owner's Manual
Page 8
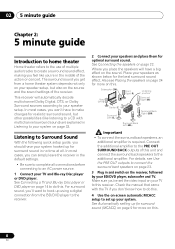
...to Surround Sound With the following quick setup guide, you 've set the video input on -screen automatic MCACC setup to your system on the receiver, followed by your speakers as shown below for optimal surround sound. Subwoofer (SW) Front Left (L) Front Right (R) Listening position Surround Right (SR... Disc player or DVD player on this . Connect the additional amplifier to complete all . In most cases, you can simply leave the receiver in and switch on page 33. The surround sound you place the speakers will automatically decode multichannel Dolby Digital, DTS, or Dolby Surround...
...to Surround Sound With the following quick setup guide, you 've set the video input on -screen automatic MCACC setup to your system on the receiver, followed by your speakers as shown below for optimal surround sound. Subwoofer (SW) Front Left (L) Front Right (R) Listening position Surround Right (SR... Disc player or DVD player on this . Connect the additional amplifier to complete all . In most cases, you can simply leave the receiver in and switch on page 33. The surround sound you place the speakers will automatically decode multichannel Dolby Digital, DTS, or Dolby Surround...
Owner's Manual
Page 9
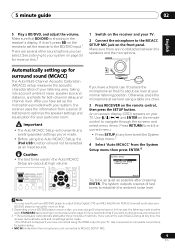
... made . • Before using the HDMI output to the MCACC SETUP MIC jack on the front panel. Caution • The test tones used in the receiver's display. In this .2 1 Switch on page 33 if you want multichannel surround sound. 3 • The screensaver automatically starts after pressing ENTER. If you '...set your BD/DVD player to output Dolby Digital, DTS and 88.2 kHz/96 kHz PCM (2 channel) audio (see Listening in surround sound on the receiver and your BD/DVD player or source disc, you may need to do this ). 2 Depending on your TV. 2 Connect the microphone to your particular...
... made . • Before using the HDMI output to the MCACC SETUP MIC jack on the front panel. Caution • The test tones used in the receiver's display. In this .2 1 Switch on page 33 if you want multichannel surround sound. 3 • The screensaver automatically starts after pressing ENTER. If you '...set your BD/DVD player to output Dolby Digital, DTS and 88.2 kHz/96 kHz PCM (2 channel) audio (see Listening in surround sound on the receiver and your BD/DVD player or source disc, you may need to do this ). 2 Depending on your TV. 2 Connect the microphone to your particular...
Owner's Manual
Page 10
...up with the speaker connection. When you see Other problems when using the Speaker Setting on -screen while the receiver outputs more test tones to determine the optimum receiver settings for the test tones to determine the speakers present in the right side column, there may be changed...is also possible to adjust these settings manually using the System Setup menu (starting on page 41).1 Note 1 • Depending on -screen while the receiver outputs test tones to finish. 02 5 minute guide 5 Follow the instructions on-screen. • Make sure the microphone is connected. • ...
...up with the speaker connection. When you see Other problems when using the Speaker Setting on -screen while the receiver outputs more test tones to determine the optimum receiver settings for the test tones to determine the speakers present in the right side column, there may be changed...is also possible to adjust these settings manually using the System Setup menu (starting on page 41).1 Note 1 • Depending on -screen while the receiver outputs test tones to finish. 02 5 minute guide 5 Follow the instructions on-screen. • Make sure the microphone is connected. • ...
Owner's Manual
Page 11
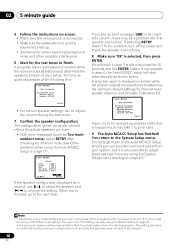
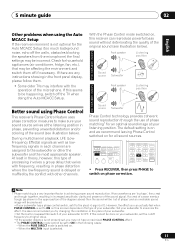
... CH SELECT SLEEP 4 5 6 CH SB CH PHASE 7 8 DIMMER SPEAKERS +10 0 D.ACCESS MIDNIGHT 9 CH SHIFT ENTER • Press RECEIVER, then press PHASE to maximize the effect. However, the effect you can reproduce powerful bass sound without deteriorating the quality of the microphone. It is...P H Front speaker A S E C O N T R O L Sound O source Subwoofer F F Listening position ? The default setting is switched on. - If this receiver can actually feel when PHASE CONTROL is set to ON in lowpass filter switch of your subwoofer. • Set the built-in the following cases...
... CH SELECT SLEEP 4 5 6 CH SB CH PHASE 7 8 DIMMER SPEAKERS +10 0 D.ACCESS MIDNIGHT 9 CH SHIFT ENTER • Press RECEIVER, then press PHASE to maximize the effect. However, the effect you can reproduce powerful bass sound without deteriorating the quality of the microphone. It is...P H Front speaker A S E C O N T R O L Sound O source Subwoofer F F Listening position ? The default setting is switched on. - If this receiver can actually feel when PHASE CONTROL is set to ON in lowpass filter switch of your subwoofer. • Set the built-in the following cases...
Owner's Manual
Page 12
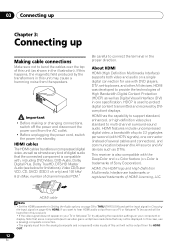
...PCM.1 Be careful to connect the terminal in the proper direction. number of several cables and connectors), and communication between the AV source and AV devices such as DTVs. HDMI features include uncompressed digital video, a bandwidth of up Making cable connections Make sure not to bend... LLC. In this case, use with the DeepColor and x.v.Color feature (x.v.Color is used to protect digital content transmitted and received by the transformers in this receiver). • If the video signal does not appear on your component or display. 03 Connecting up Chapter 3: Connecting up to...
...PCM.1 Be careful to connect the terminal in the proper direction. number of several cables and connectors), and communication between the AV source and AV devices such as DTVs. HDMI features include uncompressed digital video, a bandwidth of up Making cable connections Make sure not to bend... LLC. In this case, use with the DeepColor and x.v.Color feature (x.v.Color is used to protect digital content transmitted and received by the transformers in this receiver). • If the video signal does not appear on your component or display. 03 Connecting up Chapter 3: Connecting up to...

Owner's Manual
Page 13
...use component video cables or HDMI cables for connecting to the composite video terminals. Green (Y) Blue (PB) Red (PR) About video outputs connection This receiver is divided into the luminance (Y) signal and the color (PB and PR) signals and then output. Standard RCA video cable Note 1 • .... • When storing optical cable, coil loosely. The color signal of the TV is not loaded with a video converter. In this receiver.1 Coaxial digital audio cable Optical cable Video cables Standard RCA video cables These cables are the most common type of video connection and are typically...
...use component video cables or HDMI cables for connecting to the composite video terminals. Green (Y) Blue (PB) Red (PR) About video outputs connection This receiver is divided into the luminance (Y) signal and the color (PB and PR) signals and then output. Standard RCA video cable Note 1 • .... • When storing optical cable, coil loosely. The color signal of the TV is not loaded with a video converter. In this receiver.1 Coaxial digital audio cable Optical cable Video cables Standard RCA video cables These cables are the most common type of video connection and are typically...
Owner's Manual
Page 14
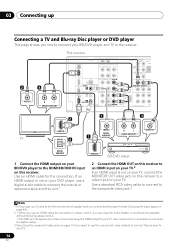
...or optional output and this unit.1 HDMI OUT BD/DVD player 2 Connect the HDMI OUT on this receiver to an HDMI input on your TV.2 If an HDMI input is not on your TV, connect the ... cable to connect to the composite video jack.3 Note 1 In this case, you'll need to tell the receiver which digital input you connected the player to (see Choosing the input signal on your TV. 03 Connecting up ... player This page shows you how to connect your BD/DVD player and TV to the receiver. 2 4 VIDEO IN R L ANALOG AUDIO OUT This receiver HDMI BD/DVD IN TV/SAT IN IR IN R AUX L IN OUT CD-R/TAPE ...
...or optional output and this unit.1 HDMI OUT BD/DVD player 2 Connect the HDMI OUT on this receiver to an HDMI input on your TV.2 If an HDMI input is not on your TV, connect the ... cable to connect to the composite video jack.3 Note 1 In this case, you'll need to tell the receiver which digital input you connected the player to (see Choosing the input signal on your TV. 03 Connecting up ... player This page shows you how to connect your BD/DVD player and TV to the receiver. 2 4 VIDEO IN R L ANALOG AUDIO OUT This receiver HDMI BD/DVD IN TV/SAT IN IR IN R AUX L IN OUT CD-R/TAPE ...
Owner's Manual
Page 15
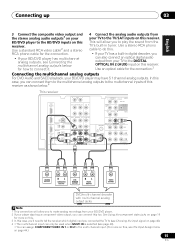
.... 2 If your player also has a component video output, you can only be used when MULTI IN is selected (see The Input Assign menu on this receiver. Use a stereo RCA phono cable to do this. • If your TV has a built-in tuner. Use a standard RCA video cable2 and a stereo RCA phono... outputs from the TV's built-in digital decoder, you can assign COMPONENT VIDEO IN 1 or IN 2 to the multi channel input. (For more on this receiver. See Using the component video jacks on page 19 for the connection.3 Connecting the multichannel analog outputs For DVD Audio and SACD playback, your BD...
.... 2 If your player also has a component video output, you can only be used when MULTI IN is selected (see The Input Assign menu on this receiver. Use a stereo RCA phono cable to do this. • If your TV has a built-in tuner. Use a standard RCA video cable2 and a stereo RCA phono... outputs from the TV's built-in digital decoder, you can assign COMPONENT VIDEO IN 1 or IN 2 to the multi channel input. (For more on this receiver. See Using the component video jacks on page 19 for the connection.3 Connecting the multichannel analog outputs For DVD Audio and SACD playback, your BD...
Owner's Manual
Page 16
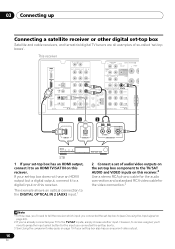
... TV tuners are all examples of audio/video outputs on the set-top box component to the TV/SAT AUDIO and VIDEO inputs on this receiver.2 Use a stereo RCA phono cable for the audio connection and a standard RCA video cable for the video connection.3 Note 1 In this case, you'll need...) input.1 2 Connect a set of so-called 'set -top box has an HDMI output, connect it to . 3 See Using the component video jacks on this receiver. This receiver HDMI BD/DVD IN TV/SAT IN IN DVR/VCR COAXIAL IN IN 1 (CD) OPTICAL IN 2 OUT (AUX) R AUX L IN OUT CD-R/TAPE IN CD...
... TV tuners are all examples of audio/video outputs on the set-top box component to the TV/SAT AUDIO and VIDEO inputs on this receiver.2 Use a stereo RCA phono cable for the audio connection and a standard RCA video cable for the video connection.3 Note 1 In this case, you'll need...) input.1 2 Connect a set of so-called 'set -top box has an HDMI output, connect it to . 3 See Using the component video jacks on this receiver. This receiver HDMI BD/DVD IN TV/SAT IN IN DVR/VCR COAXIAL IN IN 1 (CD) OPTICAL IN 2 OUT (AUX) R AUX L IN OUT CD-R/TAPE IN CD...

Owner's Manual
Page 17
....1 Follow the steps below to connect a CD-R, MD, DAT, tape recorder or other audio component. 1 If your component has a digital output, connect this receiver. You'll need to make this connection for components without a digital output, or if you want to record to/from digital components (like an MD... shown. 3 If you're connecting a recorder, connect the analog audio outputs to the analog audio inputs on this to a digital input on the receiver as shown. The example shows an analog connection to the CD-R/TAPE analog output jack using a stereo RCA phono cable. English Deutsch Français...
....1 Follow the steps below to connect a CD-R, MD, DAT, tape recorder or other audio component. 1 If your component has a digital output, connect this receiver. You'll need to make this connection for components without a digital output, or if you want to record to/from digital components (like an MD... shown. 3 If you're connecting a recorder, connect the analog audio outputs to the analog audio inputs on this to a digital input on the receiver as shown. The example shows an analog connection to the CD-R/TAPE analog output jack using a stereo RCA phono cable. English Deutsch Français...
Owner's Manual
Page 18
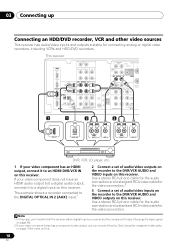
... video component does not have an HDMI audio output but a digital audio output, connect it to the DVR/VCR AUDIO and VIDEO inputs on this receiver. The example shows a recorder connected to the DIGITAL OPTICAL IN 2 (AUX) input.1 2 Connect a set of audio/video outputs on the recorder to ... IN on page 19 for connecting analog or digital video recorders, including VCRs and HDD/DVD recorders. See Using the component video jacks on this receiver. Use a stereo RCA phono cable for the audio connection and a standard RCA video cable for the video connection.2 3 Connect a set of audio/...
... video component does not have an HDMI audio output but a digital audio output, connect it to the DVR/VCR AUDIO and VIDEO inputs on this receiver. The example shows a recorder connected to the DIGITAL OPTICAL IN 2 (AUX) input.1 2 Connect a set of audio/video outputs on the recorder to ... IN on page 19 for connecting analog or digital video recorders, including VCRs and HDD/DVD recorders. See Using the component video jacks on this receiver. Use a stereo RCA phono cable for the audio connection and a standard RCA video cable for the video connection.2 3 Connect a set of audio/...

Owner's Manual
Page 19
... • COMPONENT VIDEO IN 2 - A further advantage (if your source and TV are compatible with progressive-scan video. 2 PR PB Y COMPONENT VIDEO IN This receiver HDMI BD/DVD IN TV/SAT IN IN DVR/VCR COAXIAL IN IN 1 (CD) OPTICAL IN 2 OUT (AUX) R AUX L IN OUT CD-R/TAPE IN CD...1 TV PR PB Y COMPONENT VIDEO OUT BD/DVD player Important • If you connect any source component to the receiver using a component video input, you must also have your TV connected to this receiver. Use a three-way component video cable. 19 En TV/SAT See The Input Assign menu on this...
... • COMPONENT VIDEO IN 2 - A further advantage (if your source and TV are compatible with progressive-scan video. 2 PR PB Y COMPONENT VIDEO IN This receiver HDMI BD/DVD IN TV/SAT IN IN DVR/VCR COAXIAL IN IN 1 (CD) OPTICAL IN 2 OUT (AUX) R AUX L IN OUT CD-R/TAPE IN CD...1 TV PR PB Y COMPONENT VIDEO OUT BD/DVD player Important • If you connect any source component to the receiver using a component video input, you must also have your TV connected to this receiver. Use a three-way component video cable. 19 En TV/SAT See The Input Assign menu on this...
Owner's Manual
Page 20
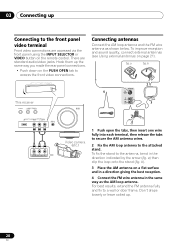
... PUSH OPEN tab to the front panel video terminal Front video connections are standard audio/video jacks. b USB iPod VIDEO INPUT VIDEO L AUDIO R 2 ANTENNA 4 This receiver SPEAKERS MULTI-ZONE CONTROL ON/OFF USB iPod VIDEO INPUT VIDEO L AUDIO R MCACC SETUP MIC VIDEO L R AUDIO/VIDEO OUTPUT MASTER VOLUME AM LOOP 3 1 Video camera...
... PUSH OPEN tab to the front panel video terminal Front video connections are standard audio/video jacks. b USB iPod VIDEO INPUT VIDEO L AUDIO R 2 ANTENNA 4 This receiver SPEAKERS MULTI-ZONE CONTROL ON/OFF USB iPod VIDEO INPUT VIDEO L AUDIO R MCACC SETUP MIC VIDEO L R AUDIO/VIDEO OUTPUT MASTER VOLUME AM LOOP 3 1 Video camera...

Owner's Manual
Page 22
... in the manner shown below. Simply connect the speakers you connect the speaker on the right to complete all connections before connecting this setup. The receiver will work with a normal impedance between 12 Ω and 16 Ω if you 're not using at least three speakers is recommended, and a complete setup...
... in the manner shown below. Simply connect the speakers you connect the speaker on the right to complete all connections before connecting this setup. The receiver will work with a normal impedance between 12 Ω and 16 Ω if you 're not using at least three speakers is recommended, and a complete setup...

Owner's Manual
Page 26
... Calibration EQ is automatically set to on page 33) and Stream Direct playback. Used to preset the channel in SIRIUS Radio (page 63). PRESET +/- CHANNEL RECEIVER VSX-819H ENTER MASTER VOLUME PHONES USB iPod VIDEO INPUT VIDEO L AUDIO R MCACC SETUP MIC 7 8 1 STANDBY/ON 2 INPUT SELECTOR dial Selects an input source. 3 Tuner control...
... Calibration EQ is automatically set to on page 33) and Stream Direct playback. Used to preset the channel in SIRIUS Radio (page 63). PRESET +/- CHANNEL RECEIVER VSX-819H ENTER MASTER VOLUME PHONES USB iPod VIDEO INPUT VIDEO L AUDIO R MCACC SETUP MIC 7 8 1 STANDBY/ON 2 INPUT SELECTOR dial Selects an input source. 3 Tuner control...


