
Owner's Manual
Page 3
... in a particular installation. However, the Plasma Display system will not occur in case of the FCC Rules. Product Name: Plasma Display System Model Number: PRO-150FD/PRO-110FD Product Category: Class B Personal Computers & Peripherals Responsible Party Name: PIONEER ELECTRONICS SERVICE, INC. These limits are...+0 ˚C to +40 ˚C (+32 ˚F to correct the interference by turning the equipment off and on, the user is connected. - Consult the dealer or an experienced radio/TV technician for connections. THIS IS FOR YOUR SECURITY. D1-4-2-6-1_En CAUTION: The switch on ...
... in a particular installation. However, the Plasma Display system will not occur in case of the FCC Rules. Product Name: Plasma Display System Model Number: PRO-150FD/PRO-110FD Product Category: Class B Personal Computers & Peripherals Responsible Party Name: PIONEER ELECTRONICS SERVICE, INC. These limits are...+0 ˚C to +40 ˚C (+32 ˚F to correct the interference by turning the equipment off and on, the user is connected. - Consult the dealer or an experienced radio/TV technician for connections. THIS IS FOR YOUR SECURITY. D1-4-2-6-1_En CAUTION: The switch on ...

Owner's Manual
Page 4
...Pioneer stand 17 Installing the Pioneer speaker 19 Preventing the plasma display from that shown in this Pioneer product. Illustrations shown in the explanatory drawings. However the method of the power plug and power outlet may sometimes differ from falling over 26 Detaching the Pioneer stand 27 Cable connections for watching digital and/or conventional TV... Allowed operation range of the remote control unit 31 06 Basic Operations 32 Turning on the power 32 Turning off the power 32 Watching TV channels 33 Selecting the antenna 33 Changing channels 33 Changing the volume and ...
...Pioneer stand 17 Installing the Pioneer speaker 19 Preventing the plasma display from that shown in this Pioneer product. Illustrations shown in the explanatory drawings. However the method of the power plug and power outlet may sometimes differ from falling over 26 Detaching the Pioneer stand 27 Cable connections for watching digital and/or conventional TV... Allowed operation range of the remote control unit 31 06 Basic Operations 32 Turning on the power 32 Turning off the power 32 Watching TV channels 33 Selecting the antenna 33 Changing channels 33 Changing the volume and ...
Owner's Manual
Page 9
...cause after displaying still images for increased efficiency. Image retention, also known as still images for 5 to 10 minutes, the system automatically turns the image off to prevent damage from screen burning • Set the Side Mask detection function to burning of the still images and the...on the screen due to "On". Displaying dark images after -image lagging. Note • When a program menu, TV Guide screen or frozen image is less of the plasma display becomes high. To use either of these screen modes to disappear depends on the luminance of the fluorescent materials. ...
...cause after displaying still images for increased efficiency. Image retention, also known as still images for 5 to 10 minutes, the system automatically turns the image off to prevent damage from screen burning • Set the Side Mask detection function to burning of the still images and the...on the screen due to "On". Displaying dark images after -image lagging. Note • When a program menu, TV Guide screen or frozen image is less of the plasma display becomes high. To use either of these screen modes to disappear depends on the luminance of the fluorescent materials. ...
Owner's Manual
Page 14
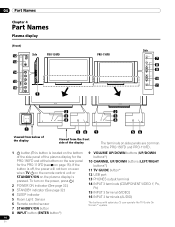
...3 3 4 4 1 56 1 56 Viewed from below of the display Viewed from the front side of the plasma display for the PRO-150FD and at the bottom on the rear panel for the PRO-110FD (see 1 on...asterisks (*) can operate the TV Guide On Screen™ system. 14 En To turn on even when TV a on the remote control unit or STANDBY/ON on the plasma display is located on ...the bottom of the side panel of the display The terminals on side panels are common to the PRO-150FD and PRO-110FD. 1 a button (This button is pressed. If the button is off, the power will not turn...
...3 3 4 4 1 56 1 56 Viewed from below of the display Viewed from the front side of the plasma display for the PRO-150FD and at the bottom on the rear panel for the PRO-110FD (see 1 on...asterisks (*) can operate the TV Guide On Screen™ system. 14 En To turn on even when TV a on the remote control unit or STANDBY/ON on the plasma display is located on ...the bottom of the side panel of the display The terminals on side panels are common to the PRO-150FD and PRO-110FD. 1 a button (This button is pressed. If the button is off, the power will not turn...
Owner's Manual
Page 16
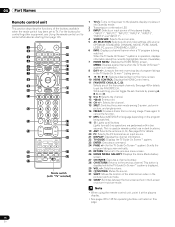
...6 22 7 23 8 24 9 25 10 26 11 12 13 27 28 14 29 30 15 31 16 32 17 Mode switch (with "TV" selected) 1 TV a: Turns on the menu screen. 10 HDMI CONTROL: Displays the HDMI Control menu. 11 FAVORITE CH (A, B, C, D): Selects any of the four preset channels.... 04 Part Names Remote control unit This section describes the functions of the plasma display. ("INPUT 1", "INPUT 2", "INPUT 3", "INPUT 4", "INPUT 5", "INPUT 6" and "...
...6 22 7 23 8 24 9 25 10 26 11 12 13 27 28 14 29 30 15 31 16 32 17 Mode switch (with "TV" selected) 1 TV a: Turns on the menu screen. 10 HDMI CONTROL: Displays the HDMI Control menu. 11 FAVORITE CH (A, B, C, D): Selects any of the four preset channels.... 04 Part Names Remote control unit This section describes the functions of the plasma display. ("INPUT 1", "INPUT 2", "INPUT 3", "INPUT 4", "INPUT 5", "INPUT 6" and "...
Owner's Manual
Page 17
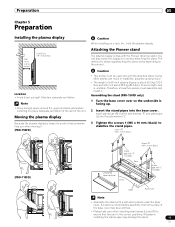
...inscribed Sheet Base cover Note • Assemble the stand with the Pioneer table top stand. Attaching the Pioneer stand The plasma display comes with a soft sheet placed under the base cover. Assembling the stand (PRO-150FD only) 1 Turn the base cover over so the underside is heavy, be used ... has no depth, and is about 55.5 kg (122.4 lbs.) and a 50 inch about 38.8 kg (85.5 lbs.), it . Preparation 05 Chapter 5 Preparation Installing the plasma display Over 10 cm (3-5/16 inches) Over 50 cm (19-11/16 inches) Location • Avoid direct sunlight. Maintain adequate ventilation...
...inscribed Sheet Base cover Note • Assemble the stand with the Pioneer table top stand. Attaching the Pioneer stand The plasma display comes with a soft sheet placed under the base cover. Assembling the stand (PRO-150FD only) 1 Turn the base cover over so the underside is heavy, be used ... has no depth, and is about 55.5 kg (122.4 lbs.) and a 50 inch about 38.8 kg (85.5 lbs.), it . Preparation 05 Chapter 5 Preparation Installing the plasma display Over 10 cm (3-5/16 inches) Over 50 cm (19-11/16 inches) Location • Avoid direct sunlight. Maintain adequate ventilation...

Owner's Manual
Page 19
...off and remove the power cord from scratches or damage. • Work only with the plasma display lying flat on to stand upright. For speaker installation, see Installing the Pioneer speaker. About the speaker • In order to prevent damage to the speaker system ...to turn the connected devices off from input overload, please observe the following precautions: • Do not use the speaker with anything other than the stand insertion slots. Plasma display 3 Replace the plasma display to the mounting fittings. Installing the Pioneer speaker Insert the stand into the plasma display...
...off and remove the power cord from scratches or damage. • Work only with the plasma display lying flat on to stand upright. For speaker installation, see Installing the Pioneer speaker. About the speaker • In order to prevent damage to the speaker system ...to turn the connected devices off from input overload, please observe the following precautions: • Do not use the speaker with anything other than the stand insertion slots. Plasma display 3 Replace the plasma display to the mounting fittings. Installing the Pioneer speaker Insert the stand into the plasma display...

Owner's Manual
Page 22
...terminals (Red) and cable (Black) to terminals (Black). Black Connect the cables correctly with respect to the polarity of the plasma display speaker terminals, that the insulation is a short in the and cables caused by slightly tugging on the cable after making ... sounds or unstable sound image. • Bundle the cable without pulling. 22 En Gray Black Gray Connecting the speaker cables to turn the connected devices off and remove the power cord from the wall outlet beforehand when changing the connection or installation method. •...
...terminals (Red) and cable (Black) to terminals (Black). Black Connect the cables correctly with respect to the polarity of the plasma display speaker terminals, that the insulation is a short in the and cables caused by slightly tugging on the cable after making ... sounds or unstable sound image. • Bundle the cable without pulling. 22 En Gray Black Gray Connecting the speaker cables to turn the connected devices off and remove the power cord from the wall outlet beforehand when changing the connection or installation method. •...

Owner's Manual
Page 25
...sound effects, delivering poor bass sounds or unstable sound image. • Bundle the cable without pulling. 25 En Connecting the speaker cables to turn the connected devices off and remove the power cord from the wall outlet beforehand when changing the connection or installation method. • If ... Lever • Be sure to the speaker. Speaker terminal Speaker terminal Speaker cable Note • Press the lever and insert the end of plasma display. Speaker terminal • Check if the end of the speaker cables are securely connected to the rear of the cable. • When...
...sound effects, delivering poor bass sounds or unstable sound image. • Bundle the cable without pulling. 25 En Connecting the speaker cables to turn the connected devices off and remove the power cord from the wall outlet beforehand when changing the connection or installation method. • If ... Lever • Be sure to the speaker. Speaker terminal Speaker terminal Speaker cable Note • Press the lever and insert the end of plasma display. Speaker terminal • Check if the end of the speaker cables are securely connected to the rear of the cable. • When...
Owner's Manual
Page 30
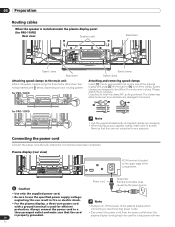
.... 2 1 Note • Use the supplied bead bands and speed clamps as necessary. • When tidying up your routing system. Note • Always turn off the power of the plasma display when connecting or disconnecting power cords. • Disconnect the power cord from the power outlet when the...hole on the upper edge of [1] to bundle them carefully. Please attach them so that the cord is located on the rear of the plasma display and snap [2] into the back of the compartment. Connecting the power cord Connect the power cord after all component connections have been completed...
.... 2 1 Note • Use the supplied bead bands and speed clamps as necessary. • When tidying up your routing system. Note • Always turn off the power of the plasma display when connecting or disconnecting power cords. • Disconnect the power cord from the power outlet when the...hole on the upper edge of [1] to bundle them carefully. Please attach them so that the cord is located on the rear of the plasma display and snap [2] into the back of the compartment. Connecting the power cord Connect the power cord after all component connections have been completed...
Owner's Manual
Page 32
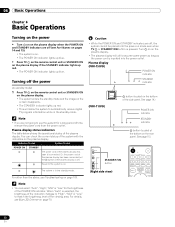
...Operations Chapter 6 Basic Operations Turning on the power • Turn a on on the plasma display when the POWER ON and STANDBY indicators are off (see Part Names on pages 14 and 15). • The system is on. • The POWER ON indicator lights up blue. • Press TV a on the remote control ... is off. For details, see Troubleshooting on mode even when TV a or STANDBY/ON button is in the standby mode. Turn a on on page 70. (Right side view) 32 En Note • You can check the current status of the plasma display has been disconnected. Note • If you are off...
...Operations Chapter 6 Basic Operations Turning on the power • Turn a on on the plasma display when the POWER ON and STANDBY indicators are off (see Part Names on pages 14 and 15). • The system is on. • The POWER ON indicator lights up blue. • Press TV a on the remote control ... is off. For details, see Troubleshooting on mode even when TV a or STANDBY/ON button is in the standby mode. Turn a on on page 70. (Right side view) 32 En Note • You can check the current status of the plasma display has been disconnected. Note • If you are off...
Owner's Manual
Page 50
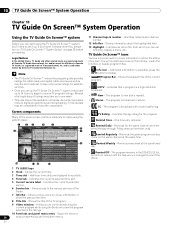
... in all eight days of listings may take up to make using the Guide or to "TV Guide On Screen™ System Setup" on page 38 before proceeding. Indicates the age rating for show or 50 product advertising (and the panel menu). Reminds the same program any day it up. Half-hour... On Screen™ System Operation Chapter 10 TV Guide On Screen™ System Operation Using the TV Guide On Screen™ system Before you can set reminder, display a menu, etc. If you haven't already done this, please turn to view the program selected in the SCHEDULE list, but will locate these icons ...
... in all eight days of listings may take up to make using the Guide or to "TV Guide On Screen™ System Setup" on page 38 before proceeding. Indicates the age rating for show or 50 product advertising (and the panel menu). Reminds the same program any day it up. Half-hour... On Screen™ System Operation Chapter 10 TV Guide On Screen™ System Operation Using the TV Guide On Screen™ system Before you can set reminder, display a menu, etc. If you haven't already done this, please turn to view the program selected in the SCHEDULE list, but will locate these icons ...

Owner's Manual
Page 60
... open the "Picture" menu. • When an adjustment screen is displayed, you can also change as OPTIMUM, Room Light Sensor and Intelligent Mode, are temporarily turned off when the "Picture" menu is displayed. A confirmation screen appears. This may cause the screen brightness to suddenly change the item to be adjusted, by...
... open the "Picture" menu. • When an adjustment screen is displayed, you can also change as OPTIMUM, Room Light Sensor and Intelligent Mode, are temporarily turned off when the "Picture" menu is displayed. A confirmation screen appears. This may cause the screen brightness to suddenly change the item to be adjusted, by...

Owner's Manual
Page 76
... connections, use the SR+ cable. • When making control cord connections. IR REPEATER OUT Connect control cords between the plasma display and other Pioneer equipment having the logo. When SR+ is used (a, b, and c): The control cables (commercially available) are mono sound cables...control cords between the plasma display and other Pioneer equipment. For more pieces of the plasma display supports SR+, which allows linked operations with the Pioneer AV receiver supporting SR+. SR+ presents functions such as option). 76 En This function is turned off when making connections...
... connections, use the SR+ cable. • When making control cord connections. IR REPEATER OUT Connect control cords between the plasma display and other Pioneer equipment having the logo. When SR+ is used (a, b, and c): The control cables (commercially available) are mono sound cables...control cords between the plasma display and other Pioneer equipment. For more pieces of the plasma display supports SR+, which allows linked operations with the Pioneer AV receiver supporting SR+. SR+ presents functions such as option). 76 En This function is turned off when making connections...
Owner's Manual
Page 77
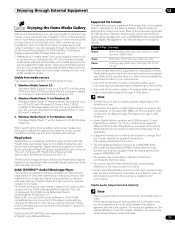
... to find digital media stores and devices that work depending on the menu screen turn white. However, media server content protected by digital rights management, such as trick...11 for updated information: PlaysForSure is files stored on one or more information. Visit the Pioneer website for Windows Vista interface. This unit complies with the Mass Storage File System through...Enjoying the Home Media Gallery back or displayed on the content. For USB interface, the plasma display supports Mass Storage Class devices. * Referred to USB sources. This unit complies ...
... to find digital media stores and devices that work depending on the menu screen turn white. However, media server content protected by digital rights management, such as trick...11 for updated information: PlaysForSure is files stored on one or more information. Visit the Pioneer website for Windows Vista interface. This unit complies with the Mass Storage File System through...Enjoying the Home Media Gallery back or displayed on the content. For USB interface, the plasma display supports Mass Storage Class devices. * Referred to USB sources. This unit complies ...

Owner's Manual
Page 78
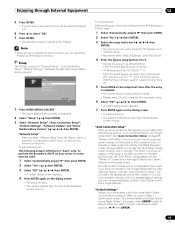
...select "No" then enter "IP Address" and "Subnet mask". See the diagram below . 4 5 Rear view Viewed from the bottom of the plasma display Cross-over ") Ethernet (LAN) cable. appears on DHCP, refer to network device's operating instructions. • You may need to enter ...Select "Setup" ( / then ENTER). 3 Select "Network Setup" ( / then ENTER). 4 Select "Automatically acquire IP" ( / / / then ENTER). • The screen turns from "Select" mode to "Input" mode. 5 Select "Yes" ( / then ENTER). • The IP Address is finished, setting values become effective and the top menu of...
...select "No" then enter "IP Address" and "Subnet mask". See the diagram below . 4 5 Rear view Viewed from the bottom of the plasma display Cross-over ") Ethernet (LAN) cable. appears on DHCP, refer to network device's operating instructions. • You may need to enter ...Select "Setup" ( / then ENTER). 3 Select "Network Setup" ( / then ENTER). 4 Select "Automatically acquire IP" ( / / / then ENTER). • The screen turns from "Select" mode to "Input" mode. 5 Select "Yes" ( / then ENTER). • The IP Address is finished, setting values become effective and the top menu of...
Owner's Manual
Page 89
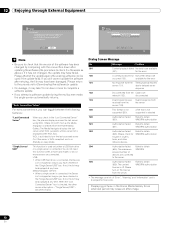
... "Automatically acquire IP" then press ENTER. 2 Select "No" ( / then ENTER). 3 Select the setup item's box ( / / / then ENTER). • The screen turns to entry mode for "IP Address" and "Subnet mask". • No need to enter "Default Gateway" and "DNS Server". 4 Enter the figures using buttons 0 to... you enjoy content on the network, you can select the desired device and then content in the box, the list is complete. • The screen turns to setup selection mode. • Repeat steps 2 to 4 to complete the necessary setup. 6 Select "OK" ( / / / then ENTER). • A restart dialog...
... "Automatically acquire IP" then press ENTER. 2 Select "No" ( / then ENTER). 3 Select the setup item's box ( / / / then ENTER). • The screen turns to entry mode for "IP Address" and "Subnet mask". • No need to enter "Default Gateway" and "DNS Server". 4 Enter the figures using buttons 0 to... you enjoy content on the network, you can select the desired device and then content in the box, the list is complete. • The screen turns to setup selection mode. • Repeat steps 2 to 4 to complete the necessary setup. 6 Select "OK" ( / / / then ENTER). • A restart dialog...

Owner's Manual
Page 91
... files is dimmed (grayed out). Software to default (See "Default Settings" on the Pioneer website (http:// www.pioneerelectronics.com). Updating the software Then perform the following procedure to... ( / then ENTER). • The screen changes to the previous screen (ENTER). Do not turn the system off until the procedure is complete. 1 Press HOME MEDIA GALLERY. • The Home... Media Gallery screen is launched, available servers are copied into the plasma display. 5 Select "Next" ( / then ENTER). • The next screen appears. Select the ...
... files is dimmed (grayed out). Software to default (See "Default Settings" on the Pioneer website (http:// www.pioneerelectronics.com). Updating the software Then perform the following procedure to... ( / then ENTER). • The screen changes to the previous screen (ENTER). Do not turn the system off until the procedure is complete. 1 Press HOME MEDIA GALLERY. • The Home... Media Gallery screen is launched, available servers are copied into the plasma display. 5 Select "Next" ( / then ENTER). • The next screen appears. Select the ...
Owner's Manual
Page 92
...): • When a single server is connected, the Server List is skipped as long as you have checked in the "Last Connected Server" box, the plasma display accesses the last server using WOL ("Wake On LAN") first as the Media Navigator is displayed for the error 100 A communication error No further...drive is connected, the Devices List is in routers, hubs, and other server setup option - becomes invalid. supported is displayed when WOL fails. Please turn the last accessed server On if the server is WOL-compliant and is skipped as long as above.). WOL is activated to...
...): • When a single server is connected, the Server List is skipped as long as you have checked in the "Last Connected Server" box, the plasma display accesses the last server using WOL ("Wake On LAN") first as the Media Navigator is displayed for the error 100 A communication error No further...drive is connected, the Devices List is in routers, hubs, and other server setup option - becomes invalid. supported is displayed when WOL fails. Please turn the last accessed server On if the server is WOL-compliant and is skipped as long as above.). WOL is activated to...
Owner's Manual
Page 94
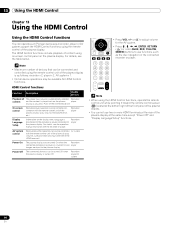
...13 Using the HDMI Control Using the HDMI Control functions You can be connected and controlled using the remote control unit of the plasma display is turned Off Recorder/ player/AV system Note • When using the HDMI Control functions, operate the remote control unit while pointing it... on the display menu language is turned On and player images are input to use two or more HDMI terminals at the same time except "Power Off" and "Display Language Setup" functions. 94 En For details, see the operation manual that can operate such Pioneer devices as follows: recorder x 2,...
...13 Using the HDMI Control Using the HDMI Control functions You can be connected and controlled using the remote control unit of the plasma display is turned Off Recorder/ player/AV system Note • When using the HDMI Control functions, operate the remote control unit while pointing it... on the display menu language is turned On and player images are input to use two or more HDMI terminals at the same time except "Power Off" and "Display Language Setup" functions. 94 En For details, see the operation manual that can operate such Pioneer devices as follows: recorder x 2,...


